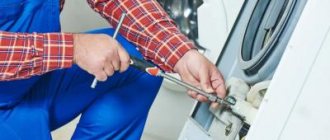
If you hear an extraneous hum while washing in a Samsung washing machine, this is the first sign that something is happening to the drum shaft bearing. Do not wait for the moment when it collapses and the shaft begins to wear out - repairs can be very expensive for you, and you may have to buy a new assistant. Timely replacement of bearings will save you from troubles.
DIY Samsung washing machine repair. Replacing drum bearings.
Hi all. Let me present you with a short instruction in which I will tell you how to replace faulty washing machine drum bearings. Very often questions arise from owners of washing machines specifically on the topic of noise during operation and replacing bearings. The noise during washing is primarily caused by the drum bearings. I have a Samsung R1043 . She worked for 6 years during which there were no complaints about her.
There were a lot of washes during this period, offhand I think one and a half washes a day.
After 6 years, I thought of changing the washing machine to a new model. LG car with a direct motor. And as if ordered, the Samsung began to make noise when washing. I purchased the selected model, which by the way is very quiet.
Since calling a technician and consumables would have cost me a normal amount, I decided to repair the machine myself. If you do it carefully, everything will certainly work out. The main thing is that your arms are straight. Next, I offer you something similar to instructions for disassembling a washing machine and replacing the drum bearings. The article is lengthy due to the large number of photographs, but this will make it easier to understand the process of disassembling and replacing bearings.
Common mistakes made by amateurs
If you don’t yet know how much a bearing for a Samsung washing machine costs, then we warn you that a good part costs about 600 rubles. And if you do something wrong, you will have to buy again and again or contact a specialist.
We will list the typical mistakes made by amateur craftsmen so that you can see what not to do. Most often, home craftsmen make the following mistakes:
- cut off the UBL wiring;
- tearing the cuff;
- damage the pulley by removing it from the axle;
- break off the mounting bolts;
- cut off the wiring of the temperature sensor or heating element;
- tear off the pipes if you forgot to remove or loosen the clamps;
- the bushing is broken when the bearings are knocked out (in this case the drum needs to be replaced).
You need to know these mistakes so as not to repeat them yourself during the repair process. If something doesn’t work out or is forgotten, it’s better to read the article again or print out the instructions and follow them strictly.
Bookmark our site so as not to lose valuable tips on replacing bearings.
The process of disassembling the washing machine
First, let's decide on the necessary tool. Since I started without knowing that I would need a tool, I looked for it as the repair progressed. I present to you a list of the entire set.
List of required tools:
1. Phillips screwdriver (you can take a screwdriver) 2. Flat screwdriver 3. Pliers 4. Hammer (where would we be without it :)) 5. Hex key 8 6. Permanent marker
Since to replace the bearings you need to get to the drum of the machine, it is necessary to disassemble it completely. Some models have a special cover on the back of the case, which provides access to the motor and belt without disassembly. However, my model had to be completely disassembled. To do this, you need enough space to make it more convenient to work and arrange the parts.
Let's start disassembling. You must first remove the top cover, which is secured with two screws on the back side. To remove the cover, you must move it away from the face of the machine and lift it up.
Remove the washing powder tray. The container is removed and three hoses are disconnected from it; they are clamped with metal clamps. It is convenient to loosen these clamps using pliers.
the large counterweight immediately catches your eye . The names of the parts are mine because I don’t know what they are actually called, but I think everything will be clear to you. We remove the large counterweight, which is secured with two long bolts.
Unscrew the bolts and remove the counterweight by lifting it up.
The counterweight is not light, so be careful not to drop it to avoid breaking it. By the way, it looks like a cast piece of cement mortar.
The body of the machine is connected to the drum by a rubber casing, which is attached to the drum with a large steel wire clamp. It is loosened by unscrewing the bolt.
Drum body without counterweight (top view).
Next, lay the car on its side and remove the bottom cover. It is made of plastic and is held in place by 4 self-tapping screws. Unscrew and remove.
Hidden behind the bottom cover is a small counterweight, an electric motor and a pump attached to the drum body. This entire structure is supported by two shock absorbers on the body of the machine.
Next we need to disconnect all the cables from the contacts of the electric motor and pump.
In order not to get confused where each wire went, you need to get into the habit of marking them. A marker, a sketch, or you can take a photo of the contact group with wires are suitable for this.
We disconnect the two shock absorbers from the washer body, which are bolted.
On the side of the top cover, a water inlet ; unscrew it without disconnecting the wires. (the wires won't bother us).
The drum body is supported on top by spring hangers. Using pliers, we first disconnect the hooks from the drum body, and then from the machine body. You will have to suffer a little, but everything will definitely work out!
In order to remove the drum, you need to remove the front part of the washing machine. First, unscrew the control panel and then remove the front part with the door. They are all attached with self-tapping screws. The screwdriver did the job in half a minute.
And here in front of us is the disassembled body of the machine. We unscrew the small counterweight to make it easier to remove the drum body.
This is such a small counterweight.
Those same spring suspensions.
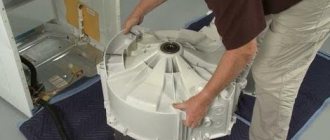
Now we carefully take out the drum body and place it on the floor. Here is the main part of the washing machine.
At the back, remove the belt that connects the drum wheel and the electric motor.
A size 8 hex bolt secures the wheel to the body. Unscrew it and remove the wheel.
We begin to disassemble the drum body.
Well, I think everyone understands that you need to take a marker (permanent) and make notes on the locations of the clamps and staples.
We unscrew the shock absorbers first; we do not unscrew the bolts completely, but only to free the second half of the body. Shock absorbers are not only attached to the drum body, but also tighten it.
The body consists of two parts, which are compressed by brackets and clamps. It is easy to remove the clamps with a wrench.
A flathead screwdriver can be used to easily remove the staples.
Once again, I will remind you to make marks to correctly assemble the body.
The staples and clamps have been removed.
We open the case and see what's inside.
After I opened the drum body, I saw an unpleasant picture. The heating element was completely covered in scale. The inside of the plastic case itself and the drum were covered in scale.
The heating element is not easy to remove. The nut is unscrewed from the outside and it is squeezed out. You must first descale it. The element is fixed with an elastic band that expands after tightening the nut.
Now we disconnect the drum from the second half of the body.
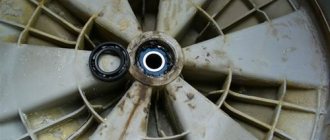
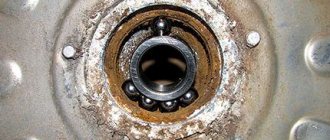
Removing the drum showed that the oil seal was in poor condition. The seal is supposed to protect the bearings from moisture, but it got to them, and they began to make noise during operation.
All scale was removed from the body using a regular metal dishwashing brush. It doesn't scratch and does its job well. There were two full handfuls of scum.
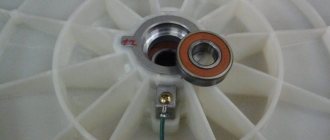
The outer bearing was fine, however I decided to replace all the bearings. I knocked out the outer one (aka small one) from the inside with a thick screwdriver and a hammer, carefully tapping the bearing rings. You need to be careful here, since the bearing is located in an aluminum bushing, so as not to scratch it. The inner bearing (large) was knocked out from the outside inwards with a metal tube of similar diameter.
I carefully hammered the new bearings into place with a hammer and placed a wooden block.
The washing machine is assembled in the reverse order.
When assembling the case, wipe all rubber seals from dust. To be safe, I lubricated the joints with sealant; this will 100% prevent the housing from leaking.
What tools are needed?
There is no need to rush to disassemble the machine. First, you should take care of the tool, without which replacing bearings will be impossible. This precaution will save time and make future work easier. The list of required tools will look like this:
- a hammer will be useful when dismantling the drum;
- the keys and sockets included will help you quickly deal with various types of fasteners;
- pliers will allow you to quickly disconnect the drain pipe, which is secured with a metal clamp;
- a chisel that can be replaced with a metal pin;
- slotted and Phillips screwdrivers are useful, since the fasteners in washing machines are different;
- a liquid level indicator is necessary to check internal leaks near the bearings;
- one adjustable wrench replaces a set of keys, which is very convenient;
- silicone-based sealant is necessary to restore the tightness of the seams;
- WD-40 is an anti-corrosion lubricant with excellent penetrating and cleaning properties.
DIY repair result
What did we end up with? The washing machine operates normally, washes and does not make any noise. Saved quite a bit in terms of costs.
Purchased:
- internal bearing (6204) - 60 rubles
- external bearing (203) - 90 rubles
- oil seal (SMA Samsung 25*50.55*10/12 P6091 (DC62-00007A)) - 200 rubles
As a result, the entire repair cost me only 350 rubles.
Having worked for 6 years, the machine is in excellent condition, not counting scale. I'm happy with the Samsung, but I bought an LG, which showed itself to be very good, quiet and has many operating modes.
By the way, in order for the machine to serve you longer, you need to install it level and check its position from time to time. Over time, due to vibrations, the washing machine may move out of place.
Final Thoughts
Disassembling Samsung washing machines is a labor-intensive process that requires a responsible approach. The principle of disassembly is practically no different from different manufacturers, since the units themselves are designed approximately the same. Some differences in the procedure are typical only for Samsung washing machines with a vertical loading type. The main thing is to accurately remember the location of each of the parts while installation is underway. Then it will be easier to reassemble in the reverse order, following the manufacturer’s requirements. It is important to assess your own strengths in advance so that disassembly later does not turn out to be overwhelming.
How to get rid of scale?
I recently learned a way to protect your washing machine from scale.
Once a month, do an “empty wash” with citric acid! In place of the washing powder, pour citric acid powder (about a handful) and set the wash to maximum temperature. You can throw some rag inside.
This article is an analogue from my former website lettore.ru. It will be more convenient for me to answer your questions here. If you still have them, I will be happy to answer them.
Determining the need for replacement
You can diagnose that the bearings are worn out as follows:
- Open the hatch and turn the drum manually. If you hear a characteristic crunch, as if something is rattling, as if over bumps, then the problem is in the bearings. , grab the edges of the drum with your fingers and try to move it. If it moves up and down by 5 mm or more, then the bearings or crosspiece are worn out.
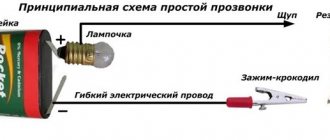
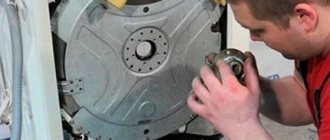
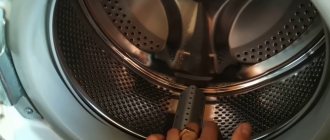
To make sure that the problem is in production, you need to remove the back cover. Spin the drum and listen near the pulley. You can take off the belt, then only the bearing will be heard.
This is what the washing machine looks like with the lid removed.