In this article we will describe the repair of the Whirlpool AWG223/1 washing machine.
The problem that the customer initially came up with was the following: the car was leaking at the front through the rubber of the hatch, so it needed to be replaced. The rubber has rubbed on the right side and a hole has formed through which water is leaking.
Upon inspection, it was revealed that the rubber of the hatch really needed to be changed, but in addition to this, another problem emerged. Our Whirlpool washing machine makes a loud noise during the spin cycle and there is already some play in the drum. We conclude that the bearings need to be replaced.
By the way, this Whirlpool washing machine is completely similar to the Vestel brand; they have the same spare parts and many components installed. Therefore, if you have Vestel and have a similar problem, then this article will be useful to you.
Step-by-step steps on how to disassemble a Whirlpool washing machine with your own hands
It is not difficult to disassemble a Whirlpool washing machine if you know how the device works. All elements of household appliances are enclosed in a metal casing, so dismantling must begin with it.
Before you begin, you need to prepare for this process and study the layout of the basic components.
To learn how to disassemble a Whirlpool washing machine with your own hands, read the article.
What to do if the washing machine does not drain water?
If for some reason the washing does not complete correctly and there is water left in the drum, it must be drained. To do this, open the lid of the drain filter, take it out and gradually drain the water into pre-prepared containers. This procedure is mandatory, since the water remaining in the washing machine may fade. Try to fix the problem by cleaning the filter. If the malfunction remains, then the cause of the problems is in the drain pump, as mentioned above. It needs to be replaced. If you have experience, you can do this yourself; if you don’t have it, then it is better to seek the help of specialists.
To drain or not to drain the water from the system until the technician arrives?
This procedure may not be necessary unless you contact a service center for assistance. Our technicians arrive quickly when called: they will drain the water for free before starting to fix the problem.
The washing machine drains, but not completely: what to do?
You may have already encountered similar troubles:
- the wash cycle has not yet completed and the machine has stopped with water in the drum;
- water remains, although you have forcibly selected the drain program;
- after washing the laundry is wet, and the spin program was set.
If this is not a pump failure, the pipes are not clogged, everything is fine with the filter - check if the drain system is clogged. When doing this yourself, perform all manipulations delicately: remove the pump volute, pump, filter, pipes. If you find foreign objects inside, remove them and install the parts back. If the water leaves the drum after washing, the cause is a blockage.
Our service center employs professional technicians who have undergone additional training in modern certification centers for the repair of household appliances. Every day we fulfill dozens of orders throughout Moscow. In this case, only original spare parts are used, which additionally guarantees the quality of the repair.
Current prices for troubleshooting - valid until February 28, 2022
| Service | Price (rubles) | Time | Guarantee |
| Home visit | for free | 30 - 60 minutes | — |
| Diagnostics at home | for free | 10 - 15 minutes | — |
| Replacing the drain pump | from 800 | 20 - 35 minutes | Up to 24 months |
| Replacing water level sensors | from 350 | 20 - 30 minutes | Up to 24 months |
| Cleaning the drain system | from 700 | 20 - 35 minutes | Up to 24 months |
| Control board repair | from 990 | 50 - 90 minutes | Up to 24 months |
Below you can see a list of whirlpool washing machines that we have compiled that drops down by clicking the mouse. This list was developed specifically to familiarize the user with what washing machines we encountered during repairs. If for any reason you were unable to find your model there, we recommend contacting the service center by phone 8 — (495) 109-07-60
.
AQUASTEAM - AWE - AWG
AQUASTEAM 9559, AQUASTEAM 9759, AQUASTEAM 9769, AQUASTEAM 9769 B
>AWE 10727, AWE 2214, AWE 2221, AWE 2316, AWE 2322, AWE 2519, AWE 4519, AWE 5100, AWE 6314, AWE 6315, AWE 6316, AWE 6377, AWE 6415, AWE 64 16, AWE 6514, AWE 65149, AWE 6515, AWE 6516, AWE 6517, AWE 6519, AWE 6628, AWE 6629, AWE 6725, AWE 7515, AWE 7526, AWE 7527, AWE 7629, AWE 7726, AWE 7727, AWE 7729, AWE 8523, AWE 8525, AWE 8529, AWE 8629, AWE 8723, AWE 8725, AWE 8727, AWE 8729, AWE 9527, AWE 9629, AWE 9723, AWE 9725, AWE 9729
AWG 1036SLASHWP, AWG 206, AWG 215, AWG 216, AWG 217, AWG 218, AWG 222, AWG 223, AWG 231, AWG 232, AWG 233, AWG 234, AWG 235, AWG 236, AWG 237 AWG 238, AWG 239 , AWG 240, AWG 241, AWG 246, AWG 247, AWG 248, AWG 251, AWG 252, AWG 253, AWG 259, AWG 263, AWG 292, AWG 294, AWG 308 E, AWG 310 D, AWG 310 E AWG 324SLASH1, AWG 328, AWG 330, AWG 334, AWG 336, AWG 338, AWG 350, AWG 358, AWG 528, AWG 530, AWG 538, AWG 550, AWG 558, AWG 630, AWG 638, AWG 650, AWG 658, AWG 681, AWG 7010, AWG 7011, AWG 7012, AWG 7013, AWG 7021, AWG 7022, AWG 7043, AWG 7080, AWG 7081, AWG 800, AWG 852, AWG 853, AWG 860, AWG 870, AWG 874, AWG 874 D, AWG 875, AWG 875 D, AWG 876 D, AWG 878, AWG 879, AWG 908 E, AWG 910 D, AWG 910 E
AWM - AWOE - AWOSLASHD
AWM 031, AWM 040, AWM 1000, AWM 1011, AWM 5083, AWM 5085, AWM 5105, AWM 6027, AWM 6080, AWM 6081, AWM 6082, AWM 6085, AWM 6100, AWM 6102, AWM 6105, AWM 6120, AWM 6125 , AWM 8000, AWM 8062, AWM 8083, AWM 8085, AWM 8103, AWM 8105, AWM 8125, AWM 8143, AWM 8145, AWM 8500, AWM 8900, AWM 9100
AWOE 7448, AWOE 7758, AWOE 8548, AWOE 8748, AWOE 8758, AWOE 8759 B, AWOE 9348, AWOE 9358, AWOE 9548, AWOE 9558, AWOE 9558 B, AWOE 9558 S, AWOE 9759
AWOSLASHD 040, AWOSLASHD 041, AWOSLASHD 049, AWOSLASHD 050, AWOSLASHD 062, AWOSLASHD 41105, AWOSLASHD 41109, AWOSLASHD 41135, AWOSLASHD 41139, AWOSLASHD 42115, AWOSLA SHD 43115, AWOSLASHD 43129, AWOSLASHD 43135, AWOSLASHD 43136, AWOSLASHD 431361, AWOSLASHD 45135, AWOSLASHD 4520 , AWOSLASHD 4605, AWOSLASHD 4720, AWOSLASHD 53105, AWOSLASHD 53205, AWOSLASHD 5526, AWOSLASHD 5706SLASHS, AWOSLASHD 5726, AWOSLASHD 5926, AWOSLASHD 6012, AWOSLASHD 61 00, AWOSLASHD 6527, AWOSLASHD 6727, AWOSLASHD 6927, AWOSLASHD 7010, AWOSLASHD 7012, AWOSLASHD 8500, AWOSLASHD 8550, AWOSLASHD 8715, AWOSLASHD 9561, AWOSLASHD AS128, AWOSLASHD AS148
AWO - AWT - AWE
AWO 10561, AWO 10761, AWO 12363, AWO 12563, AWO 12763, AWO 9161, AWO 9361, AWO 9561
AWT 2205, AWT 2240, AWT 2250, AWT 2256, AWT 2260, AWT 2261, AWT 2262, AWT 2267, AWT 2274, AWT 2275, AWT 2284, AWT 2285, AWT 2288, AWT 2289, AWT 2290, AWT 2 295, AWT 2296 , AWT 2352, AWT 5080, AWT 5085, AWT 5088SLASH4, AWT 5100, AWT 5108, AWT 7105, AWT 7125, AWT 8123 ED, AWT 9120
AWZ 410, AWZ 475, AWZ 477, AWZ 512 E, AWZ 514D, FL 5042, FL 5053, FL 5054, FL 5064, FL 5085, FL 5105, HDW 6000SLASHPRO WA, STEAM 1400, TAWS800JQ
In the specified areas (and districts), the following conditions apply: Diagnostics at home - free of charge. A technician's visit for repairs is free.
Southern Administrative District
- Chertanovo, Nagornaya, Orekhovo, Nagatino, Biryulyovo-East, Tsaritsyno, Brateevo, Zyablikovo, Danilovsky, Donskoy, Nagatinsky Zaton
SEAD
- Maryino, Lyublino, Kapotnya, Kuzminki, Printers, Lefortovo, Tekstilshchiki, Vykhino, Zhulebino, Yuzhnoportovy, Printers, Ryazansky , Nizhny Novgorod
South-Western Administrative District
— Teply Stan, Konkovo, Yasenevo, Cheryomushki, Yuzhnoye Butovo, Zyuzino, Academichesky, Kotlovka, Lomonosovsky, Gagarinsky
SZAO
— Mitino, Strogino, Kurkino, Shchukino, Khoroshevo-Mnevniki, Pokrovskoye-Streshnevo, Tushino
NEAD
— Medvedkovo, Rostokino, Marfino, Bibirevo, Sviblovo, Otradnoye, Maryina Roshcha, Butyrsky, Lianozovo, Severny, Yaroslavsky, Alekseevsky
Company
— Solntsevo, Kuntsevo, Dorogomilovo, Ramenki, Vnukovo, Krylatskoye, Mozhaisky, Prospekt-Vernadskogo, Ochakovo-Matveevskoye, Novo-Peredelkino, Filevsky Park
VAO
— Perovo, Sokolniki, Veshnyaki, Novokosino, Novogireevo, Izmailovo, Golyanovo, Metrogorodok, Bogorodskoye, Vostochny, Ivanovskoye, Sokolinaya Gora, Perovo, Preobrazhenskoye
Central Administrative District
— Kitay-Gorod, Khamovniki, Meshchansky, Basmanny, Arbat, Zamoskvorechye, Tagansky, Yakimanka, Krasnoselsky, Tverskoy
SAO
— Savelovsky, Khovrino, Sokol, Begovoy, Koptevo, Degunino, Beskudnikovo, Airport, Voikovsky, Golovinsky, Dmitrovsky, Levoberezhny, Timiryazevsky, Khoroshevsky
[- travel outside the Moscow Ring Road - 50r/km] [- refusal of repairs - 600r.] [- warranty repairs - up to 2 years] [- official warranty - up to 2 years]
Preparing to disassemble the Whirpool washing machine
Preparing to disassemble a Whirlpool washing machine is a mandatory step. You should not ignore it, so as not to be distracted by searching for the necessary tools while doing the work.
For dismantling you will need:
- pliers;
- screwdrivers of different shapes or a screwdriver;
- wrench;
- hammer (needed when replacing bearings);
- empty bucket and rag;
- VD-40 lubricant or its equivalent.
When the tools are collected, it is necessary to decide on the location of the work.
Before proceeding with transportation, the equipment must be disconnected from all communications . In order not to spoil the floor covering, it must be covered with cardboard or thick material. You should also keep a bucket and a rag at hand in order to collect the remaining water from the pipes in time.
Getting ready to carry out repair work
First of all, if there is any water left in the machine, it must be completely drained, because the washing machine will have to be completely disassembled. To do this, perform the following steps:
- the washing machine is de-energized from the electrical network,
- the same actions are performed with the drain filter located under the front cover and hidden by a small hatch or panel base. Using a screwdriver to open the latches, open the panel, unscrew the filter, and drain the water.
All communications are disconnected (water supply and drainage to the sewer). The water remaining in it is drained from the water intake hose,
SMA device diagram
Basic elements of all Whirlpool machines:
Motor. If it is a commutator, then it includes a drive belt. The inverter motor is directly connected to the drum.- Buck . It consists of two halves with a drum inside. Its package includes a crosspiece, a bushing, a shaft, and bearings. There are bumpers (stiffening ribs) inside.
- Water drain pump . Its design consists of a motor, impeller and pipes. Before entering the pump, the water passes through a mesh filter.
- Shock absorbers. These are two springs that hold the tank.
- Control board . This is the main element that is responsible for all the actions performed by the washing machine.
- heating element . This element heats the water. It is located under the tank.
- Tacho sensor . It controls the rotation speed of the drum.
- Pressostat . A small sensor is located under the top cover. It performs the function of determining the water level in the tank.
- Counterweights . They hold the device in place during vibration.
In addition to the listed elements, the design of the washing machine includes:
- drain hose,
- inlet hose,
- input filter,
- power cable.
A diagram of the washing machine is needed in order to understand exactly where each element is located. In general, the differences between different models of Whirlpool SMAs are minimal. The only difference is the orientation of the drum.
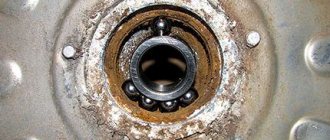
We remove the bearing together
After removing the tank, we disassemble it and remove the bearing. If there are traces of grease on the drum cover, then the need to replace the seals and bearings is only confirmed.
Structurally, the tank consists of two parts, which are connected to each other using bolts or glue. In the case of the second connection option, it is carefully sawn. Experts say that in terms of disassembly it is easier to deal with bolts. When the tank decomposes into two separate elements, you can proceed to the following steps:
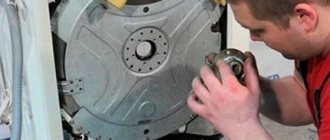
- We unscrew the drum pulley using a special star-shaped wrench or armed with a hammer and chisel. It is worth noting that the bolt is difficult to give in, the tool must be of high quality and reliable, the actions must be careful so as not to damage the thread,
- loosening the pulley a little, we remove it from the drum screw, and a bearing appears before our eyes,
- The drum shaft is knocked inward, which allows you to separate the washing machine tank from the drum. Before this, you can replace the original shaft with an old one to protect it from damage,
- bearings are placed on the internal and external sides. We insert a metal rod under the bearing race and begin to knock it out with a hammer, moving in a circle. If you have a special puller, you can use it.
With the help of such a device, the bearing can be dismantled quickly and the race will not be damaged. This is very important when the bearing is functional and the shaft needs to be replaced. The shape of the puller may be different. It is most convenient to work with a model with legs, which, in the process of tightening the element, exert a load effect only on its inner cage, with virtually no effect on the outer one.
As a rule, the small bearing is dismantled first, followed by the second, larger one. Before dismantling the bearing, remove the seals, which are also recommended to be replaced with new analogues.
The work is done, all that remains is to install new components and reassemble the washing machine, proceeding in the reverse order. When installing new components, do not forget to lubricate them thoroughly to ensure protection from moisture. In addition, the lubricating layer will reduce the percentage of friction of parts, increasing their service life. A new gasket is put on parts of the tank, and sealant is applied over the entire surface. The pulley is inserted and secured with a key.
Washing machines in which the base of the tank is made of stainless steel are much easier to repair. In these modifications, the bearing is located in the crosspiece or rear element of the tank, which is very easy to remove.
Instructions
The disassembly diagram for the Whirlpool washing machine will differ depending on the type of load. First of all, this concerns the sequence of actions.
Front loading appliance
Adhering to the following algorithm, you will be able to disassemble any model of Whirlpool washing machine with horizontal loading:
Unscrew the top cover. It is secured with two bolts, which are easy to reach. After removing them, the lid is lifted up slightly and pushed forward.- Unscrew the screws holding the control panel and remove it. Behind it is an electronic module, which is fixed with small bolts and latches that need to be opened.
- Immediately under the top cover you can see the water level sensor. It is held on by one bolt, which is unscrewed.
- The next step is to remove the detergent tray. To get it out, you need to pull the plastic tab. There are no other fixing devices.
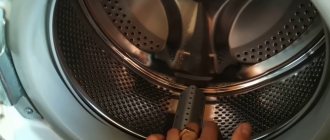
- To remove the front wall, you need to tighten the top mounting screw. If necessary, remove the hatch cover. Release the clamp and remove the cuff. You can then remove the front wall completely and move it to the side.
- Behind the front wall there are traverses that need to be twisted.
- Disconnect the contacts leading to the surge protector and remove it.
- Remove the water supply valve. It can be seen on the back panel at the top.
- Twist the counterweights.
- Remove the belt and motor.
- Remove the heating element, which is fixed with one bolt. You need to take it out carefully, swinging it from side to side.
- Disconnect the thermostat.
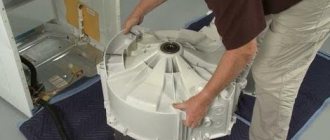
- Remove the tank. If necessary, untwist it into two halves.
- There is a drum inside the tank. If access to its internal components is required, first remove the spider, then the pulley, oil seal and bearings.
- Dismantle the pump. It is disconnected from the filter, drain hose and pipes.
The washing machine is completely disassembled. You can begin repairing or replacing spare parts.
The video will show you how to disassemble the Whirlpool washing machine:
From vertical
To disassemble a Whirlpool top-loading washing machine, perform the following steps:
- Unscrew the fasteners that are located on the right and left walls of the case. They act as external latches for the top cover.
- Carefully pry up the control panel and disconnect the contacts from it.
- Under the panel you can find several more bolts that are also twisted. Another screw is located behind the seal; once this is removed, the top cover can be removed.
- Loosen the clamps and remove the pipes.
- Screw in the bolts holding the side walls and front panel.
- Remove the belt from the motor.
- Dismantle the engine.
- Remove the pump.
- Twist the heating element.
Disassembling the washing machine tank
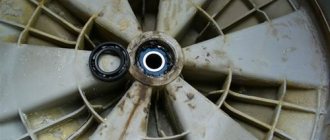
To get to the bearing we need to divide the tank into two halves and pull out the drum. Both halves of the tank are fastened either with special latches or with bolts that are located along the entire perimeter of the tank. Therefore, either disconnect the latches or unscrew the bolts and disconnect the front half of the tank. You can clean it of debris if you wish before putting it back together. We begin to disconnect the drum from the back of the tank; to do this we need to remove the pulley. Using a wrench, unscrew one bolt that holds the pulley on the drum axis, then remove it from the axis and move it to the side. And we screw the bolt that we unscrewed all the way back into the shaft, so that when knocking out the drum, we do not damage the shaft itself.
Next, use a regular hammer to hit the shaft with a little force, trying to knock it out. If the shaft moves a little, then we continue in the same spirit. If the force is already large, but the shaft does not give in, then it is better to unscrew the standard bolt and replace it with any other one that you would not mind throwing away, since with a large force the bolt may become deformed. As soon as the shaft is sunk to the bolt head, unscrew the bolt and pull the drum out of the back wall of the washing machine tank.
Inspect the bushing and the shaft itself located on the drum. If you delay the repair, then they could wear out and then you will also have to change the cross, which significantly affects the cost of the repair. In order to check the integrity of the shaft, wipe it well with a rag and look for wear on it. To be sure, take new bearings and place them on the shaft. After this, check that there is not even the slightest play in the bearing. If there is play, then you need to replace the crosspiece with the shaft.
Also check the bushing that is located on the shaft and on which the oil seal fits; it should also not have strong wear or transverse grooves. If the wear is high, the oil seal will leak water and the new bearing will quickly fail.
How to put it back?
After completing the planned work, the machine needs to be assembled.
All actions are performed in reverse order, starting with the largest element - the tank. When it is in place, install the pump, motor, heating element . The sensors are screwed on top, pipes are inserted, and counterweights are fixed.
When all the nodes are in place, the body is assembled. Before screwing on the top cover, you need to once again check the reliability of the fittings and the tightness of the contacts.
If the detergent dispenser and pipes are coated with limescale on the inside, the stone must be removed before reinstalling. A solution based on citric acid copes well with this task. Soaking time is about 30 minutes.
After connecting the device to communications, you need to check its functionality . To do this, the wash is started without items. You can choose a short program, the main thing is that all functions are used: heating the water and spinning.
Features of repairs with vertical loading
If it is necessary to replace a faulty bearing in a top-loading machine, you need to take into account a number of design features. In these types of equipment, the drum is supported by 2 axle shafts and 2 shafts. The replacement process thanks to this device is much simpler.
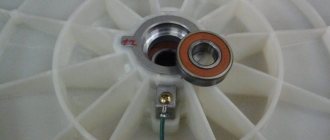
First, replace the bearing on the side where the drive pulley is missing. For this purpose, remove the caliper, which consists of bearings and an oil seal connected in one housing. Changing the caliper on the internal engine side begins with removing the belt and drum pulley. Next, they begin to remove the grounding pads, after which they unscrew the caliper itself.
The location of the oil seal and the shaft itself are cleaned of accumulated dirt, and then treated with lubricant
When installing a new bearing, it is important to avoid distortion of the sealing material. Otherwise, it will not be able to provide protection against liquid leakage, which will provoke another malfunction.
After installing the new oil seal and bearing, tighten the caliper securely, avoiding damage to the threaded connection. Subsequent assembly of the washing machine is carried out in the reverse order.
Difficulties and ways to overcome them
Difficulties that you may encounter when disassembling the Whirlpool washing machine:
- in order not to confuse the bolts that secure different elements, they need to be laid out on sheets of paper and the corresponding signatures made; matchboxes are also suitable for this purpose;
- when connecting the control board, there is a risk of mixing up the terminals, which can cause damage to household appliances - to prevent this from happening, the wire layout must be recorded on your phone;
- some bolts may come out of the thread with difficulty; if they are rusty, they need to be treated with lubricant;
- if after assembly any of the elements do not work, it is necessary to check the tightness of the contacts;
- To avoid stripping the threads, do not apply excessive force; the bolts must be secured securely, but without force.
Replacing Whirlpool bearings
Video: changing flanges and bearings
Almost every home now has washing machines. Regardless of the brand and manufacturer, they fulfill their responsibilities to make our things clean. Many machines are capable of washing both shoes and delicate fabrics with equally good results.
Whirlpool brand appliances are of excellent quality. It appeared in the USA, and is now produced in Russia. This brand has a wash class A and contains at least 18 modes. Some models are designed to load up to nine kilograms.
Any, even the coolest equipment, is subject to minor and major breakdowns. The latter include those that require disassembling the device. For example, there was a need to change a bearing.
Tools
- Screwdrivers: flat and Phillips
- Pliers, wire cutters
- Spanners
- Necessary parts and gaskets for them
- Special lubricant or dishwashing detergent
- Hammers: simple and rubber
- Bit
- Sealant
If everything is available and you are determined to implement your plans, we begin preparations.
1.Unplug from the socket. This is the main condition for all intrusions into the device.
2. Disconnect from the water supply
3. Free Whirlpool from everything unnecessary.
4.Put it in an open place
5. We drain the remaining water, which is always present in the drainage paths. We use a drain filter for this or simply lower the hose to the floor.
When the preparatory steps are completed, we begin dismantling.
Set of tools
Any replacement part can be purchased in the store without any problems. To do this, you need to know its name, size and number. They can be viewed in the “Washing Machine Operating Instructions”.
Tools you will need:
- Screwdriver Set;
- pliers;
- wrench 17*19;
- set of socket heads;
- bearing puller;
- hammers: metalworker's and with a copper head;
- hexagon 6;
- wrench (suitable for a car spark plug key).
Depending on the brand of washing machine, you may need additional tools.
It is necessary to have a special lubricant for the rubbing components and seating surfaces of the CV joint, WD-40 liquid, and silicone sealant. When making repairs, clean rags are needed.
This is interesting! Inlet hose for a washing machine: types and connections, common causes of leaks and the Aquastop system
Sequencing
- Use a screwdriver or screwdriver to unscrew the holders
- The top cover retracts to the side
- We take out the powder tray, use a wrench to unscrew the lock under it
- Freeing the socket
- Open the tank, remove the seal, tuck the cuff inside
- We unfasten the locking device and immerse it inside
- Remove the bottom panel through the hole in the drain filter
- We dismantle the front panel with the door, the clamp, the counterweight at the bottom, the metal upper part
- Use pliers to disconnect the pipe and move the inlet hose
- We dismantle the upper counterweight
- Disconnect the clamps of the electric heater and temperature sensor
- Unscrew the drain corrugation holder and remove it from the tank
- Remove the shock absorber struts, then move the pump
- Lifting the tank, release it from the housing
- Remove the belt, engine and pulley
- We unscrew the collapsible tank, cut the solid one strictly along the seam using a hacksaw
- Knocking out the drum
- We remove the bearings together with the seals using a screwdriver
- We thoroughly clean the sockets, put new spare parts in them, thoroughly lubricating the seals, and hammer them in with a hammer until they are completely immersed.
- Cleaning the shaft
- When assembling, we glue the tank with sealant, and put the sawn one on bolts for greater strength.
- We return everything disassembled to its place in strict sequence.
When carrying out such an operation, do not forget to check the condition of all internal components. If something is not in order, it is better to replace it immediately so as not to have to dismantle the device once again.
Instructions for dismantling the tank
To remove the drum, you will have to disassemble the body of the washing machine. We will act in a certain sequence:
- We provide access to the machine,
- remove the panel from above, for which we unscrew a couple of bolts from the back using a screwdriver,
- remove the tray for washing powders,
- unscrew the bolt located under the receiving tray,
- remove the bottom of the body located at the front,
- we unscrew more bolts that will appear before our eyes,
- remove the clamp from the door, remove the rubber seal from the body part,
- release the hatch lock, disconnect the front hull part,
- start unscrewing the back panel,
- remove the drive belt,
- find the wiring to the water heating element and disconnect it,
- disconnect the pipe connecting the pump and the tank,
- remove counterweight elements,
- unscrew the bolts securing the electric motor, remove it,
- remove the shock-absorbing devices and springs on which the tank is supported,
- we take out the tank.
Remember that the job of removing the tank is quite complex.
Useful tips on how to repair Whirlpool washing machine bearings
It is not difficult to detect a breakdown due to a bearing problem in a Whirlpool washing machine.
In this case, the machine knocks, “jumps,” constantly vibrates, and sometimes freezes. It is impossible to operate it in this condition. If repairs are not carried out in time, more serious damage will occur - the drum, shaft, and cross are deformed. Replacing the bearings will help restore the machine and prevent further development of faults. It is important to take your time and follow the instructions.
We will tell you further how to repair and replace the bearing of a Whirlpool washing machine.
Main reasons for replacement
Using this element, the shaft is fixed and the uniformity of its rotational movements is created. Such a compact part absorbs all load forces on its body.
The reason for the failure of this element may be old seals that have lost their tightness and allow water to pass through. Due to long-term use, the lubricant has been washed away, corrosion has begun to form, and the bearing is wearing out.
It is no secret that many users put laundry items into the machine drum, guided by the rule “as much as will fit.” Such actions are considered incorrect, because constant overloads cause wear of parts, which include the bearing. This is evidenced by an unpleasant grinding noise that appears during spinning or manually turning the drum.
Another sign of a problem situation is the appearance of a leak. If you find water accumulation under the bottom of the machine, check the bearings.
Failure to solve the problem in a timely manner may cause damage to the tank, wear of the crosspiece and the shaft itself. Such problems relate to major repairs; sometimes it is necessary to change not only the tank, but also the drum of the machine.
How to determine that a Whirlpool washing machine part needs to be replaced?
The bearing regularly experiences heavy loads, which is why it has a certain service life, usually 6-10 years. First, the oil seal is deformed: the rubber does not provide a seal. Water from the tank, falling on the bearing, washes out the lubricant, and therefore full rotation of the shaft does not occur.
Visible signs of damage include:
- Knocking, strumming, vibration of the machine.
- Puddles under the car.
- The device does not cope well or does not cope with the spin cycle.
- Oil stains remain on the laundry after washing.
- The drum rotates unevenly, with a hum and squeak.
Causes of bearing unit failure
Bearing malfunction occurs when the washing machine is used incorrectly, natural wear of internal parts, or mechanical damage. If there is a breakdown, you need to determine the specific cause in order to carry out the appropriate repair or replacement.
Worn oil seal
Wear of the oil seal leads to water leakage during the washing process, which causes moisture to destroy the bearing. The seal is used to protect bearings from direct contact with liquid. The element is mounted on a single axis with bearings on the drum side. A bushing is located under the oil seal, which ensures the movement of the lip lips, which prevents the penetration of water.
How to repair?
Replacing bearings in a Whirlpool washing machine is much easier than in machines of other brands. It is enough to disassemble part of the housing, get close to the drum and dismantle the part. The most important thing is to detect the breakdown in time, avoiding further complications that require more problematic and expensive repairs.
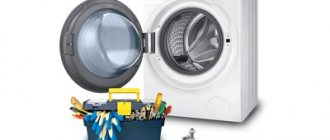
To work you will need the following tools:
- selected parts, gaskets;
- wire cutters and pliers;
- slotted and Phillips screwdrivers;
- wrenches for nuts and bolts;
- lubricant;
- rubber and regular hammers;
- hacksaw;
- sealing agent.
Dismantling begins with preparatory actions:
- First of all, you need to unplug Whirlpool.
- Disconnect the machine from the water supply.
- Free the machine from anything that may interfere with operation.
- Place in free space.
- Drain the remaining water using a filter and hose.
- Remove the cuvette (powder tray).
After preparation, the actions will be as follows:
- Using a screwdriver, unscrew the holders and remove the top cover.
- In the place where the cuvette was located, use a key to unscrew the lock under it.
- Clear panel.
- Release the tank by removing the seal and tucking the cuff deep into it.
- Unfasten the locking device and leave it inside.
- Remove the bottom panel using the drain filter hole.
- Dismantle the front panel with the door, remove the clamp, lower counterweight and upper metal part.
- Using pliers, disconnect the pipe and move the fill hose.
- Dismantle the upper counterweight.
- Disconnect the fixing elements of the electric heating device and temperature sensor.
- Unscrew the drain corrugation holder and remove it from the tank.
- Remove the shock absorber struts and move the pump.
- Remove the tank from the housing by lifting it up.
- Remove the belt, motor, and drum pulley.
- If the tank is disassembled, unscrew it. If the part is solid, cut strictly along the seams with a hacksaw.
- Knock out the drum.
- Using a screwdriver, remove the bearings with seals.
- Thoroughly clean the nests. Place new parts in them, and carefully lubricate the seals. Drive in the parts until they are completely immersed.
- Clean the shaft.
- During assembly, the tank must be secured with sealant. If it is sawn, secure it with bolts for reliability.
- When assembling the machine, return all parts to their places, observing strict sequence.
Testing of the repaired device is carried out in washing mode. To check, you need to connect Whirlpool to communications and start it. If the technical device does not vibrate, there is no hum, then the repair was carried out efficiently.
The video will show you how to change bearings in a Whirlpool washing machine:
The main mistakes that occur during the process of disassembling the AGR and replacing the bearing
Professionals highlight a list of the most common erroneous actions made by beginners who do not know how to properly remove a bearing in a machine. They entail serious consequences, causing major repairs of the unit or its complete failure.
Here is a list of such violations:
- the wiring of the sensor blocking the door breaks when dismantling the front panel of the washing machine,
- When removing the pulley, significant damage is caused to it,
- the threads in stuck bolted joints are broken,
- the water fill pipe breaks off,
- In the process of knocking out the bearing, the drum is damaged, which sometimes has to be replaced.
We recommend that you pay attention to these situations and try to avoid such violations.
It is possible to replace the bearing on your machine yourself. You just need to weigh your strengths and experience, because there is a possibility of serious breakdowns.
Where and at what price can I buy a new one?
Before repairing, you must purchase spare parts. It is not possible to buy a universal part, since the size range of bearings is quite wide. One manufacturer may have more than a dozen species. When choosing, it is recommended to follow the designations of original or similar parts.
The most common bearings for whirlpool with numbers:
202;- 203;
- 204;
- 205;
- 206;
- 207;
- 305;
- 306.
You can use the following selection methods:
- Find the information in the instructions for the washing machine.
- Using the serial number of the machine, obtain information from the Internet.
- Dismantle the old part and use its markings to accurately decide on the purchase. This is the most reliable way.
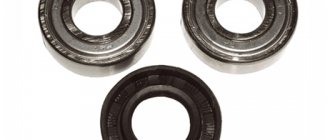
You can purchase bearings at many home appliance parts stores. Parts are often offered by workshops that repair cars. A large selection is available in online stores. The price is within 500 rubles, the elements are sold both in a repair kit and separately. Replacement usually requires two bearings: a large one and a small one.
Additional components are also important . Even the most expensive bearing will not last even a year if a low-quality oil seal is installed and the wrong lubricant is used.
Call a specialist
If it is difficult to replace the Whirlpool bearings yourself or you don’t have the time, it would be advisable to seek help from professionals. The master has in his arsenal all the necessary tools and control devices. When called, he is able to quickly identify the problem and determine whether repairs are needed.
A specialist will fix the breakdown much faster than anyone else. Another advantage is that many organizations themselves purchase spare parts and subsequently provide a guarantee for them, as well as for services.
Finding a master will not be difficult; there are many offers.
You can contact:
- to the service center;
- to the workshop;
- to a private specialist, through word of mouth;
- by announcement or advertisement;
- leave a request on the official website.
When choosing, you should read reviews and pay attention to work experience. If an organization has been operating for a long time and its specialization is only the repair of washing machines, then these are great advantages.
The cost of the service for replacing bearings in a Whirlpool machine varies. On average it ranges from 2500-3000 rubles.
SMA repair at home
Is it possible to replace the bearing on site, or will I have to take the machine to a service center? The technician will be able to repair the machine at home, and it won’t take much time. As soon as the problem is identified, the specialist will begin to “reanimate” the unit immediately.
As a rule, one visit by a technician with the appropriate level of qualification is enough for a complete repair. He will have all the necessary elements, and you can verify their originality yourself.
Having completed the repair work, the specialist will turn on the unit and check it in all modes.
It will take an experienced technician several hours to find the problem and fix it. He will demonstrate the correct operation of the washing machine, characterize your incorrect actions that caused the breakdown, and advise how to handle the machine in the future. Calling a specialist to your home is the right and very profitable decision. Arriving at your home and diagnosing the problem will be done free of charge. All work and cost of parts are at fixed prices.
You can not only save your time, but also financial resources. In addition, after the repair you will be issued a warranty card for the services provided.
How to avoid encountering scammers?
As a rule, employees of unscrupulous organizations promise to carry out free diagnostics and eliminate the cause of the damage. In this case, the contract is not drawn up, the necessary documents are not drawn up. A few days later, the consumer is notified that the repair has been completed and the washing equipment can be picked up.
When choosing a service provider, in order to avoid negative situations, it is recommended to pay attention to the following points:
- Fraudsters have a hard time hiding their reputation. Negative reviews about organizations that have violated the rights of service recipients are often published on the Internet.
- An important element is the company sign. A workshop that does not want to attract undue attention to itself will not post legally significant information about itself.
- A reliable service organization will not require large upfront payments. Full payment must be made after repairs are completed and upon acceptance of the equipment. An advance payment is charged with the client's consent.
- The service provider must have a cash register. Advance and full payment must be accompanied by checks.
- You should not agree to repair if the company’s employees do not offer to conclude an agreement and draw up an acceptance certificate for the faulty device.
- You should carefully study the contract. It should not contain phrases indicating that the contractor unilaterally has the right to change the type of service and its cost.
- The warranty period or formalities associated with it must be indicated.
- Upon receipt of the repaired automatic machine by the customer, the responsible person demonstrates the work done.
- After the service is provided, it is necessary to sign a bilateral acceptance certificate with a mark in the contract.