Kandy washing machines are in demand, as the manufacturer offers an optimal balance of price and quality. However, any household appliance fails during active use.
Knowing which parts break most often and what signs indicate this, you will be able to overcome trouble that occurs at the most inopportune moment.
Read the article to get your Kandy washing machine repaired quickly and profitably.
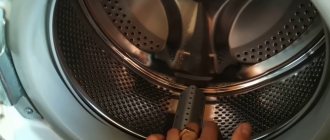
How many bearings are there in a washing machine, their location
In standard models of automatic machines, 2 bearings are installed - upper and lower.
They are located at the rear of the drum and ensure uniform, smooth and silent rotation of the shaft in the seat. For this reason, it is necessary to carefully monitor the technical condition of this unit. Untimely replacement in case of failure can lead to more serious consequences, requiring expensive repairs or even replacement of the machine. Repairing a washing machine, such as replacing a bearing, is a labor-intensive process that requires the most precise adherence to all instructions. If a home master is not confident in his abilities, it is better to immediately turn to professionals. Remember that no self-respecting craftsman will undertake to assemble the unit you have disassembled. A washing machine breakdown can be a real disaster.
Tips for all cars
There are errors that are common to all machines. At first glance, they are banal, but often problems arise precisely because of carelessness.
- Washing machine won't turn on
. You need to check whether the machine is connected to the outlet and make sure that there is electricity throughout the house.
- Large amount of foam. Check to see if hand washing powder has been accidentally added.
- Water does not flow into the drum. It's worth checking to see if delayed start is enabled.
- There is no draining of water and no spinning after a completed program. The following modes can be set: no spin, no draining or light ironing.
- Indicators light up randomly. You need to restart the washing machine by turning it off for 2 minutes.
- Large vibration during machine operation. Is the equipment priced correctly? The drum may be overloaded.
After reading the information, you must remember that washing machine error codes do not eliminate the problem, but tell you where to look for it.
What bearings are needed for machines from different manufacturers?
As noted above, you need to choose a bearing based on the model of the washing machine or the removed part itself. Because There are not many well-known brands of this device; it is possible to trace their preferences in choosing the configuration:
- LG and Bosch. Typically, grades 6203-6206 are used, less often - 6305, 6306.
- Ariston. Usually this is SKF BA2B 306037 (two-digit), less often 203-206 ZZ.
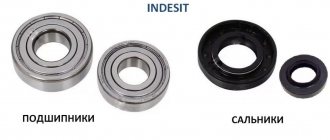
- Indesit. It is better to focus on specific sizes. With parameters of 2 cm, 4.7 cm and 1.4 cm for internal, external diameters and height, respectively, and with values of 2.5 cm, 5.2 cm and 1.5 cm - ZVL 6205-2RSR.
- Beko. Only numbers from 6203 to 6205.
- Ardo. 6204 and 6305 are most common, less common are 6202 and 6203.
This list is for informational purposes only and should not be relied upon entirely. This is especially true for the newest models - manufacturers are free to use unusual parts. As for the material, there are metal and plastic bearings. Moreover, the latter are considered more reliable - they are also made of metal, but covered with plastic. However, it is recommended to replace the bearings in automatic washing machines with the same type that was installed before.
Mechanical breakdowns
When these actions are unsuccessful, it is not normal failures that should be diagnosed, but mechanical damage. The locking mechanism or handle is probably worn out and needs to be completely replaced.
It happens that children hang on an open hatch and begin to swing. Such entertainment causes the loading door hinges to bend. The element stops closing or opening normally, and the mechanical latch often jams.
In this case, it is recommended to change the hinges or the lock itself. To change the locking mechanism, you have to remove the top panel of the washing machine, find the locking element, and open the latch. The lock mechanism will immediately unlock. After the hatch allows penetration into the drum, the blocker is changed.
With loops the situation is somewhat more complicated. If you do not have the necessary skills, then it is recommended to invite a specialist to perform such work, who will promptly correct the breakdown.
What causes bearings to break?
If a part fails, it is necessary to find out the cause of this phenomenon. The information obtained will facilitate the repair process and help eliminate the possibility of a recurrence of the breakdown. The reason for wear of a part may be:
- long-term operation of the installation (metal parts have a certain service life, after which the manufacturer allows them to break);
- corrosion resulting from moisture entering the bearing;
- design features - the belt drive causes serious loads on small parts, which leads to serious destruction of their surface layer.
Failure to timely replace a worn bearing and oil seal entails incorrect operation of other components of the device, which leads to complete failure of the machine. Restoring such a unit will be more difficult and expensive. It will be cheaper to purchase a new washing machine.
Changes to the manufacturer's blocking program
In all automatic machines, the hatch opens only some time (not for a long time) after the end of the washing program and the completion of spinning the laundry. Typically this time is on the order of thirty seconds to one and a half minutes. But! In some models, in order to improve safety, manufacturers increase this period to 3-4 minutes. Which leads to another common breakdown - mechanical damage to the washing machine handle. This happens especially often in cases where the owner previously had a machine with a standard UBL (up to 1.5 minutes). As a result of forced attempts to open a locked hatch, which, as a rule, is accompanied by additional physical effort, the door or locking device simply jams.
Washing machine hatch handle
This is how you can unlock a jammed door. In the same small hatch that we used for emergency, forced drainage of the remaining water in the drum, you should find a cable that is directly connected to the door locking mechanism. Manufacturers designate it orange or a color close to it. The hatch will open automatically after it is pulled normally by your hand. If the desired cable is missing, then you should use the second method, which we described a little earlier.
Namely. Remove the top cover and tilt the machine, displacing the drum, and open the latch with your fingers.
Why do you need to change the bearing?
As a part that is constantly subjected to severe loads, a bearing has a limited service life - usually from 6 to 10 years. The oil seal is the first to fail - the rubber is deformed, it begins to leak water from the tank onto the bearing, the lubricant is washed out, and the unit can no longer ensure smooth rotation of the shaft. If the part is not replaced in time, the shaft, drum and tub of the washing machine may be destroyed.
Replacing a bearing on your own if done poorly can lead to a reduction in the service life of the entire unit. To carry out the work you need to have special skills and the necessary tools.
An additional factor affecting bearing wear is overloading the washing machine drum. If you regularly wash too much laundry, the unit may fail after just a few years of use. You should not discount possible factory defects in the part or errors in its installation.
Thus, if you hear knocking and grinding noises when the washing machine is operating, which intensifies during the spin cycle, get ready to replace the bearing. A sign of a problem will also be a noticeable play of the drum relative to the tank.
Opening a door with a broken handle
Very often, the handle with which the hatch is unlocked breaks due to careless operation. Plastic is easily mechanically affected, especially if you pull the handle hard. You can unlock the door using a thin rope or fishing line:
- take a rope that is approximately 25 cm longer than the circumference of the hatch;
- insert it into the gap between the door and the front wall of the device;
- Pull the ends of the rope firmly, positioning it perpendicular to the floor, after which the hatch will open.
If the door still does not open, there is no need to make additional efforts. This may make the situation worse and lead to additional problems.
First of all, it is important to remove all the water from the machine and only then proceed to one of the selected unlocking methods. When none of the options listed above produce results, it is better to call a specialist
Source
How to choose a new bearing
The main point in preparing to replace the old bearing in a washing machine is purchasing new parts. A new oil seal and 2 bearings will be required, which must be identical to their predecessors. There are two ways to select a suitable bearing:
- Write down the model and brand of the washing machine, go to a spare parts store and ask for a part for your machine.
- Disassemble the washing machine, remove the bearings and oil seal, go with them to the spare parts store and select exactly the same parts.
Of course, it's best to use both options to ensure your purchase is as accurate as possible. Preference is always given to original parts! Typically, the bearing begins to “whistle” after 5-6 years of operation, when the warranty period comes to an end. Only the choice of high-quality “original” parts will allow the repair to last for several years.
Program switch and control module
Next, if no problems were found during inspection of the external and internal wiring, proceed to checking the program switch and the general system control module.
The easiest way is to replace the broken part when a malfunction is detected, however, often such repairs can be expensive and can hardly be called justified.
You can repair the switch and control module with the help of a professional who will do everything to get the machine to start turning on. It is not recommended to do this yourself, as there is a risk of aggravating the situation, causing additional damage.
How to diagnose that your washing machine bearings are worn out
Typically, diagnosis of a breakdown is limited to external signs, this can be:
- characteristic knock;
- vibration during spinning;
- the drum “moves” from side to side while loading laundry;
- the drum stops spinning.
If the breakdown is not corrected in time, this can lead to serious deformation of the rod shaft, the washing machine motor can burn out, and the drive belt can break due to excessive vibration; if the spin is done incorrectly, important components and assemblies can be damaged, which in almost a hundred cases out of a hundred results in to the loss of the washing machine without the possibility of restoring its operation.
What can cause bearing failure:
- overloading the machine tank with laundry;
- washing heavy clothes without a protective net (for example, washing shoes and sports equipment should be carried out in a special net), which can lead to increased vibration and load on the motor during spinning;
- damage to the oil seal and water getting into it (in this case, a leak may occur);
- Damage to the sealing rubber due to washing sharp objects, fasteners, knitting needles, belts, etc.
How to open a locked door?
Sometimes this needs to be done while the process has begun. For example, they didn’t put something in the washing machine that needed immediate washing, or they didn’t take out a bunch of keys from their pockets, which began to rattle in the drum.
Just pause the washer and wait a few minutes. If the door does not open, remove the plug from the electrical outlet. Many devices at such moments begin to drain the water on their own, then open the hatch to load.
If this measure does not help, turn on the washer again and start the “drain” function; it should start immediately. If the reason for the failure of the blocking device lies in the clogging of the filter element, water remains in the drum. Because of this, a special sensor prevents the hatch latch from opening.
This problematic issue can be resolved by simply cleaning the filter. As a rule, it is located at the bottom of the machine and is closed with a plug. If everything is in order, then screw the plug into place and try to set the “rinse and spin” modes. If such actions do not help, disconnect the washing machine from the power supply and wait at least a quarter of an hour. If this does not help, you will have to remove the top cover and try to open the lock from the inside.
It happens that the washing machine does not want to open the hatch when the button that blocks the door from small children is accidentally pressed. In such a situation, all you have to do is hold down the “start” button for about five seconds to unlock the washing machine.
Symptoms of a problem
No matter how good and expensive a particular Candy washing machine model is, this does not mean that it will work forever. Any mechanism has its own service life. Bearings have an average service life under average statistical conditions of 5-6 years. But it can also be less if a particular washing machine was operated in an unfavorable environment. When the bearings reach the end of their life, they need to be replaced to extend the life of your home appliance.
How to reset?
Provided that the appearance of an error on the control panel of the washing machine is not caused by serious breakdowns, a reboot will help restore the operation of the household appliance.
If the washing machine signals a malfunction after starting the wash, you can reset the error by holding down the “Start/Pause” button for at least ten seconds (in some older models, the selector knob is additionally switched to the neutral position). The indicators on the control panel blinked green - the reset was successful.
If no indicator lights up or the error appears before the work cycle starts, you can fix the problem in the following way:
- Switch the selector handle to neutral position.
- Hold the Start/Pause button for five seconds.
- Unplug the household appliance, wait twenty minutes, and then reconnect the washing machine to the power supply.
If the washing machine does not respond to button presses and turns of the selector knob, abruptly unplugging the appliance from the outlet will help resolve the problem.
The emergency reboot method can be used only in exceptional, isolated cases, otherwise there is a high risk of control module breakdowns, which entails expensive, time-consuming repairs of household appliances.
We are starting to prepare for the renovation
Before you begin repair work, you should take care of preparing both tools and materials, and the machine itself. First of all, the device is disconnected from the communications and pulled out into a free space that can provide the “master” with access to all units. It is recommended to choose uncluttered spaces (rooms, outbuildings, garages). The next stage is preparing the tool. To perform simple manipulations you will need:
- hammer;
- hand tools for plumbing and installation - pliers;
- two figured, Phillips and slotted, screwdrivers;
- metal rod;
- set of open-end wrenches;
- one-component sealing agents;
- lubricants that prevent corrosion (as an option - lithol);
- a pair of bearings, an oil seal (sold at service centers or specialized retail outlets).
In order not to make a mistake in choosing parts, it is worth implementing the advice of an experienced craftsman. Disassemble the unit to find out what bearings are on the Kandy washing machine. Thanks to accurate information, the seller will offer the required consumables. Tell the seller the brand of the machine.
Purchasing original spare parts for a specific Candy washing machine model will ensure uninterrupted operation of the unit for a long time.
When making repairs yourself, you should use a camera. Thanks to its use, you can easily monitor the process of correct assembly of components after the repair is completed.
Do-it-yourself car repair Kandy
First of all, if you notice an error code, reboot the washer. Unplug it for 10-20 minutes.
If after switching on the code does not disappear, you need to continue searching. The photo shows the structure of the Candy washing machine to make it easier for you to navigate.
You can also look at the operating instructions for the Kandy washing machine.
Solving drainage problems
Let's figure out how to get rid of the blockage. DIY repair:
- Cleaning the drain filter. It is located below: on the front panel, behind a small hatch. Unscrew the filter and inspect for blockages.
- Checking the drain pipe. It is necessary to lay the washing machine on its side and reach the nozzle through the bottom. For more information about cleaning and replacement, watch the video:
Along with the pipe, inspect the drain hose, which could also be clogged. To clean, you can rinse it under water pressure.
Checking the pump (pump) is performed after inspecting the impeller. Take out the drain filter and look into its hole
Using a flashlight, notice whether the impeller is spinning or not. If it stays still, it means there is a problem with the pump, or a thread or piece of fabric is wound around the impeller axle. To remove the error from the screen and return the SM to functionality, you need to get to the pump
To remove the error from the screen and return the SM to functionality, you need to get to the pump.
DIY repair:
- Disconnect the SM from the network and communications.
- Place the washer on its side with the bottom open.
- Unscrew the pump mounting bolts.
- Open the connectors by disconnecting the wires.
- After removing the pump, inspect the impeller for blockages.
If the pump malfunctions, you can install a new part in the reverse order.
How to turn on the Kandy machine
If your washing machine does not turn on or display an error code, do the repair yourself:
- Check the power cord and extension cord (if connected through one). Connect any household appliance to the extension cord. If it works, then the extension cord is working. If the wire is damaged, it must be replaced.
- To find out if there is voltage in the network, connect one of the devices to the outlet. If it doesn't work, you need to call an electrician.
- To inspect the power button and its contacts, you need to remove the front panel.
What to do:
- Remove the top cover of the washer by unscrewing the bolts at the back.
- Remove the dispenser tray.
- Unscrew the screws holding the receiving tray.
- Unfasten the latches and remove the panel.
- Disconnect the wires coming from the control module.
Now inspect the button contacts. They may need to be replaced.
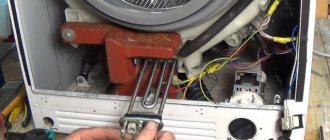
Replacing the heating element in a washing machine
When using low-quality powders and hard water, the heating element becomes covered with scale. Subsequently, scale may cause the heater to burn out. If the heating element breaks down, the corresponding error code will appear on the display.
To replace the element, you need to remove the back panel of the SM Kandy. Make your own repairs:
- After unscrewing the screws and removing the panel, you will see a heating element below the tank.
- Disconnect all connectors.
- Unscrew the central nut and push the bolt inward.
- Carefully prying at the edges, pull out the element.
Visually assess the condition of the heating element. Additionally, you can check the heater while it is in the car. To do this, attach the multimeter probes to the contacts of the heating element and measure the resistance. A working part will show from 20 ohms to 30 ohms.
If broken, install a new element.
How to check the heating element and its thermostat, watch the video:
Bearing replacement
To replace the bearings, you need to know how to disassemble a Kandy washing machine. Getting to them is very difficult, and not everyone can do it.
Watch detailed video instructions:
Solving electronics problems
What are the signs of this breakdown in the Kandy automatic washing machine? You are trying to start the wash, but the process does not start. An error code lights up on the display.
The reason may be an open hatch door. If the locking device fails, the hatch is not electronically locked, so the wash does not start. Do-it-yourself repair involves replacing the UBL:
- De-energize the CM, open the door.
- Bend the rubber cuff and use a screwdriver to remove the metal clamp.
- Unscrew the bolts securing the locking device.
- By bending the cuff, disconnect the lock from the panel.
- After disconnecting the electrical connectors, remove the lock and move it to a new part.
Electronic problems can be caused by a broken wire circuit between the control board and the rest of the machine. Therefore, you need to inspect everything sequentially. For this you will need a Candy washing machine wiring diagram.
If there were sudden voltage changes, the board itself or its elements could burn out.
It is better not to repair the main component of the Kandy automatic washing machine yourself, but to entrust it to a professional.
Source
Required Tools
You won’t be able to get to the bearing without special tools, because you first need to disassemble the washing machine. In order not to damage the spare parts, it will not be possible to arm yourself with only one screwdriver. For this purpose you will need a whole list:
- pliers;
- screwdrivers - slotted and Phillips;
- chisel;
- regular hammer;
- waterproof sealant;
- a set of keys;
- rubber mallet (optional).
Changing a bearing yourself is a labor-intensive and responsible process at every stage. In fact, you will have to completely disassemble the washing machine and then reassemble it. It is advisable to photograph each step, and write down the sequence of actions. Only in this case will it be possible to carry out the replacement successfully.
You will need to purchase waterproof bearing grease for your tool kit. If it is unavailable, lithol can be used.
What is necessary
To replace, you need a few tools and skill in their use. You will need: two Torx screwdrivers and one small slotted screwdriver.
Broken hinge and tools
You may need a flashlight for illumination. Instead of Torx screwdrivers, I use a set with bits of different sizes. If the bolts turn sour due to rust, then I treat the joint with WD-40 and leave it for 5-10 minutes.
Do you wash by hand?
Oh yes! No
Expert opinion
I work in the household appliance repair industry. Extensive experience in restoring washing machines and dishwashers.
Ask a Question
As a rule, this is enough. In very severe cases, I use an end tool. But it should be noted that screwdriver bits will not fit any standard socket wrench size. In this case, a special adapter from the bit to the socket wrench is required.
Before replacing, you need to find a suitable hinge. The best way to do this is by looking at the product number, which is located on a white sticker under the hatch door. In our case, it is 31000970. Using this number, we select the required hinge from a supplier of spare parts for washing machines. The hatch hinge with number 49001262 is suitable for our SMA.
G
M
T
Audio feature limited to 200 characters
| Settings: History: Feedback: Donate | Close |
Sticker under the hatch.
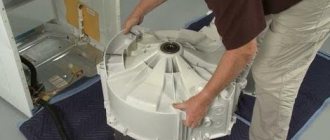
Stages of disassembling a washing machine
First of all, the washing machine must be disconnected from the communications that supply it with water and electricity, and provide drainage. To get to the broken bearing, you will have to remove the tank, and to do this, virtually disassemble the entire car.
It would be a good idea to have a camera or cell phone with a similar function to record all stages of disassembly.
When assembling, such forethought can be of invaluable help, because relying 100% on memory is more than risky. As a last resort, the entire process needs to be recorded, especially the order in which the wires are connected.
Step #1 - remove the cover and dashboard
First the cover is removed. To do this, unscrew 2 screws on the back wall and lift it, moving it slightly back.
The next task is to remove the washing powder tray. It will leave the grooves quite freely if you pull it towards you by extending and pressing a special latch. In models not equipped with such a button, the powder receptacle can be pulled out by slightly pressing it down.
Before removing the upper instrument panel, you need to determine where the bolts securing it are located. Their location and number may vary depending on the model, but in the place where the powder tray was removed, some of the screws are located exactly.
Another one is always placed on the right side of the washing device. If after unscrewing them the panel does not want to be removed, you need to continue searching for the missing fasteners.
In principle, the panel can be left hanging, but it will not be very convenient to work, and besides, the wires can be accidentally damaged
Before disconnecting a whole bunch of wires going to the control board, be sure to photograph them - this will be very helpful when reconnecting. Next you need to remove the bottom panel: after pressing with a flat screwdriver on the latches holding it, it is easily released.
Step #2 - release the hatch, remove the front wall
The next step is to release the cuff, that is, the rubber gasket, one side placed on the tank and the other on the front panel of the washing machine. It is fixed with a spring and a clamp. We discussed the removal process in more detail in this instruction for replacing the cuff.
By running your hand along the perimeter of the cuff, you can find a spring holding the ends of the clamp together. The spring together with the clamp is taken out into the light by prying it off with a flat screwdriver. The cuff is carefully disconnected from the hatch hole and tucked into the tank
It was time to dismantle the front wall. To do this, with the hatch latched, remove the bolts holding the panel and carefully remove it from the hook, remembering the wire connecting the panel and the hatch lock. As soon as possible, the wire should be disconnected. There are no obstacles left to remove the wall.
Step #3 - remove the heating element, wiring and tank
First of all, the internal top panel is removed, for which the screws securing the water supply valve are found in the back of the device and removed. After this, the bolts on the panel begin to twist. But you shouldn’t rush to remove it right away - before this action you should disconnect it, not forgetting to take pictures of the wires and pipes with the camera.
Next comes the dismantling of the drain pipe, connected to the tank using a clamp. The clamp is unscrewed and the pipe is removed. It’s a good idea to have a rag on hand, as remaining water may leak out of the nozzle.
The heating element must also be removed. To do this, disconnect the wires leading to the heater. In different models, the location of the heating element is possible both in the front and in the rear of the automatic washing machine, so you need to be prepared to dismantle the back wall.
After disconnecting the wires leading to the heating element and unscrewing the nut, the electric heater is pryed up with a screwdriver and carefully removed from the tank. At this stage, the wiring is completely dismantled. It must be borne in mind that sometimes it is attached to different parts of the unit using different types of fasteners. For example, it can be attached to the tank with ties or wire.
Next, the wires from the engine are removed. You can also disconnect the wiring from the pump and put it outside so that it does not create unnecessary interference when it comes time to remove the tank. To make it easier to remove the tank, you should remove the counterweights - lower and upper. Depending on the model, they can be found both in the front part of the case and in the back. Using a wrench, remove the bolts that secure the shock absorbers and water level sensor in the desired position.
After removing the belt and disconnecting the engine and shock absorbers, the work of removing the tank from the bowels of the car is nearing completion. The tank was left hanging only on the springs; it weighs little, so it doesn’t require much effort.
You need to lift the tank with one hand, and with the other unhook it from the retaining springs and remove it from the car. The tank has been removed, the next task is to remove from it everything that will interfere with further work or is accidentally damaged. For convenience during future disassembly, the released tank is usually placed on a durable table with the pulley facing up.
Kandy machine fault codes, their meaning
Depending on the type of model, the SM may display the error in different ways:
- Electronically controlled Activa type models will show an error on the display.
- Candy Aquamatic models indicate a problem by blinking the bottom light on the left. The number of flashes after a pause indicates an error code.
Washing machines Candy Holiday, Aquamatic, Activa and other models are characterized by the following error codes: E01, E02, E03, E04, E05, E09.
| Error code name | Meaning, decoding |
| E01 | The hatch door is not closed tightly. Malfunction of the locking device (UBL) or mechanical latch. |
| E02 | Error when drawing water. The tank is overfilled or there is not enough water for washing. There are likely problems with the intake valve, pressure switch, and control module. |
| E03 | There is no normal drainage of water. The time allotted for draining has expired. The problem is a clogged drain system or pump. |
| E04 | Water intake error. The tank is filled above the required level. The fill valve or pressure switch may be damaged. |
| E05 | The water does not heat up. Malfunction of the heating element, electronic controller, temperature sensor. |
| E07 (08, 09) | Problems with the engine or its elements: tachometer, triac, control module. |
Step-by-step replacement of worn bearings
The matter is gradually moving towards completion, and soon it will be possible to get rid of the faulty bearings, but there are still a few preliminary steps ahead.
Stage #1 - preparatory work
Now you need to carefully disconnect the drum from the back of the tank - a responsible operation that requires special attention.
First you need to free yourself from the fasteners holding the pulley. The tank is turned over with the pulley up, and the bolt securing it to the shaft is disconnected. When the pulley is removed from the axle, the unscrewed bolt is returned to its place to avoid damage to the shaft when the drum is knocked out.
The shaft is removed gradually, by carefully tapping with a hammer. Some experts advise inexperienced craftsmen to use a rubber mallet in this case, so as not to inadvertently flare the bearing seat.
If the shaft moves little by little, the work continues patiently. If the result is negative, before increasing the effort, the standard bolt should be replaced with one that you don’t mind throwing away if it becomes deformed. When the position of the shaft is equal to the head of the bolt, the latter is unscrewed and the drum is removed out.
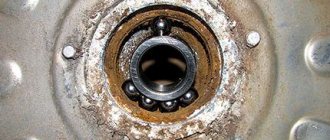
It is necessary to carefully inspect the shaft and bushing for their integrity. To check, you can put a new bearing on the shaft to make sure there is no or no play. If flaws are found, the shaft with the cross will have to be replaced.
Such a drum shaft must be cleaned until it shines and only then returned to its original place. You can additionally treat the surface with anti-corrosion paint. The bushing located on the shaft should also be free of wear and tear defects and mechanical damage.
Pronounced transverse grooves eloquently indicate that the oil seal on such a bushing will not be able to protect the bearing from moisture, and, therefore, repeated repairs are inevitable.
Before removing the bearings, the seal must be removed. The operation is simple: pick it up with a flat screwdriver and remove it. If it doesn’t work right away, you’ll have to soak it with a penetrating lubricant. It won't be a problem if the seal breaks, it still needs to be replaced.
Stage #2 - removing the damaged part
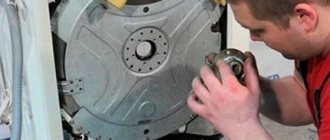
The tank is placed on wooden blocks, and it’s time to work with a metal rod or a blunt chisel. Place the pin on the worn bearing and hit the part with a hammer.
Subsequent blows are applied in a circle until the part is knocked out. During operation, care must be taken to ensure that the bearing does not become distorted. The outer bearing is removed first.
The tank is a rather fragile part, so many craftsmen, in order to avoid breakage, knock out the bearing by placing the container on their knees or a soft base. The second bearing is also removed using the same method. The blows should be careful and not strong. And yet, this procedure is quite noisy, so the neighbors will be grateful to the home craftsman if he finds the opportunity to do it outside the walls of the house.
The landing sites must be thoroughly cleaned of dirt using an anti-scale agent and a soft cloth, until they shine, to prevent clogging of new parts.
Solving the hatch blocking problem
When a blockage occurs, you should not take sudden actions, this will lead to additional damage to the handle or lock, but you should quickly try to assess the situation and decide how to unlock the washing machine door.
What to do? Having reacted quickly, before the water fills, you should press the start button and hold for several seconds. In this case, the washing machine will pause operation and the door can be opened. However, such manipulations need to be done in extreme cases in order to lead to electronic failure.
If you don't know how to open the washing machine door immediately after finishing the wash, just wait and the door will unlock itself. The factory settings set the lock to lock within 1-3 minutes. after the drum has finished rotating, so that opening the hatch door prematurely does not lead to injury.
If the power is turned off during operation, the setting may also be lost and the hatch door will be blocked. Then start another program, for example rinse, the handle should turn after draining the water and the door will open.
The child lock feature can be activated accidentally by pressing two buttons at the same time. Each washing machine brand has its own combination, which can be specified in the instructions. This function can be disabled by pressing two buttons together. Another washing program is activated after the start/pause button.
The remaining water in the tank after operation of the machine will not allow you to open the door. The sensor will not allow you to unlock the lock while there is water in the machine. It needs to be completely drained for the door to open. How to manually get rid of water in the machine?
You can try to drain it by pressing the drain or rinse button again. If these steps do not help, see if your washing machine has a thin tube near the filter. Then lift the lid, take out the straw and remove the cap from it. This way you can get rid of water.
If the drain hose is connected to the bottom of the machine, it is enough to disconnect it and also solve this problem.
When the reason for the water not draining in the washing machine is a clogged pipe, it is disconnected from the pump, cleaned and returned to its place.
If the hose is damaged, it can be temporarily sealed or replaced with a new one.
Then the water from the tank will drain completely and the hatch door will open in time.
Read more information about washing and washing machines here.
Source
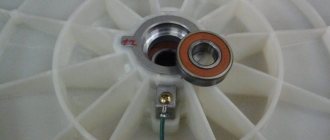
Part replacement
The location of the bearings requiring replacement is the rear wall of the removed drum. Before you get them out, you need to remove the oil seal. To do this, a straight-pin screwdriver is used, which simultaneously prys up and removes the oil seal, which is thoroughly inspected and, if necessary, replaced.
The next step is to remove the internal (small) and external (large) bearing. The process is carried out using a punch (metal rod) and a hammer. The outer bearing is knocked out first, the inner bearing second.
Next, you should make sure that the new parts are installed in a clean seat. The small bearing is installed first, and the large bearing second. Parts are also hammered using a metal rod installed according to the “crosswise” principle. The dull sound emitted by the part during the driving process becomes louder at the stage of correct installation.
Before installation, the oil seal must be treated with a lubricant with water-repellent characteristics. The installed part is a signal for assembling the washing machine in the reverse order to how it was disassembled.
Craftsmen claim that changing bearings in a Candy washing machine is not a very complicated process. The main condition is consistency, caution and attention to detail, especially fragile ones. Advice for those who doubt their own strengths and abilities: seek the help of professionals. But remember that getting a bearing replaced by a professional will cost money - approximately 30% of the price paid for a new Candy machine.
Clearing a clogged drain system
If the machine does not drain water, you need to find out the cause of the blockage. This may be a mechanical reason - when coins, buttons, small toys and other small parts get into the filtration system. And also a natural way for a drain system to become clogged is when small particles of fabric, threads and hair, as well as pet hair, accumulate on the filter. This problem is being fixed step by step.
Cleaning the pump cover
To clear the blockage yourself, you need to perform the following manipulations.
- Turn off the power to the washing machine.
- Unscrew the pump cover. It not only functions as a filter that catches small parts and prevents them from entering the pump, but is also part of the pump itself. The lid is located on the bottom of the machine.
- Clean the lid filter from contamination.
Checking the drain pipe (pipe)
It is necessary to lay the machine on its side and disconnect the drain pipe from the pump using pliers. After this, using a Phillips screwdriver, you need to loosen the clamp holding the pipe to the tank and release the pipe. Next, the pressure sampling chamber is disconnected from the tank from above and the connecting clamp on the pipe is unscrewed with pliers. After completely removing the pipe from the machine, it is cleaned of accumulated debris and washed under running water.
Assembling the tank and washing machine
Before assembling the tank, both halves must be thoroughly cleaned of scale and dirt. The joints should be carefully treated with silicone sealant. The gasket between the tank halves should be replaced with a new one. The bolts should be tightened crosswise.
Reassembling the Kandy washing machine is done in the reverse order. If the user took photographs at the disassembly stage, you should check them, especially when connecting the wiring. Installed parts must be inspected, cleaned if necessary, or replaced if damaged. Be sure to descale the heating element.
After the equipment is assembled, it is necessary to leave it for the time required for the sealant to completely harden. Next, you need to connect the washing machine to communications and electricity, add a small amount of detergent and run a test wash. This is necessary to remove dirt, grease and unpleasant odors remaining after the repair. If during the test wash the Kandy washing machine operates quietly, no extraneous noise is heard, and no moisture appears under the machine, this indicates that the bearing repairs were carried out successfully and the equipment was assembled correctly.
What parts of the Candy washing machine break most often?
The Kandy washing machine has a complex structure; it consists of many parts. Most often, the main components that bear the main load fail . We are talking about a belt, a crosspiece, an electric heater, a hatch handle and more.
heating element
The heating element is the heating element of the washing machine. It comes into operation every time there is a wash in warm or hot water. The part is located under the drum.
Causes of failure and ways to eliminate them:
Voltage fluctuations in the network that lead to failure in electronics. You can deal with the problem by rebooting the device.- Hard water, which causes salt deposits on the electric heater. If the part is not burnt out, you can try to descale it and put it back in place.
- Oxides on contacts. They need to be cleaned.
- Damage associated with active and prolonged use of the machine. In this case, the heating element will have to be replaced.
Error codes indicating a breakdown of the heating element are 5, E5, E05, Err5, Error 5, or the same letters, but with the number 14, 16 or 22. Read more here.
Control board
The control board is the intelligence of the Kandy washing machine; it is responsible for executing all programs. The part is represented by a microcircuit, which is located in the upper part of the case .
The control board is susceptible to moisture and voltage surges. These reasons most often lead to the fact that either individual elements and tracks burn out, or a failure occurs in the firmware.
There are various signs indicating a board failure. The machine may not turn on at all, or will not execute one or more programs, jump from mode to mode, etc. Error codes – 14, E14, Err14, Error 14, or any other errors associated with performing a certain action.
The repair comes down to diagnosing the board, replacing burnt-out capacitors or triacs , and soldering the tracks. Sometimes flashing the memory and reprogramming the device is required. If the damage is serious, the board is replaced.
Water level sensor
A pressure switch is necessary so that the device can assess the degree of filling of the drum with water and perform further actions. If it breaks, the machine does not start the wash, the tank overflows or remains half empty.
Reasons for failure of the pressure switch:
- voltage surges leading to burning of wires;
- blockages in the pressure pipe;
- natural wear and tear.
To deal with the breakdown, you need to remove the part and check it for blockages. You should also eliminate minor damage, clean the contacts, and restart the machine. If these measures are ineffective, the pressure switch must be replaced.
Error code indicating a breakdown of the water level sensor is 2, E2, Err02, Error 2 or 20, E20, Err20, Error 20.
Cross
The cross is responsible for rotating the drum during washing . The part is subject to enormous loads, so over time it can break or bend.
A malfunction of the crosspiece is indicated by extraneous sounds that appear during washing and spinning. It may be rustling, knocking, grinding.
The only option to repair a broken or bent part is to replace it. There is no separate error code for a broken crosspiece. It is the same as the one that indicates bearing wear - 7, E7, E07, Err7, Error 7.
Causes of crosspiece failure:
- malfunction of the device,
- drum overload,
- bearing wear,
- hard water.
Belt
Without a belt, it is impossible to rotate the drum, since it is the belt that transmits the energy of the engine. If the belt falls off or breaks, a hum will be heard and the appliance will continue washing or spinning. However, the drum will remain in place.
Causes of failure and ways to eliminate them:
- The belt has stretched due to constant overload. It needs to be replaced.
- The belt falls off due to wear of the oil seal and bearings, or due to a burst crosspiece. There is no need to change it, you need to fix the main damage.
- The belt broke due to improper use of the device. Repair is not possible, replacement is required.
There are no error codes for belt breaks. A message may appear indicating that the bearings or motor are damaged. To diagnose the problem, just unscrew the case.
Hatch handle
The hatch handle serves for its safe and convenient opening. It is made of durable plastic, which is difficult to break. However, with the application of force, this is possible.
If a part is broken, it cannot be repaired . You'll have to buy a new pen. To perform the replacement, the door must be removed.
Possible error codes are 1, E1, E01, Err 1, Error 1. Although in most cases, no additional prompts are needed.
Pump or pump
The pump or pump is responsible for pumping water out of the drum and discharging it into the drain pipe . The part is located at the bottom of the device; you can access it after completely disassembling the washing machine.
The most common cause of failure is debris that gets into the part. Foreign objects either simply block the operation of the pump, or cause the impeller to break, or disable the motor, which is subject to excessive loads.
If the pump breaks down, the water will not drain or will leave the drum more slowly than usual. In this case, a code will appear on the screen - 3, E3, E03, Err3, Error 3, or similar letters, but with the number 20.
To eliminate the malfunction, the device must be disassembled, the pump removed and inspected. If a blockage is detected, the pump should be cleaned. A breakdown of the impeller or motor requires replacement of the part.
Engine
The motor is one of the main components of the Kandy washing machine. It is this that is the source of energy that sets the drum in motion. The most common reasons for its failure are short circuits . They can occur in the rotor and stater windings due to voltage surges, overloading of the washing machine, and even improper installation.
The main sign of a motor malfunction is the termination of any program. After diagnosing the breakdown, repairs are carried out. Most often, a complete engine replacement is required. Possible error codes are 8, E8, E08, Err 8, Error 8 or similar letter designations, but with the numbers 9 or 10.
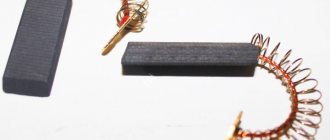
Brushes
Brushes are necessary to transfer voltage from the stator to the rotor. They are made of graphite, so they wear out over time.
Worn brushes in Kandy washing machines are indicated by weak spin. If they are worn down too much, the drum will not rotate at all , since the motor will not have enough power. Sometimes sparks are visible under the machine.
There are no specific reasons leading to brush abrasion. This is a natural process that accelerates with active use of the device. The brushes cannot be repaired and must be replaced. Error codes indicating brush wear are 8, E8, E08, Err8, Error 8.
Bearing
The bearings allow the drum to rotate smoothly and silently . Its breakdown is indicated by loud sounds in the form of roaring and grinding. They intensify during spinning. If the bearings fail completely, the drum stops rotating.
The causes of failure are excessive loads on the elements, for example, when the machine is overfilled with laundry. An additional risk factor is moisture ingress. You need to understand that over time, even the best quality bearings break down. They cannot be repaired; the part must be replaced. Error codes indicating bearing failure are 7, E7, E07, Err7, Error 7. Details are in this article.
Shock absorbers
Shock absorbers or dampers are designed to dampen vibrations of the tank during spinning and washing. They work in conjunction with springs. Damage to the shock absorbers is indicated by strong vibrations and knocking noises during spinning. In this case, the device itself can “jump” and move from its place.
Reasons for their failure:
- drum overload,
- spin at high speeds,
- placing the device on an uneven surface,
- resource development.
Repair of shock absorbers is impossible; they must be replaced. There are no error codes indicating damage to the shock absorbers. To make a diagnosis, you will have to focus on external signs.
Read about repair and replacement of shock absorbers here.
Cuff
The elastic band located around the circumference of the hatch is a cuff. It helps the door close tightly and prevents leaks.
The most common reason for damage to its integrity is the carelessness of the owner of the washing machine, who leaves sharp objects in his pockets. It is they who cut the seal during the washing process.
The main sign of cuff damage is leakage . If the gap is minimal, you can seal it and turn the elastic band over so that the hole is on top. If there is significant damage to the integrity of the rubber band, it will have to be replaced. There is no error code, but in this case diagnosis is not difficult.
Drum
If the drum breaks down, it may stop rotating, when it moves, extraneous noise appears, and water begins to stagnate in it. Sometimes it begins to leak due to a hole, or becomes deformed. The main cause of the malfunction is violation of operating rules. Repair comes down to replacing a part. Error codes indicating problems with the drum are 10, E10, Err 10, Error 10.
Features of repairs with vertical loading
Here the drum is supported by 2 axle shafts and 2 bearings. With such a reliable design, they fail infrequently, usually when there is some other failure. They are often damaged by water penetrating through a faulty seal. Rusting and steadily becoming clogged with dirt, the bearing eventually fails.
Repairing such machines is much more convenient. When communications are disconnected, 2 side covers of the housing are removed, and access to the work area is provided.
The bearing on the side where there is no drive pulley is replaced first. To do this, the caliper is removed - a ready-made set of bearings and oil seal enclosed in a housing.
The calipers of the same machine have different thread directions. On the side where the pulley is missing, it is right-handed and unscrews counterclockwise. On the reverse side, such a part has a left-hand thread and is unscrewed clockwise
The seat of the oil seal, as well as the shaft itself, is freed from contamination. When installing a new bearing, it is necessary to avoid distortion of the sealing ring. Otherwise, it will not be able to prevent fluid leakage, which will cause new bearing failure.
Changing the caliper on the motor side begins with removing the belt and drum pulley. Then comes the turn of the grounding block. Next the caliper is unscrewed. The shaft and seat, as in the first case, are thoroughly cleaned.
A serviceable oil seal is installed in its proper place, and the caliper is tightened. There is no need to put in much effort, because the carving is made on plastic. Assembly, as usual, is carried out in reverse order.
Repair: breakdowns and ways to eliminate the defect
If a superficial inspection of the condition of the Candy washing machine does not reveal any defects, you need to move on to the components that are involved in the process of turning on the washing machine.
But before opening the case, you must make sure that the following conditions are met:
- The washing machine is not under warranty.
- The plug is pulled out of the socket and the device is completely de-energized.
- The water supply tap to the machine is closed.
If the device is under warranty, then in the event of a malfunction, you should call a technician only from the service center.
Interference filter
Washing and other household appliances have an interference filter. This is a block that is part of the electrical circuit of the washing machine itself, and is designed to dampen electromagnetic waves that can disrupt the operation of other electrical appliances in the house.
A failed noise filter stops passing current through itself. The circuit breaks and the Kandy washing machine does not turn on. This block is located under the top cover. You can check its condition using a multimeter.
If the filter is faulty, it is replaced with a new one.
It is important to make all contact connections correctly. To avoid mistakes, you should photograph all connections before removing the part. Very often, the malfunction of the unit is noticeable even with the naked eye - there are swellings on the body, burnt areas and other defects.
Very often, the malfunction of the unit is noticeable even with the naked eye - there are swellings on the body, burnt areas and other defects.
Where to find a filter in a washing machine, and what it looks like, you can watch the video:
Power button
The failure of the Candy machine's power button is not a rare failure. The cause of the failure may even be oxidation of the contacts from moisture.
To inspect the part, access it from the inside of the washer. To do this, partially disassemble the case by removing the top panel. If there is damage, the button is replaced with a new one.
Control module
The Candy control board is the “brain” of the washing machine. If the module fails, various systems may fail and the device may not even turn on. To diagnose the board you will need special tools. Without relevant experience, it is not advisable to take on such complex work.
Wiring
The electrical wiring in the Candy washing machine connects individual components and transmits signals from the control module and sensors.
If the electrical circuit is broken due to damaged wires, the operation of the washing machine may not even start or may be interrupted and malfunction.
To analyze the condition of the wiring, the Candy washing machine is partially disassembled, and not only the wires themselves are inspected, but also the terminals. If a defect is detected, twist it and clean the oxidized contacts. If the damage is significant, the entire cable is replaced.
Hatch door lock
If the door is not locked, the Candy washing machine does not start working. A stop in operation may occur immediately after pressing start, while the indicators are illuminated, but the washing process does not proceed. On the display, the door lock error corresponds to code E01.
If the door simply was not closed until it clicked, then the problem can be solved as simply as possible: you need to check that things do not interfere with the closing of the hatch and close the door well. But if the cause of the failure is the failure of the UBL, the unit will need to be repaired or replaced. To resolve the issue, you will have to partially disassemble the washing machine.
How to remove and replace a bearing from a front-loading washing machine drum
In this case, first of all, let's prepare the tools. This process is more labor-intensive, since you have to remove the drum. Let's look at the whole process using the example of working with a Samsung automatic washing machine, model s-1052. We specifically took a standard model in order to use an example of working with it to show the principle of replacing bearings, which is suitable for similar work with many other household appliances of this type.
Next we follow the instructions.
| Illustration | Description of action |
| An important point: before you begin any work on assembling and disassembling your washing machine, check its service model and purchase the required replacement set of bearings. The data can be viewed on the back panel, here. | |
| The peculiarity of our model is that it has a blank back wall and we will have to do all the work from its front side. But don't worry, it's quite simple. And we will show all the stages in detail. | |
| We dismantle the top cover and powder receiver. Before doing this work, it is important to disconnect all elements and terminals. | |
| Carefully remove the panel, having first unscrewed all the fixing screws. Please note: the top part of the panel is secured with latches - do not damage them when dismantling. | |
| Remember or photograph the original position of the chips and terminals, if they are similar - mark the necessary wires with electrical tape of a certain color to prevent mistakes during assembly. | |
| This way we freed up the front panel for work. | |
| We begin work by releasing the bottom panel, which is usually used to clean filters. We free the front panel from the screws. | |
| We take out the tank, remove the strap. Next, the engine and shock absorbers are dismantled, since they will not allow the tank to be disassembled in half. | |
| We remove the pulley, clearing the approach to the oil seal with bearings. For disassembly, it is better to use a 17 mm spanner to unscrew the pulley. | |
| This is the deplorable state our oil seal is in. Now you need to get to the bearings. | |
| Before continuing work, pay attention to the condition of the shaft itself. If the bearing jams very often, the wear on the shaft can be quite severe. | |
| Next, we free the oil seal from the bearing, replace them, and coat the oil seal with grease. In this case, the work is carried out similar to that which we described above. | |
| Further, all stages are carried out in reverse order. |
How to disassemble a household appliance?
Analysis of SMA Kandi involves the following algorithm of action:
- remove the top cover, which is secured with a pair of bolts from the back of the device;
- get the powder receptacle;
- unscrew the water level sensor;
- remove the panel with buttons;
- carefully remove the counterweight, which is secured with bolts;
- disconnect the surge protector;
- turn off the filling valve;
- unscrew the back panel, remove the belt, disconnect the motor and heating element;
- using a screwdriver, unscrew the bolts securing the hatch - if there is no need to remove it, then leave the door on the front panel;
- disconnect the inlet hose;
- unscrew the counterweights;
- remove the tank from the shock absorbers and remove it.
The two halves of the tank are fixed with bolts; if necessary, they need to be unscrewed. This way the machine will be disassembled. Read more here.
What results from untimely replacement of bearings?
So, if you notice grinding, rustling or other extraneous sounds while your washing machine is operating, this is a signal that it is time to replace the bearing. Such problems usually occur after using the washing machine for quite a long time. This is five to seven years.
Extraneous sounds that increase over time indicate that the problem is getting worse and the destruction of the elements of the unit begins. Various defects in the bushings and shaft seating occur. The drum becomes very loose and cracks and grooves appear in its leading edge. Therefore, the sooner the operation of faulty equipment is stopped, the greater the likelihood that the breakdown will not lead to damage to the drum, pulley and other functional elements of the unit.
If you contact the service center in a timely manner, you will receive a washing machine that can function fully. Before carrying out repair work, the specialist will carefully examine the tank in order to identify possible cracks and damage, and will also inspect the drum shaft. Such careful diagnostics will allow you to receive a unit after repair that will delight you with trouble-free operation for a long time.
It should be said that all manufacturers usually include in their warranty service a complete replacement of the rear segment of the tank. Such repairs are carried out absolutely free of charge throughout the warranty period. After the warranty period has expired, service organizations offer to replace the bearing block. This is done to minimize the cost of repairs.
A few more refusals
It happens that during startup the machine does not turn on. There may be several reasons for this:
- The network cable is burnt out or twisted. It must be checked and, if necessary, replaced. It happens that the problem is hidden in the extension cord used, so it is recommended to start checking with it,
- there is no voltage in the network. It may also simply not be enough to start the washing machine. To check you will have to use any electrical device. If the “diagnosis” is confirmed, invite an electrician,
- the contacts on the start button have oxidized. Remove the top cover, remove the powder container, remove the panel, disconnect the wiring leading to the control module, inspect the contacts. They will either have to be protected or changed,
- The control module has failed.
If you notice a puddle on the floor, it is recommended to urgently look for a leak. But before starting all actions, the machine must be de-energized to avoid electric shock.
There may be several reasons for a leak:
- the dispensing tray is clogged with detergents, clogging the pipe,
- The water drain pipe is damaged,
- Due to long-term use, the cuff has worn out or been damaged by small objects, losing its tightness.
Tips for use
Do not overload the detergent hopper. This may cause the detergent hose to become clogged with excess powder. Apply exactly the amount of detergent required for a specific wash program.
Don't forget to clean the drain filter. It is located at the bottom of the machine and collects all large fractions that can harm the pump. If this is not done, then sooner or later it will clog to such a state that water will stop draining from the tank.
Expert advice and preventive measures
It is recommended to regularly clean the outside of the Kandi SMA, without using products containing solvents, alcohols or abrasives. It is enough to use a damp cloth for this work.
Constantly check the detergent tray to remove any remaining powder. If necessary, remove the container and rinse it thoroughly with water.
The drainage system should be checked and cleaned twice a year.
When moving the device to another place and not using it for a long time, all water must be drained from the system.
Summarize
Despite the fact that the work of repairing automatic machines is not easy and quite labor-intensive, if you have free time, it is better to do it yourself. This will save money, and it’s not for nothing that they said from time immemorial: “If you want to do it well, do it yourself.” But before you disassemble the bearing, you should soberly assess your strength. Remember that a normal technician will not assemble the unit you disassembled.
We hope that today's article was useful to the reader. If you have any questions while reading it, you can ask them in the comments below. The editors of electric-220.ru will be happy to answer them. If you have experience in producing such work, please share it with novice home craftsmen. Write, communicate, ask. And finally, according to the already established good tradition, we bring to your attention a short but quite informative video on today’s topic.
Step by step disassembly
Before starting repairs, it is necessary to disconnect the machine from the electrical network. This will make the work process as safe as possible. In addition to disconnecting the unit from the power supply, you should unhook the cold water supply hose so as not to flood everything around.
How to remove the top of the hatch? First of all, you should remove the top of the device body. The cover can be fixed using various screws, which can be easily unscrewed with a Phillips screwdriver. The screws are located under the top of the panel on the back side. Once they are unscrewed, you can press lightly on part of the lid. You will need to press on the front side. Now you can lift the cover body up.
How to remove the detergent tray? The Candy washing machine has a dispenser that is easy to remove. In order to properly remove the detergent tray, you will need to find a separate plastic button by feeling. Typically the element is located in the central part of the tray. You should press the button and pull the container in your direction.
How to dismantle the control panel? The control panel is secured to the washing machine with two screws. The first screw is located under the powder dispenser. The second screw is located on the opposite side. The control panel will need to be handled with extreme care as it is very fragile. As soon as it is removed from the device, you must immediately hang it on a hook or put it away so as not to accidentally damage fragile elements.
How to remove the service panel? To dismantle the service panel, you will need to simultaneously press two locking latches, and then press the third one located in the middle. How to remove the front wall? You must first remove the metal clamp that holds the hatch cuff. The cuff is installed in the loading hatch. The metal clamp is secured with a small spring. You can push it slightly and the clamp will be removed. Now you can push the cuff inside the drum.
The hatch door may interfere with the removal of the front wall, so it would be a good idea to unscrew it. It is tightened with several bolts. After this, you will need to remove the front panel of the device. We unclip the latches that hold the protective cover. If you lift the panel a little, you can easily remove the additional hooks that hold it in place. Inside the control panel there are microcircuits that can be disassembled individually, if necessary.
How to remove the back cover. It is necessary to unscrew the screws using a screwdriver. Typically, screws are placed around the entire perimeter of the back wall to securely fix the elements.
Stuck during washing
If the simplest reasons for stopping work have been verified, then it is necessary to move on to a serious analysis of the performance of the nodes. In order to narrow the scope of work, it is necessary to determine at what stage of the wash the freeze occurred.
Doesn't take up water
If the washing machine cannot fill with water, the program stops and the wash does not even start. In this case, the freeze appears right at the beginning of a given work cycle. To determine the exact reason for the LG stopping, you need to check all the systems that are involved in collecting water one by one.
The heating element burned out
A malfunction of the heating element in LG leads to a stop in operation.
In this case, the electronic unit sends a signal about the need to heat the water, but the heating element cannot carry out this work. As a result, the machine fills with water and the cycle stops.
You can make sure that the reason is in the heating element by carefully testing the temperature of the sunroof glass. If it's cold, then it's the heating element.
This hang-up can be solved by replacing the heating element. This article will tell you how to replace the heating element.
Damage to the water level sensor
The pressure switch is another important component, if it fails, washing may not even start. This part is responsible for determining the water level. If the pressure switch breaks, it is replaced with a new one.
Motor brush wear
In LG commutator-type machines, the motor brushes are responsible for transmitting rotational motion to the drum. If there is significant wear, contact is lost and the drum cannot accelerate to the desired spin speed. Over time, the problem even extends to washing - the drum completely stops rotating. The issue is resolved by replacing the brushes with new ones. Read how to do this here.
Drum jamming
If a foreign object gets between the tank and the drum, the rotation may stop. If the drum is jammed, the LG washing machine freezes.
Jamming can be caused either by the ingress of small objects (coin, key, etc.) or by distortion of the drum due to failed bearings. Since the drum cannot turn, the laundry processing process stops.
Diagnostics is necessary to accurately determine the cause of the rotation stop. If it turns out that the problem is a foreign object, it will need to be removed. If there is a problem with the bearings, they are replaced along with the seal. Read how to change bearings here.
Drain violation
During washing, the LG machine fills and drains water several times per cycle. If water cannot be removed, the program execution process stops.
If such a malfunction occurs during washing, soapy water remains in the drum. It is impossible to immediately give a conclusion as to the reason for the lack of drainage in LG - diagnostics and checking of all components is necessary.
This can be either an easily removable blockage or serious damage, for example, to a pump or control unit.
Control module malfunction
If the LG control module breaks down, freezing can occur at almost any stage of processing items, including the washing stage. To analyze the performance of the circuit, it is necessary to partially disassemble the washing machine itself, disconnect the board, and test and repair it in a workshop.
The engine has become unusable
An LG engine can become unusable for various reasons - from voltage surges to water getting on it, long-term use and physical wear. If this particular part is to blame for the freezing, in most cases it has to be replaced with a new one rather than repaired. You can find out how to do this here.
Checking the tachometer and engine
Unfortunately, the attached instructions do not include a detailed description of error E08. It only contains information that it occurs when the motor tachogenerator breaks or when it shorts out. It can also occur when the engine fails, and less often when the control module breaks down. Based on the information provided, first of all you should check the functionality of the following parts:
- motor;
- tachometer;
- control module.
Verification requires compliance with a certain algorithm. At the first stage, the motor with the tachogenerator is removed, and then the following steps follow:
- disconnecting the machine from power;
- removing screws from the rear panel;
- dismantling the panel itself;
- removing the drive belt while simultaneously pulling it towards yourself and turning the pulley.
Then you should remove the engine. To do this, it is recommended to put marks on the wires coming from the motor in order to prevent difficulties during connection. Then we unscrew the bolts that hold the engine and remove the latter from the housing. Now we inspect the Hall sensor in the machine: strong vibrations could lead to loosening of the fastening or loosening of the contacts. In such a situation, you only need to tighten the mounting bolts and restore the connections.
If this is not the problem, you will need to check the resistance of the tachometer. There are two methods for this.
- Setting the tester to resistance determination mode. It is necessary to release the wire connectors and remove them from the sensor contacts. Then the probes are adjusted to the contacts to check the resistance. The normal range is considered to be from 60 to 70 ohms.
- Switching the tester to voltage detection mode to understand whether current is being generated or not. To check, probes are applied to the sensor contacts while the engine is cranked. If the values change (approximately 0.2 Volts), then the part is in working condition.
It is imperative to check the wiring for integrity, because Often it is this that leads to breakdown of the tachogenerator. And if the part is in a faulty condition, it will need to be repaired or completely replaced.
If the breakdown has not yet been identified, you should start checking the motor. At the starting stage, we check the brushes, and if it turns out that they are worn out, we replace them.
So, using a multimeter, we check the wiring supplying the tachometer and the motor for breakdown. If no breaks are found, you will need to check the rotor and stator resistance. Then we check whether there is a current leakage to the housing, followed by testing the turn-to-turn short circuit in the winding. A breakdown means that the engine cannot be repaired due to the high cost of repairs, and the best option would be to install a new engine.
Cause and troubleshooting
In rare cases, the issuance of a fault code is associated with a voltage drop or an accidental combination of circumstances.
In this case, restarting the Candy machine will help correct the situation. To do this, turn it off (pull out the plug from the socket), wait a quarter of an hour and turn it on again.
If the cause was a random failure, the code will not appear again. Otherwise, it is necessary to proceed to diagnostics of the device when it is partially disassembled.
Thermal sensor
Depending on the condition under which the fault code appears, it is possible to determine what is broken in the equipment. If the error appears immediately when you turn on the machine, then the cause may be an open circuit.
When an error occurs, at first glance, without a system, at different stages, the sensor can penetrate the housing. Also, if the temperature sensor fails, it can transmit incorrect data to the control unit. The resistance value is measured with a multimeter. The solution to the problem is to replace the temperature sensor.
Analysis of the operation of the Candy thermal sensor - what it looks like and where it is located in the washing machine:
heating element
When the problem is with the heating element, the Candy washing machine stops working during the washing process after 10 to 20 minutes have passed from starting. However, there is no water heating. It is possible to verify this. When you put your hand on the glass of the hatch, it remains cold. But in some cases, E05 may appear at other stages of work.
In order to verify the condition of the heating element, the washing machine will have to be partially disassembled. Using a multimeter, the part is tested. If broken, replace it.
To access the part, remove the back cover from the Candy case. To remove the heating element from its seat, you need to act very carefully. The heating element itself “sits” very tightly. It is recommended to analyze the condition of the heating element and temperature sensor immediately, since they belong to the same unit.
You can see how to replace the heating element in the video:
Control block
If tracks or elements on the Candy control unit burn out, incorrect operation of not only the temperature sensor, but also other components may occur. The block is removed for inspection and further repairs. Almost always it can be restored, but in case of very serious damage the part is completely replaced.
Programmer
In Candy models with electromechanical control, a programmer known as the program selector may cause a malfunction. If it burns out, the part is replaced.
Wiring
Damage to the wiring in the circuit of elements that are responsible for heating water (heating element, control module, temperature sensor) can lead to the issuance of E05.
Frequent vibration during washing can cause a malfunction, which can cause loose contacts, as well as physical damage to the wires themselves, for example, as a result of rodent attacks.
To solve the problem, the Kandy washing machine is partially disassembled, the integrity of the wires and the quality of the contacts are checked. If necessary, they twist, replace the cable and carry out other required work.
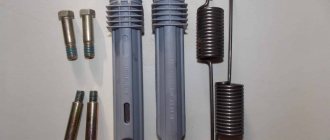
Damper and shock absorber - what is it?
You've probably noticed that at high speeds the washing machine starts to hum a lot and sometimes jump. It is to dampen these vibrations, the beating of the tank against the body, that shock-absorbing devices are installed. There are no particular differences between their types. The design is only slightly different.
Earlier models of washing machines used shock absorbers. These devices consist of a cylindrical body. Inside it is a piston, the movement of which is ensured by a return spring. The device also includes gaskets to reduce friction.
A modern washing machine damper is also located under the tub. Its only difference is the absence of springs in the body. Now they are brought upstairs and the tank is hung on them. Thanks to this difference, parts break much less often, because the springs can now be replaced separately.
The operation of the product is based on the resistance that the gasket creates during friction. Over time, this seal wears out, which leads to the need for replacement. Main signs of failure:
- Strong vibration during spin cycle.
- The machine cannot stand still and moves around the room.
- The tank hits the walls of the hull hard.
How to check if dampers are working properly?
It is not necessary to disassemble the equipment for diagnostics. Do this:
- Disconnect the SMA from the network.
- Unscrew the bolts securing the top cover. They are at the back.
- Remove the lid and press the tank down with your hands.
- Lower it and watch the movements. If it was difficult to lower the tank and it immediately jumped up and stopped, the parts are in good working order. If you easily lowered the tank, and then it quickly jumped up and began to swing, the shock absorbers need to be replaced or repaired.
To finally verify the breakdown and carry out work, you need to get to the parts. Therefore, how to remove and restore shock absorbers will depend on the brand and model of the SM.
DIY damper repair
In some models, it is enough to turn the washer on its side to gain access to the springs. How to do it correctly:
- After unplugging the machine, disconnect the inlet hose.
- Open the small door under the loading hatch.
- Place the container. Unscrew the filter plug counterclockwise.
- Wait for the water to drain.
Now you can turn the case on its side. If there is a bottom underneath, then unscrew the fasteners and remove it.
It’s more difficult if you have to dismantle the front wall to check:
- Remove the top cover.
- Remove the detergent drawer.
- Unscrew the screws around the perimeter of the control panel. Remove it and leave it hanging on the wires.
- Open the loading door.
- Pull the cuff, remove the clamp using a screwdriver.
- Thread the sealant into the drum.
- Unscrew the screws of the front wall and remove it from its place. Remove the UBL wires.
How to change and repair dampers?
The parts are located under the tank. Remove the spring fastening to the SMA body, and also unfasten the latch on top. Sometimes the elements are tightly fixed to the tank, so you have to drill out the plugs using a drill.
Home craftsmen offer a solution to the problem with gaskets. A leather belt is used for this.
- Remove the rod from the body.
- Take the belt. Its thickness should not exceed 3 mm.
- Estimate by eye how much material you will need to replace the seal. Measure and cut the desired piece of belt.
Push the new gasket all the way in. Install the plug on top, lubricate and insert the rod into place. How to lubricate the element? You can use machine oil or other lubricant. Watch the video for more details:
How to check when purchasing and replace a shock absorber?
When buying a new part, as well as when dismantling an old one, you need to compress the damper several times. If the compression is tight, then everything is in order. If it is easy, this indicates wear of the seals.
Now you know how to restore and repair shock absorbers in a washing machine. If you don’t want to bother with repairs, then buy a new set of spare parts and install them in the washing machine.
Source