Watching a potter make a piece on a potter's wheel is a magical experience. This article will tell you how to make a pottery wheel with your own hands and start creating things. If your goal as an artist is to create unique pieces, then this type of pottery wheel is perfect for you.
Just find a 360 degree rotating bucket, use a few items from around the house and you'll be ready in 10 minutes. The project is inexpensive and works as efficiently as any pottery wheel. With a little practice I can center, twist and turn this pottery wheel well. After correcting the vibrations, centering is now automatic thanks to the concentric circles on the potting tray.
The foot potter's wheel is inexpensive, lightweight, portable and takes up little space. What's great is that there's no soldering, no heavy machinery, and it works on your feet. The best part is that it doesn't require electricity.
Here's a quick compilation of all my videos after I learned how to throw mop buckets on a potter's wheel after 50 throws in 14 days.
Step-by-step instructions for making a circle with an electric drive
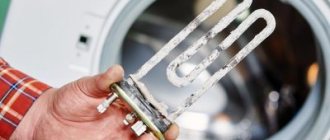
We will consider a simple manufacturing option from scrap materials. You will only have to find an electric motor from a washing machine or other household appliance and a bicycle wheel.
Choosing a motor for a pottery wheel
Step 1. Cut two corners approximately 50 cm long with a shelf width of 45 mm. Using a grinder, cut out recesses of 1 cm and 5 cm on the side edges.
Cutting blanks from corners
Step 2. Weld these corners together, you will get the upper platform of the supporting frame of the machine, and then all other elements will be mounted on it.
The workpieces are welded together
Step 3. Insert the axle shaft with the flange into the hole and place the ball bearing on top of it. Adjust the position of the parts, install them in a strictly vertical position and grab the bearing.
The axle is threaded through the hole, then the bearing is put on
Prices for popular models of welding machines
Welders
The loads on the potter's wheel assemblies are insignificant; there is no need to completely scald the bearing; it is enough to grab it in several places.
The bearing is spot welded, not circularly welded
Step 4. Make a hole in the axle shaft and insert a threaded rod. Then it must also be welded, ensuring complete alignment of the parts.
Insert the stud into the axle
Step 5. Place the bicycle wheel rim onto the axle and secure its position with a nut. Both front and rear wheels can be used.
The rim of a bicycle wheel is placed on top of the axle.
Step 6. Drill four holes at the other end of the welded corners to secure the electric motor. The distance between them and the diameter are selected depending on the parameters of the housing flange; each engine has its own characteristics. In our case, we used a motor from an old washing machine. It comes with a set of high-capacity capacitors, due to which it can operate from a single-phase home network.
Pre-made holes for engine mounting
Step 7. Cut the metal between the holes with a grinder and remove the strips. Thanks to this modification, it will be possible to regulate the tension force of the drive belt, it will not slip, and the wheel will rotate at the same speed.
Use a grinder to make cutouts for the drive belt
Step 8. At the bottom of the frame, fit any stops to secure the bearing race. Weld four vertical posts for the pottery wheel table around the perimeter of the frame.
Stops for mounting the bearing
Step 9. Cut a plate of suitable size from a piece of sheet iron. We use the door of an old refrigerator, cut a hole in it for the machine axle. The hole can be made with a grinder.
- Draw a circle in the right place. The diameter should allow the axle to rotate without problems.
- Use a grinder to cut several diameters in the circle; the more diameters there are, the better.
- Fold all the triangles up and cut off the vertical ends.
Making the frame cover
Place the sheet in place, drill holes in it and the frame and fasten with bolts. Now we need to make a circle for the master to work with. We also make it from sheet steel, only the thickness of the metal must be at least 2 mm.
Making the top circle
Step 1. Weld the metal to the axle flange, the connection must be strong, the safety of working on a pottery wheel depends on this.
A sheet of metal is welded to the axle flange
Step 2: Assemble the machine and turn on the motor. Use a grinder to mark a circle on the rotating metal. Stop the machine and cut off the excess metal.
While the plate is spinning, use a grinder to mark a cut line
Step 3. Turn on the machine again and remove all rust from the surface of the sheet iron. First, work with a grinder, then with emery cloth, remove burrs and sharp edges.
The metal is carefully polished
Prices for angle grinders (grinders)
Angle grinders (grinders)
If desired, the surface of the machine can be cleaned of old paint and rust and painted with durable paints for exterior use. But it is not necessary to do this; after a few days of work, the pottery wheel will become dirty with clay and the paint will be invisible. This is the working state of the machine, no need to pay attention.
Connecting the engine
First, we need to find out the identity of each wiring that is visible from the engine of our activator-type product. It is better to perform this action , guided by the correct electrical diagram, but if you do not have one, you need to work at random. We need to find the wires:
- the wires that control engine speed (if any) will go to the stator winding;
- two wires will go to the brushes.
Let's disconnect the supply wire and install a switch on it. Let's cut a groove for the switch in a comfortable place on the body. All wiring is completely insulated. If possible, you should put a rubber cambric on each wire or simply wrap each wire with tape . After this, we will mount and connect the device that regulates the engine speed.
We connect this device to the power supply and two wires that control the speed of the motor. After this, we will put the pulley in place, put on a special belt, insert and secure the shaft with the impeller. Then we will assemble the body and go through the groove with sealant so that water does not accidentally get into it and that’s it, now we have finished assembling the electric potter’s wheel.
Other photo ideas for flower pot design
Using the tips above, you can create a truly unique pot at home, as well as decorate and decorate it with your own hands.
What do you think people did when there were no computers, televisions, plants and factories, and in general, when there was no electricity. Maybe they sat on a bench and did nothing? But doing nothing is simply not interesting. They came up with various necessary things for the home and thought about how to make them with their own hands. There was always the question of what to cook in. And they figured out how to make a clay pot, jars, jugs of different sizes, and later flowerpots. The video will clearly show the process of clay modeling by children in a creative workshop.
When there was no electricity, people were engaged in various crafts: they carved wood, worked in forges and blacksmiths forged various objects from metal, women weaved threads and fabrics, embroidered, people engaged in pottery and created beautiful clay jugs, pots in which they prepared beautiful healthy and natural food from quality products.
Nowadays, many different creative circles exist in our time. And more and more often there is a desire to try to plunge into the world of crafts. Pottery skills and modeling of clay dishes also attract people. Moreover, it is very good to cook in ceramic dishes.
It should also be noted that the property of earthenware, pots, jugs and jars is the ability to retain odors. It is for this reason that it is advisable to have a separate pot or jug for each type of product: for meat dishes, dairy dishes, cereals and potatoes. So that odors are not transmitted.
Modern technology for processing clay pots allows you to cook in a modern oven. To do this, it is better, of course, to use ready-made clay pots and other ceramic dishes, such as this one https://kuzaranda.ru. Glazed ceramic pots with a lid are very convenient and can be used to cook whatever you want, from roast to borscht.
There are also clay pots for storing vegetables. They do not cook in them, but they store fresh herbs, tomatoes, cucumbers and even mushrooms. Ceramic dishes are easy to clean and fit perfectly into a stylized interior.
How to make a potter's wheel | Do it yourself
One of the first pottery wheels originated in ancient Babylon, and its working platform was driven by the left hand. Over the course of time, pottery masters modernized this machine, making it a foot drive, freeing both hands to work with clay.
You will need
- lumber from wood species of varying hardness, carpentry tools, rolling bearings, metal brackets and an axle.
Instructions
1. First, reinforce an ordinary bench with additional horizontal bars, one of which will serve as a stand for your left leg. If there is no bench, make it taking into account increased strength from loosening and the use of the mentioned stand. Then you can begin manufacturing the machine design itself.
2. To make a flywheel or lower circle, assemble a sheet of tongue-and-groove boards (with grooves and protrusions for them). Secure them at the sides with wooden blocks and wedges. With the support of a nail, a pencil and a piece of cardboard, draw a circle as shown in the picture.
3. Attach the boards with temporary plywood fasteners. Use a jigsaw or a wood saw with a tight blade to cut out a circle. Nail it to the second canvas.
Along the upper circle, the one that will serve as both a sample and a guide, saw off the excess parts of the boards. It is also possible to make another 1-2 layers. Drill a center hole in the same place as the nail.
Another layer of plywood is needed to prevent moisture from getting between the boards.
4. Previously, the axle was made of wood. For longer service life of the machine, cut an iron rod with a diameter equal to the inner diameter of the rolling bearings and the required length, taking into account the thickness of the upper and lower circles, fasteners and bench height. Cut threads at both ends for the mounting nuts. In the upper circle you should make a recess for the washer and nut.
5. Before assembling the machine, soak all wooden parts of the structure 2-3 times with hot drying oil, allowing the entire layer to dry. Press the lower bearing into the recess in the central crossbar under the bench, and the upper bearing into the bench itself.
After this, you can begin assembling the potter’s wheel units. Place a sheet of rubber on the axle under the upper circle, having previously made a hole in it slightly smaller than the diameter of the axle, and coat the bench under it with glue.
This sheet will protect the bearings underneath from water and clay. Lubricate both bearings generously.
Tip 2: How to make a circle
A circle is a geometric figure that has a center and a radius. The radius of a circle is the distance from its center to any point on the circle, and the circle is its boundary.
You will need
- Compasses, ruler, sheet of paper, scissors.
Tip 3: How to make ceramics
Hand-sculpting ceramics is a good way to relax, get a great energy boost and feel like a creator of exclusive products. They will keep your hands warm and your desire to become a pottery master for a long time. This will require tools, the selection of which must be given due attention.
You will need
- - clay;
- - Potter's wheel;
- – stacks;
- - bake.
Potter's wheel from a drill
To make such a pottery wheel you will need the following tools and materials:
- Old drill
- Sewing machine pedal
- Plastic bucket
- Rotating round tray
- 10mm drill
- Self-tapping screws
- Wiring terminals
- Extension
- Silicone sealant
- Carriage bolt and nut
How to make a pottery wheel with your own hands
- A hole is drilled in the bottom of the plastic bucket with a 10 mm drill. This is quite easy since most of these buckets have a raised mark. At the bottom of the container you also need to drill a hole with a diameter of 15 millimeters for the wires to exit.
- At the next stage, check the coincidence of current and voltage in the drill and in the pedal from the sewing machine. This data may be indicated on product tags. This is very important, because if the initial parameters do not match, the pedal will overheat and even smoke.
- It is also necessary to remake the pedal plug from the sewing machine. Its two central wires are marked with electrical tape in order to connect later.
- Cut the plug from the pedal wire and pull the wires through the hole drilled in the side of the bucket.
- Now the two marked wires are twisted together and secured with a wiring terminal.
- For safety during operation, the wire connection is treated with silicone sealant. The remaining two wires are connected to the extension socket (it must be waterproof).
- Since the wires will be located inside the container, where moisture may enter while working with clay, additional precautions are required: grounding connections and careful insulation of all connections.
- To check the operation of the device, the pedal is connected to an outlet, and the drill wire is inserted into a new plug. Then you need to press the power button of the drill and press the pedal. If it does not work, then disconnect all wires and check the correct connections and contacts.
- Next, they begin to make a rotating circle, for which they use a purchased plastic tray. If there is a raised center mark in the center of the tray, this will make drilling the hole easier. You can also determine the center of the circle by the rod at the bottom. Drill a hole using a drill and a drill of a suitable diameter.
- A carriage bolt is inserted into the hole so that its head is located on top of the surface of the tray.
- On the back side of the cover, the gap between the surface and the bolt shaft is filled with silicone sealant.
- Screw a 6mm hook onto the bolt shaft and tighten it so that the head of the bolt is recessed into the hole in the cover.
- To prevent the nut from loosening, you can slightly deform it and tighten another identical nut on top. For additional reliability of the connection, you can treat it with silicone sealant.
- Now you can start assembling. At this stage, the drill, which will act as a rotating drive, must be installed vertically in a plastic bucket and at the desired angle to the bottom. You can use a mounting bracket for this.
- To align the drill and the hole drilled at the first stage, use a wedge made of a wooden block measuring 50x100 mm
- bracket, which greatly simplified installation. To achieve alignment of the tool with the 6 mm hole that I drilled at the beginning of the work, I used a wedge made from a wooden beam with a cross-section of 50 * 100 mm and several self-tapping screws.
- Silicone sealant is applied to the bottom of the tray and placed on top of the bucket so that the fixed bolt fits into the drill chuck, which is then tightened.
- The drill is connected to the plug from the pedal. The drill power button (or trigger) is pressed all the way and fixed in this position to turn the device on and off only with the pedal.
- After assembling and checking all the connections of the resulting homemade circle, it can be tested in operation. You also need to check its tightness: to do this, wait until the silicone dries, disconnect the device from the power supply and spray it with water to detect leaks. If water gets inside, all cracks must be sealed again with silicone.
If all stages of work are carried out correctly and elements are selected, this homemade circle can work reliably and for a long time. This principle of operation is also suitable for homemade pottery wheels with other devices as a rotating drive.
- If during long work it is noticeable that the drill is overheating, then you can place several wooden blocks under the plastic bucket for cooling and better air circulation.
- In the pedal of a sewing machine, you can make a speed limiter in the form of a thin stick - it is placed under the lid. This must be done in order to avoid too high a speed of rotation of the wheel, because this can cause the pots to turn out uneven, and the clay will fly off while the wheel is rotating.
- If you have to work often and for a long time, then it is better to use a more powerful drill. For example, if there is a large amount of clay, a low-power drill may not be able to cope with the load.
Evaluate the manufacturing method:
( 4 3.25 out of 5) Loading... Pin-up registration. Do you need more money? January 2, 2021 ( 0 0.00 out of 5, you have already rated it )
Santa's Riches Greentube-Novomatic is going from strength to strength this year with its new Christmas-themed online slot, Santa's Riches. Although the starting point of 5 x 3 may...
gox bet is a modern online casino January 1, 2021 ( 0 0.00 out of 5, you have already rated it )
Ah, Christmas time. 'Tis the season for cookies, candy, and stockings hanging neatly by the chimney. And wild symbols, multipliers and cluster pay. Yes, it's time to look at new ones...
AIR - slots in which you can get a bonus January 1, 2021 ( 0 0.00 out of 5, you have already rated it )
Big Bass Bonanza is not a slot I usually gravitate towards. This is a ten payline slot with no base game modifiers. Another online slot AIR slots in which...
Slot machines Gaminator January 1, 2022 ( 0 0.00 out of 5, you have already rated it )
Let me set the stage so you get the point. There is a counter on the reels with a picture of each game symbol. Its purpose is to track multipliers, and that's...
Review of the website of the bookmaker MarathonBet December 31, 2020 ( 0 0.00 out of 5, you have already rated it )
Distributing points is almost as easy as betting on winnings. Let's say two football teams meet on Sunday. One of them won every...
December 26, 2022 ( 0 0.00 out of 5, you have already rated it )
Variety of games This post is about payments, speed and convenience, but let's not forget that gambling at Riobet Casino Ukraine for real money is…
Vulcan Original - 100% quality December 25, 2020 ( 0 0.00 out of 5, you have already rated it )
Best Payment Methods for Instant Casino Payouts There are two types of payment methods that can be used for instant withdrawals at…
December 25, 2022 ( 0 0.00 out of 5, you have already rated it )
Leveling Up to Big Wins Cosmolot allows you to bet from 0.20 to 100.00 and contributes to a maximum win per spin of X1,100 depending on your…
December 25, 2022 ( 0 0.00 out of 5, you have already rated it )
Two latecomers to the Christmas party, a prince, an empress and valuable potions make up the list of the best new online slot releases for mid-December 2020...
How to find a good household chemicals store December 24, 2020 ( 0 0.00 out of 5, you have already rated it )
Situations when you need to walk through shopping centers with heavy bags, buying a good cleaning product, are already a thing of the past. Current Internet sites will help you purchase...
Elslots: play slot machines December 15, 2020 ( 0 0.00 out of 5, you have already rated )
Many online licensing authorities are sketchy at best. Since most online casinos https://Dumskaya.net/sloti/ and gambling sites are located in...
How does a potter's wheel work?
Historically, this device was driven in several ways:
- Initially, the pottery machine was rotated by the master working on it. He did this by regularly pressing the pedal with his foot. This organization of work was inconvenient, because the potter had to simultaneously perform two actions and was deprived of the opportunity to fully concentrate on the work.
- Gradually, devices that were designed to operate on electric traction came into use. In this case, the speed of the machine is maintained automatically, and the master has the opportunity to fully concentrate on creating pottery.
What to cook
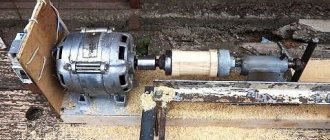
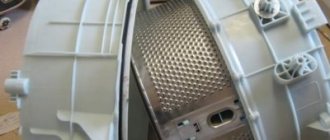
To make a pottery wheel with your own hands, you will need an old washing machine, the components from which can be used to create a pottery wheel.
It is important that the washing machine used is of the activator type (for example, the Malyutka washing machine). In this case, the axis of rotation of the motor will be directed vertically.
The pottery wheel that will be installed will rotate while in a horizontal position.
In addition, you will need the following materials:
- A piece of plywood of the required size that is resistant to moisture.
- The simplest board with a microcircuit that will make it possible to switch the rotation speed of a pottery wheel.
- It is necessary to prepare varnish and paint that are resistant to moisture.
- White Spirit.
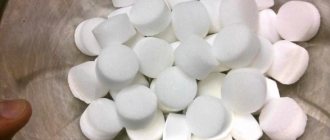
- Wheel of the required size for the design.
- A plastic medicine bottle is required.
- Electric switch.
- A roll of insulating tape.
- To seal against leaks you will need silicone sealant.
- In order to solder, you will need tin and rosin.
- In order to connect the parts, you will need screws with nuts and self-tapping screws.
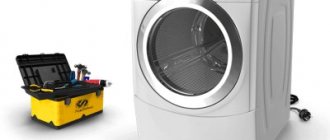
To carry out the work you need to stock up on the following tools:
- soldering iron;
- multimeter;
- a hacksaw with small teeth;
- well sharpened knife;
- felt-tip pen for making marks;
- keys and screwdrivers of different sizes;
- pliers;
- ruler.
Carrying out work
First, it is necessary to partially disassemble the washing machine in order to clarify the location of its main components. To free the shaft, you need to disconnect the pulley and drive shaft.
Some of the units that were used here will not be needed to operate the potter's wheel. An example here is, for example, the timer on the Indesit washing machine.
Under the washing tub in some machine models there is a plastic disk that protects the motor from getting ingress. It also needs to be removed.
When making a potter's wheel, it must be taken into account that, although there is a motor along with a drive mechanism, there is nevertheless no base on which the potter's wheel will later be attached in the machine.
This part should consist of a small section of pipe and a small disk perpendicular to it with holes for attaching a circle.
The easiest way to get the part you need is to order it to be made by a professional turner. However, if you have the necessary equipment and the appropriate skills, you can make a unit for the machine yourself.
The already made part is cleaned of dirt and rust, and then primed and painted with waterproof paint. After this, it is put aside.
Now you will need to cut a circle of the required size for the machine from thick, moisture-resistant plywood. It must be treated with white spirit and then coated with waterproof varnish. It will be better if this wooden part is pre-impregnated.
The composition for it can be prepared by making a mixture of white spirit and this varnish. Double processing will make the wooden disk more protected from moisture and dirt.
It is necessary to drill holes in the disk that correspond to those that were on the previously manufactured part.
Now you need to attach these parts to each other using self-tapping screws.
The next step is to protect the shaft and motor of the machine from moisture and dirt. To do this, you need to use a plastic medicine bottle prepared in advance. Its upper part is cut off and put on the shaft. Using a nut, the plastic protection is securely fastened.
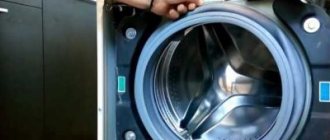
Next, you need to prepare the tank and body of the washing machine. In the future, most of them will not be needed for the machine. You need to cut the tank and body so that the lower part remains along with low sides.
When making the rotating part in this machine, two parts were used. However, it is permissible to make this unit in the form of one part, making a circle from PCB.
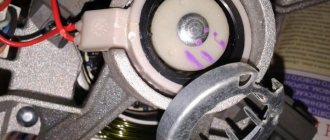
Motor connection
Before you start connecting directly, you need to figure out which wires come from the motor. If you have documentation for the washing machine, this will not be difficult.
However, if we are talking about an old Fey washing machine, the usual situation is when no circuit diagrams can be found.
In this case, you need to remember that the following types of wires come from the motor:
- Those that are connected to the brushes.
- Connected to the stator winding.
- Perhaps the design of the engine provides that there are those that provide regulation of the rotation speed.
The purpose of the wires can be determined experimentally.
It is necessary to install a switch for the machine on the wire through which electrical energy is supplied to operate the motor.
All protruding wires must be securely wrapped with electrical tape. If rubber casings are available, they can be placed on the free ends of the wires.
Now you need to mount and connect the board that controls the rotation speed of the machine’s motor. You don’t have to do it yourself, but you can order it in a workshop or buy it in a specialized store. It needs to be connected to a power supply wire and two wires that control the rotation of the motor.
Now you need to reinstall the pulley and drive belt. Next, you need to connect the shaft to the working pottery wheel.
After the machine is assembled, the grooves through which water can leak into the motor are sealed with silicone sealant.
Now the pottery wheel is ready for use.
How to work with a pottery wheel correctly
Adjusting the motor rotation speed is important because the normal rotation speed is incompatible with working on a pottery wheel. In the latter case, the rotation should be significantly slower.
Conclusion
Using a washing machine, you can assemble a pottery wheel yourself according to the existing pattern without special technical skills. At the same time, the quality will be similar to expensive purchased machines.
In addition, from a used washing machine you can also construct:
- lawnmower,
- grass cutter,
- electric bike,
- honey extractor,
- router,
- irrigation pump,
- wood splitter,
- concrete mixer,
- lathe,
- juicer,
- circular
- and much more.
DIY pottery wheel
Pottery making has become very popular lately, especially among children. This is not only interesting, but also develops hand motor skills, coordination, attentiveness and determination. In addition, it will be very important for the child to see the final result of his work.
To practice pottery, you need equipment that you simply cannot do without. When making clay products, you definitely need a furnace to fire them. Unfired clay will not gain normal strength and will simply crack. Another indispensable attribute of a potter is a potter's wheel.
Without it, it is impossible to make smooth cylindrical parts.
There is no point in buying a pottery wheel for your child's activities. Firstly, it is far from a fact that a young hobby will not disappear in a few weeks, and a rather expensive unit will simply take up space in the garage.
Secondly, pottery wheels are not very cheap, especially electric driven models. A way out of this situation may be to rent a pottery wheel or make it yourself.
Learn how to make a pottery wheel with your own hands later in the article.
Types of pottery wheels
The construction of the potter's wheel, according to historians, is several thousand years old. During this time, she practically did not change. It is a solid wheel made of solid material (it can be wood, stone or steel), on which a clay workpiece rotates at a given frequency. When rotating, it is processed manually or using a special tool.
Pottery wheels are distinguished by the type of drive, thanks to which the workpiece rotates. They can be:
- Foot. The simplest design of a potter's wheel, which has been used for many hundreds of years. It is a shaft on which drive and working circles were mounted from different ends. The rotation of the drive wheel was given by the potter himself, pushing it clockwise with his feet. This design is not very convenient, as it requires significant effort during operation. Making a pottery wheel with your own hands is very simple, which is its main advantage.
- Mechanical. Such a circle was developed by the famous English potter Bernard Leach. Lich's design turned out to be quite successful, so industrial production of such circles began in the middle of the last century. The principle of operation of such a circle is based on the transformation of the reciprocating motion of the pedal into the rotational movement of the circle shaft due to the crank mechanism. This was much more convenient; it became possible to more accurately regulate the rotation of the wheel, which is very important when processing materials with different properties.
- Electrical. With the advent of electric drives, the mechanization of pottery wheels took a step forward. Thanks to such machines, the potter no longer needs to exert force to rotate the part, but can directly concentrate on processing it. Precise adjustment of the rotation speed of the part has also become possible. In addition, the dimensions of the machine have become much smaller.
Electric pottery wheel design
The design of an electric pottery wheel is quite simple and its installation is not particularly difficult. To bring the project to life, skills in handling electrical devices, installing electrical equipment, and welding are required. If you have all this, you can get to work.
The design of the circle consists of several main components:
- Bed. Welded metal structure onto which all machine components are attached.
- Electric drive. Low power electric motor for rotating the shaft.
- Driver and driven pulleys. Designed to transmit torque from an electric motor to a potter's wheel. The pulleys are connected using a V-belt.
- Circle. A steel disk of the required diameter on which the workpiece is directly processed.
- Electrical equipment. Frequency converter, power regulator, circuit breaker.
- Drive shaft with hub and bearings. Serves to transmit torque from the driven pulley to the wheel itself.
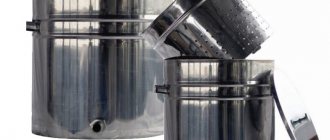
- Production bowl. Designed to protect the room from dirt during clay processing. Under the influence of centrifugal force from the rotation of the circle itself, poorly secured pieces of material can simply fly apart. To prevent this from happening, the circle is placed in a production bowl, most often made of plastic.
Preparing materials, tools and spare parts for a pottery wheel with your own hands
Before starting work, it is best to make a drawing of a pottery wheel with your own hands. This will help determine the required amount of materials and outline the sequence of work. To build a simple electric pottery wheel with your own hands you will need:
- Profile pipe measuring 80x40 mm. Designed for the manufacture of a bed frame. To install the engine mount structure, a pipe of smaller cross-section is used.
- Engine. The engine must be low-power (no more than 500 W) with a maximum speed of up to 1500 rpm. If you have a working but unused washing machine, the drive mechanism can be taken from it.
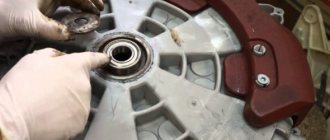
- Pulleys. The drive and driven pulleys for the belt can be taken from the same washing machine. In some cases, if a different engine is used, a pulley for the belt can be machined directly on the rotor shaft. The driven pulley must be of a larger diameter.
- Potter's wheel. It is made from sheet steel up to 10 mm thick, preferably stainless steel. It is cut and processed on a lathe. The faceplate must match the diameter of the drive shaft.
- A shaft and bearings are used to connect the driven pulley and the potter's wheel. The most suitable bearing is the wheel bearing from the Zhiguli nine. Its advantage is that when crimping the clip it centers itself. To install it, you need to grind out the glass and weld it into the frame crossbar.
- Shaft. The shaft is machined to the size of the pulley.
Tools for assembly you will need:
- Welding machine with a set of electrodes.
- Grinder with a set of circles for cutting metal and cleaning welds.
- Drill for drilling holes.
Making a pottery wheel with your own hands
Work order:
- The first step is to weld the metal structure of the pottery wheel frame. It is a rectangular frame made of a profile pipe with welded legs. It is better to connect pipes at an angle of 45°. To do this, the ends of the pipe are trimmed with a grinder.
- Closer to one of the edges, a crossbar from the same pipe is welded into the middle of the frame, only with its larger surface facing up. It will serve as the basis for installing the shaft and faceplate.
- After this, a supporting structure is welded at the engine installation location. It consists of a transverse pipe, which is welded to opposite frame pipes, and two longitudinal ones, which are welded perpendicular to the transverse one.
- Guides and skids are installed on the longitudinal pipes. The engine frame is attached to them. The skids are needed to change the distance from the engine to the driven pulley, thereby increasing or decreasing the tension of the V-belt.
- The engine base of a homemade pottery wheel, made with your own hands, is a sheet of metal, in the middle of which a hole is drilled for the shaft and mounting bolts. It is better to do this on a radial drilling machine. Drilling a hole for the shaft with a hand drill will be problematic.
- The engine is secured with mounting bolts. The slides are made of steel, with milled grooves and welded to the supporting structure. Now the engine can “walk” back and forth, changing the belt tension.
- The next step is to weld a cup for installing the shaft bearings, after which all the mechanics are assembled: the shaft and drive pulley are installed. Be sure to check the alignment of the engine pulleys and drive shaft. Their centers must be on the same axis, and the pulleys themselves must be in the same horizontal plane. Otherwise, the belt will become distorted, which will lead to rapid wear.
- Next, a protective casing is installed on the machine frame. For the latter, you can use any plastic container (large dish or bowl). Holes are drilled in it for the mounting bolts and one hole for the shaft on which the pottery wheel (faceplate) will be attached. After this, it is installed in place.
- The last step in assembling the mechanical part of the potter's wheel is installing the faceplate.
- After the mechanical part of the potter's wheel is assembled, you can proceed to the electrical part. It consists of several parts:
- a frequency converter;
- switch (regular light switch);
- adjustable resistance.
The motor is directly connected to the frequency converter. One of the suitable models of the latter is the Vesper-8100. It allows you to adjust the engine speed from zero to 1500 rpm. At the same time, engine power does not decrease.
A variable resistance (rheostat) is connected to the frequency converter, which allows the user to change the number of revolutions. The rheostat is connected to the converter according to the diagram indicated on the device itself or in its operating manual.
Switching on the voltage in the network is carried out by a conventional switch, which breaks the alternating current phase. Instead of the latter, it is better to install a 10A circuit breaker, which will serve as additional network protection.
How to make a pottery wheel with your own hands: video
What to cook
To make a pottery wheel with your own hands, you will need an old washing machine, the components from which can be used to create a pottery wheel. It is important that the washing machine used is of the activator type (for example, the Malyutka washing machine). In this case, the axis of rotation of the motor will be directed vertically. The pottery wheel that will be installed will rotate while in a horizontal position.
In addition, you will need the following materials:
- A piece of plywood of the required size that is resistant to moisture.
- The simplest board with a microcircuit that will make it possible to switch the rotation speed of a pottery wheel.
- It is necessary to prepare varnish and paint that are resistant to moisture.
- White Spirit.
- Wheel of the required size for the design.
- A plastic medicine bottle is required.
- Electric switch.
- A roll of insulating tape.
- To seal against leaks you will need silicone sealant.
- In order to solder, you will need tin and rosin.
- In order to connect the parts, you will need screws with nuts and self-tapping screws.
To carry out the work you need to stock up on the following tools:
- soldering iron;
- multimeter;
- a hacksaw with small teeth;
- well sharpened knife;
- felt-tip pen for making marks;
- keys and screwdrivers of different sizes;
- pliers;
- ruler.
When all of the above has been collected, you can begin making a potter's wheel.
Clay - modeling and treatment
Many people would love to devote themselves to creativity with a material such as clay, but the first thing that stops everyone is the price of a pottery wheel.
So, on average, for the specified unit you will have to pay from $500, if we talk about domestically produced models. As for foreign companies, you need to be prepared to pay $1,300 or more for a product. The question arises, what to do in this case, abandon this idea? The answer is simple: you can make a pottery wheel with your own hands. Naturally, you will need to make an effort. There is no need to expect a high-end model, but for beginners the end result is quite suitable.