The design features of the tray in the Indesit brand automatic machine cause difficulties when trying to remove it from the installation socket, which sometimes leads to breakage of the cuvette.
Even after carefully reading the instructions and repeated attempts to follow the recommendations outlined in it, all actions end in failure.
How to remove the powder tray from the Indesit washing machine without damaging the device? Below is a detailed description of simple manipulations with which the tray can be removed without difficulty.
A note for Indesit washing machine owners
Sometimes the use of simple tips prevents the negative effects of substances that are aggressive towards household appliances, and following some of them returns household items to their original properties:
- A little trick to make it easy to get the tray out: to make it easier to remove the tray from the Indesit machine, grind off the limiting protrusions by literally 1 mm with sandpaper or a file. In the future, the tray will be pulled out without problems.
- Don’t be lazy to regularly remove and clean the tray from the Indesit automatic machine. After all, the accumulation of plaque, mold and bacteria during the washing process enters the drum with water and remains on the items being processed!
- After using bleach, you should turn on the dry wash cycle. This will help prevent the aggressive effect of the bleach remaining on the walls of the container and the entire washing system on colored items during subsequent loads.
Detailed operating instructions for Indesit washing machines are presented in this section.
Combined cleaning
Is water not getting into the compartment? The cuvette is completely clogged. Cleaning with chemicals will not work. Mixed cleaning will help. It goes like this:
- Pull out the device and soak it in a basin in water for 5 minutes (water temperature - at least 60 degrees).
- Add or pour chemical into the water and mix well.
- Let the dispenser sit in the solution for several hours.
- Remove the container and scrub vigorously with a brush.
- Rinse, dry and reinstall.
To reduce dirt
In addition to timely care, there are a few more tips for maintaining your Samsung automatic machine in perfect condition. To keep the powder tray less dirty, you should:
- install a filter to purify the water entering the washing machine;
- use only high-quality and safe laundry detergents;
- leave the machine hatch open for ventilation after each use of the machine.
By following these simple rules, it is not difficult to keep your “home assistant” clean. When caring for SMA, you will enjoy high quality washing and uninterrupted operation of the equipment for a long time.
Interesting:
- Rating of Samsung washing machines
- Reviews of Samsung washing machines
- What to do if mold appears in the washing machine?
- How to remove the powder tray from a Beko washing machine?
- Cleaning a Samsung washing machine from dirt
- How often should you clean your washing machine?
Reader comments
- Share your opinion - leave a comment
How to clean powder from a washing machine: chemicals to help
We figured out how to wash powder in a tray with light dirt. It may happen that mechanical cleaning was unsuccessful. Contaminants in the form of old detergent, plaque, and mucus remain in the compartment.
What to do in this case? How to dissolve hardened laundry detergent and stubborn dirt? There is only one way out - use the right chemistry. With its help, you can tidy up the dispenser, as well as the insides of the washing machine. Great, because other parts also need cleaning.
Follow the instructions:
- Open the detergent compartment and add the amount of chemical recommended by the manufacturer. Do not exceed the norm so that the parts do not break.
- Remove things from the drum and turn the SMA to “idle” at a maximum temperature of 90–95 degrees.
- Restart the rinse cycle.
Cleaning the tray and machine is finished!
This method has its drawbacks. The main one is that it does not allow you to remove old dirt and completely clean a very dirty compartment.
How can I prevent plaque or mold from forming?
The best way to maintain the original appearance of the detergent tray is regular maintenance. To make this process easy and enjoyable, after each wash you should thoroughly rinse off the remaining powder and wipe the tray dry. As a last resort, you can leave the container open so that all the moisture from it evaporates and there are no conditions for the appearance and proliferation of mold.
Important! To increase the service life of your household appliances, it is very important to follow some recommendations while using them. Check out the basic rules for using an automatic washing machine on our website.
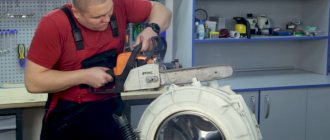
Preparation
Before you begin any repairs, you need to make sure you have the necessary tools. You may need:
- a set of flat and Phillips screwdrivers;
- socket and open-end wrenches;
- set of heads and knobs;
- hammer;
- multimeter;
- bit;
- hacksaw for metal;
- pliers;
- WD-40 product;
- awl.
In order to disassemble a washing machine, you may need a variety of tools.
Please note that the presented list of tools and tools is as wide as possible and allows you to perform any repair. In some cases, you can get by with a much smaller set.
You must understand that troubleshooting can take more than one day, and the removed parts will take up a lot of space. Therefore, if possible, move the unit to a garage, shed or any other utility room, where it will not be in the way, and spare parts can be neatly laid out.
Before disassembling the automatic machine, find the warranty card and make sure that the warranty period has expired. Remember that the manufacturer is not responsible for equipment that was repaired at home, so if the warranty is still in force, contact a specialized service center.
If there is no free space, organize the work on site: prepare a section of the floor at least 2 x 2 m in size, removing carpets, furniture and covering it with film or old newspapers. Disconnect the washing machine from all communications and carefully disconnect the hoses.
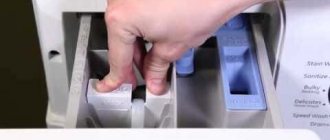
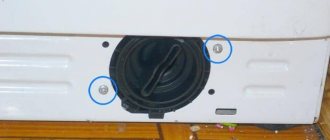
It is imperative to drain the remaining water from the tank so that during disassembly it does not get on other parts. To do this, place a dry cloth under the machine, unscrew the drain filter and wait until all the water drains from the hole. Also remove the detergent tray (usually to do this you need to press the latch located in the middle and at the same time pull the part towards you) and set it and the filter aside.
In order to disassemble a washing machine, certain skills are required. If you are not confident in your own abilities, it is better to entrust the work to professionals.
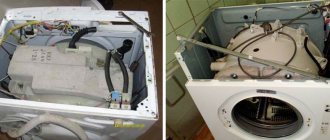
So, the Indesit washing machine is ready for disassembly, what should you do first?
Simplify tray removal process
After you have managed to remove the powder container from the washing machine for the first time and remove dirt from it, there is no need to rush to put the container back in place. This is explained by the fact that the secondary procedure for removing the container from the machine may also be accompanied by problems due to the same teeth.
That is why professional craftsmen recommend stocking up on sandpaper or a needle file and slightly sharpening the interfering teeth. There is no need to apply a lot of force; it will be enough to cut off approximately 1 mm.
Thanks to these actions, the container will be easier to remove and it will not jump out on its own if you pull it a little harder.
Preventive measures
The service life of household appliances directly depends on their care. Therefore, for preventive purposes, it is recommended to follow simple but important rules:
- Systematically clean the internal and external surfaces of the detergent dispenser - after 1 - 2 washes.
- Remove dirt not only from the tray, but also from its nest.
- Once a month, wash the entire system of tubes through which detergents enter the drum with citric acid powder, using the method described above.
Ignoring preventive measures is the reason for the appearance of plaque on the tray and, as a result, poor quality washing.
If there are few embryos, do they need to be grown until 5 days?
At the initial stages of development of in vitro fertilization (IVF), embryos were transferred into the uterine cavity on the 1st and 2nd days after the puncture. By now, science has stepped far forward and in the laboratory it is possible to create optimal conditions for cultivating embryos to the blastocyst stage (5th day of development). This has become routine practice due to the introduction of new equipment such as multi-gas incubators, as well as new embryo culture media.
Transferring embryos into the uterus at the blastocyst stage increases the chance of pregnancy compared to transferring embryos at earlier stages. Cultivating embryos for up to 5 days is a kind of selection, since not all embryos reach the blastocyst stage.
However, this method cannot be recommended for all patients. In patients with reduced ovarian reserve and severe male factor, there is a high risk of embryo transfer cancellation due to the fact that the embryos will not be able to reach the blastocyst stage when cultured in vitro. It should also be noted that no matter how much we try in the laboratory to create conditions for the embryo as close as possible to natural ones (in vivo), we will not be able to recreate them 100%. When cultivating in vitro, we only ensure optimal temperature conditions, the gas composition of the environment, and supply the embryo with nutrients. In the uterine cavity, among other things, embryos receive various growth factors and cellular signals from surrounding tissues. Based on the fact that in the uterine cavity embryos receive the most optimal conditions for their development, ART clinics practice transfer on both the 3rd and 5th days of embryo development.
Methods of cleansing
the removed detergent dispenser , removing deposits, powder residues and accumulated dirt. The plastic case can be easily washed using simple means - soda, table vinegar or citric acid.
Using Baking Soda
Sodium bicarbonate or sodium bicarbonate is a proven anti-pollution agent. Baking soda can also deal with deposits on plastic.
To cleanse you will need:
- mix soda and water in a 1:1 ratio;
- apply the composition to the cuvette;
- in 5 – 10 minutes. Wipe the sides of the tray with a dishwashing sponge.
This treatment will clean the removable part from adhering powder and mold.
Application of citric acid
The recipe for cleansing with citric acid is even simpler. The tray is wiped with a solution prepared from lemon juice (1 tbsp) and warm water (100 ml).
For this:
- Pour 1 – 2 sachets of citric acid into a cleaned cuvette previously inserted into the socket.
- Set the temperature to 50-60°.
- Turn on the wash (without loading laundry).
This method can be used for preventive purposes. In this case, you do not have to remove the tray from the machine.
In addition to treating the tray, citric acid can be used to clean the entire system that ensures the flow of detergents into the drum of the machine.
Cleaning with table vinegar
Plaque and traces of detergents are easily removed with a solution of vinegar diluted with warm water.
To carry out the procedure:
prepare a solution by mixing vinegar with water - 200 ml of vinegar per 1 liter of water;- place the tray in a spacious container;
- completely fill it with the resulting mixture;
- leave for 4 – 5 hours;
- then rinse the cuvette under running water.
Plaque and powder will come off the surface of the tray without any effort. In addition, the vinegar solution will destroy mold, mildew and pathogenic bacteria.
The installation socket must also be treated with a cleaning compound. It also accumulates plaque from detergents, mold and pathogens.
Why might you need to remove the box?
A clogged powder loading tray can cause the machine to not function properly.
There are several reasons for cuvette contamination:
- If the water pressure is low, the detergents are not fully used. Over time, they accumulate on the walls of the housing in the form of a sticky coating, which reduces their supply to the drum. This negatively affects the quality of the wash.
- Plaque on the walls of the cuvette also appears when using a rinse aid. The active components of the product are located in a special compartment of the tray from the beginning to the final stage of washing, as a result of which they stick to the walls of the container.
- The quality and type of media used also affects the condition of the unit for loading them. When using powder, plaque forms faster than when using liquid preparations.
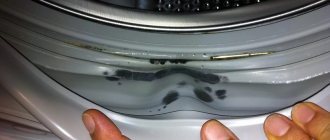
Without systematic cleaning of the cuvette, in addition to detergent residues, contaminants from the clothes and linen being treated accumulate on its surface.
This provokes the formation of mold and fungi, for which the presence of humidity and a comfortable temperature becomes a favorable environment for reproduction.
Good and excellent embryos - what's the difference? How does their quality affect the unborn child?
The better the quality of the embryos, the higher the chance of pregnancy. That is why embryos with the best morphological characteristics are selected for transfer into the uterine cavity.
However, sometimes it happens that the best embryos from the entire pool of embryos are those of average or low quality. Don't despair. Even in this case, pregnancy and the birth of a healthy child are possible. To date, no correlation has been established between the quality of the embryo and the health of the child.