The list of possible breakdowns of washing machines from a well-known South Korean manufacturer is not very extensive, but to correct the vast majority of them, complete or partial dismantling of the body parts will be required. To provide yourself with access to some components and assemblies, as well as to be able to completely disassemble the case, you need to remove the top cover of the Samsung washing machine. In most cases, this is quite simple, however, any repair of household appliances requires certain knowledge and skills.
Built-in Samsung models
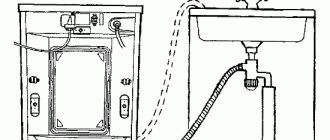
Household appliances built into a furniture set have a number of significant advantages, but you have to pay for it with difficulties in case of repairs. There cannot be a single instruction for removing a Samsung washing machine from a cabinet or cabinet; it all depends on the design of the furniture and the features of a particular model, but in general, you need to do the following:
- de-energize the device;
- close the tap that regulates the water supply;
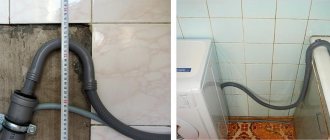
- remove the supply hose;
- disconnect the drain from the siphon.
You need to work with hoses with the utmost care; there is likely to be water left in the kinks, which can damage the flooring or furniture. Before dismantling begins, it is worth laying several rags on the floor and preparing a bucket. Next, carefully move the washing machine towards you, taking care not to scratch the varnished surface or damage the coating of the body.
Repair of front-loading devices
So, before starting dismantling, let's make the following preparations:
- Unplug the washing machine.
- Move the machine away from the wall, since the screws securing the top cover are located at the back and you need a margin of distance to unscrew them with a Phillips screwdriver.
- Pay attention to maintaining the integrity of the drain hoses and power cords.
Direct dismantling
When you pull out the washing machine, you will most often see two, and in some models, three self-tapping screws on the back that hold the lid. Unscrew them completely and remember that there are plastic washers under them that you need not to lose.
Place the screws and washers separately in some containers. Then apply force and slide the top cover back so that it comes out of the grooves, then it can be removed upwards.
Article on the topic: Where is the drain pipe of the Suzuki Grand Vitara air conditioner located?
Set it aside and make any necessary repairs. The cover must be installed in the same order as it was removed. That is, put it on top, insert it into the grooves, move it forward and screw it with self-tapping screws at the back. Carefully move the machine back to its original location without touching the water supply and drain hoses.
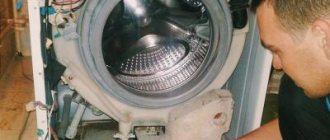
To fix more serious problems, such as replacing drum bearings, you will need to completely disassemble the washing machine.
At a washing machine repair service, for example https://ob-service.ru/, removing and installing the drum will cost from 2000 rubles
Complete disassembly of a front-loading washing machine
So, let's look at this process step by step:
- It is imperative to drain the water from the filter.
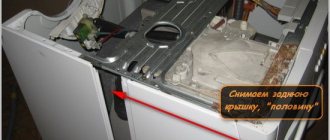
- Remove the back panel. We unscrew all the screws and remove the back cover, disconnect the motor power supply terminals and the temperature sensor. Carefully inspect the drum for leaks.
- Take the 10mm head and unscrew the two screws that secure the engine. From above, under the cover, use the same head to unscrew the three bolts that secure the upper counterweight and remove it.
- We take out the container for the powder and on the front panel under it, unscrew three self-tapping screws at the front and one at the top using a Phillips screwdriver (preferably with a magnetic tip). Remove the upward movement control panel and disconnect the two terminals. Before disconnecting any terminals, it is advisable to photograph them with a mobile phone.
- We unscrew the screw from the back that holds the valve and remove the area of the fill container, disconnecting the fill hose from it.
- Now we disconnect the rubber cuff of the drum, place it on its side and unscrew the drain pipe, holding the clamp with pliers. Move the engine to the side and remove it.
- We disconnect the two black dampers, which dampen the vibrations of the drum with a head of ten.
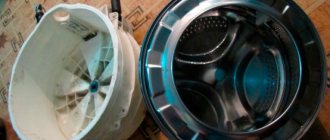
- Place the washing machine in a vertical position and remove the two springs from the top. Now you can pull out the drum completely.
Article on the topic: Where can you sell an old TV in Brest
It should be noted that the drums in front-facing machines are Indesit, as well as in some washing machines LG, Bosch, Ariston - cast. Therefore, to repair the drum , it needs to be sawed along the seam, and after replacing the bearing, welded again. These types of repairs are carried out at a service center, but you no longer need to pay for disassembly and assembly. As a result, a good saving of money.
Procedure for removing the top cover
Once access to the cover fasteners is open, you can proceed directly to dismantling. The top panel of the Samsung washing machine is attached using several screws of the same type; for work you only need a Phillips screwdriver; in some cases, tweezers are useful; they are convenient for removing washers that have “fused” with the panel material over the years of use.
The screws are unscrewed and put aside. The same applies to the washers; they will be useful during subsequent assembly. It is better to work in natural light, but if this is not possible, you need to provide good light using a carrier or a flashlight.
You can proceed directly to dismantling the top cover. To do this, just move it back (in the direction from the front panel) and carefully lift it up. That's it, the cover is dismantled, you can inspect and repair the machine.
What tools will you need?
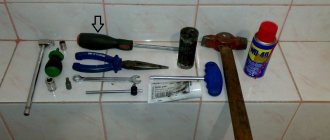
To ensure that work on dismantling the washing machine drum goes quickly, you should make sure you have the following tools in advance:
screwdrivers: Phillips and slotted (a screwdriver with attachments will significantly speed up the work);- a set of keys;
- pliers;
- hammer, chisel;
- marker;
- lubricant-cleaner and sealant.
Also, the work cannot be done without rags, a large basin and rubber gloves for hands.
Possible difficulties during work
In most cases, disassembling a Samsung washing machine is not difficult, but you need to be prepared for possible difficulties. Do not forget that the machine operates in conditions of constant humidity, which negatively affects metal parts.
There may be several difficulties, first of all, the screws may “not want” to be unscrewed. You should not try to tear them off by force; in this case, WD-40 or its equivalent will help. It is enough to apply a few drops, let the lubricant penetrate inside the threaded connection, and the work will go easier.
It is possible that it is not the fasteners that have become stuck, but the top cover of the Samsung machine itself. The symptoms are as follows: the screws are unscrewed, but the lid does not move. This is due to rust or dirt on the slide that secures the top panel. They are located approximately in the middle of the body on its side faces. To open the problematic cover, you need to do the following:
- mentally draw a line parallel to the front panel, passing through the middle of the body, this is where the grooves are located;
- gently tap your hand first on the lid, then on the side panels;
- try to move the lid;
- knock again, but with more force.
As a rule, this gives results. It is only important not to overdo it and not to use heavy objects; we must not forget that a modern Samsung washing machine is a reliable device, but it is not designed for strong shock loads.
What do the details look like?
The purpose of shock absorbers is to dampen vibrations of an automatic machine during the washing process. When the drum rotates strongly, the washing machine begins to vibrate. Shock absorbers located at the bottom prevent it from bouncing and jerking.
The design of these parts includes the following elements:
- cylinder;
- gaskets;
- piston with curtains;
- spring.
In modern models, spring shock absorbers are replaced with dampers, which have a similar cylindrical design, but without springs.
The dampers are also located under the tank, and the springs are located above it, and it is on them that the tank itself is suspended . Such designs are considered more relevant, as they contribute to better performance of the main function - vibration damping.
Depending on the model of the washing machine and user settings, the drum can make up to 1,800 revolutions per minute. This creates a significant load, which contributes to the wear of the parts and connections involved in this process.
Shock-absorbing devices, making spring movements, allow the drum to rotate . And at the same time, the increased load is not transferred to the nodes adjacent to it, which, thanks to this, last much longer.
Shock-absorbing devices in washing machines perform a job similar to similar parts in a car.
Reinstalling the cover
The final stage of repairing the washing machine will be installing the top cover. The work is performed in the reverse order, but before putting the panel in place, you should carefully inspect the grooves; you may have to clean them. Next, the cover is placed on the guides, lightly pressed with your palms and moved towards the front panel until a characteristic click is heard. After this, all that remains is to tighten the screws and you can use the washing machine, of course, not forgetting to reconnect it to the power supply, water supply and sewerage.
The strength of Samsung household appliances is not only ease of use, but also ease of maintenance and repair. It is easy to disassemble, easy to assemble, and even a novice repairman can fix most problems. Removing the top cover is exactly where any repair of a washing machine begins; this is what every home craftsman should be able to do.
Samsung washing machine diagram
Before you start disassembling the washing machine, it is advisable to get an idea of its structure. The unit diagram will show the location of the functional parts and will help when making repairs.
Here is a diagram of the internal structure of the washing machine
If you suspect that the problems are caused by poor electronics, it will be useful to have the electrical diagram of the unit on hand.
Here is a schematic diagram of a Samsung washing machine.
For an ordinary user, a schematic representation of a machine’s structure may seem complex and incomprehensible, but if anyone wants to understand the circuit, anyone can understand it.
First start
When the washing machine is connected to all communications, you need to make sure that the installation was carried out correctly. The first start of the washing machine is carried out without placing laundry in the drum.
Detergent (a small amount) is poured into a special compartment. For these purposes, it is advisable to choose a special preparation for the first wash. A good option is Helfer Start HLR0054 - against industrial contamination and for disinfection.
A program with a long cycle and water heating is selected on the control panel. The start button is pressed.
When starting the machine for the first time, you need to monitor its operation, paying attention to the following points:
- no water leaks;
- heating water;
- filling the tank with water;
- quality of drum rotation;
- drain work;
- machine behavior during spinning.
If leaks, grinding sounds uncharacteristic of normal operation, and other defects are detected, the machine must be stopped.
If the machine itself displays an error code on the display, its decoding should be clarified in the documentation for the device. There may be an incorrect connection or other user error. Read more about error codes here.
The first test run allows you to analyze the connection quality and operation of the washing machine components, and also makes it possible to eliminate dirt, lubricant residues, and the specific smell of new equipment from the drum.
Problems
If the Samsung washing machine does not work, the buzzer sounds when there is a malfunction. Then the light flashes at intervals of 0.5 seconds and an error code is displayed. The engine and associated components are temporarily disabled. The fault code can be read in the instructions. You can also enter the washing machine into testing mode by turning on the “ON” button while simultaneously holding down the “1” and “2” keys. After pressing “3” testing and diagnostics begin.
Doesn't turn on
Several elements are checked step by step:
- availability of power supply in the network;
- cable integrity;
- contacts of the noise filter control board;
- fuse;
- output voltage of the power transformer.
If everything works, the problem is in the control board.
Doesn't pump out water
A drain fault is highlighted by indication E2. Turns on if, when an imbalance is detected, the carrier frequency is less than or equal to 25.3 kHz. To reset the error, turn off the washing machine and turn it on again.
To eliminate this, check for kinks in the drain hose, clogged filter, and integrity of the drain pump motor. If everything is normal, change the control board.
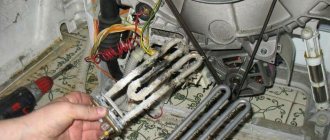
No heating
Error E5, E6. The message appears when the water heats up too quickly or too slowly. Check the heating element for serviceability - 20.5-21.5 Ohms. If everything is in order, then change the control board.
Doesn't take up water
A water supply malfunction is indicated by code E1. It turns on if, during flooding, the change in the carrier frequency of the level sensor is less than 50 Hz, or the specified level is not reached within 20 minutes.
They check whether the water is open, whether the machine is paused, the contacts on the EC, the operability of the coil, and clean the contacts of the level relay. If everything is normal, the problem is in the control board.
The drive belt is worn out
When there is a malfunction, increased noise is heard. Check the integrity and tension of the drive belt and remove the shipping fasteners. It is also necessary to make sure that the washing unit is stable.
It's buzzing a lot
A humming sound during the spin cycle may indicate the “end” of the bearings or drum cross. To identify the error, shake the drum from side to side with your hands and twist it. A humming or crunching noise means the bearings are faulty. Strong imbalance of the tank - cross.
Stops during a cycle
The most common problem is turning off the water or electricity supply. When resumed, the machine will continue washing. The following reasons are engine malfunction, heating element failure.
Stuck on rinsing can be due to various blockages.
Other typical errors that cause a stop:
- heavy weight of laundry, improper styling;
- problems with electronics;
- activation of leakage protection;
- the loading hatch door is open.
Read the instructions carefully and ensure that the wiring is in good condition.
The drum does not spin
Check the correct installation and integrity of the belt, the presence of power supply, the integrity of the rotor windings, the generator, and the stator. Inspect the fuse. If everything is working, the problem is in the control board.
The door does not open
Perhaps the machine did not finish washing and there is water left in it. Or the hatch door lock does not work. Several solutions to the problem:
- wait 3-5 minutes after finishing washing;
- run “Spin” or “Drain” to remove water, then try again;
- Unplug from the socket and drain the water in an emergency.
If the door still does not open, contact service.
Broken circuit
The control module fails for several main reasons:
- wiring burns out;
- tracks and semistores burn out during a power surge;
- the board oxidizes when exposed to moisture;
- the cable breaks.
In general, if it is clear that the problem is in the circuit, then the control board is replaced or repaired.
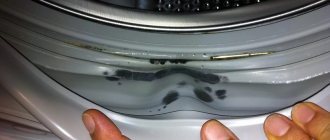
Glass damaged
If the glass on the door is cracked, then there will be no problems with diagnostics - you can immediately begin repairs. After removing the hatch from the body, we get to work
It is important to understand that operating a “broken” machine is highly discouraged: if the seal is broken, there is a high probability of leakage and electric shock.
Replacing glass is also not an option, since this option is available for single models. Therefore, the user has only two options: buy a new machine or seal the gap. The second method is cheaper, but will require some steps.
The crack is sealed according to the following instructions.
- Secure the film on the outside of the glass with tape, avoiding voids and cracks.
- Apply reinforcing tape to the inside.
- Mix resin and hardener in a ratio of 6 to 4, adding EDP glue. You should get a homogeneous mass, similar to liquid sour cream. If the composition is too thick, it is recommended to heat it in a water bath, stirring regularly.
- Fill the crack with the prepared mixture.
- Leave for a day.
- Remove the polyethylene and sand the glass.
It is not recommended to use tape and sealant instead of epoxy resin solution - they do not last as well and give short-term results. But you need to strictly observe the proportions. Otherwise, the “protection” will not last long.
Typical breakdowns of household units
To understand the problem that has arisen, you need to consider the most common of them and the reasons for their occurrence.
Here is a list of common problems:
- Water is not being filled into the tank of the machine - this means that the heating element, or the inlet valve, or the drain pump may be faulty, or the pressure switch may not be working;
- The machine does not turn on - the hatch is not closed very tightly, the locking system or the “Start” button does not work, there is a break in the power cord, poor contact. It could also be more serious problems, such as a breakdown of the heating element or motor;
- The drum does not rotate when the motor is running - the drive belt is torn, the bearings or motor brushes are worn out. It is possible that a foreign object has gotten into the gap between the drum and the tank;
- Water does not drain - this problem means a blockage in the drain hose, or in the washing machine filter, or in the sewer system;
- The car hatch does not open - there is a malfunction in the locking system or the handle is damaged;
- Water leakage - occurs when the seams or parts of the machine are depressurized, as well as the drain hose or pump leaks;
- Self-draining of water - if the water is drained before it has yet accumulated, then this is either a connection problem or a malfunction of the control system;
- Problems with the spin cycle – the “Spin off” button does not work, problems with the drain or with the electric motor of the washing machine;
- Unusual sounds for washing – the bearings and seal are worn out. They will have to be replaced, and the drum may also need to be replaced;
- Large vibrations may be caused by a large load of laundry or improper installation of the appliance;
- Problems with the control system - the terminals on the buttons have oxidized or the contacts have shorted due to water ingress.
Next, we will consider methods for repairing them with your own hands, because it is not always possible to call a specialist. And for this you need to have a set of necessary tools.
A list of the most common problems that occur with a Samsung washing machine can be found in the manual supplied with the product by the manufacturer. There you can often find a solution to the problem.
Before starting repairs, you need to make sure that all the tools from this list are available:
- flat and Phillips screwdrivers or screwdriver;
- set of wrenches;
- pliers, pliers, nippers;
- tweezers – elongated and curved;
- powerful flashlight;
- long-handled mirror;
- soldering iron;
- gas-burner;
- small hammer;
- knife.
In addition to the tools listed, you may need a magnet for pulling out small metal objects caught inside the machine, a long metal ruler for aligning the drum, a multimeter or a voltage indicator.
A set of the most necessary repair equipment will be needed to carry out repair operations accessible to the home craftsman. Most of the tools can be found in the household, the rest can be borrowed from friends
But that’s not all; in addition to the necessary set of devices, you will need to purchase the following consumables for repairs:
- sealant;
- Super glue;
- insulating resin;
- materials for soldering - rosin, flux, etc.;
- wires;
- clamps;
- current fuses;
- rust remover;
- electrical tape and tape.
Sometimes a multimeter is not needed, just turn on the machine and select a mode with high water temperature. Based on the operation of the apartment electric meter, it can be easy to understand whether power is supplied to the heating element.
The fixing elements are broken
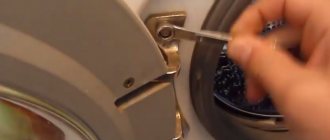
More often than not, problems with the locking mechanism prevent the door from closing tightly. More precisely, the latch lever becomes deformed during careless or too long use, which leads to the appearance of unevenness and bevels. All this prevents the door from locking into the provided grooves. The problem is fixed as follows:
- the door is removable;
- the hatch is placed on a flat surface with the latch facing up;
- use a file to grind off all the irregularities on the latch;
- the latch is treated with graphite lubricant (for preventive purposes);
- the door is installed on the body.
Often the door does not close tightly due to sagging hinges or loose external fasteners. In this case, it is necessary to adjust the position of the hinges. But you will have to act by eye - tighten the fasteners until the latch fits into the groove.