LG washing machines are durable and reliable.
However, even the best quality household appliances can fail. To fix the problem yourself, you need to get to the broken part, which will require disassembling the LG washing machine - read the article on how to do this correctly and how to overcome possible difficulties.
Preparing for work
To disassemble an LG washing machine, regardless of the loading method, you will need the following tools:
- screwdrivers of different shapes;
- hammer;
- pliers;
- open-end and socket wrenches;
- any lubricant;
- screwdriver
After the tools have been collected, they begin to prepare household appliances. To do this, perform the following steps:
- Disconnect the device from the power supply.
- Remove the drain hose from the sewer and turn it over so as to remove any remaining water.
- Move the machine away from the wall and interior items.
To avoid difficulties with unscrewing parts, the machine should be taken out of the bathroom. The more free space there is, the better.
Electronic panel
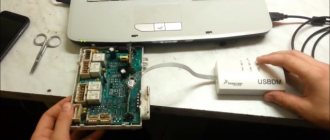
The most important process is to correctly remove the control panel; manipulating with a Phillips screwdriver will not work. After you remove the bolts under the powder section, you will have to look where the plastic latches are located; the top ones will have to be opened using a flat-head screwdriver; the video clearly shows how this can be done so as not to damage anything. The lower latches can be released by simply pulling the panel to the top. In essence, this completes the process of disassembling the case; now it is necessary to separate all the power and other cables.
Device diagram
The design diagrams of LG washing machines may differ slightly, depending on the specific model.
However, their main nodes are located the same way. Each device is equipped with the following parts:
- lid;
- Front Panel;
- back wall;
- control Panel;
- tank and drum;
- control board;
- inlet valve;
- drain pump;
- shock absorber;
- pressure switch;
- powder receptacle;
- heating element;
- belt and motor - machines with an inverter motor do not have a belt;
- sensors, counterweights, shock absorbers.
In addition to the main circuit of the washing machine, during the repair process you may need a control board circuit. It is needed when the part does not work properly and needs soldering. There is no universal scheme; they differ for each model of household appliance.
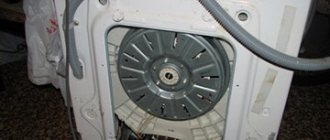
LG car tank
Before removing the tank, you must unscrew all the bolts from the inverter and remove it. Here you will need heads; with their help this will be done much faster than with a wrench or pliers. Hold the tank while unscrewing the central bolt, so it will not spin, which will make the task much easier. Once all seven bolts are removed, including the center one, you can remove the motor, just move it to the side.
The tank can be pulled out from the front of the device; such work will be difficult for one person; it is best to use someone’s help.
You can contact the masters from our service center by calling or writing your question on the feedback form.
Your message has been sent.
Thank you for your request.
Author:
You might also be interested in
Disassembly
Depending on what type of load the LG washing machine has, the sequence of actions when disassembling it will differ. While front-loading appliances have a control panel and various sensors under the top cover, top-loading appliances have a tank there.
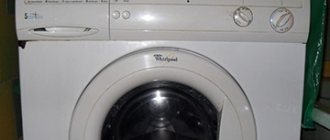
LG automatic washing machine with front loading
Procedure for disassembling an LG front-loading washing machine:
- Tighten the two bolts located on the rear wall. They hold the top cover. Sometimes there may be three screws, which depends on the specific model.
- Pull the top cover towards you; some effort may be required. Lift the cover up and remove it.
- Under the cover there is a powder receptacle. To remove it, you need to press the special tab. The tray comes out easily.
- To remove the pressure switch, disconnect the pipe and wires, and then tighten the screws.
- There are 2 bolts behind the powder receiver; they need to be unscrewed, after which you can remove the front panel. It is held on by small clamps. Then all terminals are disconnected sequentially. Remove the panel to the side.
- After removing the electronics, unscrew the upper counterweight, which is secured with 4 bolts.
- Now you can remove the front metal strip and powder pocket. First, disconnect the pipe from the drum, then the rubber band. The pocket can be moved to the side.
There is also a surge protector located under the front cover of the LG washing machine. It is designed to suppress interference occurring in the electrical network.- Before unscrewing the water supply valve, you need to disconnect two terminals. The valve itself is located in the corner, near the back cover of the case.
- The pressure cable is removed from the cuff, after which the elastic itself is pulled out. To loosen the tension on the cable, just feel for the spring. After pressing on it, removing the element will not be difficult.
- Unscrew one bolt that holds the lower false panel and remove it. There is a metal strip under it, which is also twisted.
- Disconnect the water supply hose and begin disassembling the rear wall. First, twist the lid, removing it from the grooves.
- The terminals of the heating element are disconnected from the tank and the bolt that secures it, the clamps are removed. The tubular heater is one of the most important elements of the washing machine, so you need to turn it off carefully, trying not to damage it. If scale has formed on the heating element, it can be soaked in a solution of citric acid.
- Disconnect the temperature sensor.
- Open the hatch door and unscrew the two bolts that hold the lock. To remove the front panel along with the hatch, you just need to tighten two more screws on top, after which it will detach without any problems.
- Now you can twist the two counterweights located behind the hatch door and framing the drum.
- Twist the motor, which is mounted on two bolts. Then you can remove the belt. It is more convenient to remove the motor itself from below, for which you need to unscrew the bottom bottom.
- When the machine is on its side, remove the pump, having first disconnected the pipe going to it.
- Remove the plastic latches that hold the shock absorbers. They are located on both sides.
- The drum is simply removed from the springs. If you need to get to the bearings, the tank is divided into two halves. They are connected by bolts. To remove the drum, you can tap the middle bolt with a hammer. Then all that remains is to unscrew the pulley, remove the oil seal and bearings.
This completes the analysis of the LG front-loading washing machine.
Instructions for disassembling the LG washing machine - in the video:
From vertical
There are no significant differences between disassembling a top-loading and front-loading washing machine. The only difference is the procedure:
- unscrew the side fasteners holding the control panel, tilt it back, disconnect the terminals leading to it;
- disconnect the fill valve, loosening the clamps in advance, disconnect the rubber hoses;
- unscrew the fasteners that secure the side panels, move them and carefully remove them - now you will be able to gain access to the bolts securing the front panel;
- begin to turn off the main components: motor, pump, pressure switch;
- then you can remove the clamping mechanism and the hatch cuff;
- if you need to remove the tank, unscrew the counterweights and disconnect the shock absorbers.
This way you can disassemble a top-loading washing machine.
Is it possible to solve the problem
If something gets into the drum assembly, it can cause the washing machine to stop and break down.
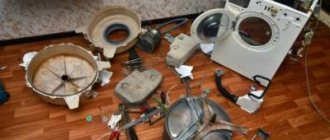
To remove debris, you must disassemble the unit. However, it is worth considering that there are some nuances. The drum should be removed very carefully so as not to touch other parts of the device. As a rule, such repairs are carried out by professional craftsmen. If it is not possible to turn to specialists for help, then you can try to solve the problem yourself. The main thing is to adhere to the recommendations described below. See also -
Problems with water temperature in the washing machine: checking the sensor
How to assemble?
Assembling the LG washing machine is easy. It is enough to perform all the steps in reverse order.
The main thing is to connect the chips and wires correctly . If the sequence is broken, the equipment may fail. At this stage, photographs taken in advance will come in handy.
The bolts must be tightened tightly so that they do not come out of the thread when the washing machine vibrates during the spin cycle. Be sure to rinse the drain hose and clean the filters.
Before assembling the washing machine, you need to clean all parts from dust and rust, remove plaque and grease from them. If wear of the rubber bands is noticed, they should be replaced .
Replacing drum bearings in an LG direct drive washing machine at home
Let's consider replacing the bearing on the LG washing machine. SMA - automatic washing machine.
“>LG brand SMAs have proven themselves to be reliable and unpretentious, while having a stylish design that many consumers like. But even such washing machines are prone to breakdowns. One of them is wear on the drum bearings. And as a result - increased noise during spinning, sometimes becoming so loud that further operation becomes unbearable. In this case, replacement is necessary.
I work in the household appliance repair industry. Extensive experience in restoring washing machines and dishwashers.
Possible difficulties and ways to overcome them
When trying to disassemble an LG washing machine on their own, a person without experience may encounter some difficulties.
Tips to help overcome them:
- If you have little experience working with household appliances, then it will be difficult to put the washing machine back together. In order to correctly connect all the wires and screw the parts, the entire disassembly process must be captured on a smartphone camera.
- Sometimes when you remove the top cover it gets jammed. However, you should not pry it with sharp objects. The cover can be removed by short swings without applying excessive force.
- If any metal parts are stuck or rusty, they can be treated with a lubricant such as WD-40.
Sometimes during the process of assembling a washing machine, people are faced with the fact that they cannot find suitable bolts, since there are many of them. To avoid such a problem, they can be placed in bags, making appropriate notes.
Preparatory stage
To avoid searching for the right screwdriver during repairs, you should prepare in advance all the tools that may be useful:
- curved and slotted screwdrivers;
- pliers, simple and bent;
- round nose pliers;
- wire cutters;
- hammer;
- mites;
- set of open-end wrenches;
- socket wrenches (heads).
If you are repairing a car for the first time, also stock up on a camera.
By filming each stage of disassembly, it will be easier for you during assembly - using photographs. You will be able to reproduce the reverse sequence of actions faster and without errors.
For some reasons (lack of finance or lack of trust in specialists), washing machine owners prefer not to contact a service center in the event of a unit breakdown. Even a beginner can repair an Ariston washing machine with his own hands, unless there is a serious breakdown.
The next topic will be of interest to owners of Beko washing machines. Here everything is about eliminating the main faults of the unit.
A washing machine is a complex piece of equipment, which is why, among other types of equipment, it is washing machines that cause the most trouble for their owners. Using this link https://aquacomm.ru/cancliz/mnogokvartirnyie-doma/santehnika/stiralnaya-mashina-ardo-remont-svoimi-rukami.html we will look at the features of repairing devices under the Ardo brand.
Water is leaking
If water leaks into the pan located under the machine, it will react by displaying the code “E1” on the display. There may be several reasons:
- The gasket between the two halves of the tank stopped holding water. This usually happens if the tank was dismantled shortly before. You need to install a new gasket, and before that it should be lubricated with silicone sealant.
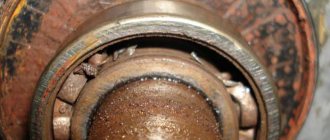
- The oil seal, which is installed next to the bearings, is worn out. In LG machines, this seal is sometimes destroyed by the drum, which touches it during rotation. The seal needs to be replaced.
- The hose that connects the tank outlet to the pump may burst. “Cure” by replacement.
Due to design flaws in LG cars, it is not always possible to put the new oil seal in place. In this case, it is placed on a sealant (the Dyson brand composition is considered the most reliable).
Water can also flow out through the hatch seal, which in this case is also replaced (how to remove the seal was described above).
Worn oil seal
To prevent the seal from wearing out so quickly, wipe off dirty water from it after each wash.