What is the power of the SM engine
The performance of the motor depends on its type. Three types of washing machines are used:
- asynchronous;
- collector;
- inverter (brushless).
Asynchronous motor
It was installed in cars manufactured before 2000. The motor of a semi-automatic washing machine has 2800 rotations per minute and a power of 180–360 W. To adapt such an engine for garage “homemade” products, you need a three-phase network, a frequency converter, and a set of capacitors. This is expensive, which is why asynchronous systems are not popular among do-it-yourselfers.
Brushed motor
A favorite of the masters. Powered by direct and alternating electric current, power 300–800 W, number of armature turns 11,500–15,000 rpm. On the plus side, the cycle can be easily adjusted without loss of power. The downside is that the brushes wear out often.
Inverter motor
The most modern and economical look. Converts alternating current to direct current. It operates without a belt drive and brushes with a power of 400–800 W, making a number of turns from 16,000 to 20,000 per minute.
Currently, a commutator electric motor is the best option for home workshops in terms of availability and price. It is versatile and easy to operate. Let's look at its structure, connection and adjustment methods.
Adjustment
Let's look at the example of a commutator motor, since it is most often used on washing machines.
Adjusting the engine speed is important, because with its help it will be possible to adapt the part of the used assistant.
To regulate the speed of the motor, it must be connected correctly. To do this, you need to connect several outputs. First of all, you need to take the motor from the washing machine, then you should notice a coil from which there are several wires, usually 2-3. a Multimeter will be useful for this
(from the English multimeter),
tester
(from the English test - test),
avometer
(from the ampere-voltmeter) - a combined electrical measuring device that combines several functions.
The minimum set includes the functions of a voltmeter, ammeter and ohmmeter. Sometimes a multimeter is made in the form of a clamp meter. There are digital and analog multimeters.
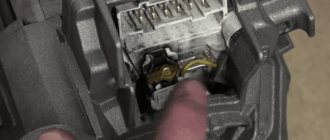
Next you need to find the motor commutator and brushes, from which there are 2 cables. Then you need to find the outputs Tachogenerator
(from ancient Greek τάχος - “fast”, “speed” and lat. generator “manufacturer”) - an electrical micromachine, a measuring generator of direct or alternating current, designed to convert the instantaneous value of the frequency (angular velocity) of shaft rotation into a uniquely related at the speed of the electrical signal.
"> tachometer. The best way to do this is visually. The wires from the sensor are easily visible. They are usually red in color and the thinnest.
I work in the household appliance repair industry. Extensive experience in restoring washing machines and dishwashers.
commutator motor elements
Now we take one cable coming from the collector and connect it to one of the coil’s electrical wires. We connect the second from the collector and coil to a 220 volt network through a heating element. If the launch was successful and the engine gradually picked up speed without jerking or jamming, then you can connect the washing machine engine through the regulator.
Connection diagram for commutator motor
Necessary unnecessary things
Many people will simply take the car to a junkyard and forget about it. But this is not a solution to the problem for a zealous and skillful owner. You would be surprised to know where and what parts of a washing machine could be used in a household. And in our article we will talk about the most valuable part of this unit - the working engine of an automatic washing machine.
The most suitable option for using an electric motor is to connect it to another device. For example, an electric grinding machine (or any other). But to do this, first of all, you need to connect the motor to a 220 V household network and adjust the number of its revolutions.
Via microcircuit
It's time to remember about the tachometer and its outputs, which we found on the engine, but set aside for the time being. It is the tachometer that will help us connect the washing machine motor and regulate its speed without loss of power. The tachometer itself cannot control the engine, it is only an intermediary. The actual control must be carried out through a microcircuit that is connected to the motor tachometer, winding and armature and is powered from a 220 V network. You can see the circuit diagram in the figure below.
What happens to the motor when we connect it to the network through this chip? And the following happens: we can start the engine with our own hands at maximum speed, or we can turn the special toggle switch to reduce the speed. We give a sudden load to the engine by placing a wooden block under the rotating pulley. The speed drops for a split second, but then recovers again, despite the load.
The fact is that the tachometer detects a decrease in speed due to the load that has arisen and immediately sends a signal about this to the control board. The microcircuit, having received the signal, automatically adds power, thus leveling the engine speed. The homemade dream, as they say, has come true. If you have such a connection diagram, you can make a grain crusher, a wood splitter and many other useful things from the washing machine engine.
To summarize our story, we will answer another reasonable question that the reader may have: where can I get such a board? You can assemble it based on the diagram and list of parts that we attach to this article, or you can order it ready-made from specialists. Fortunately, there are enough offers on this matter on the Internet. You need to look for the TDA 1085 circuit.
Source
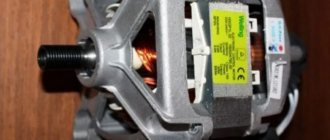
The device of the commutator electric motor of an automatic washing machine
The appearance of motors of different models may differ, but the design and operating principle are almost identical. The device consists of:
- housings;
- starter;
- starter coils (shoes) with two or three terminals;
- anchors;
- pulley;
- two brushes;
- collector;
- tachometer (with two or three wires);
- terminal block.
To connect the motor, you need to know the outputs of the armature, starter and tachometer windings. A tester will help you avoid getting tangled in wires.
Easy motor connection
Set the tester to the mode of least resistance and call the windings of the tachometer, coils and armature. Make connections through terminals that communicate with each other. A correctly connected device picks up speed smoothly, does not crackle or spark. You can check how many revolutions the motor makes using a speed sensor.
A visual step-by-step implementation can be seen in this video:
Connection to 220 Volt
In order to connect the electric motor to the home electrical network, you will need a multimeter.
With its help we call the output wires coming from the electric motor. The purpose of this operation: to detect among the wires (from 2 to 4 pieces) two with the highest resistance (about 12 Ohms). Accordingly, if there are only 2 wires, then the task is simplified to a minimum. At the moment we have on hand two power wires from the excitation coil of the washing machine motor.
Next, we identify the wires from the commutator and engine brushes. There are also two of them, so it is impossible to confuse them.
The third pair of wires we need belongs to the tachometer. They are mainly attached to the engine housing. Otherwise, you will have to partially disassemble it (the motor).
We connect one of the collector wires to the coil wire. And we connect the remaining pair (collector - coil) in a convenient way to a 220 Volt network. We are conducting a test run.
If you do not know what the parts we named mean and what they look like: excitation coil, collector, tachometer, and so on, it is better to postpone reading this article until you become familiar with the structure and principle of operation of the commutator motor of an automatic washing machine.
Frequency regulation
Just recently (10 years ago), there were a limited number of frequency controllers for motor speeds on the market, and they were quite expensive. The reason was that there were no cheap high-voltage power transistors and modules.
But developments in the field of solid-state electronics have made it possible to bring power IGBT modules to the market. As a result, there is a massive appearance on the market of inverter air conditioners, welding inverters, and frequency converters.
At the moment, frequency conversion is the main way to regulate the power, performance, speed of all devices and mechanisms driven by an electric motor.
However, frequency converters are designed to control three-phase electric motors.
Single-phase motors can be controlled by:
- specialized single-phase inverters
- three-phase inverters with the exception of the capacitor
Converters for single-phase motors
Currently, only one manufacturer announces serial production of a specialized inverter for capacitor motors - INVERTEK DRIVES.
Optidrive E2 model
For stable engine starting and operation, special algorithms are used.
In this case, frequency adjustment is possible upward, but in a limited frequency range, this is prevented by a capacitor installed in the phase-shifting winding circuit, since its resistance directly depends on the frequency of the current:
f – current frequency
C – capacitance of the capacitor
The output stage uses a bridge circuit with four output IGBT transistors:
Optidrive E2 allows you to control the motor without removing the capacitor from the circuit, that is, without changing the motor design - in some models this is quite difficult to do.
Advantages of a specialized frequency converter:
- intelligent motor control
- Stably stable engine operation
- Huge capabilities of modern inverters:
- the ability to control the operation of the engine to maintain certain characteristics (water pressure, air flow, speed under changing load)
- numerous protections (motor and device itself)
- sensor inputs (digital and analogue)
- various outputs
- communication interface (for control, monitoring)
- preset speeds
- PID controller
Disadvantages of using a single-phase inverter:
Diagram of a simple motor speed controller
Of course, the speed is best controlled by an inverter, but for simple amateur devices, simple homemade regulators should be sufficient.
Useful: Digital push-button potentiometer - volume control
The minimum speed obtained with this circuit was 200 rpm. C2 is a smooth start. Soft start works great at idle, although with a load on the shaft, if necessary, select R5 = 0 - 3 kOhm depending on the load; R6 = 18 – 51 Ohm depending on the triac; R4 = 3 – 10 kOhm – this is protection T3; RR1 = 2 -10 kOhm – the speed controller is galvanically connected to the network, protection from mains voltage is required. There are potentiometers with a plastic axis; it is advisable to use them.
What experts say
Until now, no dependence has been identified on the speed of the machine, its service life and reliability. All models have different service lives, which are set by the manufacturer, who provides warranties and produces spare parts. Even those models that can spin no more than 600 rpm can still work for a whole decade. However, some manufacturers are reviewing the service life of their devices. Sometimes without even giving official statements about it.
For example, Ariston has reduced the service life of its machines from ten to seven years. Most experts attributed this to the fact that many complaints began to be received about the operation of equipment from this manufacturer. And thus, he decided to protect himself. Today, more and more companies have gradually begun to accept such a reduction in quality. Perhaps this is due to attempts to make their products cheaper for the buyer.
Did you like the article? Follow new ideas from the world of construction, design, and useful tips in our channel. Subscribe to us in Yandex.Zen. Subscribe.
Article rating:
Loading…
What speed should a good washing machine have? Link to main publication
What are the power characteristics of an electric motor?
The rotation speed of the drum of an automatic washing machine—the number of revolutions it makes per minute—depends on the type and power of the engine. The higher the speed, the better the spin. However, you need to remember that not all fabrics can withstand such speeds without consequences. For a more gentle push-up, set the speed lower - in modern machines you can adjust the spin speed. And the technical documentation indicates its maximum value.
The electric motor determines how much electricity the entire washing machine consumes. The number of kWh that the device will “wind up” depends on its power indicators. When buying household appliances, the consumer is not interested in the power characteristics of the electric motor, but in how much he will have to pay for the light. Energy consumption is a value that depends on several factors. The number of kilowatts consumed per hour is affected by power:
- electric motor;
- heater - 1.7–2.9 kW, the hotter the water, the greater the value;
- pumps - 0.024–0.040 kW, this is enough to pump out dirty water;
- sensors, control unit and display - 0.005–0.010 kW.
The total power is calculated only for one mode - “Cotton”. At 60°C and full load. Based on the test results, the models are assigned energy efficiency classes - there are 7 in total, and are designated in Latin letters. The highest class is A, the lowest is G.
How to check functionality?
There are commutator and inverter motors on sale, so further we will only talk about these two varieties.
It is quite difficult to check the performance of a direct drive or inverter motor at home without the involvement of specialists. The simplest way is to activate self-diagnosis, as a result of which the system itself will detect a malfunction and notify the user by highlighting the corresponding code on the display.
If the need nevertheless arises to dismantle and check the engine, then these actions must be performed correctly:
- turn off the power to the washing machine and remove the back cover, unscrewing the fasteners for this;
- under the rotor you can see screws holding the wiring, which also need to be removed;
- remove the central bolt securing the rotor;
- dismantle the rotor and stator assembly;
- Remove the wiring connectors from the stator.
With this disassembly completed, you can begin to inspect and check the performance of the power unit.
With commutator motors the situation is simpler. You can check their operation in several ways, but in any case you must first dismantle them. To do this you will need to perform a number of actions:
- turn off the power to the machine, remove the back cover;
- disconnect the wires from the motor, remove the fasteners and remove the power unit;
- we connect the winding wires from the stator and rotor;
- connect the winding to a 220 V network;
- rotation of the rotor will indicate the serviceability of the device.
Voltage regulator
The simplest and most accessible regulator of the speed of the electric motor of a washing machine is any device designed for such actions. It could be:
- Dimer;
- Electric drill trigger;
- A swivel wheel, etc., taken from any household appliance or purchased from a store.
The meaning of the operation for adjusting the speed is simple and consists in reducing or increasing the voltage supplied to the engine from a 220 Volt network. That is, by turning the adjustment wheel, we regulate the voltage, and therefore set the rotation speed. The diagram of this connection looks like this:
- We connect the wire from the coil (1) to the cable coming from the armature.
- We direct the 2-reel wire to the network.
- We close the remaining cable (2) of the armature to a dimer.
- The second output of the dimer is to the network.
- We test run the electric motor and operate the regulator.
If you haven't mixed anything up, the engine will obediently change its speed. But there will be one big problem. When touching the rotating axis of the motor, it will stop. That is, at the slightest outside influence, a loss of power occurs, regardless of the applied voltage. Essentially, we have a working engine on our hands without any useful functions.
Connection via board (chip)
Our speed control scheme was not initially the most elementary. And that is precisely why we used a tachogenerator in it. Now it's time to get to work on it. After all, with the help of a tachometer we will be able to regulate the speed of the washing machine engine without any loss of its power, that is, turning the electric motor into a truly functional device.
In our case, the tachometer is an intermediary between the engine and the microcircuit, which looks like this. This circuit is created on the basis of a factory board marked TDA 1085. It will not be difficult to purchase it in radio equipment stores.
Read also: Drilling machine ZIL 2a125
A completely appropriate question would be: what will change in the operation of the engine after it is connected via a microcircuit? A lot of things.
If with the usual connection we described above, you had to start the engine with a movement of your hand. Now this is possible with a simple turn of the toggle switch. When trying to influence a rotating pulley, the engine does not stop completely, but drops the speed literally for a split second, after which it returns to the set power, but taking into account the increased load.
That is, the microcircuit we built, having received a signal from the tachometer about a decrease in the number of revolutions due to the increased load, instantly reacts to this and increases the power, and therefore the number of revolutions of the electric motor.
Any washing machines become unusable after a certain period of time, and most often they are simply sent to a landfill. But some details from it can be given a second life. For example, an engine from an old washing machine that has broken down can become the basis for a new homemade device or tool. There are many different options for using it to benefit your household. True, all this depends on the imagination and skill of the home craftsman.
How to adjust rotation
There are many ways to control speed:
- laboratory autotransformer;
- adjustment board for household appliances;
- screwdriver buttons, grinders;
- lighting regulators (switches, toggle switches).
The adjustment scheme is simple, you can do it yourself.
This is a satisfactory option for a pump or fan. For more powerful mechanisms (for example, machine tools), a different regulator circuit will be needed.
The essence of the question is how to reduce speed without losing performance? The connection is made through a tachogenerator, which transmits the number of turns to the speed controller microcircuit, which coordinates the cycle using a thyristor.
Such a board allows you to either increase or decrease the speed, but requires constant, intensive cooling due to overheating. A detailed video about how the speed and power of the stroke are regulated by connecting to the microcircuit can be viewed here:
Now you know what speed different types of engines make and how to set up this process in your home workshop. Good luck!
Adjustment methods
The easiest way is to use any voltage regulator, such as triggers, dimmers. Now you need to do the following: connect the coil cable with the armature, connect the second wire of the coil to the network, connect the armature wire with the dimmer, and connect the dimmer output to the network. We start the engine. To regulate the speed of the washing machine without any loss of power, you will have to use a more complex connection diagram.
Through a microcircuit. Thanks to the tachometer generator, we can regulate the speed of the washing machine without losing power. But the sensor itself cannot regulate engine rotation. In reality, control occurs using a special microcircuit when connected to a tachogenerator
(from ancient Greek τάχος - “fast”, “speed” and lat. generator “manufacturer”) - an electrical micromachine, a measuring generator of direct or alternating current, designed to convert the instantaneous value of the frequency (angular velocity) of shaft rotation into a uniquely related at the speed of the electrical signal.
“>tacho, armature winding, which will be connected to the network. This chip is called TDA 1085.
Types of motors
Asynchronous
- Simplicity of design.
- Easy maintenance.
- Fairly low noise level.
- Inexpensive cost.
Among the disadvantages, it can be noted that it has:
- low efficiency and;
- impressive in size.
Often such engines are used in inexpensive washing machines.
Collector
- Modest dimensions.
- Huge starting point.
- Simplicity of the control circuit.
- Short service life.
- Weakening of the magnetic field, which subsequently prevents the drum from rotating.
Direct drive
- Simplicity of design.
- It has an efficiency higher than that of other types of engines, while the vibrations of the machine are much lower.
- The sound level emanating from the MCA is also low.
- Due to the complexity of the circuit, manufacturers need to put in more effort, which increases the cost.
Correct connection of the commutator motor
Whatever the engine power of an automatic car, it must be controlled correctly. Therefore, it is important to be able to regulate the speed.
Let's figure out how to connect a commutator motor and identify the wires of the tachometer, which acts as a speed controller.
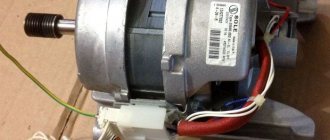
- In some motors, the stator and rotor terminals can be identified by color. As shown in the photo below, the first two white wires are the tachometer outputs. You won't need them to connect yet. Red and brown are the stator wire, gray and green are the rotor.
- To be sure, test the wires with a multimeter, looking for pairs. The working winding shows less resistance, while the outputs of the tachogenerator (speed sensor) should show about 70 Ohms.
- According to the diagram, connect the stator output to the rotor output, connect the remaining two wires to a 220 Volt network.
After the engine is started, monitor how many revolutions it produces. There are two circuits that regulate the rotation of the washing machine - we will describe them below.
Connection and launch
When dismantling the electric motor from the washing unit, it is recommended to make special marks on all its wires. These steps will help you connect the motor directly to the electrical network in the future (this is especially true for asynchronous electric motors from old washing units, which require connecting starting capacitors). Other types of motors also have their own characteristics.
Therefore, to correctly connect each type of electric motor, it is best to search for information on the Internet or use special reference books for this. And if during dismantling all contacts were marked, then starting the motor from the washing device will not be difficult. To do this, you just need to follow the instructions for connecting a certain type of engine to the network and adhere to safety rules.
How to dismantle a commutator type motor?
The motor from a washing machine with a commutator circuit belongs to the category of low-voltage modifications. The stator contains permanent magnets connected to a constant voltage.
There is a sticker on the motor that indicates the voltage required for operation. Connecting the motor from a washing machine with a collector configuration assumes that this indicator is supplied.
Tips for use
With careful and proper handling, a washing machine can last much longer and require repairs less often. To do this you need to follow a few simple rules.
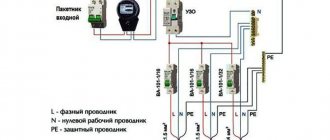
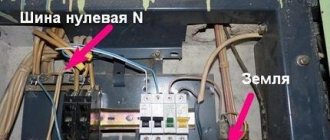
- When connecting, you need to carefully select wires based on power, brand and cross-section. Two-core aluminum cables cannot be used, but copper or three-core cables can be used.
- For protection, you must use a circuit breaker with a rated current of 16 A.
- Grounding is not always available in houses, so you need to take care of it yourself. To do this, you will need to separate the PEN conductor and install a grounded outlet. It is better to choose a model with ceramic fittings and a high protection class, especially if the “washing machine” is in the bathroom.
- When connecting, do not use tees, adapters and extensions.
- If there are frequent voltage fluctuations, it is necessary to connect the washing machine through a special converter. A good option is an RCD with parameters no higher than 30 mA. The ideal solution would be to organize catering from a separate group.
- Children should not be allowed near the machine for playing with buttons on the control panel.
Do not change the program during washing.
Motor models and their power
If you want to understand in as much detail as possible the technical characteristics of the washing machine you are purchasing, you can clarify which engine it is equipped with. There are enough variations of motors; different manufacturers choose, in their opinion, the optimal engines for their equipment. Let's talk about some models.
- Engine CESET MCA52/64-148/AD You can find this motor on automatic Indesit and Hotpoint-Ariston machines. The engine power is 430 watts, which corresponds to 11.5 thousand revolutions.
- CESET MCA38/64-148/CY15 electric motors are equipped with washing equipment from the Candy, Zerovat and Hoover brands. Characterized by a power of 360 watts, they are capable of accelerating to 13,000 rpm.
- The engine of the CESET CIM2/55-132/WHE1 series is installed on automatic machines manufactured by Whirlpool and Bauknecht. The motor power reaches 800 watts, the speed of revolutions is up to 17 thousand.
- The WELLING HXGP2I.05 WASHING engine is also equipped with Indesit equipment. In addition, such motors can be found on some Vestel models. The maximum power of the engines does not exceed 300 Watts.
- HXGP2I Welling Electronic Control. This electric motor can be found on Samsung and Ardo automatic machines. Their power rating is 300 watts.
Some modern engines can be adjusted by adjusting the speed. For this, a tachogenerator is connected. The sensor will monitor the number of turns and transmit all information to the main control module.
Today, the vast majority of washing machines are equipped with either commutator or inverter motors. Asynchronous two-phase engines are a thing of the past; now they can only be found on older semi-automatic machines, “Fairy” or “Vyatka”.
Interesting:
- Technical characteristics of the washing machine motor
- What is the power of the washing machine motor?
- Advantages and disadvantages of an inverter motor in…
- Which Bosch washing machine is better to buy?
- Which motor in a washing machine is better, inverter or...
- What brand of washing machine should I buy?
Reader comments
- Share your opinion - leave a comment
Second life of an electric motor
From an old, out of order washing machine, it is possible to make many homemade items for household needs. Many of its elements are suitable for this, including the body, drum, covers, etc. But units are most often made for use in household purposes, home workshops or garages - using a motor.
You can use the electric motor from a washing unit, for example, by making a homemade juicer for the kitchen, a vibrating table for the workshop, as well as making many other useful devices and accessories that can greatly simplify certain types of work for a home craftsman.
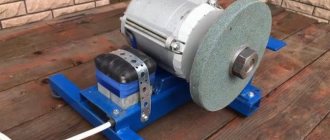
Grinder
To make a sharpening machine, a high-power motor is not required, and in terms of the number of revolutions, any electric motor from an old washing machine can be suitable.
To build the machine, you need to prepare a base plate for it from a piece of thick wooden board and attach an electric motor and a switch removed from the same washing machine to it. Metal brackets can be used for fastening.
Next, cut the thread and attach the adapter-attachment to the shaft for attaching the grinding wheel. An adapter with a neck for a cutting abrasive wheel can be supplied with the nozzle. Then you will have a cutting machine that can be used to cut plastic pipes, as well as fittings, metal sheets or corners.
The result may be a compact, portable and almost universal sharpening and cutting machine, the manufacture of which will not require the use of electric welding.
Feed cutter and grain crusher
Another homemade product to help those involved in agriculture can be made from an electric motor removed from washing equipment. This is a grain crusher and feed cutter in one.
Converting a laundry machine into a feed cutter doesn't require much effort. To do this, you only need a machine body with top loading of laundry and the electric motor itself. The case can be purchased for pennies at points where scrap metal is accepted or searched at a landfill.
The manufacturing technology of the feed cutting unit itself will be as follows:
- Cutting blades (knives) are made from steel strips, which slightly do not reach the walls of the washing drum.
- At the bottom of the drum, under the knives, a small hole measuring approximately 50x50 mm is made, through which the ground feed will come out.
- The blades are attached to the motor shaft near the very bottom of the washing drum. For more efficient operation of the feed cutter, it is advisable to use two shafts, which should rotate in different directions. If there is a second shaft, additional blades are installed approximately 100-150 mm above the lower knives. Naturally, you will have to install two electric motors: one from below under the feed cutter drum, the other in the middle of the drum
- Install the electric motors and connect them to the shafts with cutting blades.
- You can cut a hole in the lid for placing raw materials into the drum for preparing feed.
A device made on your own will cost much less and will work almost as well as one made in a factory.
Making a mortar mixer
For those who are planning to build or make repairs in the future, the motor from the washing machine can be useful for making a full-fledged mortar mixer, which can facilitate the process of construction work and at the same time save significant money. This will be especially beneficial for residents of rural areas, where the construction process practically never ends.
The process of making a mortar mixer looks something like this:
- The base for the mortar mixer is best made from 50-gauge steel angle. To do this, you need to cut out two pieces of 600 mm each and 4 pieces of 800 mm each, from which two triangles should be welded.
- Nuts are welded to the tops of the triangles, the internal diameter of which must be more than 30 mm.
- The triangles are positioned vertically at a distance of 500 mm from each other, after which a metal pipe is threaded through the nuts, at the ends of which limiters are welded.
- At the bottom, the racks are welded together with two corners, and the result is a rigid structure, to which a frame with a container for mixing the solution will be attached on top.
- The frame is made measuring 1.4 x 0.4 meters from the same corner as the base. In the center of the finished frame, an additional cross member is welded from an angle, after which it is rigidly fixed using electric welding to a pipe inserted into the holes of the nuts.
This design is convenient in that it works like a swing, and the prepared solution can easily be poured out of the mixer by simply tilting the tank.
To mix the solution, it is best to use a washing tub from a top-loading machine. Its capacity is just enough to mix several buckets of solution.
The activator is removed from the tank and the hole for draining the water is tightly closed. Instead of an activator, a shaft is installed on which a steel strip with sheet metal blades is attached inside the tank.
The tank is placed and secured to a movable frame welded to the pipe of the mixer base. An electric motor connected to a shaft is attached externally to its bottom. To do this, two holes are drilled in the bottom of the tank, the same size as those located on the motor housing, after which the tank is rigidly bolted to the barrel.
After this, all that remains is to connect the electric motor and test the operation of the mortar mixer.
DIY vibration table
Using the motor from a washing machine, we can make a vibrating table for paving slabs.
Equipment of this type is constructed in a fairly simple way. A homemade vibrating table is made in the form of a plate, which is the upper part of the device, attached to a metal base using a movable connection, with a motor with an eccentric from a washing machine. When the slab vibrates, air bubbles come out of the concrete that is poured into the molds on this slab and voids disappear. Thanks to this, the finished products are characterized by high strength and quality.