A belt drive is used to transmit torque from the electric motor shaft to the drum. When replacing? rotor ball bearings or damage to the drive wheel, it becomes necessary to remove the pulley from the washing machine motor. The impeller is fitted with an interference fit and secured against turning by a key or screw.
Remove the washing machine drum if there is a disposable tank
If you need to twist a disposable tank, then after repairing the machine you will need to replace it with another one, it is best if it is no longer disposable.
We will look at the method of disassembling the drum in more detail below. The need for this arises when you need to separate the cross from the drum. The crosspiece needs to be replaced if the bronze bushing wears out. Finally, a few tips on how to properly care for your laundry assistant so that it lasts longer and you no longer need repair recommendations.
- Wipe the exterior and interior of your machine regularly to remove water stains. You can use a solution of dishwashing detergent on the outside; just wipe the inside of the drum with a damp cloth.
- After each wash, leave the hatch door open for a while to allow any remaining water from inside to evaporate.
- Periodically wash the conditioner container without using household chemicals.
- If the quality of the wash has deteriorated, and an unpleasant odor appears in the machine, then deep cleaning is necessary. To do this, you can purchase a special product in the store, or prepare it yourself. Simply mix 1 tablespoon of powder with ¾ cup of bleach. The resulting mixture must be poured into the machine and run a pre-soaking cycle, and then turn it on for rinsing. After completing the process, make sure that all the solution is removed from the drum.
- If you use the top surface of the machine as a shelf, cover it so that it does not get scratched or dirty. Do not place sharp objects on it and avoid contact with corrosive substances.
- It is advisable to change the connecting hoses for draining and collecting water every 5 years and regularly inspect them for wear and cracks.
By following these simple rules, you will be able to keep your machine in working condition for a long time.
Washing machine repair
Again the washing machine became mopey and during the investigation I learned a lot of new and interesting things that I would like to share. Professional repairmen most likely won’t learn anything new, but microcodiles will definitely learn something.
This is a starter picture for you.
It all started with error E10. For our Electrolux, this means an inability to get water. I ran to check the condition of the nets. Everything is fine in the hose. At the entrance of the washing machine, too, more or less. Well, of course, I washed everything and put it back together. I thought it helped, but it didn’t. It still starts to dial, and the sound is very strange, as if it’s picking up slowly. And then for some reason I thought that the pressure switch was to blame. The first stupidity in this long distance race. As usually happens, a bad head gives repentance to the legs, so I quickly bought a new one and went to install it. At the same time I checked the hose. Replaced. As expected, the defect did not disappear. But I have an original pressure switch, which I immediately opened to study its operation. Next time I’ll tell you how it works (if you want).
I began to think further. And then I somehow climbed to the risers (I have a warehouse for household chemicals there), and at that time the washing machine was trying unsuccessfully to draw water. And I noticed that the water meter was barely spinning. Then I realized that it looks like the block with the valves is clogged! Again I took everything apart, unscrewed the valve block (I have a fancy one with two, on the previous Bosch washing machine there was only one). I looked through it all. I found an impeller with a reed switch inside - the washing machine itself can measure water flow. Put it back together. Then I made a mistake on the relay that opens the water intake valve. I thought that if the water flows slowly, the valve probably opens just a little, and this could only be because of the relay. Again I disassembled the washing machine to take a photo of the installed relays.
I went looking for the relay. Everything in the stores is sour, the relay itself is cheap, but delivery is 4 times more expensive. I remembered that the giblets from the Boche are lying around! I found it and unsoldered 3 things.
Before soldering I decided to check. Before this I realized that the problem was only in one valve. Because for washing, water is drawn normally, but for rinsing only through E10. Started the wash. I waited for the rinse. I paused it. I removed the top control panel and swapped the power wires for the electromagnets. I continued washing and the rinsing continued successfully. Thus, it became clear that the problem was only in the rinse valve.
Before the heap, I decided to take a closer look at the water valve from Bosch. And this turned out to be the brightest thought. He turned it over in his hands and decided to break it. While the skewer guessed that the coil was simply tightly put on the shank. I hooked it with a screwdriver and it came off quite easily. And then I saw the carving and that’s where the map struck me! It turned out that Electrolux has a similar device.
The coil is pressed onto the shank. And the shank is simply screwed into the body.
When I took it apart everything fell into place. I thought there was 220 power supply to the electromagnet in order to pull the tight spring that holds the water pressure. But it turned out to be a little trickier. The water pressure shuts itself off. And in order for the valve to open, a small metal peg rises, which opens a tiny hole in the middle of the cuff. Water then seeps under the cuff and lifts it. And then water flows normally through the perforation of the cuff.
I took off this cuff. In the middle there is a plastic insert in which this starting hole is located. And it was slightly clogged. Because of this, the water flowed very poorly and did not raise the cuff for normal water flow.
Unfortunately, while I was washing it, I accidentally tore it. I had to take a cuff from an old Bosch (it fit perfectly, although the seat of the electromagnet is different).
I assembled everything and haven’t had a single error for a week now.
Oh, if only I knew in advance that everything was so simple.
I advise everyone to put a filter in front of the machine so that they don’t have to take it all apart and clean it.
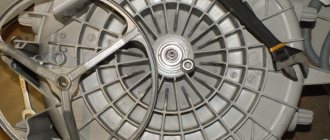
Reasons for pulley failure
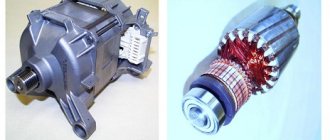
The pulley is a ring with a groove corresponding to the profile of the belt used. The outer part is connected to the hub using spokes reinforced with stiffeners. The part is cast from reinforced plastic or aluminum alloy, and then goes through a dynamic balancing stage (to reduce vibration of the equipment during operation).
Common causes of failure of a part installed on the motor:
- destruction of the spokes or bead as a result of material fatigue;
- the appearance of material peeling on the treadmill due to manufacturing defects, which damage the belt during operation;
- Damage to the mounting hole due to installation of the pulley with a misalignment or insufficient fixation.
Unscrewing the pulley bolt
The drum needs to be dismantled not only if a foreign object gets in, but also to replace the bearings. Different car models may have different tanks, but the algorithm for disassembling is approximately the same. First you will need to remove the pulley.
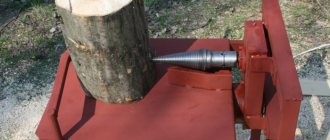
The pulley is attached to the drum shaft with a special bolt or nut right in the middle. The pulley twists in a counterclockwise motion, and it is better to place some object, for example, a block of wood, to avoid twisting.
Unscrewing the washing machine pulley bolt
Unscrewing a bolt is a rather difficult task, because it is reinforced with a compound specially poured into the hole that prevents it from unwinding during vibration. What to do if you can’t unscrew the bolt the first time? You can use a gas burner to heat it up. The metal will heat up, move, and require less effort to remove. Before using a gas burner, be sure to read the safety instructions, because working with it requires certain skills.
Heating method
If a thermal method was used to install the pulley, based on the expansion of materials, metals in particular, when heated, then a thermal effect on the pulley will be required for its dismantling:
- due to the heating produced from the edges of the pulley, the diameter of the hole increases by fractions of a millimeter and, accordingly, the degree of pressing against the shaft decreases;
- after this, it becomes possible to move the part from its seat by successively tapping it from different ends.
What you should pay attention to when using this technique:
- one-time heating may not be enough, especially with a large pulley hole diameter;
- the shaft must be reliably isolated from the temperature-increasing action that is applied to the pulley, since in the case of indirect heating of the shaft, the mating of the elements will only become stronger;
- if this happens, you must wait until the elements have cooled completely and repeat the procedure.
Depending on what material the pulley and shaft are made of, another strategy may be chosen, in which, on the contrary, the shaft is cooled.
Self-diagnosis
Before removing or checking the condition of the drives, you must:
- Turn off power to the equipment, and then disconnect the water supply and drain lines.
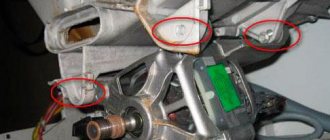
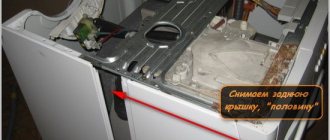
- Remove the side covers and rear wall to gain access to the belt drive. On some machines, the belt drive is covered with an oval-shaped shield, which is attached to the body with Phillips-head screws.
- Place the machine on the side surface of the body.
- Remove the belt from the pulleys, loosen the motor mount to reduce tension, or remove the belt manually (by holding the rubber element with your hand while simultaneously rotating the impeller on the drum).
Withdrawal procedure
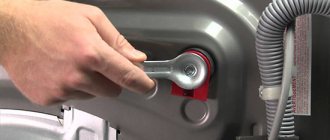
To remove the pulley from the washing machine drum yourself, you will need a screw puller for rolling bearings. The central nut is first unscrewed (not available on all installations), which can be kept from unscrewing spontaneously by a metal washer. Then the legs of the device are inserted between the spokes and rest against the rear part of the hub, the screw is located in the centering hole on the axle. When the handle rotates, the part is smoothly pulled off the shaft without damaging the mating surfaces.
Possible difficulties
If you have no or insufficient experience in repairing washing machines, you may encounter a number of difficulties, including:
- broken wires;
- cuff tear;
- breakage of the pulley when removing it from the axle;
- breakage of the bolts on which the parts are attached;
- breakage of pipes;
- deformation of the bushing during bearing removal.
To avoid such troubles, you need to act carefully, applying a minimum of effort. Otherwise, the damaged part will have to be replaced. If the wires are inexpensive, then if the bushing breaks, you will have to buy a new drum.
Pulley installation
Installing a keyed wheel consists of the following steps:
- Insert the segment or rectangular key into the groove provided on the motor shaft.
- Heat the new pulley to a temperature of 125-150°C, and then put the part on the axle.
- Install the drive element using a mandrel and a hammer until it stops.
- After the parts have cooled, the engine is installed in its original place, and then the belt is put on.
- Check the operation of the drive, replace the removed covers of the washing machine body.
When installing the drive on a spline shaft, it is necessary to apply thread locking agent to the surface of the axle. The pulley for the poly V-belt is placed on the shaft using a screw press or a vice; warping of the parts is not allowed. The element is installed on the shaft to its original state (the location of the end edge of the pulley must be marked on the shaft before removing the part).
The drum pulley is put on the shaft in a heated state; sealants are not used in the connection. The part is pressed onto the shaft until it stops by striking a wooden spacer with a hammer. Excessive force poses a risk of structural failure. Then the central bolt or nut is tightened, which is kept from spontaneous unscrewing by a thread lock or the bent edges of a steel washer (depending on the manufacturer of the washing machine).
What are the options for mounting the unit?
To remove the pulley from the electric motor that drives the tank using a belt, you must first determine the type of its fit.
Mounting methods differ in appearance and are defined as:
- spline connection (has a serrated edge of the shaft end);
- “hot” landing (the end of the engine axis is visually smooth and completely round);
- keyed fit (a groove is visible at the end);
- fit on a cone with a lock nut (the presence of fasteners is visually noticeable).
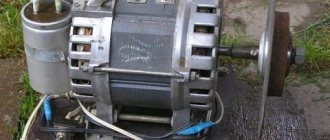
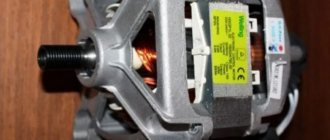
Automatic washing machine drive pulley
The vast majority of modern front-loading washing machines (Indesit, Bosch, Electrolux, Elgie and others) are equipped with a serpentine belt drive. Their pulley looks like a cylinder with transverse annular grooves. The fit of the part is usually splined or hot. The large wheel that turns the tank is usually secured with a locknut or screw.
What part is it and where is it located?
In the language of an amateur, a washing machine pulley is a rather large round wheel that is located behind the washing machine drum. This wheel is equipped with a belt that transmits engine speed to the pulley, causing it to rotate itself and rotate the drum with dirty laundry. The mechanism is quite simple, primitive, but at the same time quite reliable and effective until, of course, it breaks.
Getting to the pulley is quite easy. It is necessary to turn off the washing machine, pull it out of the niche in which it stands and unfold it. To find the pulley, you will either need to open the technical hatch, which is often located on the back of cars specifically for repairing the belt and replacing the pulley, or if there is no hatch, remove the rear wall. In any case, unscrew a few screws and you are there, remove the back wall or hatch, and the pulley is in front of your eyes.
Engine speed is transmitted to the pulley through the belt, which means the belt is the main weak point of the mechanism. Many masters think so, and they are right, but there is one thing. Frequent breaks and slipping of the belt can be the result of a faulty pulley, and sometimes only an experienced eye can notice this fault.
For your information! In very rare cases, the belt will come off and break due to the motor and not the pulley.
How to detect a breakdown?
A sure sign that a washing machine pulley needs to be replaced is frequent problems with the belt. If the belt flew off several times, then stretched out and became unusable, and you changed it and the problem remained, then the problem is not with the belt, but with the pulley.
Cheap washing machines made in Russia and China, made from counterfeit parts, quite often have a similar problem. A slightly bent pulley is installed on the washing machine directly at the factory, and then, soon, it begins to “float the brain” of the owner. Sometimes pulleys are made so clumsily that in their working grooves you can see sharp metal burrs and edges, thanks to which the belt wears out in 5-6 washes.
Important! When removing the old belt from the electric motor and pulley of the washing machine, inspect it carefully. Any abrasions, tears and cracks should alert you.
If there are frequent problems with the belt, or the drum rotates too slowly during washing and spinning, you need to check the condition of the pulley. To do this, the pulley does not need to be removed. Do the following:
- remove the back wall of the washing machine;
- remove the belt, to do this, grab the belt with your left hand, and with your right hand, twist the pulley, the belt will come off;
- grab the pulley with both hands and swing it from side to side;
- carefully run your finger along the working surface of the pulley and check it for sharp edges and burrs;
- Inspect the pulley for deformation.
If defects are found: bent or sharp edges, etc., the pulley must be replaced. Do not leave everything as is, otherwise the belt will have to be changed every two months, or even more often.
Replacement
To replace a part, you must first carefully remove the old drum pulley. This can be quite difficult to do, since it is not just put on the drum shaft, but also secured with a bolt, which in turn is not just screwed in, but placed on a sealant. But first things first.
- We disconnect the washing machine from the power supply, water supply and sewerage.
- We take it out to a free place so that it is convenient to work. If there is a barn or workshop, it is better to drag it there.
- Take a Phillips screwdriver and unscrew the screws holding the back wall or service hatch.
- We remove the back wall.
- Next you need to remove the drive belt from the engine and pulley.
- We inspect the pulley to make sure there is damage.
- We take a small wooden block and use it to clamp the pulley and crosspiece. This is necessary so that the shaft and pulley do not rotate and interfere with unscrewing the bolt.
- Now take a blowtorch and heat the bolt a little, but do not heat it red hot. While the bolt is still warm, spray it with WD-40 or similar lubricant.
- We wait a little while the lubricant comes into contact with the remaining sealant, then throw on the wrench and unscrew the bolt.
The bolt may not give in the first time, don’t despair, take a hammer and gently tap the key. Over time, you will be able to break the bolt this way, just don’t knock too hard so as not to damage the edges.
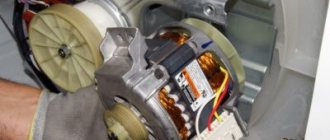
Then all that remains is to remove the drum pulley and continue the repair. The next step is to check the engine pulley. Very often, when problems arise with the drive belt, the cause lies in the engine pulley. It is even more difficult to remove than the drum pulley. The motor brushes may also need to be replaced. How to remove the engine pulley?
- First, unscrew and remove the washing machine motor, not forgetting to disconnect the wires from it.
- We take a special puller for pulleys and bearings.
- We clamp the pulley of the washing machine motor with a puller, creating maximum tension. You won’t be able to immediately tear the pulley off the shaft, so don’t break the puller; it costs money.
- We take a gas burner and carefully heat the pulley, while trying not to heat the puller itself and the shaft.
- As the pulley heats up, increase the tension; it should come off. If the gas torch does not produce sufficient heat, use a blowtorch, but handle it with extreme caution.
We are done with removing the drum pulley and motor pulley, now we need to install new pulleys. Installing the drum pulley is not difficult. You just need to put the new part on the drum shaft, lubricate the bolt with sealant and tighten it with a wrench. You will have to tinker a little with the engine pulley.
- We take a blowtorch and light it.
- We wait until the lamp warms up properly and begins to produce the maximum flame temperature. To speed up the heating of the lamp nozzle, you can point the flame of a gas burner at it.
- We clamp the new engine pulley with pliers and heat it with a blowtorch.
- We put the heated pulley on the motor shaft, and then quickly, before it cools down, press it in using a hammer and a metal rod.
Keep in mind that the blows must be applied lightly so as not to break the engine. Typically, hot pressing does not require much effort. Once the pulley has cooled, it will sit securely on the shaft. That's all, all that remains is to put the engine in place, then put on the drive belt and install the rear wall. You can test the car!
Interesting:
- How to put a belt on a washing machine
- Repair of Asko washing machine faults
- Indesit washing machine does not spin the drum
- How to change the belt on an Ardo washing machine?
- How to repair a Samsung washing machine
- Belt spins in washing machine
3 reader comments
- 09/30/2016 at 20:28
Yuri:
Many thanks to the author for the hint - to heat the tank pulley bolt. The bolt was “sitting” dead. I just did not heat it with a burner, due to the lack of one, but with a SKIL hairdryer at 1800 watts. Before heating, I covered the plastic of the tank with corrugated cardboard, just in case. Then the hair dryer was in the 3rd position (approximately 570 degrees) and heated the bolt for about 2 minutes. Then a gentle blow to the key, and - ... away went darling :) Further, like you ..., with the only difference that the bolt I had was M12x30, countersunk 90°, with internal. 6 grains on “8” By the way, also with the heated bushing, I repressed both tank bearings. PS Noticed such garbage. The end of the bushing facing the tank is severely damaged by corrosion. The material of the sleeve, judging by its appearance, is made of third-grade aluminum. alloy, g….o, in other words.
Answer
- 11/29/2017 at 11:05
Anonymous:
I have a hairdryer for microcircuits - its power was not enough, but I have a camp stove along with hammer blows - they do not leave anyone indifferent! Unscrewed it!)
Answer
- 02/09/2020 at 22:35
Alexey:
Masterpiece tips. But what if the pulley is plastic? Should I use a soldering iron or a hairdryer?