Like any complex household appliance, Ariston washing machines can also fail. And some types of breakdowns can only be eliminated by almost completely disassembling the machine into its component parts. And since most of these problems with the Ariston washing machine can be eliminated on your own, the independent disassembly process should not be intimidating. Now let’s look at how to turn this into reality.
How to remove the lock from an Indesit washing machine?
Indesit
Washing
machines
of this brand often block if there is some water left in the tank after washing. In this case, you need to activate the “Drain” mode, wait a while and try to open the device. If the attempt is unsuccessful, you will have to manually pour out the retained liquid using a hose.
Interesting materials:
How to enable caller ID display on iPhone? How to enable the display of hidden and system files and folders? How to enable display of line thickness in AutoCAD? How to enable display of all users in Windows 10? How to turn on a Lemax heating boiler? How to enable fingerprint on hp laptop? How to enable fingerprint on Lenovo laptop? How to enable delay start in an LG washing machine? How to enable grayscale on Samsung? How to enable replies to Instagram stories?
Preparation for repair
We do not give a 100% guarantee that you will fix your washing machine. We provide recommendations for disassembling the machine. Therefore, if you are determined to replace a faulty part or find the cause of a breakdown, start preparing.
What tool do you need?
You will need:
- Screwdrivers of different configurations: slotted (flat), Phillips, hex.
- Set of Torx keys.
- Open-end wrenches 8 mm and 10 mm.
- Hammer and chisel.
- Pliers.
- Wire cutters.
- Hacksaw and metal blade.
To disassemble the Ariston washing machine, you need to properly prepare it:
- Pull out the plug from the socket, de-energizing the SMA.
- Close the water supply shut-off valve.
- Unscrew the inlet hose nut from the machine body. Since the back cover needs to be removed, it is better to move the hose completely to the side.
Preparing the washing machine also involves draining the remaining water. Therefore, prepare a collection container in advance. When unscrewing, water may flow out of the inlet hose.
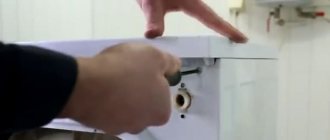
- Moving to the front, locate the drain filter. It is located at the bottom of the hull, behind the hatch. Open the hatch by releasing the latches. Unscrew the filter and drain the water. At the same time, clean the part from debris.
- Move the machine away from the wall so that you can easily move around and remove parts.
This completes the preparation. You can provide in advance a container for collecting bolts and screws, of which there will be a lot.
Types of pollution and factors causing them
Before cleaning the filters, it is necessary to determine the type of contamination and the reasons for its occurrence. To prevent the formation of dirt, there are preventive methods and means. Knowing the causes, consequences and ways to eliminate the problem, you will extend the life of your machine and ensure its trouble-free operation.
In addition to the usual garbage that gets into the washing machine along with things, ordinary dirt, limescale, scale and mold deposits can be considered as filter contaminants. There are different methods and available means to eliminate them. With their help, you will not only clean the filters, but also prevent the appearance of contaminants.
Poor quality water becomes one of the main reasons for the formation of scale and limescale on filters and other machine parts. Professional and home remedies can be used to clean the washing machine.
Professional tools are selected in accordance with the functional features of the device and your financial capabilities.
Whiteness is considered a simple and affordable remedy. Cleaning can also be done mechanically, but not independently, but with the help of specialists who use special devices for these purposes.
When dirt, lint from clothing gets on the filter, as well as when cleaning is not done in a timely manner and low-quality laundry detergents are used, deposits of dirt, mold and an unpleasant odor are formed. Cleaning is carried out, as in the first case, with home and professional means.
How I found my ideal hair growth product
Hello dear! I want to share with you my solution to the sensitive problem of hair loss . The problems are very serious, at least for me. I would never have thought that this misfortune would touch me, especially at the age of 29 (read more...)
In addition to vinegar and citric acid, it is recommended to use copper sulfate and soda, as well as whiteness. After cleaning and finishing the rinsing cycle, all parts must be wiped with a clean, dry cloth and dried.
Bearing replacement: procedure
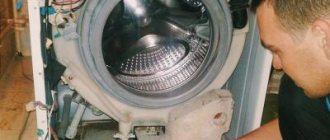
To replace the bearing, you need to get to the washing machine drum on which it is installed. The car is disassembled, gradually removing all the parts from it.
Emptying the washing machine tank
The body of the unit begins to be disassembled from the cover by unscrewing two bolts located on the top on the far side. To do this you will need a Phillips screwdriver. Once the bolts are removed, the cover must be pushed forward towards the scoreboard and then removed.
To remove the dashboard , open the detergent compartment and remove it by pressing the latch in the center. In the resulting niche you can see several bolts and several more on the opposite side of the panel. The bolts are unscrewed, all the plastic latches are opened, after which the wires are disconnected and the panel is removed to the side.
To get to the washing machine tank, first remove the lid and dashboard
Next, remove the back panel - unscrew the bolts around the entire perimeter and remove the cover to the side. By carefully rotating the pulley wheel, remove the belt that connects the motor shaft to the pulley mounted on the tank.
The next step is to remove the back panel and the belt connecting the motor shaft to the pulley
Then they move on to releasing the top of the tank . Disconnect the pipe that leads from the powder compartment to the tank, remove the contacts of the valve that lets water into the washing machine. Remove the valve and pipe to the side.
Take photographs of the location of contacts, bolts and parts before proceeding with dismantling. After completing the repair, this will help you quickly and correctly reassemble the washing machine in reverse order.
Next, unscrew the bolts that secure the counterweight and remove it. Disconnect the hose connecting the pressure switch to the tank.
To free the washing machine tank, you need to remove all the parts located in the upper part of the body
The next step is to dismantle the front panel . First, remove the rubber cuff from the hatch of the washing machine, carefully prying it off with a screwdriver. Then unscrew the bolts located next to the lock mechanism and disconnect its wiring. The hatch door is removed by first unscrewing the screws that hold its hinges.
To remove the hatch cover, you need to unscrew the bolts that hold its hinge
All that remains is to unscrew the bolts located around the perimeter of the front panel and remove it.
Next we move to the back of the installation . Disconnect the wiring of the heating element and the washing machine motor. The heating element is left in its place, but the motor is dismantled, having first removed all the bolts that hold it in place. Then remove the counterweight installed below.
To get to the washing machine tank, you will have to remove the engine.
Finally, the shock absorbers on which the tank is attached are disconnected and removed from special hanging hooks.
The shock absorbers are disconnected from the tank last.
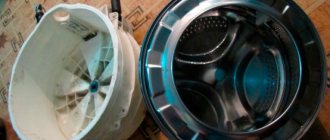
Now the tank can be removed from the body, unscrew the bolts and remove its front part.
In the photo you see the open tank of the washing machine, in which the drum is located
A shaft (metal axis) is inserted into the rear wall of the drum, passing through the bearing, the wall of the tank and connecting to the pulley. To get to the bearing, the pulley must be disconnected.
Usually the bolt securing the pulley is not just tightened, but also additionally set with glue. Before unscrewing, spray it with WD-40. If this doesn't help, you can use a hammer and chisel.
Unscrewing the bolt that secures the pulley can be very difficult
After removing the pulley, unscrew the bolts attaching the drum to the tank, unfasten the latches and remove the tank wall. Now you can proceed directly to replacing the bearings in the drum.
How to open a non-separable tank
Most Ariston washing machine models are available with a non-separable tank. Making a one-piece tank is easier for the manufacturer (no screws and fasteners), but this is not the only reason for producing non-separable parts. If a drum, bearing or other elements located inside a solid tank fail, the manufacturer recommends replacing it entirely.
However, there is a way to replace the bearings in this situation. This allows you to minimize repair costs.
If, when a bearing fails, you are offered to completely replace the washing machine tank, it may be worth turning to other specialists who can save your budget and make a spot replacement.
If you take out the tank and find that it cannot be disassembled (there are no bolts connecting the two halves), you will have to spend time opening it. Let's look at how to disassemble a solid tank, step by step with photo illustration.
First of all, using a drill, holes are made around the perimeter of the weld at a distance of approximately 5 cm from each other.
The next, most important step is to carefully cut the tank along the seam using a hacksaw. In order not to spoil the part, you should not rush when doing the work.
Before closing the tank (after replacing the bearing), silicone is applied to its sawn edges
The two parts of the tank are connected and bolted together using previously drilled holes.
Bearing replacement
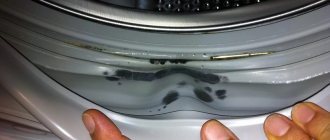
When you get to the bearing, you will most likely see signs of deformation and contamination on it. How to change a bearing? First, the old parts need to be removed.
Start with the bearing located closer to the outside of the drum. The part is laid with the hatch hole down, the chisel is placed on the outer rim of the metal ring and hit with a hammer.
Carefully monitor the position of the chisel when knocking out the bearing - if the tool slips and the blow hits the inner ring, it may fly out, and it will be very difficult to remove the remaining bearing from the seat.
The inner bearing is removed in the same way, after which the oil seal is removed.
The bearing housings are treated with WD-40, dirt and rust are removed, and then lubricated with grease.
The new part is driven into place, hitting only the outer edge. The bearing must fit into the seat all the way.
The bearing must fit into its seat all the way
The oil seal is placed on the inside of the tank, having been pre-treated with lubricant.
It is important to correctly install not only the bearings, but also the oil seal. If the latter is not given due attention, it will quickly begin to leak water, which, in turn, will lead to deformation of the bearing.
The oil seal is also treated with lubricant before installation.
Now that the bearing replacement is complete, you can begin reassembling the machine. Before installing the drum, you need to clean the bushing from rust, scale and dirt.
Let us repeat once again that replacing a bearing on a washing machine yourself is a complex process that requires special skills. Proceed with repairs only if you are firmly confident in your abilities. We hope that our article helped you.
Why do you need to change the bearing?
The average service life of a unit is from 6 to 10 years. After this time, the oil seal begins to lose elasticity, water from the tank gets onto the metal parts, washes away the lubricant, and the bearing becomes deformed.
Replacing a bearing on your own if done poorly can lead to a reduction in the service life of the entire unit. To perform the work, special skills and practical experience are required; if they are absent, it is better to contact a service center.
Bearings can “knock” before their allotted time if, for example, you constantly overload the washing machine tank during washing. Factory defects in parts cannot be ruled out.
If you notice that there is a knocking and grinding sound when spinning the washing machine drum, this means that the bearings need to be changed urgently. Do not delay replacing parts - deformation of the oil seal and bearing can lead to breakage of the washing machine shaft and other expensive parts.
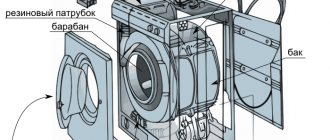
Device
Let us take as an example the classic design of a front-loading machine. There are 15 main elements inherent in it.
The device of a washing machine with front loading of laundry
Main details:
- Lid.
- The front panel - for Indesit, Ariston, Zanussi, Electrolux - is non-removable.
- The back wall cannot be removed for some Samsung and Vesta models.
- Control panel - with or without monitor.
- Tank - can be metal or plastic.
- The drum is always made of stainless steel.
- Electronic module - on some machines it is located on the panel or in the depth.
- Valves - single, double or triple.
- Drain pump.
- Shock absorbers.
- Pressostat - there are 2 pieces.
- Dispenser tank for washing powder.
- TEN - tubular electric water heater.
- Drive belt - not used on vehicles with Direct Drive.
- Motor - asynchronous, commutator or direct drive.
As well as counterweights, springs, hatch, cuff, UBL, electrical wiring, pipes and hoses.
The design of the Zanussi and Electrolux washing machines is different, but not fundamentally. The rear part of the body of these machines is removed. This can be seen in the photo below.
This is how the Electrolux and Zanussi SMAs are designed
Electrolux washing machine with half of the body removed
We will look at disassembling a top-loading washing machine separately. The differences are due to the design. The tank is made differently - in a different place there is a hole for loading laundry, with a closing lid.
The device of a washing machine with vertical loading of laundry
In the little ones, the design is exactly the same, only all the parts are pressed very tightly against each other. Among the additional devices that manufacturers can use, we note the following:
- “shower” system - another pump is built in, which circulates water during washing;
- protection against leaks - AquaStop system;
- weighing laundry - sensor or analysis using a motor.
Video
Here you can see how the Ariston Margherita 2000 AL109X SM is repaired:
The video tells how an Ariston AFM with a non-separable tank is repaired:
Electronic engineer with many years of experience. For several years I was engaged in organizing the repair of household appliances. I am glad to share with readers my knowledge in the field of operation and repair of devices. Loves sport fishing, water tourism and travel.
Found a mistake? Select the text with the mouse and click:
Threads made of gold and silver, which were used to embroider clothes in the old days, are called gimp. To obtain them, the metal wire was pulled for a long time with pliers to the required fineness. This is where the expression “to drag out the rigmarole” came from - “to do long, monotonous work” or “to delay the completion of a task.”
There are special traps to combat moths. The sticky layer with which they are covered contains female pheromones that attract males. By sticking to the trap, they are eliminated from the reproduction process, which leads to a decrease in the moth population.
The easiest way to remove scale and carbon deposits from the soleplate of the iron is with table salt. Pour a thick layer of salt onto the paper, heat the iron to maximum and run the iron over the salt bed several times, applying light pressure.
If your favorite things show the first signs of gestation in the form of untidy pellets, you can get rid of them using a special machine - a shaver. It quickly and effectively shaves off clumps of fabric fibers and returns things to their proper appearance.
Protection from child interference
Sometimes it happens that the user unknowingly activates this mode. The child lock feature is activated by pressing two buttons. Different models of washing machines have different options for combinations of buttons that activate this option; you need to look it up in the instructions for the washing machine.
You also need to disable the child protection mode by pressing the two buttons selected for this.
The described methods will only work when there is no liquid left in the drum of the machine. But what to do when the washing machine is filled with water? It is possible to remove the hatch lock in this situation, but the solution to the problem will be a little more complicated.
Required Tools
There are several reasons why you need to disassemble the equipment:
- warm water is cloudy, there is a foreign odor;
- scale flakes are visible;
- when touching the body, a current discharge is felt;
- when the tank is turned on, the machine is activated;
- the device takes a long time to heat water or does not heat up at all;
- water is slowly rising;
- weak pressure of warm water when exiting;
- the housing is leaking.
To disassemble and subsequently assemble the Termex, Aquaverso es30v, Oasis water heater, you need to use the following tools:
- Screwdrivers - straight and Phillips.
- Wrenches. You need a universal gas wrench or a socket wrench - horn size - 22; 14; 10; 8, for some models you may need 32, 24 mm.
- Slotted screwdriver.
- Hexagon 4 mm.
- With pliers.
- Indicator screwdriver.
How to open a locked door?
It is normal for the door to lock after a cycle. Therefore, it is necessary to wait a few minutes before opening, and not pull it straight away. You can try to open the door as follows:
- You need to turn off the equipment and turn it on again. Moreover, it is important to completely turn off the power to the device by unplugging the cord from the outlet. This will allow you to reset your settings if the problem was a system failure.
- After 30 minutes, the equipment can be connected to the network. You need to run the loop again and then stop the program. If the machine has managed to fill with water, then press the drain button. After unlocking the door, you must immediately remove the laundry.
Ariston brand models sometimes block the hatch door due to an incomplete cycle. In addition, some programs do not require pumping out used water. Due to the presence of liquid inside the tank, the door cannot be opened. You can try setting a different cleaning mode or refer to the user manual.