A washing machine is usually purchased with long-term use in mind, but its service life depends on many factors: the integrity of the manufacturer, frequency of operation and regular monitoring of the technical condition of the device.
In order for the washing machine to last as long as possible, the detergents must be of high quality, cleaning and scale prevention must be timely, and the internal elements must be functional.
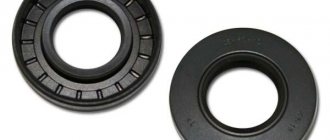
One of the small but important parts of the washing machine is the oil seal (seal) of the tank. Monitoring its condition means avoiding premature wear and costly replacement of the bearing.
To maintain the seal's performance, there is a special lubricant for washing machine seals. We will talk about what kind of material this is and whether it is really necessary below.
What is an oil seal and why is it lubricated?
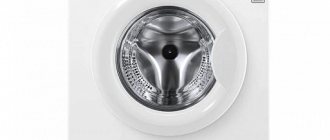
The washing machine oil seal is a small round part made of dense rubber, which serves to protect the drum bearing from water, as well as seal the moving and stationary parts of the mechanism.
The oil seal, mounted on a special bushing, is in maximum contact with the shaft on which the tank and drum of the washing machine are attached. The hermetically sealed seal prevents water from escaping through the joint gaps.
While rotating, the shaft constantly comes into contact with the inner surface of the oil seal, as a result of which the seal quickly wears out. To slow down this process, a special lubricant is used to improve sliding and thereby reduce the friction of the oil seal on the shaft.
Lubricant is applied to the seal every time it is replaced. If you ignore the lubrication process:
- The seal dries out, wears out and loses its sealing properties.
- Water gets into the bearing, which negatively affects its condition.
- The bearing is subject to corrosion, increased wear and quickly fails.
Why do you need to lubricate the oil seal in a washing machine?
First, let's look at the structure and operating principle of the oil seal. Not a single washing machine is complete without this part.
This rubber o-ring serves to protect the bearing at the joints from water. For high-quality sealing, the washing machine tank seal must fit as tightly as possible. That is why it is recommended to replace it at the same time as the bearings.
A metal bushing passes through the central axis of the tank, which, when rotated, contributes to wear of the oil seal. To prevent this from happening, it is necessary to use a water-repellent lubricant for the oil seals.
Which oil seal lubricant should I choose?
Some owners of washing machines believe that specialized compounds for oil seals can be replaced with folk remedies, for example, vegetable oil or fat. This solution is more economical, but is completely ineffective and even harmful.
The washing machine oil seal is lubricated only with special compounds. They can often be purchased together with a washing machine - some manufacturers of household appliances also produce materials for their maintenance.
Lubricant for washing machine bearings and oil seals meets the following requirements:
- It is moisture resistant, that is, it does not lose its properties with constant contact with water.
- It has a non-aggressive chemical composition, therefore it does not destroy the surface of the oil seal and metal shaft
- Resistant to temperature changes, does not disintegrate and does not lose its qualities when exposed to heat
- Has sufficient thickness and viscosity to not be washed off with water for a long time
Despite the fact that some lubricants are produced for specific brands of washing machines, most of them are interchangeable (the main thing when selecting is to take into account the main component of the lubricant).
The most popular are silicone and titanium materials, which repel water well and can withstand temperatures up to 200 °C.
If a non-separable bearing is installed
Is it possible to treat bearings with lubricant without removing their caps?
If there is a closed type element in the washing machine, you can lubricate it using a plastic bag:
- Pre-cleaning is carried out using WD-40.
- The inner ring is filled with a polyethylene bag.
- The neck of the tube containing the lubricant is cut off.
- After installing the tube on the inner ring, you need to squeeze out the contents until it appears on the other side.
- To evenly distribute the lubricant, you will need to rotate the bag.
- After removing the excess, the part is placed in its original place.
Sources
- https://mcgrp.ru/article/5747-sposobyi-smazki-podshipnika-v-stiralnoy-mashine
- https://tehnika.expert/dlya-chistoty-i-poryadka/stiralnaya-mashina/kak-smazat-podshipnik.html
- https://stroy-podskazka.ru/stiralnye-mashiny/smazka-dlya-salnikov/
- https://stiralnihremont.ru/zapchasti-aksessuary/kak-smazat-podshipnik-v-stiralnoy-mashine/
- https://cosmo-frost.ru/stiralnye-mashiny/remont-i-zamena/kak-smazat-podshipnik-v-stiralnoj-mashine/
- https://1stiralnaya.ru/uhod/smazat-podshipnik
Stages of work
Unusual sounds when the washing machine is operating, as well as poor quality of washing, indicate a malfunction of some elements. A knocking sound, for example, often occurs due to bearing wear, and oil stains on washed clothes are a sign of poor oil seal performance. Ignoring these points can lead to serious consequences, including machine failure.
To assess the condition of the bearing and seal, the device must be disassembled. The task is quite complex, so if you decide to do it, be sure to have time and patience (as well as suitable lubricant for the oil seal and bearing).
First you need to remove the tank:
- After disconnecting the machine from the network and communications, drain the remaining water from the drain filter (it is located under the front panel, behind the small hatch)
- Remove the two screws from the back to remove the top panel, unscrew the screws around the perimeter of the back panel and remove it
- Remove the drive belt from the drum by stopping the pulley with the handle of a hammer and unscrewing its central bolt
- Disconnect the wiring that may be attached to the drum using plastic clamps
- Remove the electric motor from the housing by disconnecting its wiring and unscrewing the fastening bolts; also unfasten the wires from the heating element
- After unscrewing the bolts, remove the upper counterweight of the tank
- Pull out the detergent dispenser by pressing the central latch
- Remove the control panel by unscrewing all the bolts and releasing the plastic latches
- Loosen the filler valve clamp and disconnect it from the tank
- Pull out the powder hopper by unfastening the wires from the fill valve and unscrewing the mounting bolts
- Remove the pressure switch hose, which is usually attached to the tank
- Open the hatch door by bending the sealing rubber and remove the outer clamp; tuck the cuff inside the tank; unscrew the screws of the UBL lock, placing your hand behind the SMA body, pull out the lock and unfasten the wiring
- Unscrew the screws around the perimeter of the front panel, pull it up and set it aside
- Remove the counterweights from the tank
- Unscrew the shock absorbers, remove the tank from the hooks and pull it out
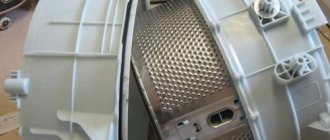
After the tank is dismantled, you can begin to remove the bearing and oil seal from the drum, lubricate them further or replace them.
- To begin, remove the drum itself from the tank by unscrewing the screws around its perimeter, releasing the latches and removing the top half
- After removing the bearing and oil seal from the bushing, assess their condition and, if necessary, replace
- Apply sufficient grease to the bearing
- Apply lubricant to the outer surface of the seal in an even, thin layer.
- Treat the inner surface of the oil seal with a thicker layer (this is convenient to do by filling the oil seal already attached to the bushing using a syringe)
- Reinstall the seal
- Reassemble the machine by performing the above steps in reverse order.
Right choice
Before you get started, you need to find out what kind of lubricant to lubricate the bearings with. There are only a few types of lubricants that meet these requirements:
- They are moisture resistant. Since the CM shaft parts are constantly in contact with water, you need a water-repellent bearing lubricant. If water washes away the substance that makes the bearing slide without wear, it will soon wear off.
- They have heat-resistant properties. Hot water in the tank and heating of the shaft during rotation can deprive a cheap lubricant of its properties. Then water will get on the parts and corrosion will begin.
- They should not have an aggressive effect on the rubber. Otherwise, the seal may become stiff, which will lead to water leakage.
- Bearing grease should be thick. Otherwise, it will simply leak out during operation.
Many users are interested in whether it is possible to lubricate bearings with Litol and other automotive lubricants. It is not advisable to use such means. They provide poor protection, so soon you will have to repair the washer again.
Which remedy should you choose?
AMPLIFON is offered by Italian manufacturers MERLONI. This is a moisture-resistant lubricant that is not washed out by water.
Anderol is known for its convenient dosage of 100 grams in jars or syringes for two uses. The product is produced by the manufacturers of Indesit washing machines.
STABURAGS NBU 12 is a water-resistant bearing lubricant that will provide a high level of wear protection. Heat-resistant and resistant to aggressive environments (cleaning solutions).
LIQUI MOLY "Silicon-Fett". Silicone grease for washing machine bearings. It has a thick texture and heat resistance (withstands from -40°C to +200°C). Adheses well, providing a high lubricating effect.
Huskey Lube-O-Seal PTFE Grease. Sticky, homogeneous texture, cannot be washed off even with a water jet. Heat-resistant, withstands from -18°C to +117°C. High corrosion protection.
What is better to lubricate
Some people think that the oil seal is processed first, while the support bearing does not need to be lubricated. This is only true if you purchased the original part.
Note! When processing the oil seal and bearing, never mix lubricants, as they may not be compatible with each other.
What can replace lubricant with?
When it is not possible to find a special lubricant for oil seals or its cost does not suit the owner of the washing machine, petroleum-based lubricants with similar effects, for example, litol or grease, can be used.
However, experts do not recommend replacing specialized lubricants with anything in order to avoid accelerated wear of the oil seals. Materials that are effective in the automotive sector are just as harmful to household appliances as edible oils and fats that are not intended for them.
How to lubricate the oil seal
Now about how to restore the oil seal with your own hands. Of course, a worn oil seal cannot be repaired. Remember a simple rule: if you decide to replace one element, you need to change the entire set if you want to perform high-quality repairs.
It is better to lubricate the oil seal using a syringe. Fill the inner groove of the oil seal and install it in place. All that remains is to assemble the SMA in reverse order.
You learned the best way to lubricate bearings and how to do it yourself. A video on the topic will help you with repairs:
Release form
Silicone greases are not as thick as pastes, so they are easier to use for maintaining rubber seals. Such materials are applied in a thick layer and rubbed over the surface with a rag or fingers.
Pastes have a very thick consistency, so they are rarely used for seals.
Aerosols are the most versatile type of silicone lubricants. They are convenient to use and dose. However, you should work with them very carefully: due to the high pressure in the cylinder, when sprayed, the lubricant splashes and can get to places where it is undesirable.
Oils do not pollute surfaces and can penetrate into hard-to-reach places, but to apply them you must use applicators (brush, rag or sponge). The lubrication process takes quite a long time.
The main advantages of silicone lubricants
Silicone lubricants have:
- High adhesion to various substrates
- Compatible with elastomers and plastics
- Inert to varnishes, paints and other coatings
- Biological inertia
- Wide operating temperature range (average values from -50 to +200 °C)
- Antifriction properties
- Good heat transfer ability
- Dielectric and antistatic properties
- Resistant to weak solutions of acids and alkalis
- Water indelible
- Elasticity
- Non-flammability
- Long service life
- Lack of smell, taste and color
Types and design
Cuffs made of moisture-resistant rubber are used in different techniques, so they have different shapes and sizes. The design is similar, only the appearance is slightly different. The quality and density of rubber varies: in some cases, oil seals are made from silicone rubber, fluorine rubber and other elastic materials.
These cuffs are made of a special waterproof material with a metal insert, which is very brittle, but it is this that helps keep the oil seal in the desired shape. When lubricating, you must be extremely careful not to break it.
Correct algorithm of actions
After completely dismantling the machine, we proceed to lubricate the oil seal - apply it evenly over the entire area of the outer contour of the cuff. After this, insert the oil seal into the workplace and carefully lubricate its inside.
As you can see, the process is quite simple, but it must be done slowly and carefully so as not to damage the fragile metal insert. After finishing the lubrication, we begin assembling the washing machine.
If it is necessary to urgently replace the oil seals due to damage or wear of their housing, a similar dismantling of the washing unit is carried out in the following sequence:
- remove the top cover, remove the back and front panels;
- disconnect the wiring, pipes and fasteners from the tank to take it out;
- we disassemble the tank into two parts to open access to the bearing assembly.
You can do the disassembly yourself, but for the first time it is better to invite a technician from the service center - he will carry out all the manipulations quickly and with a guarantee. For those who are confident in their abilities, we attach the following video to help, where the master explains all the nuances of correct installation of the oil seal.