Symptoms of Veko machine malfunctions
For experienced specialists in the repair of washing units, it is not difficult to determine while the equipment is operating which element or component may fail or require repair. If there are problems with your household equipment, then calling a specialist from the service center may be completely justified, since a professional technician will not only be able to figure out the cause of the breakdown, but will also be able to quickly fix it on the spot. Quick repair of washing machines from Service 044 at home in Kyiv and the region. You can find out more on the website - https://servis044.kiev.ua/remont_stiralok.html.
Let's look at the symptoms of malfunctions of Veko brand washing equipment:
- there is no heating of water and the washing process is observed in cold water;
- the program fails, and the water becomes very hot, not meeting the temperature set by the user;
- It takes a very long time for water to be poured into the tank;
- when the program is set, there is no water supply;
- the hatch is not able to close completely, as a result, the washing process does not begin;
- there is no drainage of water after completion of the washing process, and there is a strong hum;
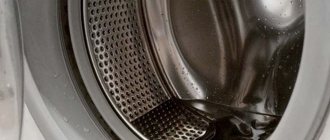
- the rotation of the drum of the Beko washing unit occurs with a strong grinding sound and other loud sounds;
- not a single washing program starts, while the household unit, after pressing the “Start” button, flashes all the buttons, or it is possible to set the program if it does not start;
- the equipment is not able to turn on from the button, while the power cord is connected to the socket;
- The Beko washing unit, which has a display, displays an error code and refuses to function
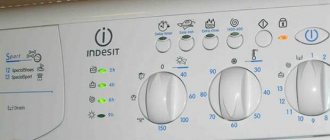
How long does the Everyday wash last?
“ Everyday wash”
"
A mode designed for synthetic items without heavy soiling. To preserve the color of items, the water temperature during washing
does not exceed 40 degrees, and the cycle
lasts
1 hour (60 minutes).
Interesting materials:
What is adaptive sleep mode? What is a hadron collider and why is it needed? What is AI Quad camera? What is Idol in Korea? What are alternative energy sources and do they have a future? What is AM in a car? What is an amp in a charger? What is suspended animation and how can it be used? What is suspended animation and examples? What is suspended animation in a crocodile?
Common malfunctions of Ardo washing machines and their elimination
To carry out independent repairs of Ardo washing machines at home, you need to clearly determine the cause of the problem and know how to solve it. The most correct thing would be to invite a specialist or take the car to a service center, where qualified specialists will diagnose and properly repair the breakdown.
All malfunctions that occur with washing machines are usually divided into:
- typical, which are common to any similar household appliances. For example, the door does not open and water does not drain. In this case, you can repair Ardo washing machines yourself using a video;
- rare. Specific breakdowns caused by failure of individual parts and requiring qualified repairs.
How to choose the right spare parts for Ardo washing machines
One of the main problems of self-repair is finding original spare parts. Many users believe that a drum bearing or drive belt is a universal thing that will fit any model from any manufacturer. In fact, to select the correct parts, you need to know the model serial number, which is located on the model nameplate. The necessary spare parts must be ordered through authorized dealers or service repair centers.
What to do if the Ardo washing machine does not turn on
Most often, problems with the inability to turn on the machine are associated with the failure of the electronic control module. There are three ways to eliminate the problem:
- replace the fuse box;
- carry out a complete replacement of the module;
- take the device to a service center or call a technician to your home.
When deciding to replace the entire electronic module yourself, it is recommended to perform a certain sequence of actions.
- The first step is to de-energize the unit.
- Next, the top panel is removed so that the user can access the module.
- The printed circuit board is freed from the fastening elements.
- The wires are also disconnected.
- The faulty element is removed and replaced with a new one.
- The reverse sequence of steps to assemble the machine is performed.
- Operational testing is being carried out.
What to do if the Ardo washing machine does not spin
There are three common reasons why a washing machine may stop spinning. All of them can be solved at home and are mostly associated with improper operation of the equipment.
- An imbalance in the drum, which can be caused either by overloading by placing too much laundry, or by not placing enough laundry.
- Selecting the wrong washing mode.
- The debris filter, which is located at the bottom of the housing, is clogged.
If, after checking the possibility of the influence of the above reasons on the malfunction of the device, the problem persists, then it is best to call a technician, since other causes of the problem may be a breakdown of the tachometer, blockages in the drain or inlet hoses, or a malfunction of the water level sensor.
How to clear the blockage and replace the pump
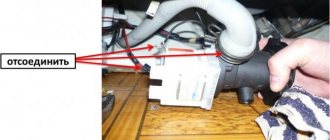
Debris getting into the drain hoses or pump may cause the washing machine to not operate properly. In this case, you can try to solve the problem yourself by removing the blockage.
- The first step is to unscrew the garbage filter, which is located at the bottom of the case. If the blockage has formed precisely in it, we can assume that the problem is solved.
- It often happens that there is no debris in the drain. Then you will need to disconnect the machine from the sewer and electrical networks and move it to a free space sufficient to access the bottom. By tilting the device on its left side through the bottom, you need to get to the pump and the pipe adjacent to it.
- If the blockage is not in this place, then the pump and motor are unscrewed. This makes it possible to get to the main hose leading from the tank to the garbage filter.
- If there is no debris in these parts, the only option is to contact a technician, since in this case the reasons for the breakdown can be much more serious.
Despite the possibility of carrying out repair work on the washing machine yourself, you should only undertake this if you have certain skills, knowledge and self-confidence. Otherwise, in order to prevent the problem from worsening, the best solution would be to contact specialists.
Electrical repair
Only users with electrical repair skills can cope with this task. If there is a break or oxidation of contacts somewhere, they will quickly fix the problem. All you need for Beko electrical repair work is a circuit diagram. Where can I get it? It is enough to know the exact name of the model to find it on the manufacturer’s website.
It is much more difficult with electronics - to repair or replace the control board, you need special knowledge and skills. The cost of the electronic module is high - reaching a third of the price of the entire SMA. Therefore, it is not recommended to touch it - it is better to trust a specialist. If the repair is minor, then repairing the module will not cost much. But independent experiments can lead to complete failure of the module - you will have to purchase a replacement for it, and a simple problem will transform into expensive repair work.
Errors in Beko washing machines
Fault codes in modern washing machines serve to promptly inform the user about the first signs of problems in the systems. The Beko washing machine is no exception. The manufacturer made sure that the breakdown was detected on time.
Therefore, if the machine shows error codes on the display, your task is to understand the reasons for their appearance. If the user manual has been lost without a trace, this useful article will come to your aid, in which we will tell you: what the code means, what to do when the SM gives an error and how to fix the problem.
Table of errors in Beko washing machines: explanation and repair tips
To determine the failure of the light bulbs in a model without a display, remember: they should be on, not blinking. Indicated in red on the diagram.
| Fault code | As displayed on Beko CM with 5 lamps | Decoding | Causes | How to fix the error |
| H1 | H1 indicates a temperature sensor error. | The sensor contacts have oxidized or burned out. |
| |
| H2 | Error H2 indicates a breakdown of the tubular electric heater of the heating element). The main symptom: the Beko washing machine does not fill with water. | The heating element became covered with scale and stopped giving off heat, which caused a short circuit and the heater burned out. | Disassemble the body of the machine, get to the shank of the heating element, measure the resistance using a tester. A working heater will show 20-40 Ohms. The heater needs to be replaced. | |
| The heating element shorted to the body of the washing machine due to a power surge. | Check the heating element for breakdown on the body by turning on the buzzer mode on the tester. If there is no breakdown, the tester is silent; if there is a breakdown on the body, the multimeter will make a characteristic sound. The heating element needs to be replaced. |
The wiring leading to the heater is broken.
Inspect the wiring, insulate or replace damaged areas. The control module has failed. Reprogram, repair or replace the electronic module.
H3
Code H3 is evidence that the heating element is constantly working, which is why the washing machine overheats the water. Failure of the thermistor (temperature sensor). In order for errors to be reset, it is necessary to measure the resistance of the thermistor. A faulty sensor must be replaced.
Malfunction of the SM control unit. Check the functionality of the controller. Repair or replace the unit.
H4
If H4 lights up on the display, this indicates that the fill valve triac is closed.
The wiring is broken or the sensor contacts are broken (oxidized, burned out).
Check contacts and wiring. Isolate, replace or resolder suspicious areas.
Board defect. Repair or replace the part.
H5
H5 on the display: the drain pump (pump) has failed. Drain filter clogged. The solution to the problem is to clean the filter. It is located at the bottom of the anterior wall of the SC.
The drain hose is bent or broken. Position the hose correctly or replace it with a new one.
Water drain hose clogged. Clean and rinse the drain hose.
Pump failure. Repair or replace the pump (pump).
H6
Error H6 appears when a short circuit occurs in the motor triac. Triac short circuit. In this case, only replacing the element will help.
Violation of wiring integrity. Review, call and repair the wiring.
Control module defective. Repair or replace the unit.
Open circuit of the electric motor. Replace the engine.
H7
If the water pressure (level) sensor—pressostat—fails, error H7 lights up. Broken door latch (locking device). It is necessary to install a new UBL.
Pressostat failure. Replacing the sensor.
The wiring in the circuit: pressure switch-controller is broken. Check contacts, repair broken sections of wiring.
Module malfunction. Repair or replace.
H11
Code H11 is not typical for all SMA Beko models. Indicates an open circuit in the electric motor. The motor wiring is broken. Check the wiring and replace defective areas.
The wiring to the tachogenerator is damaged.
There is a break in the wiring between the motor and the controller.
Engine failure. Replace faulty parts.
Tachogenerator failure.
Now you know what every error on the display of your Beko washing machine means. You know what to do if they appear.
You can also check whether this or that value was displayed incorrectly. In order to clear the error, reboot the SM by unplugging it from the network for 15-20 minutes.
Electrical communications of the machine
If everything is in order with external power communications, then the failure occurred inside the machine. As a rule, the main “culprits” are the plug and wire of the power cord, the third in line is the interference filter. In any case, on Beko models, all three elements are inseparable, so they are all checked together.
Elements are checked individually. First, the fork is inspected. The presence of melted plastic or dark spots on the insulation clearly indicates a fire has occurred. Then the cord is tested, which is “ringed” with a multimeter for breakdown. If the device detects a current leak, then it is prohibited to continue using the wire - replacement is necessary. In this case, local repairs are excluded, since experts do not recommend repairing a damaged core with electrical tape or twisting . Otherwise, there is a high probability of repeated breakage, short circuit and fire.
Before using the multimeter, you need to check its functionality: set the resistance mode and close the probes - the display should display “0”.
Next in line is FPS. The multimeter in ringing mode clings to the filter contacts, and if the result is positive, the resistance is also measured. When “0” or “1” is displayed, it will become clear that the capacitor is burnt out and needs to be replaced.
Water does not heat up
If the water in the washing equipment does not heat up, there may be several reasons. How to repair a Veko automatic washing machine with your own hands:
- The most common is the heating element burning out. To solve this problem, the heating element should be replaced.
- Faulty water level sensor.
- The heating element is serviceable, but the contacts have oxidized. To fix this problem, you need to get to the contacts and strip them to bare metal.
- The problem is a faulty relay.
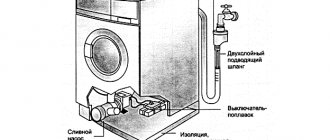
Water level sensor is faulty
The heating element is turned on only when the tank has a sufficient amount of water. If the water level is incorrectly determined, then there is no command to turn on the heating element. Such a malfunction can be eliminated by replacing the sensor. To do this you should do the following:
- Remove the top cover of the washing unit.
- Find a water level sensor, the so-called pressure switch, which looks like a small plastic box. The pressure switch is located on one side of the side wall of the housing, to which a thin tube and conductors are connected.
- Unscrew the two bolts that secure the relay and remove the tube, first loosening the clamp. If there is a rigid tube at the end, then the rigid part needs to be cut off about 12-15 mm.
- You can find a tube of exactly the same cross-section, about 10 mm, and a corresponding length of about 20 mm, maybe a little more. Then put one end of the tube on the fitting, blow into the other end, while holding the pressure switch near your ear. If you hear a click after you blow, the relay is working. And vice versa - if despite all efforts there is no click, the relay is damaged. The conductivity of the winding is measured at the moment when the tube is blown. During operation, a change in conductivity occurs.
- Reinstall the working pressure switch.
Thermal relay is faulty
How to repair a Veko washing machine with your own hands? Thermal relay sensors are located under the loading hatch. They are characterized by both different shapes and different types. There is a bimetallic or so-called gas-filled thermostat, which looks like a tablet with a diameter of 2-3 cm, and new models of washing machines have a thermistor.
The temperature sensor should be removed from the tank housing of the washing unit and checked, for this:
- When cold, measure its resistance.
- Place it on a hot pan, wait a few minutes and measure the resistance again.
- If the difference turns out to be very large, then the relay is functioning normally; in the case of a slight change in resistance, it is necessary to replace it with a working part.
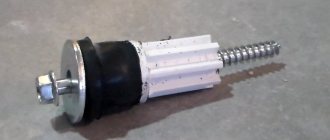
Replacing the heating element
Very often the heating element on Beko washing equipment fails. It's easy to replace it yourself. In accordance with the recommendations of professional craftsmen, it is necessary to perform the following actions:
- Since in these models the heating element is located in the rear of the tank, you first need to remove the back wall, after unscrewing several bolts.
- After removing the wall, you can see a large round wheel, the so-called pulley, and just below you can see two large contacts - the heating element. Using a suitable key, you need to unscrew the fastening element that holds the heating element and disconnect the wire from the contacts.
- Without applying force, carefully pull the heating element out of the groove.
- Replace by inserting a new heating element into the groove and screw it on.
- Connect the wires to the contacts and replace the back wall.
- Check the operation of the new heating element.
Drying function
A washing machine with dryer is a godsend for residents of big cities. If in a village or town you can dry your laundry right on the street, then in a big city there are problems with this. Not every apartment has a balcony on which you can stretch ropes. In addition, if there is a highway near the house, it is not advisable to dry clothes, especially children’s clothes, on the street.
Due to its design, a washer-dryer takes up a little more space than a regular one. The device is equipped with two heating elements, one of which heats water, and the second heats air. The only negative is that you won’t be able to dry everything that has been washed in one go. For drying, the load should be half as much.
Related article: Can I wash the Razer Goliathus mouse pad in a washing machine?
The washing machine with drying function is equipped with special modes. You can set the process of drying clothes by time or by residual moisture. The second option is more convenient. You can leave your clothes slightly damp to make them easier to iron (Iron mode). Or dry it completely to immediately put it in the closet. Also, many models have programs for different types of fabric, which provide for changing the temperature of the hot air.
Description of the work progress
The degree of disassembly of the washing machine depends on the existing problem. If it is necessary to replace the drive belt or inlet valve, then 10-20 minutes will be enough. In the case of repairing a bearing assembly, you will have to remove almost all the main components of the machine and spend at least 40 minutes. However, the procedure will not change.
The instructions are as follows:
- disconnect the hatch door (unscrew the two bolts on the hinges, lift it and remove it from the rod);
- unsnap the technical hatch door;
- loosen the outer clamp of the cuff and insert the elastic into the drum;
- unscrew all the bolts located around the perimeter of the front panel;
- bend the front panel 2-3 cm, and through the vacated gap unhook the wiring from the UBL;
- remove the “end” completely;
- unscrew the retaining bolts from the rear panel;
- remove the drive belt from the pulley;
- unscrew the screw that secures the pulley wheel (you need to insert a screwdriver between the blades to prevent the wrench from turning);
- release the wires connected to the drum;
- pull out the water supply hose attached to the tank;
- Using pliers, remove the metal brackets inserted around the perimeter of the tank;
- pull the front half of the tank towards you.
The next one is the drum. We go around the back of the washing machine, place the “dull” tip of the chisel in the center of the cross and punch it with a hammer. As soon as the fixing bolt “falls through,” insert the screw and release the tank.
Next we knock out the bearings. We insert a metal rod into the hole freed from the cross and tap it with a hammer until the oil seal and bearings leave their seat. If the parts are strongly stuck, then the area is treated with WD-40 lubricant.
Experienced craftsmen advise not to rush and record the dismantling on the camera, especially when disconnecting the wires. This measure will help avoid confusion and protect against errors during reassembly. The Beko machine is assembled in a similar way, only in the opposite order. The seat for each part is pre-cleaned, as are the components themselves.
Interesting:
- Reviews of Beko dishwashers
- How to disassemble the drum of a Beko washing machine?
- Faults and repairs of Beko washing machines
- Beko washing machine does not turn on
- Washing machine socket installation height
- Installing a faucet for a washing machine
Reader comments
Share your opinion - leave a comment
What determines the behavior of the machine?
Even those far from repairing washing machines understand that panel lights that do not light up indicate a lost connection with the electrical network.
Without current, the washing machine does not “wake up” and start working. It is logical that you will have to check the electrics and electronics - contact has been lost somewhere: inside the machine or outside it. It’s better to start searching for the reason with the simplest and most banal:
But sometimes electrical problems are not so obvious. Less noticeable breakdowns also occur:
If the Beko washing machine does not respond to being plugged into the mains, it means that the machine is cut off from the power supply.
The algorithm for what to do is extremely simple. It is necessary to sequentially check all possible “pain points” until the problem of failure is detected. First, we assess the condition of the supply lines, then we inspect the insides of the machine, and lastly, the Beko dashboard.
Features of Beko washing machine repair
Severe lack of space in compact models inevitably leads to an increase in such malfunctions as leaks, loss of contact in connections, and mechanical damage to elements. In this case, “floating” faults often occur. Fixing such a breakdown costs a penny, but finding the problem can take a lot of time.
I have already said above about the special shock absorption system; I will only add that replacing failed parts will not solve the problem of increased noise 100%. This is the burden of all Beko owners.
Electronics, in general, are normal, without severe glitches and jambs. Although problems do occur here, this can be said about any brand of washing machine.
Self-diagnosis system base
It usually happens that the operating instructions for the washing machine have been lost for a long time, and it is necessary to deal with the malfunction as soon as possible. Below is a list of the main errors found in the washing machine database. For the convenience of users, we will indicate not only the alphanumeric designation, but also the sequence of indicator lights.
- H1 – indicates a failure of the temperature sensor. The contact leading to the thermostat may have been interrupted. It is necessary to check the resistance of the thermistor using a multimeter; normally the value should be 4700 Ohms at an ambient temperature of 25 °C. If, when checking the sensor, it turns out that it is faulty, install a new element.
- H2 - tells about a malfunction of the heating element. To eliminate the breakdown, it is necessary to carefully examine the contacts of the heating element; if everything is in order with them, replace the electric heater.
- H3 - signals that the heating element is always on, that is, the fact that the water in the drum is overheated is detected. You should check the temperature sensor with a multimeter by measuring the resistance of the element. If the thermistor is OK, there may be a failure on the main control board.
! It is better to invite a repairman to repair or replace the control board.
- H4 - indicates the closure of the fill valve triac. Diagnostics of the element contacts will help eliminate the problem. If the wiring is not damaged, the machine's main control board may need to be repaired or replaced.
- H5 - indicates a pump malfunction. In most cases, we are talking about weak suction power of the pump. To fix the breakdown, clean the drain filter, eliminate kinks or defects in the drain pipe, and get rid of debris in the hose. If this does not help, install a new pump.
- H6 - indicates that a short circuit has occurred in the SMA motor triac. However, this error can also occur due to a triac failure, a broken motor wiring, or a defective control board. If it is determined that there is an open circuit in the motor, the electric motor will have to be replaced.
- H7 - indicates a breakdown of the pressure switch. Intelligence has detected some malfunction of the water level sensor. There may be several reasons: defects in the contacts leading from the pressure switch to the main control module, failure of the level sensor itself, or failure of the control board. It is possible that the error is displayed due to a malfunction of the UBL mechanical lock.
- H11 - signals that there is a break in the machine’s motor circuit. It is necessary to examine the contacts leading to the engine, check the wires connected to the tachogenerator, and examine the integrity of the wiring from the electronic controller to the engine. If the contacts are not broken, check the motor and tachogenerator.
Knowing which element of the system has failed, it is easy to make repairs yourself. Having understood the designation of certain breakdowns, it is easy to understand what actions should be taken to return the washing machine to its previous performance.
Interesting:
- Error codes for AEG washing machines
- Whirlpool washing machine errors without display
- Error codes for the Indesit washing machine based on blinking indicator
- Miele dishwasher errors
- Malfunctions of Hotpoint Ariston washing machines
- Miele washing machine error codes
Reader comments
Share your opinion - leave a comment
Is it possible to fix the breakdown yourself?
Theoretically, all automatic washing units of the Veko brand can be repaired, and it does not matter at all what drum load they are characterized by, how old they are, or whether they have a control display.
But in practice a completely different picture emerges. So, sometimes there is a situation when it is impossible to carry out repairs on your own, or it is not practical due to the high cost, or there are no suitable spare parts. In any case, if you have identified a problem and are ready to fix your washing equipment yourself, you need to consider these factors to avoid losing valuable time and money.
Important! In order, for example, to replace a washing machine bearing, it takes a qualified specialist several hours. Think about how long it will take you to make such a replacement and whether you will be able to do it correctly.
Experts advise performing only simple repairs, such as removing blockages or replacing simple parts. To eliminate other faults, it is better to invite qualified specialists to avoid the risk of spoiling something.
Let's look at what typical breakdowns you can fix yourself:
- you can clean the drain filter, removing dirt and debris that interfere with the normal functioning of the washing unit;
- you can replace the drain pump, but only when you are sure that the old pump has failed;
- replace the heating element;
- check and replace the intake valve, but to do this you need to make sure that the problem is not the control board.
Beko washing machine error codes
Any equipment malfunction occurs due to the breakdown of components and parts. The first thing you need to find out is the reasons for the malfunction. Manufacturers have made it easier for users to search by equipping the machines with electronic controls and a self-diagnosis system. Beko washing machine error codes indicate the location of the breakdown. What does the code on the display mean? You can see its decoding in the instructions. And if the manual is lost, then our publication will help.
Fault codes for Beko washing machines
What to do if the system gives an error? Eliminate system failure. If moisture gets on the board or there is a power outage, the electronics may give incorrect information. Therefore, reset the errors:
- Disconnect the equipment from the network.
- Wait 10–15 minutes.
- Resume work.
Take a look at the display: do the characters appear on the screen again? This means that the issue is not a failure, but an internal problem. Study the error codes and begin troubleshooting.
| Problem code | Lighting of indicators on the panel | What does it mean? | How to fix it? |
| H1 | There are problems with the temperature sensor | The water in the tank may overheat or, conversely, not reach the set value. Diagnose the sensor: |
- Examine his contacts.
- Check with a multimeter. Apply the tester probes to the contacts; normally, the readings will be 4700 Ohms at an ambient temperature of 25 degrees.
- If faulty, replace the part
H2 is lit on the display
The tubular electric heater (TEH) does not work. Washing is done in cold water, but the laundry remains dirty. Solution to the problem:
- Open access to the heating element.
- Disconnect its wiring.
- Apply multimeter probes to the contacts.
- The element is operational with readings from 20 to 30 ohms.
- Make sure the wiring from the heater to the electronic board is intact.
- Install the correct parts
H3
The heating element works without stopping, the water overheats. How to fix the situation:
- Ring the thermistor, which is responsible for measuring temperature.
- Inspect the control board and temperature sensor triac
H4
Fill valve control triac malfunction. Inspect the connection circuit and contacts. If burnt parts are found, replace the cable. If burns are found on the board, install a new part or contact a service center
H5
The drain pump is broken How to fix the problem:
- If water does not drain well from the tank, clean the drain filter and pipe.
- Assess the condition of the drain hose; it should not be pinched or twisted.
- Check the pump. If damaged, install a new unit
H6
Problems with engine control If the machine shows error H6 on the display, you need to make sure:
- The control triac on the board is in good working order.
- The wiring from the module to the motor is intact.
- In engine performance.
Defective components should be replaced
H7
The pressure sensor (pressostat) has failed. To clear the error, you need to eliminate its cause:
- Press the hatch door tightly until it clicks; it should be closed.
- Check if the inlet valve is open. Unscrew it all the way.
- Inspect the pressure switch and its wiring.
- Ring the intake valve. It should receive a voltage of 220 Volts.
- Install the correct parts
H11
Lost connection with the motor Check the connection circuit of the motor, board, tachometer.
How to prevent breakdown of the Beko washing machine (SM):
- Clean the drain and fill filter to remove debris every six months.
- Connect the SM to the network through a stabilizer. It will protect electronics from burning during a power surge.
- Install a cleaning filter. The device reduces the salt content in water, so the heating element will last much longer.
As can be seen from the error codes, the most sensitive area of Beko washing machines is the electronics. It is advisable to install the device in a dry room to avoid exposure to moisture on the control board.
Repairing damage
Immediately prepare the necessary tools and materials:
- Phillips and slotted screwdriver.
- spare parts for replacement (lock, tongue, spare glass).
UBL repair
Can't open the hatch after washing? The UBL lock may have broken. Since it runs on electronics, check to see if the lights in the apartment have been turned off. In this case, the door will remain locked.
The operating principle of the UBL is simple: the control module supplies electric current to the lock plates. When heated, they bend and press on the latch, which latches the hatch.
How to understand that the device is broken? According to these signs:
- After turning off the machine, the hatch does not open.
- When you start the wash, an error code appears on the screen.
- You've loaded laundry, but the lock won't lock.
To make sure that the problem is in the device and not the control board, you need to carry out diagnostics with a multimeter.
- Attach the tester probes to the “neutral” and “lock phase” contacts.
- Measure the indicators.
- Everything works if three numbers are shown on the screen.
- Then attach the probes to the “neutral” and “common” contacts.
- Zeros or one on the screen indicate a breakdown.
To open the door when locked, you can use the method suggested by our users. Take a thin ribbon and thread it between the SMA body and the hatch. Holding the ends on both sides, pull the tape towards you. After opening, you can begin repairs.
How to fix it yourself:
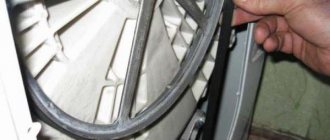
- Pull back the cuff.
- Using a screwdriver, remove the clamp. If it is plastic, remove the latch.
- Remove the bolts that hold the device in place.
- Tuck the cuff in and remove the lock.
- Disconnect the wiring.
- Install the new part in reverse order.
Replacing the latch
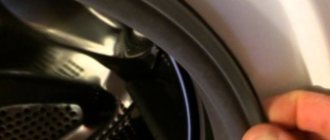
Over time, the latch lever becomes deformed and irregularities appear on it, which interfere with normal closure. To perform the replacement, you need to know how to remove the door:
- Remove the clamp and rubber cuff. If you don’t want to remove it completely, bend it back and tuck it inside.
- On the side you will see the door mounts.
- Remove two screws.
- Lift the hatch up and remove it from its seat.
To return the latch to a smooth surface, you will need a file - grind off the nicks and irregularities. Lubricate parts with graphite lubricant for better performance. Lock the door in its original place.
The reason for the drum not closing tightly may be sagging hinges or loose fastenings. When installing the hatch in place, you need to adjust its position so that the latch fits normally into the hole.
Glass replacement
It’s good if the glass in your SMA model can be replaced, but such luck is rare. Otherwise, you will have to seal the cracks.
What causes Beko air conditioner breakdowns?
However, over time, especially with heavy use, your Beko air conditioner may break down. This can manifest itself not only by turning off the device and the appearance of an error code on the display, but also trivially: the unit will begin to leak, the cooling flow will weaken, and ice will appear.
Both the external and internal units of Beko air conditioners are constantly exposed to external influences. Most of them adversely affect the operation of climate control equipment
Main causes of breakdowns:
- improper unprofessional installation of a split system, carried out independently or by incompetent craftsmen;
- failure to comply with the operating requirements of the unit;
- ignoring scheduled maintenance;
- normal wear and tear of parts after long-term use.
After repairing the equipment, be sure to study the instructions for routine maintenance of the air conditioner.
Classification of breakdowns
Masters conditionally divide all malfunctions of washing machines into two groups - external and internal. The first group includes those that appeared as a result of mechanical impact and are associated with a violation of the integrity of the body:
- cracks in sunroof glass,
- scratches and dents on the body,
- breakdown of washing mode switches, hatch handles, etc.
Internal malfunctions of the BEKO washing machine include problems associated with the electronic control of the unit and various mechanisms.
Features of typical breakdowns of Beko washing machines
As mentioned earlier, all malfunctions are accompanied by certain symptoms - from minor malfunctions to complete failure. The problem of the home handyman always lies in one thing - how to connect the existing signs of breakdown with its causes. Here you just need the knowledge and advice of specialists of a narrow profile.
Next, we will briefly summarize information about the main breakdowns.
Problematic drainage of waste water in Beko machines
If you know how to use a Beko washing machine, then you know that the waste water after washing is not clear and clean - this is the specificity of washing. To prevent dirt, threads, hair, etc. from clogging the pump, there is a special drain filter on the way to it, which mainly suffers from blockages.
Your task is to find this filter, which is usually located at the bottom of the washing machine, under a small hatch or behind a panel. How to proceed next:
- Before removing the filter, do not forget to place a basin or a rag under the machine, because residual waste water will definitely flow out of the hole.
- To remove the filter, simply twist it to the right.
- Next, clean the filter by hand and rinse under the tap.
- Armed with a screwdriver, you can also clean the pipe - it usually also becomes clogged with debris from waste water.
- Once you have the tools at hand, do not rush to put them away - for preventive maintenance, also clean the filter that is located on the water supply (it is located at the place where the hose is attached to the rear panel). Sand and rust from the water supply slowly collect in this filter and eventually interfere with the normal flow of water into the drum.
- After cleaning the inlet filter, do not rush to put it back in place - also check the drain pump. Often, Beko washing machines, during self-diagnosis, detect a breakdown of the pump and signal this using fault code H5. But in case of some breakdowns, the controller may not see minor violations - such as a loose impeller (can be identified by hearing a hum).
- To check the pump, start the drain mode and look into the hole in the filter plug to see how the impeller behaves. If it rotates, then everything is in order, but if not, then the pump needs to be cleaned or even replaced.
Problem with water heating in Beko machine
To fix this problem, you will also need to at least partially disassemble the Beko washing machine, but more on that below.
First, let's say that in the SM one of the most vulnerable components is the thermoelectric heater, simply the heating element. The mineral salts present in the water crystallize under the influence of hot water and settle on the heater in the form of the familiar scale - like in a kettle. The coating does not allow heat to pass through, so the heating element does not transfer it to the water and burns out.
If there is no scale, you have soft water, or you use special products, this does not mean that the heater could not burn out. The heating element has its own production resource, and maybe its time has come.
If the heating element fails, you will know about it by errors H2 and H3. To be absolutely sure what happened to it, first get to the heater. In some Beko models it is located at the rear, in others it is at the front.
So, how to disassemble a Beko washing machine, find the heating element, check and replace it, read on:
- If the heating element is located at the front, then to remove the front panel, you need to remove the hatch cuff. To remove it, act carefully - if something goes wrong, then your activity is fraught with damage to the cuff and leaks.
- You will not see the entire heating element - only its shank with two contacts and wires going to them.
- Disconnect all wires.
- Take a tester and measure the resistance. Typically, normal readings will be 25-30 ohms. If the indicators are different (for example, infinity), then the breakdown is obvious.
- Remove the heating element by unscrewing the nut from the bolt that holds it under the drum.
- Clean the installation site from debris and deposits.
- Install the new heating element in the reverse order, reconnecting all wiring.
This video shows in strict sequence how to remove, check and replace the heating element:
If the heating element turns out to be faulty, then you need to check the temperature sensor (thermistor). You will find it under the top cover. How to remove and check the sensor:
- Remove the top cover by unscrewing the screws.
- The sensor is dismantled by removing the detergent cuvette and the control panel - all of this prevents access to the element. Having reached the sensor, free it from the wires.
- The resistance measured by the tester should be 4.7 kOhm in room conditions.
- Heat the sensor in a glass of warm water - after this the readings should drop. If this does not happen, the sensor needs to be changed.
- Installing a new sensor is the same as dismantling it, just do it in reverse order.
Electrical repair
Only users with electrical repair skills can cope with this task. If there is a break or oxidation of contacts somewhere, they will quickly fix the problem. All you need for Beko electrical repair work is a circuit diagram. Where can I get it? It is enough to know the exact name of the model to find it on the manufacturer’s website.
It is much more difficult with electronics - to repair or replace the control board, you need special knowledge and skills. The cost of the electronic module is high - reaching a third of the price of the entire SMA. Therefore, it is not recommended to touch it - it is better to trust a specialist. If the repair is minor, then repairing the module will not cost much. But independent experiments can lead to complete failure of the module - you will have to purchase a replacement for it, and a simple problem will transform into expensive repair work.
Common causes of malfunctions
Considering all the malfunctions of VEKO washing units, it is worth noting that the drain system and pump are more susceptible to them than other parts. This usually occurs due to foreign objects entering the system and hoses becoming clogged. During operation of this unit, excess objects often fall into the drum, which cause malfunctions. The unit may not pick up speed well, there may be extraneous noise, drum knocking, or high vibration. But bearing wear can also cause such “symptoms”. In this case, the operation of the washing machine becomes unstable, and you should contact a technician to fix the problem.
The number one enemy of washing machines is hard water flowing through water pipes. Because of this water, lime deposits form in the hoses, which prevent the stable operation of the drain system. In addition, lime is deposited on the heating element, which significantly impairs its functioning and, over time, completely disables it. To prevent this from happening, you need to periodically descale the washing machine and use special products, for example, Calgon. When operating the machine, water often gets on the electronic controls, which causes them to malfunction. Such cases are accompanied by smoke, the unit may spark when turned on, the indication disappears, or the machine simply does not turn on at all.
How to stop washing
The first thing to do in the event of a failure in the washing algorithm is to stop the program. The option of pulling the plug from the socket should only be considered as a last resort. We must not forget that after switching off, the hatch lock will be removed, but the water will remain in the drum and if it is opened, it will spill out onto the floor.
You need to stop the washing machine correctly. To find out how this is done, you should look at the instructions for your specific model. In most washing machines made by Samsung, Ariston, Indesit and others, to reset, just press and hold the “Start” button. Sometimes the Pause button is used for this.
After stopping, you can try to restart the wash, but it is better to remove the laundry and use the washing machine’s automatic diagnostic program.