In recent years, washing machine manufacturers have been trying to produce equipment that produces as little noise as possible. Different brands of washing machines have different levels of noise and vibration during spinning. A situation where the machine jumps and vibrates strongly during spinning may indicate a breakdown of some of its components or parts.
If it is discovered that the washing machine jumps or vibrates strongly during operation, the malfunction must be corrected immediately - in such conditions, all components of the machine are subject to increased load - this leads to damage to many parts of the unit and increased cost of repairs.
There may be several reasons why the machine moves and jumps during operation. Before diagnosing the washing machine, it must be de-energized.
Dismantling and installing the part
How to remove shock absorbers? In fact, there is nothing complicated about it. To remove the dampers, you need to remove the “top” and the rear panel of the case, which is very simple to do. On some Bosch models, you will have to “unhook” the front wall to gain access to the parts. Then the algorithm of actions will be as follows:
- remove the lid from above. To do this, unscrew the two bolts, lightly press on it and slide it back;
- remove the detergent dispenser;
- remove the lower decorative panel hiding the garbage filter;
- Unscrew the bolts securing the control panel. Carefully place it on top of the automatic machine so as not to break the wires connecting the part to the control module;
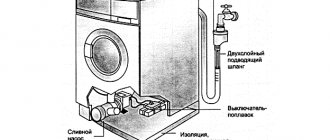
- open the hatch door, remove the metal clamp holding the cuff, insert the elastic into the drum;
- Unscrew all the screws securing the front wall of the machine;
- disconnect the hatch locking device from the body;
- remove the front panel;
- find the dampers. They are located below, under the washing tank;
- unscrew the bolt securing the shock absorber or damper to the body (it may be necessary to remove the latch);
- remove the shock-absorbing elements.
Then you need to examine the disconnected shock absorbers and see what exactly is broken. You may not need to purchase new spare parts; repairing the part will suffice. If not, all that remains is to purchase and install serviceable components by performing the described steps in reverse order.
Installing a new part
- we take out the shock absorber and, applying force, place it in special grooves;
- take the previously used plug and carefully drive it into the hole on the damper through both partitions;
- we install the drill in the drill and, including the “reverse” movement, remove the self-tapping screw;
- check the reliability of fixation;
- repeat the steps with the other stand, turning the machine over to the opposite side;
- if the tank was removed, then install it back into the body;
- we return the engine to its place, securely tighten the screws and hook up all the supply wiring;
- put on the drive belt, not forgetting to rotate the pulley;
- We raise the machine gun “to its feet” and screw the back wall.
The final stage will be running the washing machine at maximum spin. If the machine is stable throughout the entire cycle, the vibration is moderate, and there is no hum or knocking, then the DIY repair was done correctly. Otherwise, we return to the disassembly stage and tighten the retaining shock absorbers of the mount.
Why repairing shock absorbers is a questionable decision
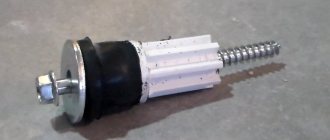
Shock absorbers (dampers) dampen vibrations of the washing machine drum during spinning and are a structure consisting of a housing - cylinder, a piston rod and a gasket between them. The piston moves inside the cylinder with a force of 80 to 120 Newton. Resistance is provided by a gasket and a special lubricant that increases friction.
As the machine is used, the gasket between the piston and cylinder wears out, the lubricant leaks out and dries out. As a result, the resistance decreases, the rod begins to move freely in the cylinder, and the shock absorber ceases to perform its functions. Gaskets are not sold separately, so it is impossible to repair the shock absorber, and you have to completely replace it.
How to repair
In theory, if the ability to absorb vibration is significantly reduced, it would be enough to replace the worn parts inside the shock absorber or damper. Most often, the gasket between the piston and cylinder fails, as a result of which both are noticeably deformed. Of course, the gasket can be replaced by making a similar one from thick fabric. It should be borne in mind that if you did something incorrectly, the results of the “repair” may negatively affect the operation of the machine as a whole.
Spare parts for the repair of such devices are not produced, since replacing one or another element of a part does not guarantee improvements in the operation of the unit. If problems arise in the operation of the shock absorption system, professional repairmen advise not to repair individual components, but to completely replace them.
Related article: DIY sound amplifier
Diagnosis of typical faults
Shock-absorbing devices of washing machines belong to the mechanical part of household equipment. Their repair and replacement do not require fundamental knowledge in the field of electrical or even mechanics. This means that even the intervention of an amateur will not be able to cause serious damage.
Please note that unique technical documentation is issued for each model of washing unit. Service techniques are usually authorized and devices are patented. However, there are methods for repairing shock-absorbing devices that are common to almost all types of washing machines, the specifics of which are worth understanding.
The appearance of typical damage to shock absorbers or dampers will be signaled by a specific noise that occurs during operation of the machine, or too much knocking inside its body.
If alarming sounds are detected, their condition should be examined, and for this you need to provide yourself with access to the devices being tested. Depending on the model, for the examination you will need to remove either the top panel, the side panel, or the back panel.
Methods for diagnosing shock absorbers for washing equipment depend on the type of load:
- From the front. If, when applying force to the tank from above, folds form on the sealing collar of the loading hatch, the shock absorbers must be replaced. By the way, you can also notice a couple of folds while the machine is operating with worn-out accessories.
- From vertical. If, when applying force to the tank from above, no resistance is felt, and the tank, after interrupting the pressure, continues to swing like a pendulum, it needs to be repaired.
When carrying out diagnostics with top loading, you must definitely pay attention to how much the tank sags when pressed, if the indicated defect occurs. It would be nice to track the fact of sagging and its conditional value with a full tank load
It is imperative to check whether there is at least some reserve for the reciprocating movement of the tank of the washing machine being examined. If it sags so that there is simply no room left for it to move during vibration, then a loud knock will occur during washing or spinning. And this is a sure sign of damage to the tank in the near future, and simply imbalance.
In normal technical condition, front-loading washing machines should not have cuff folds at all, regardless of the function being performed. Note that the formation of a single fold on this rubber seal indicates that only one of the shock absorbers is damaged.
If the folds on the cuff of the washer do not indicate damage to the shock absorbers, it means that it is worn out or deformed from the use of substances undesirable for its structure. In this case, the seal should be replaced.
In normally functioning units with a top load, if the shock-absorbing devices are not damaged, after applying force to the tank from above and abruptly interrupting the load, i.e. retracting the hand, the tank should smoothly return to its original place without excessive swinging and vibration.
Step-by-step repair guide
A washing machine with a damaged shock absorber or a worn damper seal, of course, can still work for some time without carrying out repair operations. But it should be remembered that without vibration damping, some extremely important parts and mechanical systems may crack or become detached. The tank and piston assembly suffer the most from this.
Making a new gasket for the damper
If noise and significant knocking are detected in a washing machine with dampers, it is often enough to change the sealing gaskets. To do this, you just need to disconnect the device and, according to plumbing rules, simply cut out new gaskets from textolite or a piece of rubber of suitable thickness.
A used rubber brake pad for a car is ideal as a starting material for manufacturing. It is better to select the rubber thickness according to the actual size of the gap between the tank and the shock-absorbing device.
The simplest option for replacing shock absorbers
In the vast majority of situations, washing machine shock absorbers must only be completely replaced. Moreover, repairmen advise changing the entire set, and not just one device.
There is logic in the statements of experienced masters. After all, during the working process, all shock absorbers wore out approximately equally. After replacing only one device during the washing/spin period, the vibrations will be damped unevenly, which will very soon lead to breakage and abrasion of previously undamaged elements.
Image galleryPhoto from Before starting repair work, disconnect the washing machine from the power supply and water supply, first turning off the tap in front of the supply hose
If broken devices can simply be disconnected from the bottom plane of the washing machine and from the tank, the work can be carried out without much difficulty.
To make a replacement:
- We remove and remove the part of the body located on the side required for repair.
- We dismantle damaged and failed devices.
- We install the new kit and reassemble the washing machine in the reverse order.
There are models in which the attachment to the tank is made in such a way that dismantling is possible only with this element. Owners of such equipment will have to almost completely disassemble the equipment before repair. In any case, before you begin repair work, you should look at the data sheet and become familiar with the fastening features.
Repair and replacement with tank removal
To replace dampers in such machines, they have to be almost completely disassembled.
Image galleryPhoto from To carry out repair work yourself, washing machine manufacturers produce repair kits. You can buy it or just shock-absorbing devices, because... The included lubricant is unlikely to be required
Having completed disassembling the body, we begin to remove the tank of the machine, at the same time cleaning the parts from rust and calcium build-up. In order not to get confused in the steps that will need to be repeated exactly during the reassembly process, we record all the stages with a phone camera.
Image galleryPhoto from Disconnecting the internal wiring of the washing machine, not forgetting to photograph the process
The work is performed in the sequence below:
- Remove the top panel of the housing.
- We dismantle the box for loading liquids and powder.
- We remove the control panel along with the systems adjacent to it.
- Separate the springs holding the tank.
- We remove the front panel and disconnect the functional components of the machine from the tank.
- We remove the tank along with the dampers.
- We replace devices, if possible, we get off with replacement of gaskets or repairs.
- We assemble the machine, strictly adhering to the disassembly sequence, only in reverse order.
In order not to make mistakes during the assembly process, it is advisable to photograph the disassembly progress.
For fastening, it is better to make an auxiliary “organizer” with several cells that can be signed along the way.
Causes and symptoms of malfunction
Malfunctions in the operation of washing machine dampers occur for the following reasons:
- Wear of mating elements (o-rings);
- Long-term loads and vibrations;
- Drying of the lubricant inside the cylinder and violation of operating rules. Branded shock absorbers in Samsung, LG, Siemens, AEG, or Ariston washing machines usually last 5-7 years without any visible disturbances in their operation.
With constant overload of the washing drum, especially in spin modes, the service life of the damping elements decreases. You can determine that the shock absorber is faulty based on several signs:
- strong vibration of the washing machine body, especially at high speeds; characteristic knocking sound when washing;
- The engine drive belt constantly weakens and falls off;
There are several ways to check dampers for working condition:
Remove the top cover of the washing machine. After removing the cover, press firmly on the washing tank, it should smoothly return to its place, but if the tank returns jerkily, this means that the devices are not working properly and require replacement.
The second, more reliable way to check is to completely remove the shock absorbers from their seats.
Call a technician: repair price and ordering
If it is impossible to replace the shock absorbers on your own, it is better to call a technician from a company that provides repairs to washing household appliances. When submitting a request, you must inform the dispatcher about the model of the automatic machine; this information is in the product passport. If dampers have already been purchased, then this should also be mentioned.
The cost of a specialist’s work depends on the company’s price list (you can check it in advance). On average in the capital, replacing one shock absorber in a Samsung washing machine will cost in the capital from 1,300 rubles (excluding the price of the part).
The duration of the technician’s work on average is up to 1.5 hours, unless problems were discovered along the way, which also require the attention of a specialist. Upon completion of the work, a test run of the machine is performed and a guarantee is issued for the repairs performed.
It is not advisable to call specialists based on random advertisements, as there is a risk of falling for scammers. In this case, you may not get quality repairs at all. It is better to contact a trustworthy company that has been in the service provision market for several days.
How to remove and check shock absorbers from a washing machine
All damping elements are protected by the body and lining; in order to get to the damper mounts for different models of washing machines, different disassembly approaches are required.
When replacing dampers on a washing machine, there is no need to completely disassemble it. For example, to provide access to shock absorbers on Bosch washing machines, simply remove the front cover. In these models, the dampers have a classic single-bolt mount, located at the bottom of the unit. The upper part of the attachment to the tank is held on by latches that are part of it.
In order to remove the shock absorber from the tank, the connection is drilled with a long drill with a diameter of 13 mm, then you need to remove the part through the front of the machine.
On some LG models, you do not need to remove any covers to remove the damper. To do this, just put the unit on its side, having previously disconnected it from the power supply, water supply and sewerage. The shock absorber is secured on both sides with plastic pins with locking latches. By pressing the latch, you can easily remove your finger from the hole, freeing it from the fastening. If the finger is very difficult to remove, you can use a special tool such as a car VD shk.
In Samsung washing machines, bolts of size M8 or M10 are most often used to secure dampers. They are unscrewed using spanners or socket heads, 12-13 mm in size. Bolt-on mounting is used on models from Miele, AEG and many other manufacturers. In Wirhpool models, the shock absorbers on both sides are fastened with special latches; by pressing them, you can freely remove the damping elements.
If the rod extends freely and there is no lubrication, and traces of rust are visible inside, we can talk about wear and tear and unsuitability of the shock-absorbing devices.
The device of spring shock absorbers
One of the most common types of shock absorbers for washing equipment has the so-called spring-piston design. To put it in exaggerated terms, it is a metal cylinder with a polymer sleeve at the top. It directs the movement of the rod installed in the shock absorber.
The upper part of the rod is “sharpened” to fit polymer liners and rubber gaskets, with the help of which it is connected to the drum. Attached to the base of the rod is a piston with a gasket heavily impregnated with non-drying lubricant. This lubricant is needed to increase the friction force when the rod and piston move through the cavity of the steel cylinder.
The main structural components of a spring-piston shock absorber include a metal cylinder, closed at the top by a bushing, and a polished rod with a piston
The operation of a spring-piston type shock absorber includes a number of sequentially repeated actions:
- During sudden vibrations, the shock absorber rod is set into linear motion.
- The piston pressed by the rod moves along the cylinder cavity.
- Impregnation prevents the piston from slipping without appropriate force.
- When the pressure is released, the rod returns to its original position.
- When effort arises, everything repeats.
To ensure that the air in the cylinder does not create additional resistance, the piston is perforated. When you press on it, a possible air lock can easily come out through the holes made through it.
The load that appears during rotation of the drum puts pressure on the rod, which in turn pushes the piston fixed at its base along the steel cylinder
Of course, such a mode of operation does not give reason to hope for the eternal preservation of parts rubbing against each other in their original technical condition. At first, just play appears, then wear. Moreover, only one spring support can be damaged, and there are 2 to 4 of them in different modifications of washing units.
To remove the air plug located inside the cylinder, holes are made in it (Fig. on the left). At the top, the shock absorber rod is equipped with a seat for rubber gaskets and polymer inserts, through which it is attached to the washing machine tank
The operating principle of shock absorbers for washing machines of different brands is similar, but there are some design nuances. Their size, angle of inclination, location may differ; not in all models of washing equipment they are supplemented with springs holding the drum on top. Instead of a pair of suspensions located on top, small springs can be used, connected to a nearby upper counterweight.
In other layout options, the tank, consisting of two parts, is supported by dampers from below instead of shock absorbers. This design type is classic, therefore it is also very worth understanding the structure of these devices. It is possible that this is exactly your case.
The motor in the modification of the washing machine shown in the diagram is mounted at the top. There is no need to disassemble it completely to replace shock absorbers; just remove the side or rear part of the body
DIY repair
Let's find out how to get to the damper. Proceed as follows:
- Let's assume you've already removed the top cover.
- Turn off the water supply and disconnect the inlet hose from the housing. There may be water in it, so prepare a container to drain it in advance.
- Now you need to remove the front panel. To do this, pull out the dispenser tray: press the latch in the center and pull the tray towards you.
- Remove the screws that secure the control panel. Two or three bolts are located behind the tray and on the opposite side.
- Release the plastic latches.
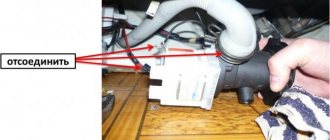
- Take a photo of the location of the wires on the panel and disconnect them or place the panel on top of the CMA body.
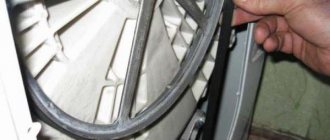
- Open the hatch door. Having bent the sealing rubber, use a screwdriver to pry up the metal clamp and remove it.
- Tuck the cuff inside the drum.
- Unscrew the hatch lock bolts (UBL).
- Disconnect the wiring from the locking device and pull it out.
- Unlock the panel latches at the bottom where the drain filter is located and set it aside.
- Unscrew the screws securing the front panel and remove it.
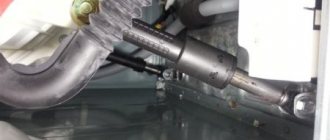
- Place a nut on the back side of the rod mount to disable the latch.
- Grasp the rod with pliers and pull it towards you.
- Now unscrew the bolt at the bottom.
Some users are wondering: how to check shock absorbers when purchasing? Same as when replacing. Squeeze and unclench the part in your hand: if this is difficult to do, then the product is working properly. If you compress the shock absorber easily, it needs replacement.
How can you repair a shock absorber in a washing machine with your own hands? First, pull out the insert that slows down the movement of the rod. If the rod moves easily and quickly, the insert (gasket) is most likely worn out. To replace it:
- Take a 3mm thick belt.
- Measure the length according to the diameter of the hole.
- Insert the cut piece of the belt into the place of the seal so that the edges fit tightly together.
- Before installing the rod, you need to lubricate the part to reduce friction. If you don’t know how to lubricate the shock absorbers of your washing machine, use regular lubricant oil.
- Install the stem. Now you know how to fix a washing machine shock absorber.
For more information about the repair, watch the video:
Details may vary between different SM models, so don’t buy at random. In the store, tell the salesperson the brand and model of the washing machine, and he will offer you the appropriate items. Or go shopping with an old damper. Be sure to select the appropriate spare part before replacing the shock absorbers on your washing machine.
To install, insert the rods first, securing the top. Then tighten the bolt at the bottom and assemble the machine. The renovation is complete. Having figured out how to change and check the shock absorber on a washing machine, you can begin to work on your own. Buy new parts or repair old ones - the choice is yours. The video will help you:
Completely disassembled shock absorber cylinder
Press the rod all the way into the cylinder and pour 200-250 grams of oil into the shock absorber body. Insert the cylinder and slowly pull out the rod so that the oil does not spill out, but gets inside. When the cylinder is fully inserted, slowly pull out and push in the rod 3-5 times to completely fill the inside with oil. Install the nut or protective cap, tighten it until it stops and pump the shock absorber again 4 times. After that, check its operation as described above. If the shock absorber is two-pipe, then all this work will have to be done by putting the upper pipe on the lower one, otherwise it will not be possible to insert the cylinder. In this case, it is necessary to press the pipe down and keep the rod in place, then pump it, tighten the nut and pump it again. Then you need to install the shock absorber on the car. After repairing the MacPherson suspension, it is necessary to check the wheel alignment.
Conclusion
Restoring or replacing the shock absorber will restore controllability and safety to your car. Now you know what operations need to be performed to restore shock absorbers yourself. This will help you in repairing and maintaining your vehicle.
How to remove and check shock absorbers from a washing machine
All damping elements are protected by the body and lining; in order to get to the damper mounts for different models of washing machines, different disassembly approaches are required.
When replacing dampers on a washing machine, there is no need to completely disassemble it. For example, to provide access to shock absorbers on Bosch washing machines, simply remove the front cover. In these models, the dampers have a classic single-bolt mount, located at the bottom of the unit. The upper part of the attachment to the tank is held on by latches that are part of it.
In order to remove the shock absorber from the tank, the connection is drilled with a long drill with a diameter of 13 mm, then you need to remove the part through the front of the machine.
On some LG models, you do not need to remove any covers to remove the damper. To do this, just put the unit on its side, having previously disconnected it from the power supply, water supply and sewerage. The shock absorber is secured on both sides with plastic pins with locking latches. By pressing the latch, you can easily remove your finger from the hole, freeing it from the fastening. If the finger is very difficult to remove, you can use a special tool such as a car VD shk.
In Samsung washing machines, bolts of size M8 or M10 are most often used to secure dampers. They are unscrewed using spanners or socket heads, 12-13 mm in size. Bolt-on mounting is used on models from Miele, AEG and many other manufacturers. In Wirhpool models, the shock absorbers on both sides are fastened with special latches; by pressing them, you can freely remove the damping elements.
Regardless of the mounting method, removal must be done carefully, without using impact tools that could damage the plastic tank or other elements of the device. Checking the damper is carried out by simply pressing the rod and pulling it out of the body
In this case, there should be noticeable resistance to pressing by hand. If the rod fits in freely, or in some cases simply falls out of the body, the shock absorber requires replacement. In some dampers, a special sealing lubricant is placed in the internal cavity of the housing.
If the rod extends freely and there is no lubrication, and traces of rust are visible inside, we can talk about wear and tear and unsuitability of the shock-absorbing devices.
Removal and test for suitability
First, make sure that the problem lies in the depreciation system.
Remove and remove the dampers from the washing device body. In some models, to do this, it is enough to place the car on its side; Access to the shock absorbers will open from below.
For washing equipment of other models, in order to provide access to the necessary parts, the front wall of the case is removed. This procedure is very troublesome.
- First, unscrew the fixing bolts (they are located on the back wall) and remove the top cover of the machine. Then the powder container and the panel that protects the drain filter are removed.
- Next, you need to unscrew the bolts and remove the control panel located at the top of the device. Do not hurry! In addition to bolts, the panel is also connected to the machine by many wires. Their length allows you to attach the part somewhere nearby without disconnecting it completely.
- Now you need to remove the cuff from the front wall of the machine and tuck it inside the tank.
- The final stage is to unscrew the bolts at the top and bottom of the machine that secure its front wall. Do not forget to unscrew the door lock, otherwise the wires coming from it will not allow you to remove the panel completely. (An alternative option: do not unscrew the lock, but try to carefully pull the contacts out of it).
- After all the above manipulations, access to the shock absorbers will be open.
To check the damper, remove it from the body by unscrewing the bolt located at the bottom. Try to press on it with your hand so as to compress and unclench the mechanism. If it barely gives way, the shock absorber is in working condition. If the piston moves without much effort on your part, such a device requires replacement.
Removing the top panel and its subsequent installation
To remove the cover you need to unscrew the screws holding it in place. The number of these parts varies depending on the specific model, but most often there are two. The screws are unscrewed, removed and set aside.
It is important to work in good lighting, since there are washers placed under the screw heads that are easy to lose, and this should not be allowed, because they will be useful during subsequent assembly
After making sure that nothing is holding the cover in place, you need to pull it towards you (away from the front panel). As a result of this action, the cover will come out of the grooves holding it. Almost ready, all that remains is to lift it and put it aside. Access to the parts of the Bosch washing machine is open, you can continue repairs.
The procedure for installing the cover is not complicated; in fact, you need to proceed in the reverse order. First, it is placed on the body with an offset. Align the grooves on the body and in the lid, applying a little force, push it into place until a characteristic click is heard. After these manipulations, all that remains is to tighten the bolts, always using the supplied washers.
Washing machine shock absorber repair
Replacing shock absorbers in a washing machine can be done even by an amateur, without causing any harm to the machine.
Checking for serviceability
To repair the shock absorber of a washing machine with your own hands, you need to check which part has become unusable.
It is necessary to provide access to the damper part of the mechanism. It is recommended to place the washing machine on its side. Then follow the instructions:
- Unscrew the two bolts on the back of the machine that secure the top cover and remove it.
- Pull out the washing powder tray.
- Release the drain filter from the panel covering it.
- Remove the control panel. To do this, you will need to unscrew additional bolts and disconnect the wires.
- After gaining access to the cuff of the façade of the device, remove the securing clamp, and then the cuff itself. Push it inside the machine.
- Now it is recommended to detach the façade.
To determine whether the damper is worth replacing, it is recommended to compress it. If it compresses and unclenches very easily and freely, then the device must be replaced. If the structure is compressed with difficulty, the shock absorber will still work.
There are other reasons for device failure.
- The liner or gasket is worn out. Then replace the rubber part of the device.
- Mechanical deformation due to improper transportation. A replacement will be needed here.
- The bolts are worn out and the shock absorber is simply hanging on them. The bolts will need to be replaced.
How to change shock absorbers in a washing machine
The ideal option when repairing shock absorbers is to replace them with an original spare part with the same characteristics. It happens that the necessary original spare parts are not on sale, or they need to be ordered and wait a long time. In this case, you can select dampers with similar characteristics. First of all, the following parameters are taken into account:
- Resistance created during operation. In most cases, this parameter is marked on the element body in the form of a digital designation in newtons. Most often it is in the range from 80 to 120 N;
- The distance between the mounting axes in a fully folded and compressed state;
- Mounting type. If there are no special latches on the shock absorbers, then it is secured either with bolts or plastic pins. Typically, silent block bushings have a hole for an M10 or M8 bolt.
Having selected an analogue that is similar or similar in characteristics and remade the mount, it is easy to install it in place. Dampers are replaced in the reverse order of disassembly.
How to adjust a washing machine yourself
You will need:
- Tools.
- Dowels.
- Liquid Nails.
- Plywood.
First, you will need to check the surface on which you are going to install your washing machine.
If the floor is uneven, then it doesn’t matter what kind of covering it has - tiled or concrete - the machine still won’t fit as it should. This means that even with slight vibration the machine will still jump and slowly move from its original location
If this applies to your case, then you need to level the floor, and then you won’t even have to adjust the washing machine.
If your floor surface is flat, then you should look at how the legs of the washing machine are positioned. To do this, you need to gently rock the machine back and forth. You can also tilt it slightly to the sides. This is necessary in order to understand which legs should be raised for adjustment.
Now let's move on to the process of regulating the washing machine. To do this, those legs that need to be lifted should be untwisted (or rather, the washer on them), and then we scroll the leg clockwise or counterclockwise. This is the adjustment process itself. To check the installation accuracy, use a building level. Ideally, the level bubble should be located centrally. To measure, it will be most convenient to place a level on the machine itself and make adjustments.
An additional device can be used to adjust and level certain types of machines. Take a sheet of plywood and cut out a base for the machine. Next, you should attach it to the floor using dowels or liquid nails. The following operation can be called a popular method: wipe the floors with very sweet water and immediately place your newly purchased device on them. It should stick to the surface. The method, frankly speaking, is dubious, but those who did it claim that everything went perfectly.
What to do if you can’t get rid of vibration?
Destruction of internal components such as shock absorbers, dampers and counterweights usually causes the washer to shake and move during the spin cycle.
Only a specialist can accurately determine the malfunction and replace the part at the highest level, so if the vibration does not disappear after correctly following all the instructions, we strongly recommend that you seek advice from a specialist.
TOP stores of washing machines and household appliances:
- mvideo.ru/- household appliances store, large catalog of washing machines
- holodilnik.ru – Inexpensive store of household appliances.
- techport.ru - profitable modern online store of household appliances
- citilink.ru is a modern online store of household appliances and electronics, cheaper than offline stores!
- ru.aliexpress.com - spare parts for washing machines
Operating principle of dampers
Such devices also work in conjunction with suspension springs. The damper body is a cylinder, but instead of a rod, there is one piston with perforations to remove air. The design is supplemented with rubber gaskets made of polymers with specific impregnation. The latter prevents overheating of the device and provides better contact with the centrifuge of the washing machine.
Shock absorber set for Indesit washing machine
The mechanism is attached to the body and drum using rubberized bushings. They minimize gross vibration to some extent, while the rest of the damping falls on the shoulders of the damper itself. Depending on the model and type of washing machine, the form factor of the device also changes.
- Collapsible. Almost all elements of the device can be disassembled manually and replaced. Most often, rubber gaskets wear out.
- Solid. The devices are tightly sealed and cannot be repaired - only replaced. Found mainly in budget models.
Dampers also vary in their maximum load capacity. For household devices, the figure varies between 50-150 Newtons. As the damper wears out, the load on the components increases even more, so it is better not to delay replacing the part. Otherwise, it may damage other important equipment elements.
What is the difference between shock absorbers and dampers
The shock absorber is a cylindrical device, inside of which there is a piston and a return spring. Between the cylinder and the piston there are gaskets, at the end there is a rubber piston and a rod. The damper does not have return springs in its design. The springs in washing machines with dampers are taken out separately, and the tank is hung on them.
Unlike a shock absorber, a damper dampens tank vibrations much better. Due to the fact that the springs are placed separately, if they break or stretch, they can be replaced without any problems. The shock absorber will have to be disassembled, but we will talk about this later.
Functionality check
You can check the performance of a shock absorber or damper without even removing it from the tank. To do this, you need:
- remove the top cover of the washing machine by unscrewing the screws holding it in place;
- press the top of the tank so that it moves down 5-7 centimeters;
- then release sharply;
- After this, watch carefully; if the tank, under the action of the springs, rose up and stopped, then the shock absorbers are in good condition; if the tank began to swing like a pendulum, then repair or replacement of the part is required.
A broken shock absorber or damper affects the operation of the washing machine, and therefore their breakdown can be suspected even before “opening” the machine. The main symptoms of faulty shock absorbers are as follows:
- during washing and spinning, the machine creaks and knocks a lot;
- The drum of the machine spins tightly, perhaps there is no lubrication in the shock absorber.
The shock absorber or damper of a washing machine most often has one of the following breakdowns:
- With constant use of the equipment, the damper liner or gasket may wear out; in some cases, replacement is possible;
- mechanical deformations resulting from improper transportation or defective assembly, in this case repairs are inevitable;
- when the bolts on which the shock absorber is attached wear out, it simply flies off and dangles.
Where and at what price can I buy a new one?
When purchasing a heater online, you need to consider the following parameters:
- seat dimensions;
- presence of a collar, seals, holes for the sensor;
- configuration of the working part of the heating element (shape, length and width);
- power.
LG washing machines are equipped with heating elements with a power of 1.1 to 3.2 kW and a length of 173-240 mm.
If a strictly similar part is not supplied, you can select a heater with similar characteristics. The permissible discrepancy in length is -1 cm, and in power - ±200 W. The new element must have the same shape as the previous one: straight or curved.
Some models of heating elements have a protective coating, which does not affect its configuration and interchangeability, but increases wear resistance and service life. The cost of the heater ranges from 400 to 1500 rubles. The best manufacturers of tubular elements for LG washing machines are IRCA and Thermowatt.
Rules for selecting spare parts
Each washing machine model has its own design features. Therefore, there are no universal spare parts that fit all washing machines.
When purchasing new shock absorbers, it is advisable to make sure of their quality. When compressed, the part must provide resistance.
If, when compressing, practically no effort is required, such a part is not suitable for installation.
You should not purchase more powerful shock absorbers with the hope that the washing machine will be overloaded. This is a mistaken opinion; this cannot be done, since all elements of the machine (not just dampers) are designed for certain loading parameters specified by the manufacturer.
If you have doubts about choosing a new pair of parts, you can go to the store with the removed ones and ask the seller to pick up similar ones.
Video review on the selection of shock absorbers:
Procedure
With use, the resistance between the piston and cylinder decreases, and the shock-absorbing functions become weaker.
There is no point in trying to repair them - there are no spare parts available for them, and home-grown measures will give too short-term effect, so these parts should be replaced with new ones when they wear out.
The shock-absorbing devices of washing machines perform purely mechanical work and are not connected to the electrical circuit of the device. This makes it possible to replace them even without special electrical knowledge. But to gain access to these parts, the washing machine will have to be partially disassembled.
Procedure:
- If there is water in the washing machine, it needs to be drained. Drain the remaining water through the drain filter.
- Laundry – remove from the drum.
- Unplug the machine.
- Shut off the water supply.
- Pull out the device so that it is easily accessible from all sides.
- Remove the top cover by unscrewing the screws that secure it on the back side.
- Remove the powder tray.
- Unscrew all the screws that secure the control panel. Place the removed part on top of the car so as not to break the contacts.
- Remove the cuff from the front of the washing machine. It is secured with a wire clamp with a spring, which needs to be pryed off with a screwdriver and removed.
- The cuff is tucked inside the machine, into the drum.
- Remove the front panel by unscrewing all the screws holding it in place. Disconnect the wires from the door lock.
- The dampers that require replacement are located under the tank, on both sides.
- Unscrew the fasteners using a wrench and remove the dampers.
- Install new parts in their place. Carefully tighten the fasteners.
- Reassemble the washing machine in reverse order
- After assembly, connect all communications.
- Perform a test run, for example, on a quick wash with spin.
Another way to access the dampers is through the bottom. In this case, the machine (with all the water previously drained) is installed at an angle. If there is a panel on the bottom side, remove it. Dampers are replaced in the same way.
Replacing or repairing a damper with pressed liners
This type of damper is most actively used today in the production of household appliances. Due to special functional features, they completely neutralize vibrations, which negatively affect the condition of the unit as a whole. Most often, the earbuds themselves, which “dampen” vibrations, fail. Therefore, sometimes it is necessary to replace the pressed liners.
The most difficult thing in this procedure is to securely and firmly fix the bracket on which the springy parts are clamped. Some perform this action using their legs. It is necessary to first separate the springs and replace them. Pull out the damper and install a new one.
Signs of faulty shock absorbers
The fact that the shock absorbers in your washing machine are worn out can be indirectly determined by the following “symptoms”:
- The machine knocks, makes noise, and rattles during the spin cycle, especially at the beginning, when the laundry is wet and heavy.
- The washer vibrates a lot, “jumps” and may even “run” around the bathroom during the spin cycle.
- SMs with a vibration sensor may not spin the laundry at all or spin only at low speeds.
It is worth noting that the symptoms described above can also occur with other types of malfunction. To determine for sure that the reason lies in the shock absorbers, we suggest conducting a simple test.
Conclusions and useful video on the topic
Video with detailed instructions for replacing shock absorbers:
Video demonstration of repair of dampers of a washing unit:
Shock Absorbing Device Refurbishment Guide:
Without undue self-deception, we agree that for an inexperienced home craftsman, the above repair operations can become a bit of a problem. At first, the procedure itself will be frightening with the unknown, but all this tension will oppress the performer only for the first time. Repairs carried out by yourself will certainly become a useful experience, on the basis of which all subsequent actions will be carried out easier and faster.
How to determine that they need to be changed?
Damage to shock absorbers and dampers for housewives does not go unnoticed. Malfunctions of this unit always manifest themselves with noise and knocking that is uncharacteristic of normal operation.
In addition, the following manifestations can be considered indirect signs of wear:
- strong vibration and even spontaneous movement of the washing machine on the floor during washing and spinning;
- An abnormally weak spin cycle or its complete absence is possible.
Since the listed symptoms are also typical for other problems, you should also analyze the type of the hatch cuff and the condition of the tank. If there are serious problems with the shock absorbers, the tank begins to sag and lose its elasticity.
This circumstance may even have external manifestations:
- creases and folds on the sealing cuff of the hatch;
- lowering the drum below the normal level;
- lack of elasticity of its fastening.
In machines with vertical loading, if there is a problem, you can notice that the tank swings freely if you touch it with your hand. The same circumstance can be noticed in front-loading machines when the top cover is removed.
Such manifestations can occur even when the drum is empty, and under load the situation becomes even worse. If there is no damage, then the tank, after swinging it by hand, very quickly returns to its original position without unnecessary swinging.
In normal condition, a working washing machine should have no wrinkles on the cuff at all
Therefore, any violation with it is a signal to pay attention to the shock-absorbing installation
If the seal only crumples on one side, most likely only one damper has failed.
If there is a problem with the shock absorbers, they need to be replaced immediately. The machine cannot be used in a faulty condition, as this may lead to breakdowns of other parts and, as a result, more complex and more expensive repairs.
Causes of breakdowns
A malfunctioning washing device can be determined by many signs.
Often the drum can make sounds when it hits the body or the hatch.
Excessive jumping and vibration of the washing machine also indicate a problem. Another sign is a frequently falling off drive belt. Also, the drum often rubs against the cuff on the loading hatch. In this case, the unit can operate normally, and only various noises or squeaks will be heard.
You should be wary if traces of oil are visible under the washing device. A leak or signs of rust on the tank also indicate problems.
It is important to pay attention in time to the strong swinging of the drum, its distortion, wedging, difficulty in turning, or metallic grinding. Chewed laundry, constantly knocking out plugs, smoke from the unit should also alert you
All of the above symptoms indicate that a significant breakdown has occurred. Moreover, even if all modes are performed in full, you should not use the unit. This can cause serious problems that cannot be fixed.
Often the drum stops working properly due to faulty bearings. This is primarily visible by bottom leakage, strong hum and excessive vibration. In this case, it is necessary to change not only the bearings, but also the seals. This failure is preceded by water entering the bearing and causing corrosion. As a result, the service life of the part is significantly reduced.
When you hear significant drum impacts during washing or spinning, you need to look for the cause in worn shock absorbers. You can check this on an open machine. To do this, pull the drum towards you and then release it. When it swings, if it does not immediately fall into place, repairs should be started immediately.
Sometimes foreign objects can get into the tank, including socks, nuts, and coins. This makes it difficult for the tank to spin up and makes unpleasant sounds. Sometimes particles of destroyed bearings or shock-absorbing elements are found directly in the tank itself. At the same time, it feels like the drum is loose, staggering, and you can hear a loud grinding sound.
Characteristics of the substance
Theoretically, lubricant should solve the problem with dampers wearing out. After treatment with a viscous compound, the friction force between the rod and the “head” of the shock absorber will be smoothed out, which will prevent the drum from swinging, imbalance and other technical problems. But ordinary products like WD-40 or Solidol will not help here - special mixtures are required.
Finding a suitable lubricant is where difficulties arise, since it is unclear where to find a professional product. At service centers and branded sales points that supply components for washing machines, you can purchase either a repair kit for repairing racks or the damper itself. The consultants working there had never even heard of lubricants - we checked several large stores and left with nothing.
What are shock absorbers and dampers?
Dampers are used in more modern washing machines. They differ from shock absorbers in that they consist only of a spring. The shock absorber has a more complex design.
- Cylinder.
- Return spring.
- Piston with rods.
- Gaskets.
This type of shock absorber is called spring-piston, and is a cylindrical metal device containing a bushing. The rod moves in it during operation. On its upper part there is a special fit for rubber inserts, with the help of the latter it is connected to the drum.
A piston with a gasket is fixed at the base of the rod. It is impregnated with a special lubricant that does not dry out for a long time and increases the friction force during movement. The work of the shock absorber is as follows:
- With sharp jumps, linear movement of the rod occurs.
- The piston, pushed by the rod, moves inside the cylinder.
- Lubrication creates the necessary conditions for movement so that it does not slip idle.
- When weakening occurs, the rod returns to its original position.
And everything repeats itself again.
The dampers have the same cylindrical design, only there is only a piston inside the cylinder, and there are holes in the walls for air to escape. The piston is equipped with a gasket that replaces the lubricant in the shock absorbers.
Dampers are divided into two types:
- Collapsible. They replace the compressed liner.
- Non-separable. The damper must be completely replaced.
The load that both of these devices can withstand varies from 100 to 150 newtons.
How to get a foreign object?
If small foreign objects interfere with the proper operation of the drum, then you should not worry too much. They can come out on their own through the drain pipe. Such elements are then easily removed from the filter. To do this, the latter is removed from the washing device and cleaned of everything foreign. Before this procedure, it is advisable to spread rags, as water will pour out of the filter hole.
At times, foreign elements fall to the bottom of the tank, where it is much more difficult to get them out. In this case, they are removed through the hole of the heating element. It is worth noting that depending on the model, the heating element may be located in the back or front of the device. Based on this, certain fastenings are removed, and then the heating element itself is removed. After this, you can remove everything unnecessary.
How to replace bearings in a washing machine, watch the video.