Scrap metal collectors will be happy to take your old washing machine. But don't rush to please them. You won't get much money for scrap, but if you approach this issue wisely, you can get a lot of useful things for your household. Homemade products made from a washing machine engine will help you quickly de-feather poultry, cut pet food, mow the lawn, and smoke fish and meat. And this is not a complete list of what can be made from a washing machine. Today in the review by the editors of HomeMyHome.ru there are detailed instructions on how to give the “iron heart” of a washing machine a new life.
Parts from a washing machine - material for many useful homemade products
What can an engine from an old washing machine look like?
If you are planning to make homemade products from a used engine, you need to figure out what it is and what it is capable of. In washing machines you can find three types of motors: asynchronous, brushless and commutated. Let's take a closer look at them:
- Asynchronous - can be two-phase or three-phase. Two-phase engines are found in older Soviet-made models. More modern machines are equipped with three-phase. The design of such an engine is extremely simple; it can reach speeds of up to 2800 rpm. The working engine removed from the machine just needs to be lubricated - and it is ready for new exploits.
Such motors are characterized by quiet operation. Their only drawback is their impressive dimensions.
- Commutator – you will find this type of motor in the design of most household appliances. Such devices can operate from direct and alternating current, have compact dimensions and a controlled speed. The only drawback of such an engine is the brushes that wear out, but these parts can be replaced if necessary.
It must be admitted that, in comparison with an asynchronous motor, such a motor is noisier. In addition, it often overheats and even sparks
- Brushless direct drive is the most modern motor from the Korean manufacturer. You will find it in modern washing machines from LG and Samsung.
Such models are the most compact.
They are characterized by wear resistance, simplicity of design and high efficiency. Now that you can determine the type of motor, all that remains is to decide where you can use the motor from the washing machine.
Checking the functionality of the mechanism
There are machines on sale only with inverter and commutator motors, so we will consider these two varieties, leaving out the asynchronous one.
We are looking for a breakdown of the direct drive motor
The inverter is not intended for home repair. The best option is to try system testing, if your machine model is capable of this.
Self-diagnosis will display a fault code, its decoding and will help you understand where the problem is and whether the services of a specialist are needed.
The testing method and error codes are different for each machine. Before testing, you need to empty the drum of laundry and close the hatch tightly
If you still want to remove the inverter, follow the correct algorithm:
- Disconnect the device from the power supply. It is recommended to wait a few minutes until all elements are completely de-energized.
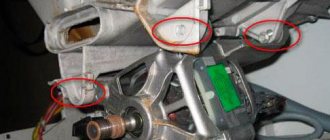
- Unscrew the bolts and remove the back panel.
- We find the screws under the rotor that secure the wiring and unscrew them.
- Before disconnecting the wires, we take photographs or sketch them, so that later we can correctly connect all power sources.
- Remove the central bolt that holds the rotor. During the process, you need to hold the rotor to prevent rotation.
- We remove the rotor assembly, and behind it the stator.
- Disconnect all wire connectors.
Now you can inspect the engine. It is unlikely that it will be possible to thoroughly test the operation of the inverter. What can be done? Check the integrity of the rotor winding.
The Hall sensor often breaks down in such engines. Whether it is operational can only be determined in a workshop if the part is replaced with a new one.
We carry out diagnostics of the belt drive
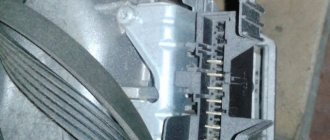
To check the collector, you must first remove it from the housing. To do this, remove the back panel, disconnect the wires and unscrew the bolts. It is permissible to pry with a screwdriver in the places where the bolts are attached, where dirt often accumulates and sticking occurs.
Now let's start diagnostics. We connect the wires of the stator and rotor windings according to the diagram. We connect it all to electricity. There is nothing wrong with the device if the rotor starts rotating.
This testing method has its own characteristics: it is impossible to test the operation of the engine in different modes, plus there is a risk of a short circuit from direct connection
To avoid a short circuit, you can connect a ballast in the form of a heating element to this circuit. We connect the ballast from the rotor side. It will begin to heat up, thereby protecting the engine from combustion.
The collector is a structure of several parts and they all require inspection. First in line are the notorious brushes. They are located on the sides of the body. We take them out and inspect them.
If they are worn out, they need to be replaced. A clear sign of such a need is that the engine sparks when rotating. To buy new brushes, take your old ones with you and write down information about the model of the washer.
The next element is the slats. They serve as current transmitter conductors to the rotor. These parts are glued to the shaft and if the motor jams, their detachment is possible.
If you have access to a lathe, it can be used to remove minor flaking. Don't forget to clean off the shavings with fine sandpaper.
Pay close attention to burrs and peelings on the lamellas; they are often the cause of unsatisfactory operation of the washing machine motor.
Now let's move on to the stator and rotor windings. If a short circuit occurs in them, the collector heats up, which causes the thermistor to operate. The result is that power is lost or the mechanism stops working altogether. We test the windings with a multimeter in resistance mode.
The stator is checked in buzzer mode. The ends of the wiring are tested one by one with probes. If there is no signal, the part is fine. You can determine the location of the short circuit by connecting one probe to the wiring and the second to the housing.
The probes are applied to the engine lamella. The display shows less than 20 Ohms - we have a short circuit, more than 200 Ohms - a break in the windings
If the device is silent, this is normal. If a breakdown is detected, you will need to create a new winding to repair it yourself, and this is difficult for a non-specialist.
If you still need to replace the engine, it is usually enough to simply install a new part in place of the old one. After all the manipulations, do not forget to turn on the machine and check its operation.
We properly disassemble and decide what can be made from parts of an old washing machine
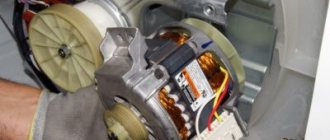
Disassembling a washing machine is a leisurely task. After working with water, a salt build-up may remain on the parts; it must be carefully removed so as not to damage the parts during removal. What can be made from an old washing machine? A motor will be useful for homemade projects - it will become the basis for many devices. The drum will also come into play. It is usually made of stainless steel. All pipes must be disconnected from the drum. A loading hatch may also be useful. In addition to these parts, do not rush to throw away springs, counterweights and body parts.
For those who are versed in electronics, you may need a circuit board - it can easily be used to find spare parts for repair work if necessary.
Speed controller, my modification
If you bought inexpensive Chinese products, then you should definitely check the device. Remove the filling from the case and pay attention to the triac. At best, it has a very small heatsink that cannot effectively remove heat. In the worst case, there is nothing at all.
Cut an M3 thread on the new radiator and adjust its length to the dimensions of the case. Spread the surface of the triac with thermal paste and secure the prepared radiator. Assemble the regulator.
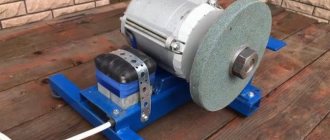
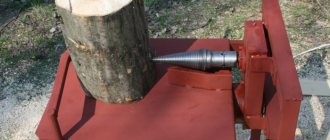
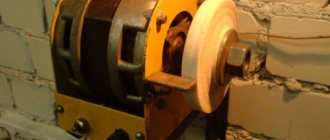
How to make a sharpener or grinding device from a washing machine engine
A sharpener is one of the most popular tools for the home. It can be used to sharpen garden tools, household knives and scissors. If you don’t already have one, buy it at any tool store or make a sharpening machine from a washing machine. The most difficult part is how to attach the sanding wheel to the motor. The easiest way is to buy a ready-made flange. It looks something like this.
Flange for motor
You can machine a flange from a metal pipe of a suitable diameter; most often, a tube with a cross-section of 32 mm is suitable. You need to cut a piece 15 centimeters long from it, this is quite enough to fix the emery. The flange is secured to the motor shaft by welding or a through bolt. The video describes in detail how a homemade washing machine sharpener works:
Other homemade products based on the sharpener circuit
The above work will have to be done if you want to get other, most diverse machines.
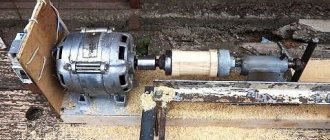
- Wood lathe. The 180 Watt motor from an old washing machine will allow you to process cylindrical workpieces with little effort and slowly. You will definitely need something like a tailstock to support the workpiece. This will protect the motor shaft from lateral loads.
- Drum grinder. For this, a large-diameter wooden cylinder is used, through the center of which a steel rod passes, one end of which is clamped into the engine cartridge, the other is attached to a bearing in a stand. The surface is covered with sandpaper, you can sharpen knives, plane blades if you have devices for maintaining the angle, and perform other operations.
Let us note right away that a sawmill cannot be made from a washing machine engine - there will not be enough torque.
But furniture makers and other home craftsmen will like the idea of making a horizontal drilling device for working with eccentric fasteners.
- The machine is made as described above, with a chuck on the shaft.
- A supporting, guide shelf is made, horizontal, at such a height that the axis of the shaft passes through the center of the end of the chipboard or wooden part.
- A drill is inserted into the chuck, the part is fed horizontally, and the drilling depth can be monitored visually.
To create a location for installing a circular eccentric, it is enough to use a drill, a vertical drilling machine and a milling cutter of the required diameter. This operation does not require high precision. The main, important task of accurately drilling a channel for a cylindrical pin will be performed by a machine made from an engine from an old washing machine.
Making a wood lathe from a washing machine
What else can you do with the washing machine motor? One popular idea is a wood lathe. Let's look at the step-by-step process.
| Illustration | Description of action |
| To firmly fix the engine on the workbench, make fasteners from a metal angle. To do this, drill holes for fixing to the motor legs and table. | |
| To fasten a wooden part, you will need a flange fixed to the motor shaft, and these are the studs made from ordinary bolts with cut off heads. Screw these pins into the base. You will need 3 studs. | |
| The motor is fixed to the table with self-tapping screws and to the metal part with bolts. | |
| The opposite end of the wooden part is attached with such a device. It consists of a screw with a loop, two wooden stands perpendicularly fixed to the corners. | |
| This wooden part must be movable so that different workpieces can be used. For mobility, it is mounted on a threaded stud with bolts. | |
| To control the motor you will need a power supply. You can use one of the computer units. You will need to install switches to adjust the rotation speed. | |
| How to connect a motor to a power supply in animation. | |
| To guide your tools, make a tool rest. It consists of two wooden parts and a metal corner. All parts are movable due to fastening with one bolt. | |
| The lower part of the tool rest is rigidly fixed on the workbench using self-tapping screws and corners. | |
| The workpiece is fixed on the machine on both sides: on the left - on studs, on the right - on a bolt with a handle. To fix it in the workpiece, you need to drill the corresponding holes. | |
| To work, you will need sharpened tools - cutters. | |
| Final sanding of the workpiece is done using a strip of sandpaper. |
Connecting the motor from the SMA
This motor contains two independent windings:
for synchronous speed 3000 rpm - two-phase winding.
for synchronous speed 500 rpm - symmetrical three-phase winding . The three-phase connection system allows you to change the rotation speed by switching the power supply to the winding.
An older type motor usually has 5 wires, black, blue, white, red and green. A series of measurements were carried out to determine the windings and the resistance between them:
Connecting an old electric motor requires finding the starting winding using a multimeter.
How to make a simple feather removal machine for home use from a washing machine with your own hands
The time of slaughtering a bird is a troublesome stage. This is usually done in the fall, when the ducks and broilers have reached the desired weight, and it is no longer profitable to keep them in the winter. You need to pluck several dozen or even hundreds of carcasses very quickly. You can get rid of hard labor with the help of a feather removal machine, and it’s easy to do everything from the same parts of the washing machine.
The only thing that can cause difficulties is the search for rubber fingers with threads - beaters. You will have to order them, so keep in mind that you need to think about making the machine long before slaughter
The device does not require disassembling the washing machine. It is especially convenient to use machines with vertical loading. You just need to fix the beats in the drum so that they point inward. Before plucking, the chicken carcass must be scalded with boiling water and then simply thrown into a rotating drum. Here's what happens:
Important! To prevent water from getting on the engine of the feather removal machine, you need to protect it with a plastic casing.
And the last point - the feather removal device must be firmly fixed, since the vibration when loading the carcass will be very strong.
Lawnmower from a used motor
We continue to look for the answer to the question of where we can use the motor from an automatic washing machine. Another original idea is making a lawn mower. For a small area, an electric model connected to a power source with a cord is quite sufficient. The design of such a unit is very simple. You will need to make a platform on four wheels with a small diameter.
The platform can be made of metal or OSB board, plywood and even the body of the same washing machine
The engine is fixed on top of the platform, the shaft is threaded into the hole below, and the knife is attached to it. All that remains is to attach handles and a lever to the cart to turn the power on and off. If you have an asynchronous motor lying around, you will be surprised at how quiet the unit will be, even compared to factory models.
Advice! To prevent grass from wrapping around the knives, you need to slightly bend their cutting edges down.
Video: how to make a lawn mower
Activator
These units are distinguished by the presence of a flat bottom, into which a disk with blades is mounted. This is the activator, driven by the engine of the machine. Reviews from housewives claim that OKA activator washes things by 60-70%. What models belong to this type? OKA-16 is a prominent representative of activator-type machines. According to the instructions, the drum is designed for 2 kg of laundry. OKA-16 is controlled using a mechanical rotary knob.
This is a washing unit for home use, equipped with a manual spin device. The OKA 9 washing machine, which we see in the photo, is suitable for washing clothes made from different fabrics. External parts and the cover of the device are made of steel, the tank is aluminum. The external parts are painted with blue enamel, which makes this model remarkable. OKA-9 is an activator-type unit that allows you to wash things at home with any detergent.
OKA 8
Like the previous model, this unit is made in blue. OKA8 is an activator type device designed for 2 kg of laundry. According to the classification of washing and drying quality, this model belongs to C and B classes. Compared to automatic cars, these indicators cannot be called good. But despite this, many people buy Oku 8 and Oku 7 due to their low cost.
OKA 18
Another representative of the activator-type machines is the OKA 18 model. The device is designed for 3 kg of laundry. Among the advantages, it should be noted the affordable cost and unpretentiousness in choosing a detergent. Otherwise, such a unit will not replace a modern automatic machine. OKA 18 is not characterized by high quality washing, it is noisy, although it does not fail for 20-25 years. As practice shows, the OKA 18 washing machine is an excellent option for unpretentious pensioners who do not have large funds.
Oka 19
This model of activator washing machine was released in 2012. Traditional vertical loading, small capacity and economical consumption of water and electricity made this model popular among the poor. The tank of the OKA 19 device is made of stainless steel, the body is enameled. And although the OKA 19 washing machine is equipped with a manual control mechanism, it is still popular among buyers due to its reliability and long service life.
OKA 50
Washing machine OKA 50. Shown in the photo, it is small in size. This is an excellent option for a summer house where it is not possible to install a full-size machine. But despite the fact that the height of the unit is only 50 cm, it holds 2.5 kg of laundry. The tank, made of composite plastic, holds 30 liters of water.
The compact model is equipped with the following useful functions, which are mentioned in the instructions:
- Possibility of half loading.
- Selecting the appropriate temperature for washing.
- Start the timer.
The manufacturer provides a 2-year warranty for the device. But practice shows that OKA 50 M operates without problems for 5 to 10 years.
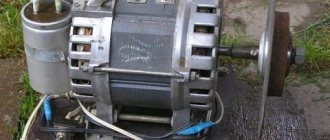
How to build a generator from an old washing machine
We continue to look at homemade products from a washing machine motor, and the turn has come to the generator. You won't be able to assemble a powerful device, but in the event of an emergency shutdown, you can be well prepared. To turn the engine into a generator, you will have to disassemble it and partially cut off the core. In the remaining part of the core you need to make grooves for neodymium magnets.
The magnets must be placed in two rows with the same spacing
The gaps between the magnets are filled by cold welding. To operate the device, the kit must include a motorcycle battery, a rectifier and a charge controller. Details of the work in the video:
Connection instructions
When using any motor from a washing machine, be it a part from an Indesit unit or from the good old Vyatka, you should remember that a starting winding is not required to start it and such devices are not started through a capacitor.
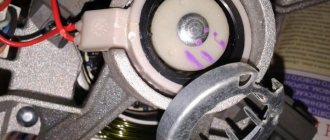
First, check out the washing machine motor connection diagram (pinout) in the photo below. It displays all the motor connections, which will be easy for even an inexperienced technician to navigate.
At first glance, it may seem that there are too many wires coming from the motor. Typically, electric motors from washing machines are designated by the number of wires that come from the part. The most common motors are 4-pin, but there are also 3-pin, 5-pin, 6-pin, and 7-pin motors. As can be seen from the above figure, not all connections will be needed during the connection process - only the wires from the rotor and stator. To make it easier to navigate, we suggest understanding the wires of different colors that are available on the engine transfer case:
- White wires (2 pcs.) are connected to the tachogenerator (Hall sensor).
- Red and brown go to the windings of the rotor and stator.
- Green and gray are connected to graphite brushes.
Depending on the model of the washing machine, the wires may be painted in different colors, but the principle of their connection is the same. To find matching pairs, ring each element in turn. The resistance of the wires from the tachogenerator is 60-70 Ohms. Put them aside and connect them with electrical tape - this pair will not be needed for connection. Next, ring the remaining wires in sequence.
First of all, you need to connect the rotor brush to the stator winding, as shown in the diagram above. For this procedure, we create a jumper (in the picture it is pink) and insulate it with electrical tape. We still have two wires free: from the second graphite brush and from the rotor winding. They need to be connected to the mains voltage.
To change the direction of rotation, you simply need to transfer the jumper to other contacts. Finally, do not forget to connect the on and off buttons to the circuit so that it is convenient to start the device and turn it off.
To control the shaft rotation speed, you can separately purchase and install a motor speed control board
The commutator motors of washing machines provide fairly high speeds, which are not always appropriate for household appliances. To install the speed controller, you can use a light intensity relay, which will need to be soldered into the device microcircuit. If you do not have skills in working with electronics, it is better to entrust this procedure to a professional.
Connecting an electric motor is a feasible task for a home handyman. To ensure that the result does not disappoint you, follow the sequence of actions and safety measures.
Homemade concrete mixer
If you have started a small renovation that requires, for example, plastering the walls, a concrete mixer will come in handy. Once again, washing machine parts will come in handy.
As a result, you will receive a compact device with low power, which you won’t mind throwing away after the repair work is completed.
As a container for concrete, you can use the same drum with pre-sealed holes for draining water. It is best to use parts from a front-loading machine; there will be almost nothing to redo. To strengthen the body, use a metal corner, and for convenient movement of the concrete mixer, equip it with wheels. The main difficulty in the design is the manufacture of a “swing” for the correct tilt and subsequent pouring of concrete. How to do it correctly in the video:
Let's start the engine first
Before using the engine again, you should make sure it is working. It is important to start the engine and see if it has lost power and is able to maintain speed under load. To do this, you will have to connect the motor to alternating current. The algorithm of actions is as follows:
- prepare a multimeter - this is a special device necessary to identify the paired wires of the motor winding;
- connect the multimeter probe to a random wire and find its pair (the tester will indicate the correct connection). The remaining 2 wires will also be considered paired;
- measure the resistance of each winding (the one with a higher resistance and a smaller cross-section is the starting winding);
- connect the wires from different windings of the engine and connect them to the mains;
- watch the engine work;
- change the movement of the electric motor in the opposite direction by swapping the contacts of the starting winding.
When diagnosing an engine, it is important to follow safety rules. If the unit passes the test, then it can be used in a homemade product.
An electric motor can be used to make a lathe, an apple or feed crusher, a grass cutter, a concrete mixer, and an emery machine.
There are many options, your task is to choose a product that will really be useful in the household. We'll tell you how to design such devices yourself.
Homemade products from a washing machine engine: circular saw
You will be surprised, but a circular machine can also be built based on the motor from a washing machine. An important point in this matter is the additional equipment of the motor with a device that regulates speed. Without this additional module, the circular machine will work unevenly and simply will not cope with the task. Device assembly diagram:
Circular saw diagram
The principle of operation of the device is simple: the engine drives a shaft on which a small pulley is mounted. From the small pulley there is a drive belt to a large pulley with a circular saw.
Important! When working with a homemade circular saw, take care of your hands. All structural parts must be firmly fixed.
The resulting unit will not be very powerful, so it can only be used for cutting boards up to 5 cm thick. How this homemade circular saw works:
Types of electric motors
An electric motor is a machine operating on electricity that moves various elements using a drive. They produce asynchronous and synchronous units .
Synchronous motor
It has been established since school days that when magnets approach each other, they attract or repel. The first case appears at opposite magnetic poles, the second - at like ones. We are talking about stable magnets and the magnetic field they constantly organize.
In addition to those presented, there are unstable magnets. Everyone, without exception, remembers the example from the textbook: the picture shows a magnet in the shape of an ordinary horseshoe. Between its poles there is a frame made in the shape of a horseshoe with half rings. Current was supplied to the frame.
Since the magnet rejects the same poles and attracts different ones, an electromagnetic field appears around this frame, which turns it in a vertical position. As a result, it is acted upon by a current opposite to the main case in terms of the symbol. The modified polarity rotates the frame and again sends it to the horizontal area. The operation of a synchronous electric motor is based on this belief.
In this circuit, current is supplied to the rotor winding , represented by a frame. The source that creates the electromagnetic field is the windings. The stator performs the functions of a magnet. In addition, it is made of windings or a set of stable magnets.
The rotor speed of such an electric motor is the same as the current supplied to the winding terminals, i.e. they work simultaneously, which gives the electric motor its name.
Asynchronous device
To understand the principle of operation, let’s remember the picture: a frame (but without half rings) is located between the magnetic poles. The magnet is made in the shape of a horseshoe, the ends of which are united.
We begin to slowly rotate it around the frame, observing what is happening. Until a certain point, the frame does not move. Further, at a specific angle of rotation of the magnet, it begins to spin behind it at a speed less than the speed of the latter. They do not work simultaneously, which is why the motors are called asynchronous.
In a real electric motor, a magnet is an electrical winding placed in the slots of the stator into which electric current is supplied. The rotor is considered a frame. In its grooves there are short-connected plates . That's what they call it - short-circuited .
Differences between electric motors
Externally, the motors are difficult to recognize. Their main difference is the operating rule. They also differ in their scope of application: synchronous, more complex in design, are used to drive equipment such as pumps, compressors, etc., i.e., operating at constant speed.
In asynchronous ones, as the overload increases, the rotation frequency decreases. They are supplied with a huge number of devices.
What else can be made from a washing machine drum: original decor ideas
The drum with its correct perforation is a material for the manufacture of decorative objects. Here are some interesting ideas.
Ottoman with drum base. It’s easy to do – you just need to attach the wheeled legs and make a soft seat
Such a drum can also be turned into an original lamp. If you place a lamp inside, the perforated surface of the drum will cast glare on the walls. Such lamps will look good on the ceiling of the veranda or even on the floor
Bedside tables and tables. Drums with doors from top-loading machines can be used to hide small items.
This is how the drum turns into a cabinet or nightstand
What is needed
- A toggle switch with two groups of contacts 220 V 15 A, you can purchase it on Ali Express
. - Speed controller 400 W 220 V 50 Hz, also get it on Ali Express
. - An electric motor from an automatic washing machine will suit almost any brand.
- Pieces of wires of different colors, preferably blue (zero) and brown (phase).
- You will need electrical tape; to install a powerful radiator, buy a new one and a tube of heat-conducting paste.
- To check the connection diagram, it is recommended to use an ordinary tester or at least an indicator.
Making a barbecue from a drum from a washing machine, photo examples
A metal grill is a temporary product. Sooner or later it burns out and requires replacement. You can buy a new one each time or use improvised material, for example, a drum from a washing machine. Making this craft from a washing machine drum takes a couple of minutes. The beauty is that oxygen easily enters the perforated container, which causes active combustion.
Kebab coals burn quickly, and the process of cooking meat is significantly accelerated
The metal of the drum can withstand a couple of seasons. Make a comfortable stand for it so you don’t have to bend over, and you’re done. Standard length skewers will fit comfortably on a small roasting pan. If necessary, you can lightly weld a couple of guides.
Possible breakdowns
Now you know how to connect an electric motor to give it a whole new life, but a small incident may occur: the motor will not start. It is necessary to understand the reasons and find a way to solve the problem.
Check engine heating after running for 1 minute. In such a short period, the heat does not have time to transfer to all components and the place of active heating can be clearly fixed: the stator, bearing assembly, or something else.
The main factors for rapid heating are:
- wear or contamination of the bearing;
- increased capacitor capacity (only for asynchronous motor type).
Then we examine every 5 minutes of work; it is enough to do this 3 times. If the reason is the bearing, then it needs to be disassembled, lubricated or replaced. During further operation, we regularly monitor the heating of the motor. Avoid excessive overheating, as repairs can cause huge damage to your home budget.
How to make a good smokehouse from a washing machine drum
The icing on the cake in our matter is the smokehouse. Fragrant smoked meat, lard and fish - what could be better for the table? If you have a tank from a top-loading machine lying around in your shed or garage, consider it a done deal.
It is necessary to cut a hole in the bottom of the tank for the firebox, and weld fasteners inside for hanging food. All that remains is to install the tank on the fireplace, hang the fish or lard, cover the top of the tank with a lid and light the sawdust.
Products need to be smoked for several hours until cooked
It is important that the fuel under the smokehouse smolders and does not burn. It is better to place such a device away from home.
Important! You'll have to keep an eye on this smokehouse. It should not be left for a long time, the fire may flare up, and instead of a smoked product you will get a burnt product.
We hope we have convinced you that you should not scrap your old washing machine.
You can make so many useful things for your home from its parts! If you have experience in making such homemade products or can suggest something tonal - write in the comments!
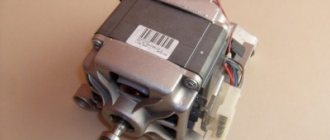
Connecting (checking) the motor
Naturally, before you start assembling something, the electric motor must first be connected and tested. In old washing machines, there are two versions of motors: an older and high-quality one, which has a closed housing with an impeller, with two supply terminals, and a newer one - four terminals, no impeller, cooling occurs through holes in the front and rear, through which the windings are visible.
The old version does not require any capacitors for starting - the starting winding is cleverly connected and disconnected inside the engine using a special mechanism. Thanks to this, no connection difficulties should arise: both outputs are connected to a 220 volt network. The disadvantage of such a motor is that the direction of rotation of the shaft is preset by an internal connection and cannot be changed. Typically the direction is clockwise and therefore it will be necessary to use a left hand thread to attach the stone.
The newer version has four terminals of two windings: working and starting. You can distinguish them using a multimeter: the resistance of the working winding is about 10 Ohms, the starting winding is about 40 Ohms. Perhaps the resistances will differ from those indicated, but only slightly. The starting winding must be connected through a 4-5 µF capacitor for a voltage of at least 400 V. I have come across composite capacitors for similar motors: two connected in series, 10 µF each at 300 V. That is, in this way the maximum permissible operating voltage of the finished capacitor was raised. Using a composite capacitor of two with low voltages (at least 300 V) is possible, but not advisable. Capacitors should be non-polar!
If you believe the manufacturing date on the case “59g” - this paper capacitor is 60 years old! And it works great. According to Soviet radio amateurs, paper capacitors tend to recover after a breakdown.
You can check the engine without capacitors and starting winding at all: voltage 220 V. supplied directly to the working winding. With this connection, the motor will start without load in any direction. To set the direction of shaft rotation, you need to connect the starting winding and capacitor. For emery, you need to set the direction counterclockwise
. The connection diagram is shown below, if the shaft rotates clockwise, you need to change the connection of the starting winding.
In many publications on the network I have seen a statement that the starting windings do not need to be connected at all, and the direction of rotation must be set manually when starting. Allegedly, if the starting circuit is used, the engine will burn out. I can only explain these speculations in one way - one wrote nonsense, and the rest were copied from the first. I can say with confidence: the starting winding can and should be connected through a 4-5 uF capacitor, the starting circuit should always be connected, without any additional buttons. And if the motor is working properly, such a connection is safe and completely harmless for it.