Today, bearings are used in almost all mechanical devices, including automatic washing machines (hereinafter also referred to as SM, ASM). The main task of the bearing is to minimize friction between the surfaces of the shaft and sleeve moving relative to each other during rotation. According to their design, modern bearings are divided into several varieties. In modern SM drums rotate on ball bearings, as well as on their roller “counterparts”. We will tell you about replacing the bearing in an Ariston washing machine in our article.
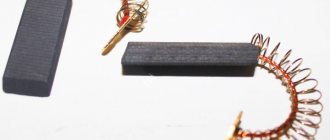
Modern plain and rolling bearings
Causes and symptoms of bearing wear in washing machines
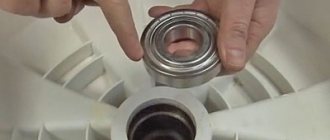
Ball bearings are designed for a long service life, on average up to 10 years. In order for the devices to work for a long time, their parts are well adjusted and generously lubricated with special substances. To prevent water from entering the mechanisms, the bearings are hermetically sealed with seals made of special types of rubber or caoutchouc.
Bearing and seal covering it in a washing machine
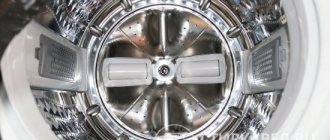
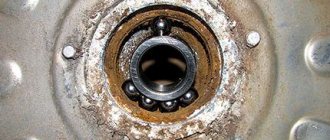
During washing and spinning, the drum rotates inside the tank on ball bearings mounted on the shaft. Replacing bearings in an Ariston washing machine, as well as other well-known brands, is inevitable after water gets into mechanical parts. This occurs due to damage to the seals, which lose their elasticity over time. The reason is exposure to an external aggressive environment: water and detergents. Water accelerates wear of parts by washing away lubricant.
Washing machine bearing corroded due to water getting inside
Accelerated wear is caused not only by damage to the seals, but also by improper operation of washing machines. If you often load a large amount of laundry into the AFM and spin it at maximum drum speed, high loads lead to the following symptoms:
- strong vibrations and hum while spinning clothes;
- play of the drum when it rocks, which can be felt with your hands;
- slow rotation or jamming of the drum during washing and spinning.
If signs of a defect are evident, replacing the bearings yourself requires preliminary preparation.
Preparing to replace the bearing
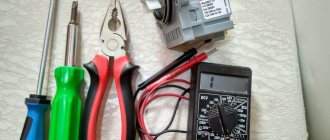
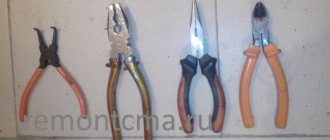
To get started, you need to have a set of tools for disassembling the unit:
- pliers and platypuses;
- a set of slotted and Phillips screwdrivers;
- adjustable wrench and set of open-end wrenches;
- metal rod;
- removable device for bearings (preferably, but not required);
- sealant and WD-40 fluid;
- hammer.
A set of tools for replacing bearings in a washing machine
It should be noted that bearings are quite easy to change in models of the Margarita 2000 series - such as AVSL 109 and others, with metal and plastic tanks that can be disassembled. But there are other models of machines with a non-removable tank made of plastic. In these cases, you will have to purchase and replace the entire expensive unit.
Some craftsmen manage to cut a non-separable plastic tank, change the bearings and oil seal, and then glue it together with sealant and fasten it with self-tapping screws. But the consequences of such repairs are unpredictable - the tank can leak at any time, as it experiences heavy loads during spinning.
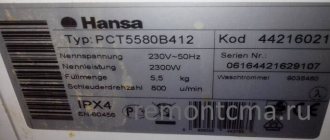
Before you change the bearings on your Hotpoint Ariston washing machine, you need to purchase the same new ones. The markings can be found in online stores that sell spare parts for ACM. New seals for ball bearings also need to be purchased. In the place where the repairs will be carried out, you need to free up a free space of at least 3-4 m2. A free perimeter around the machine is necessary for access to all its components.
Difficulties in disassembly during repairs
Features and nuances for self-repair of vertical units:
The device contains the same elements (pressure switch, water intake valve, drum, tank, control board, pump, and so on). The drum axis is structurally made on two bearings; a self-positioning sensor is sometimes located on the tank (the drum is fixed with the flaps up).
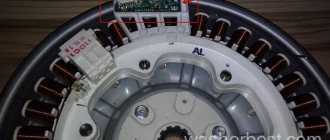
We will show the dismantling of components using the example of Electrolux:
1. Using a screwdriver, release the control panel from the sides 2. Pull the plastic panel up and slide it towards you 3. Tilt it at a slight angle towards you to remove the wires from the board connectors 4. Remove the panel
To remove the electronic control module, disconnect the remaining wires and unscrew the screws shown in the figure. For quick and correct assembly, take photographs of the connection points of the wire loops. To remove the water fill valve, disconnect the rubber hoses from the clamps and dismantle them. Unplug the wires and press on the holes from the outside to press out the valve.
To remove the side panels, unscrew several screws; do not forget to save the washers for grounding the case. Bend the wall from below with your hand and slide it down.
After removing the two sides, access to the screws for removing the front panel appeared. Unscrew them.
To remove the NTC sensors and position the DSP drum itself, it is enough to remove the right wall and dismantle them.
Many “craftsmen” sin that the control module is to blame for everything. But no!
It is enough to unscrew two bolts from the back and remove the control panel.
This very cracked handle is the culprit. Use a metal ring (antenna plug for example).
By squeezing the plastic handle, the ring will prevent programs from skipping.
There is an opinion that two drum supports instead of one are good.
This is not so, and in the case of the “vertical” it is simply a forced engineering decision. The service life of the drum bearings does not increase even by a minute.
If the screws are difficult to unscrew, heat them with a blowtorch.
On the Kandy, in order to change the bearings, you need to disassemble the entire machine down to the screw! And what about the wild cramped conditions in the depths of the “verticals”. Sometimes you have to do everything literally by touch.
Source
Disassembling the washing machine to remove the cross
Below is the procedure for replacing parts in the Ariston Margherita 2000 AVL 109 washing machine with a stainless steel tank. A special feature of this model is that the tank does not have to be removed from the housing. It is enough to remove and remove the crosspiece, which contains two bearings and an oil seal. It is located at the rear of the tank. The work is performed in the following sequence.
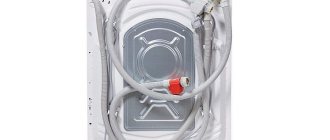
First, the top and then the back panel of the case is removed. To do this, you need to unscrew 2 screws on the top cover, and then 6 more on the back.
Ariston washing machine back cover with drain pipe
Once the back cover is removed, the belt that drives the drum is exposed. It must be carefully removed. After this, you can remove the pulley on which the belt was placed. It is held on the shaft with a bolt. The pulley must be fixed, and then the bolt must be tapped with a hammer through some copper die. This is done because the bolt was screwed together with the sealant, so it will be very difficult to unscrew.
Drive belt and drum pulley
The upper counterweight is removed by unscrewing two bolts.
Top tank counterweight and two mounting bolts
Access to the cross appears. To remove it, you need to unscrew all the mounting bolts - 8 pieces, 4 at the top and bottom. In order to get to the bottom screws, the machine will have to be placed on its side.
Unscrewing the upper mounting bolts of the crosspiece
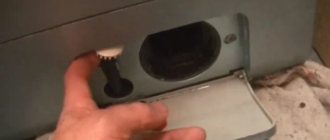
After the cross is released, it must be pulled off the drum shaft and removed from the tank. If you have a bearing puller, use it. If it is not there, you will have to remove the plastic plugs from the CM body located in the places where the bolts were located for transportation.
Plugs in the locations of transportation bolts
It is necessary to carefully pick up the ends of the cross with a long flat screwdriver through the holes in the case and pull it towards you.
Screwdriver in the socket for transport bolts
Another option is to screw a bolt of the required size into the shaft hole and lightly hit it several times with a hammer, trying to push it down.
One of the ways to pull the cross off the shaft
The crosspiece is removed from the body. Now you can begin replacing the bearings and seal.
Crosspiece with bearings removed from the machine body
If the drain filter leaks after cleaning
After the part is cleaned, you will need to check the washing machine for leaks. It should be borne in mind that it may not appear immediately, but only after several washes.
There are a number of reasons why a washing machine leaks.
- The first and main reason is incorrect installation of the drain filter. It could be screwed in loosely or crookedly. The part must be screwed in without distortion to prevent accidental shifts along the thread. In this case, the element must be tightened tightly, but very carefully. It is worth remembering that with strong pressure when tightening the lid, you can damage the threads on the plastic part. To eliminate a leak, just unscrew and reinstall the unit in its original place, correcting the misalignment and fixing it tightly.
- Secondly, the integrity of the rubber gasket, which ensures the tight installation of the drain filter, could be compromised. It could crack during use or become damaged due to careless removal of the part, as well as during careless cleaning using cutting tools. To eliminate such a breakdown, you will need to replace the rubber seals, if they are commercially available, or install a new drain filter.
- The third reason for filter leakage is its damage or a defective thread. This could happen if the part was removed incorrectly or if the cap was tightened too much. As a result, the contact of the drain elements becomes weaker, which is why a leak appears. To fix the breakdown, you will need to replace one or several parts at once, for example, a filter and a snail. If you are not sure that you will be able to perform all the steps correctly, you should seek help from professionals.
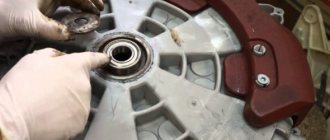
Bearing replacement
To remove old bearings, you will need a removal device. If this is not available, you can use a metal rod and a hammer. If you have never performed such an operation before, it is better to resort to the services of a specialist.
The Ariston SM model AVL 109 has bearings 6205 and 6204, as well as an oil seal with a skirt 65 x 30 x 52 x 10 mm. This marking is deciphered as follows:
- 65 – skirt diameter, expressed in mm;
- 30 – internal diameter;
- 52 – outer diameter;
- 10 – thickness, also in mm.
Two bearings and an oil seal installed in the Ariston AVL 109 crosspiece
If you decide to replace the bearings yourself, you need to perform the following sequence of actions.
Use a metal rod and a hammer to knock out the old bearings. The crosspiece must be placed on stops so that there is free space under the bearings. The operation must be performed with utmost care.
Removing used bearings from the spider
To install a new bearing, you need to take a hammer and very carefully seat it in the seat, tapping the edges of the outer race of the bearing and slowly moving in a circle. Then, when it is almost completely seated, you should place the old bearing on top, using it as a guide, and, tapping with a hammer, completely seat the new part in the seat.
New bearing, partially seated in the seat
Before putting the cross back, you need to clean the drum shaft with “zero” sandpaper and a rag, as well as the front surface of the tank - in the place where the oil seal will come into contact with the tank. It is also necessary to lubricate the surface of the oil seal. To do this, you can use a lubricant with molybdenum.
Shaft and place of contact of the oil seal with the tank
The crosspiece must be carefully installed on the shaft. To do this, use a hammer, gently tapping it along the edges of the cross.
Assembly is carried out in reverse order.
As you can see, with certain skills you can repair your washing machine yourself. When working with other models, deviations from the above-described sequence of work are possible, but we have described the main stages.