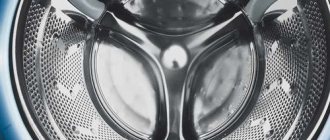
When installing the washing machine, it is connected to the cold water supply system using a special hose, adapter fittings and shut-off valves. At the same time, the faucet for the washing machine should not only shut off the water supply, being highly reliable, but also be located in an easily accessible place after installation and be convenient to use.
When choosing a faucet to connect a washing machine to the water supply, they consider various options for its design, materials of manufacture, manufacturers, cost, choosing the optimal combination of all parameters. It is quite easy to connect a washing machine with all the components, the main ones of which are a tap and flexible hoses, simple plumbing tools and any type of sealing materials, by yourself, following the basic rules and instructions outlined below.
Ball valves - varieties
Installing a faucet on a mixer
The attitude of professional plumbers to the idea of installing a pass-through tap to connect the washing machine to the water supply on the mixer can be called ambiguous.
This design does not look very aesthetically pleasing, since the filling tap of the machine is difficult to place beautifully in such a situation. In addition, the position of the faucet usually changes, it moves forward, and it may not be as convenient to use as before. Finally, additional loads arise for which the mixer was not designed, and its service life will be reduced. Installing a faucet for a washing machine on a mixer is a relatively inexpensive and simple solution, but it creates additional loads on plumbing equipment and is not recommended for permanent use
However, such a solution is quite possible when it is necessary to temporarily connect a washing machine. Of course, there is nothing more permanent than temporary solutions, but equipment owners must take into account the risks posed to their plumbing.
If the faucet will be installed in front of an old Soviet-era mixer, which is mounted directly on the pipes, it makes sense to install a new mixer. This will facilitate installation and increase the reliability of the entire structure. Otherwise, you will simply have to install a mortise clamp on the pipe, which is more expensive and more difficult to install than a regular straight-through valve.
Sometimes it happens that the ends of the pipes have been damaged by corrosion over time and become uneven. There are two ways to fix the problem. The easiest way is to file the ends to make them straight again. Then the hose gasket can be securely pressed to the pipe. Another way is to install an extension cord. It will hide the uneven ends, and the hose with the gasket will be secured to a new, undamaged surface.
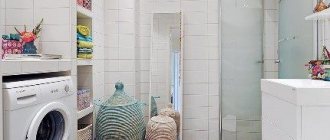
Installing a washing machine under the sink can save space in a small bathroom, but connecting the device to the faucet can ruin its appearance
Some craftsmen, as an experiment, install a pass-through tap not on the cold water pipe in front of the mixer tap, but after the taps and in front of the spout from which warm water flows. This is done so that already heated water enters the washing machine, which allows you to spend less electricity on heating. The solution is non-trivial, but technically not entirely correct.
When you turn on the tap with this placement, there will definitely be a mixture, i.e. the flow of cold water into the hot water supply pipe. As a result, the quality of hot water supply to the neighboring apartment may deteriorate. The problem could be solved by installing check valves in front of the mixer, but then during washing (i.e. for several hours) it will be impossible to open the mixer taps.
If the washing machine is equipped with an “Aqua-Stop” type system (it may be called differently by different manufacturers), then you can completely avoid installing a tap. On such models, the end of the inlet hose is equipped with special magnetic valves, which are controlled by the machine and connected to it with special wires. In this case, the control system itself will shut off the flow of water if necessary, and also ensure unhindered water intake. However, there is no such technology that does not break. If possible, you should still consider installing a crane even for such machines.
Special connection options
Separately, we can also mention non-standard types of tap connections. They are often used if it is not possible to make a traditional connection or an unusual method is the most convenient.
Option #1 - installing a faucet on a mixer
This option is found in practice because it attracts users with its simplicity and accessibility. However, it can hardly be called acceptable, since such a scheme has a large number of negative factors.
The connection tap installed at the mixer does not look very aesthetically pleasing, since it is quite difficult to place an additional valve in this position
This arrangement of the tap has a detrimental effect on the condition of the mixer: the latter experiences an increased level of stress, which significantly reduces the service life of the device. In addition, combining two appliances complicates the use of both the tap and the mixer.
Experts consider it acceptable to use such a solution only as a temporary option, but it is worth taking care in time to correctly connect the machine.
Models equipped with the Aqua-Stop system allow you to eliminate the need for a tap to connect. For these options, magnetic valves are installed at the end of the inlet hose to prevent the water level from exceeding
It is worth especially warning apartment owners against installing a faucet on old-style mixers. To connect the device in this case, you will have to perform a complex procedure that requires material and time costs.
If this particular connection diagram is required, it is advisable to install a new modern mixer simultaneously with the installation of the tap.
Option #2 - installation on old pipes
In older houses, the water supply network is often made of metal (usually cast iron). In this case, the ends of the pipes may be corroded, which complicates installation work.
There are two methods for installing a similar problem:
- File the edges of the pipes . This will allow the ends of the elements to be aligned, so that the hose can be laid close to the pipe.
- Install an extension cord, at one end of which you can hide the ends damaged by corrosion. On the other end, this part is mounted with a fixed hose with a gasket.
In any case, it is important to ensure the integrity of the structure and protect the pipes from further destruction, for example, by covering them with anti-corrosion paint. But it’s even better to immediately change the pipes so that connecting other devices does not cause problems.
Option #3 - double connection of the washing machine
Some models of washing machines, most often made in Japan and the USA, provide the ability to simultaneously connect to hot and cold water supplies.
The double connection of a washing machine is generally similar to a conventional connection using a flow-through tap, however, these parts are installed on two hoses at once, stretched to the cold and hot water pipes
Such options can significantly reduce energy costs, since there is no need to specially heat cold water, as in conventional units.
The widespread use of such machines is hampered by the low quality of hot water: it contains a large amount of mineral impurities, which not only increases the risk of mechanism failure, but also reduces the quality of washing.
Checking the correct connection
Before turning on the washing machine for a full wash, you need to perform a test run to make sure that the connection is made correctly.
The test begins with drawing water - the machine must fill the tank within a certain time specified in the technical passport. In this case, you need to monitor not only the speed of water collection, but also the tightness of all connections and hoses. Any leaks that occur should be repaired immediately.
The collected water should heat up to the set temperature in 5-7 minutes. No extraneous noise is allowed when the unit is operating. If the machine knocks or makes a lot of noise, you need to stop it and check again that the connection is correct. At the last stage, check the spin and drain.
After checking the connection of the washing machine, you can load laundry into the drum and start washing
So, you can connect the washing machine without calling a technician if you use the operating instructions and recommendations outlined in our article. Be careful and careful, and you will succeed!
Test activation
After installation is completed and all communications are connected, a test run of the new machine should be carried out without loading things.
You need to pay attention to the speed at which water is drawn into the tank. If this happens for a long time, then the reason is most likely poor pressure
The joints of fittings, pipes and hoses must not leak. If there are drops of water, tighten the nuts more, but it is better to rewind them and seal them with sealing material. During washing, rinsing and spinning, water should circulate without interruption. The equipment should not make any extraneous sounds. If problems are discovered during the test run, they should be corrected immediately.
Connecting the washing machine must be carried out following the instructions. If you don’t have the skills to listen to the advice of specialists, then the work will go quickly and easily.
Top 10 best washing machines under 20,000 rubles
How to connect a washing machine to the water supply?
As for connecting the washing machine to cold water, below are step-by-step instructions with which you can connect it yourself:
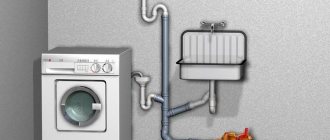
Connection diagram of the washing machine inlet hose through a tee to the water supply
- First you need to select the connection location. Of course, the best place will be the area where the connection between the metal-plastic pipe and the flexible mixer hose is marked. In principle, the connection can also be made to a shower tap;
- then unscrew the flexible hose;
- then we wind the fume tape onto the thread of the tee and, directly, install the tee itself;
- Fumlent is also wound onto the remaining two threads and flexible hoses from the washing machine and washbasin faucet are connected;
- Finally, you need to tighten all threaded connections with a wrench.
Connecting the washing machine to the water supply system
It is worth noting that it is necessary to check the presence of O-rings at both ends of the inlet hose, since they are the ones who prevent water from leaking at the connection points.
Another option for connecting the washing machine hose to the water supply
There is another option for connecting the machine to the water supply, by connecting the supply (inlet) hose to the drain tap in the bathroom or sink.
If you decide to use this method, then you will need a longer inlet hose. In this case, one end of the hose is screwed to the tap after disconnecting the gander. People who choose to connect to this system claim that the process itself takes just over a minute.
At the same time, they are completely confident that they will avoid water leaks when the machine is idle, because the supply hose was not connected permanently.
https://youtube.com/watch?v=KCsq1YbxZ-A
The point that deserves special attention is that today many modern automatic units are equipped with a special system that blocks the supply of water to a switched off machine.
This technique is equipped with an inlet hose, which at the end has a block of solenoid valves. These valves are connected to the machine using wires, which actually carry out control.
If desired, you can purchase a special inlet hose with automatic leak protection
This entire system is located inside a flexible casing. That is, when the machine turns off, the valve automatically shuts off the flow of water into the device.
This is very convenient and reliable, since, for example, when the lights are turned off, you will be sure that when turned off, the machine will not continue to pump cold water into itself from the water supply.
As you can see, connecting the washing machine to the sewer and water supply is quite feasible on your own. The main thing is to follow the established rules and follow the instructions that come with the equipment.
A correctly connected washing machine will serve for a long time and faithfully
If you suddenly doubt something or are not sure about the correctness of your actions, you can always turn to specialists for help. Of course, a specialist will be able to install the device much better and faster, but he will have to pay for it.
The equipment will work smoothly and for a long time only if all the necessary installation measures are carried out as expected and in accordance with the standards.
It is worth saying that if you purchased a dishwasher, then its installation is carried out according to the same principle. All installation procedures are identical to those for installing an automatic washing machine.
Naturally, in this case it is also necessary to first read the instructions for the equipment, which must necessarily come with it upon sale.
How is a plumbing tee used?
The tee with the tap is made from such parts as: a body made of brass, which is plated with nickel, a rod, which is also made of brass, a ball valve, handles, rings and a clamping nut. The tee is used to connect household appliances to the water supply; it can also be used to install another water supply. It is easy to install the tee using a union nut using the union connection method.
You can install the tap tee in any position convenient for you. A tee valve can also be used to move liquids with temperatures not lower than -10 and not higher than +85 degrees. The pressure in the pipes should not exceed 6 bar. The handle of this faucet rotates 90 degrees, and the weight is about 100 grams. This tee faucet comes with two outlets: three-quarter and half-inch. It can also have both external and internal threads. The manufacture of handles for such faucets is sprayed in black or red. The service life will be approximately four thousand cycles and repair of the crane is not possible. To avoid early failure of the tee valve, you must very carefully choose a high-quality tee valve in order not to become the buyer of a defective product or a counterfeit tee valve made of low-quality and cheap material.
You need to remember the advice of the experts to prevent buying a fake or defective product:
- The logo on the faucet must be clear;
- Letters on the product should not be smeared;
- It is necessary to buy strictly brass products and that the ball for stopping the water in them is also brass, since an analogue made of metal can lead to a flood and subsequently to quarreling with the neighbors below and, accordingly, to the payment of funds for repairs;
- It is imperative to ask about the quality of the product, this is necessary to ensure that the product is not made from recycled brass;
- If the funds for the purchase allow, then you need to choose something more expensive and of better quality;
- The locking ball must be perfectly smooth and reflective;
- If the water supply pressure in your home is not constant, but fluctuates, then you need to purchase a faucet with a stem inserted from the inside.
Related article: How to disassemble a frap faucet
Based on these recommendations, you can purchase a high-quality faucet that will become a reliable protector from unforeseen situations.
Recommendations from installation experts
It often happens that equipment installed independently or by a master begins to vibrate during the spin cycle. This indicates that the installation was performed incorrectly. Therefore, even before purchasing, you need to decide on a place for the machine and read the recommendations of installation specialists.
Professional advice on installing a washing machine, as well as step-by-step instructions will help you complete the installation and connection according to all the rules.
Tip #1 - prepare the conditions for installation
When choosing the overall dimensions, type of construction and technical characteristics of the model, they are guided not by their own wishes, but by the capabilities of the room in which it will stand.
In a spacious bathroom, as a rule, there are no problems with installing a washing machine. In order to save money, it is placed as close as possible to the outlet, water supply and sewerage distribution
Necessary conditions for the operation of the washing machine include close proximity to an outlet and water. This will help avoid lengthening of electrical cables and hoses.
They also pay attention to ease of use, as well as the aesthetic component. Problems with placement most often arise in small apartments
Tip #2 - choose the optimal room
Most users, when choosing a location, choose the bathroom as the most suitable from a logical point of view. After all, this is where the water pipes and sewer drains are located. In addition, the washing process will be hidden from view.
The washing machine can also be placed in a small bathroom, having previously decided on the size and location. In this case, to save space, the machine was installed under the sink
When choosing a location for the machine, pay attention to the following points:
- the ability of the floor to withstand vibrations;
- possibility of laying communications over remote distances;
- during measurements it is necessary to take into account unevenness on the walls;
- the space for installing the machine must be at least 1 cm larger than its nominal dimensions.
If space is limited and the dimensions of the machine are large, you should think about placing the unit in the kitchen or hallway.
Tip #3 - The Importance of Proper Connection
The issue of correctly connecting the washing machine to communications should be treated extremely carefully. Next we will consider this process in more detail.
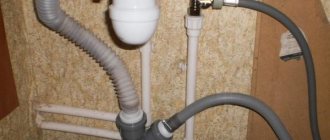
Connecting water to the machine
Machine washing, like any other, is impossible without water. The water supply must meet two basic requirements: sufficient pressure in the pipes and clean water.
If they are not met, a pump is installed to increase the pressure, and the water is filtered. A tap is built into the pipe supplying water to the machine to shut it off. Thus, the likelihood of leakage becomes minimal.
Electricity supply issue
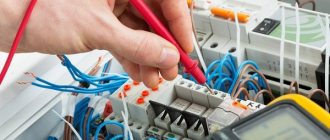
A washing machine is a powerful unit. Residents of old apartments in which the wiring has not been changed are recommended to install a separate cable, since the wires and sockets installed many years ago are not suitable for connecting modern equipment. The cable cross-section must correspond to the expected load.
The socket for connecting the washing machine is installed with grounding. If we are talking about a room with high humidity, for example, a bathroom, then it is advisable to choose models with a protective cover
We discussed in detail the installation and connection of a grounded outlet in this material.
Tip #4 - take into account external factors
The ambient temperature and type of flooring should also be taken into account when installing the washing machine.
High quality flooring and flooring
There are high demands on the quality of the floor. It must be strictly horizontal, hard and even.
The floor covering will have to withstand the vibrations created by the rotating drum. If there are doubts about the quality, it is necessary to strengthen it at the installation site of the machine.
Ambient temperature
In a heated apartment or house, equipment is kept warm. During prolonged heating outages, which are often observed in country houses and technical rooms, the equipment cannot be left in place.
The water remaining inside the machine after washing will definitely freeze. This will result in a rupture of the hose or even the pump and will require repair/replacement
Which type of crane do you prefer?
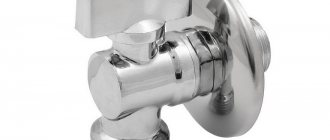
In the process of choosing a faucet model, you must first of all proceed from the location where you plan to install the washing machine. In small rooms it is better to use corner elements, with which you can reduce the space for connection.
If it is necessary to simultaneously connect two or more plumbing fixtures, it is better to use a three-way valve, and if there is an outlet for the washing unit, a pass-through ball valve.
An important factor when choosing faucets is the material from which the products are made. Although silumin elements are more expensive, you need to pay attention to the material from which the faucet is made. Silumin products are cheaper than brass ones, but the latter are durable and able to withstand heavy loads
It is also necessary to pay attention to the diameter of the device, which must match the dimensions of the water pipes. And also take into account the features of the thread - its size, location on the outside or inside. The last parameter can be omitted if the installation of the faucet requires independent thread cutting.
The angle of rotation of the device is no less important: it is not very convenient to use a device whose valve closes towards the wall, touching it.
Prepare for the process
The owner of the machine needs to know the specific procedure for installing the unit to the water supply.
After all, a breakdown of a special tap may occur, which will need to be replaced in the future, or if the machine needs to be moved to another place in the house. Even a beginner in this matter can cope with the task quite well if he remembers the list of important points.
Choose a prominent location for the tap
When installing an automatic washing machine, it is possible to use stopcocks of a fairly simple design.
The installation of such taps is carried out in a visible place so that the owners can turn off the water flowing into the washing machine at any moment out of control.
The machine automatically performs various actions, heats up the water, having previously taken it from the system, at this time various types of breakdowns can occur, which can only be prevented if the tap is in a visible place, and then it becomes possible to turn the valve and stop the water supply.
In most cases of car breakdown, it is necessary to turn off the water, and if this is not done, then there is a possibility of flooding the apartment (house) and neighbors.
Types of shut-off valves
When connecting your washing machine, you can use shut-off valves, the types of which are divided into two categories:
- Walk-through tapsThey are cut into an existing water supply system, which goes to other objects (mixer, boiler, etc.);
- End taps They are placed on a branch of the water supply system and are specially made for automatic machines.
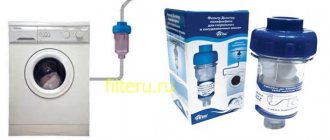
Filter for water supply system
It would be better for the washing machine if it received water from the water supply running throughout the house with exactly the same cross-section.
It is advisable to install a filter in the system - it will purify the water that will flow into the machine.
The filter is a mesh that is very easy to install. Don't forget to clean it periodically.
We recommend turning off the water supply to the machine after washing, and turning it on only before starting it.
Or you can install a whole filter system. But this is subject to the availability of material resources.
Which hose is better?
It may be that the manufacturer provides a special hose for connecting to the water supply, and if one is available, then it is better to install it. The length of the provided hose may not be enough, so you should not immediately connect it in two parts, because in this case it will soon be broken.
The best option is to buy a new, longer hose in a special store from the manufacturer of your machine. It is better to buy a hose in a company store, because cheap analogues in ordinary stores, as a rule, break very quickly.
Purpose of tees
Such devices are installed at points in pipelines where it is necessary to divide the circulation flow. As a result, circuits with variable and constant hydraulic mode are formed. Flows of the first type are intended for facilities where it is not the quality of the coolant that is important, but its volume. The constant mode traditionally serves consumers for whom quality indicators are of paramount importance.
How are three-way water taps different from two-way devices? Their main feature is the inability to block a constant flow. The rod is unable to completely stop the flow of coolant, so the movement of the coolant through the network and the temperature cannot be influenced in any way by the tap. Thus, pipes in hot water supply and heating systems are additionally protected from sudden cooling, which is especially dangerous in winter. You can only regulate the variable flow, that is, the volume of coolant and the pressure with which it is supplied.
Connection to water supply
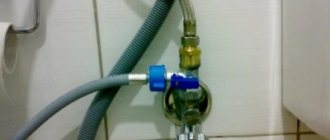
Before directly installing the water supply hose, a special tap for such a connection must be installed separately in the water pipe. It is called a valve for connecting a washing machine.
Its main feature is the size of the threaded connection for the water supply hose. The size is ¾ inch or 20 mm, while the diameter of the thread for the water pipe is ½ inch (approximately 15 mm).
The simplest and cheapest solution for connecting a machine to a water supply is to install a three-way valve to connect the washing machine.
The valve is inexpensive, sold at any hardware store with a plumbing department, and does not require reconstruction of the plumbing system. It is installed at the junction of the cold water supply hose to the washbasin and the cold water outlet of the water supply system.
Installation procedure for a three-way valve:
- shut off the cold water supply to the washbasin;
- disconnect the cold water supply hose from the water supply;
- a sealant (fum, flax) is wound onto the threaded connection of the water supply in a clockwise direction (i.e. to the right);
- screw the three-way valve onto the threaded connection of the water supply until it stops;
- screw the washbasin cold water supply hose onto the opposite end of the valve;
- Slowly open the cold water supply to the water supply and check the connections for leaks.
If the valve is installed correctly, water leakage is excluded. In exactly the same way, a three-way valve can be connected to a kitchen sink or toilet.
We screw one end of the water supply hose onto the threaded connection on the rear panel of the washing machine, and the other end onto the threaded connection of the three-way valve.
The main advantage of this installation method is that it is suitable for any type of water supply: steel, metal-plastic or polypropylene. Also, this method is ideal if the water pipes are hidden in the wall.
Made from steel pipes
To supply water to the washing machine, it is necessary to install a conventional valve to connect the washing machine. To carry out such an installation, it is most advisable to make an insert into the water supply system.
The procedure for making inserts:
- shut off the cold water supply;
- drill a hole 10.5 mm in diameter in the wall of the water pipe;
- We install a special clamp with a flange and a threaded outlet on the pipe. The flange must fit into the hole you made in the pipe;
- We tightly wind the seal onto the threaded connection of the clamp clockwise (to the right). Sealant – linen or fumig;
- screw the valve onto the threaded connection of the clamp until it stops;
- smoothly open the cold water supply to the water supply and check the connections for leaks;
- screw one end of the water supply hose onto the threaded connection of the rear panel of the washing machine, and the other end onto the threaded connection of the valve.
Made from polypropylene and metal-plastic pipes
The valve for connecting the washing machine can be installed using the method described above, that is, by inserting it into the water supply. The advantage of this method is its relative simplicity and minimal availability of tools and equipment.
The next method is more aesthetically pleasing in terms of beauty, but requires special equipment (a welding machine for polypropylene pipes, mechanical or hydraulic shears for cutting pipes) and skills in handling it.
The essence of this method of installing a valve for a washing machine is that it requires cutting out part of the pipe and installing a tee in this place.
A fitting is mounted to the outlet of the tee (a polypropylene coupling combined with an external thread), and only then the valve itself is installed on the coupling. The washing machine is connected to the valve.
A tee with one threaded outlet and two connectors for metal-plastic pipes is also inserted into the water supply system made of metal-plastic pipes. The valve itself is mounted directly onto the threaded outlet.
Buying a triple tap
A task performed by one triple water valve can be performed by a pair of two-way valves. To do this, they need to be installed so that when one closes, the second one immediately opens (reversely). The question is why do you need to construct a structure of two mechanisms if you can easily purchase a high-quality tee in a store or online.
Similar products are produced by such well-known manufacturers as Grohe, Herz, Womix and many others. Before purchasing a three-way water tap, you should clarify the main technical parameters of the system. If the product offered to you is produced by an unknown brand, be sure to request documentation confirming its compliance with GOST.
You should be especially careful in the case of Chinese models. The quality of plumbing fixtures produced in this country often causes fair criticism from Russian consumers. Its only advantage is that it costs less, but such “savings” often turn out to be a waste of money, since you have to buy a new device.
The highest quality products are made from brass. The chrome coating looks good and additionally protects against corrosion. Cheaper alloys are significantly inferior in terms of strength and durability. One of the main complaints against the Chinese is that they often indicate the wrong material from which the faucet is actually made.
Installation materials and tools
To connect the unit to the water supply network, it is not enough to select a suitable valve.
You also need to stock up on tools, which include:
- A wrench with an adjustable mechanism, which is needed to perform installation work: connecting pipes and pipes, tightening nuts.
- Plastic pipe calibrator for adjusting the tap when installing it on a water pipe.
- A thread cutter or similar tool used for this purpose.
- Drill, file, screwdriver, which may be needed for drilling and other work.
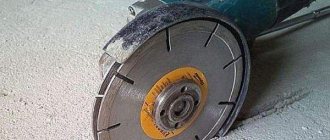
- Scissors for plastic pipes or a grinder for inserting a tap into a water supply system made of plastic or metal elements.
In addition, you will need a double hose, which can be included with the automatic machine or purchased separately. It is advisable that the length of such an element be slightly longer than required - this will allow for a small margin required when rearranging.
If a hose is purchased specifically, it is better to give preference to a part that has wire reinforcement, which makes it easy to withstand high pressure in the pipes.
The water purification filter is mounted on the thread of the tap, which is connected to the outlet of the water pipe. The small element improves the quality of the water used, thereby reducing the risk of plaque and sediment formation.
If the liquid contains a large amount of minerals, simultaneous use of several filters is allowed.
Sealing rings, winding, FUM tape, spare bolts, which are difficult to do without when installing plumbing products - the listed set will ensure reliable fastening of the faucet and the tightness of this unit. You should also consider the optimal connection option, taking into account the configuration of the room and the placement of plumbing fixtures.
Heat distribution
The main task of the heating system is to regulate the heat supply. To do this, use a three-way valve or tee specially designed to redistribute the coolant. Distinctive features of the product are compact size, ease of operation and functionality.
Crane characteristics
A triple stroke heating valve is installed in the heating system. It helps regulate the water temperature.
The product is used in:
- heating circuits;
- water supply systems;
- hot water supply systems.
The faucet has one outlet pipe, and it is equipped with a plug with holes, due to which the flow of coolant is regulated.
The advantages of the products include:
- high seal tightness;
- absence of stagnant zones;
- ease of operation;
- easy maintenance;
- low hydraulic resistance;
- durability of use.
You can easily install a valve in a heating system with your own hands, following the installation rules. It does not require frequent maintenance.
Among the disadvantages of three-way valves, we note:
- if used incorrectly, they may jam;
- inexpensive products of the simplest design do not withstand long-term use and quickly fail;
- The valve is most often used in heating systems where the pipe diameter is small.
How the faucet works
A three-way valve belongs to shut-off and control valves; it has 3 holes:
- for supplying cold water;
- for supplying hot water;
- day off.
The device simultaneously supplies hot and cold water.
The following happens when the faucet:
- half-open – the flow comes out at an average temperature;
- fully open - the flow is at maximum temperature, hot water enters the system directly from the boiler;
- closed - only cold water is supplied to the batteries.
Types of plumbing shut-off and control products
A three-way valve can be:
| Regulatory | Equipped with an electromechanical device that opens the necessary valves. |
| Constipated | The design has a ball device that switches the flow of coolant. It is simpler in design and requires constant maintenance, and the product wears out quickly. |
Tip: install a three-way shut-off valve only in systems with low water pressure.
Using a tap in a heating system is appropriate:
- if it is necessary to maintain the same temperature at the incoming boiler pipe, usually it is 40˚C;
- for a mixer in a heated floor system;
- when it is necessary to reduce the flow of hot coolant.
Valves are made from:
The material directly affects the lifespan of the product. The price of a faucet also depends on what it is made of.
The shut-off device can be connected to the pipeline using:
Accordingly, a separate type of crane has been developed for each method.
Classification of three-way valves according to other parameters, which include:
- type of flow part of the device - full-bore version or trial-and-bleed;
- the shape of the rotating part of the structure - type L, S and T;
- case heating;
- method of fitting the valve element (stuffing box or tension).
The instructions allow you to control the operation of the device and adjust the temperature of the coolant using:
- pneumatic drive is a safe method, since there is no risk of electric shock;
- electric drive – an electric magnet or an additional device with an electric motor;
- manually - allows you to mix water flows only in approximate proportions. It is the most inexpensive and optimal option for domestic use.
Advice: in order to correctly and accurately regulate flows, it is necessary to use special mechanisms that mix cooled water from the return to the supply.
In this case, the gas or water flow remains unchanged, but the temperature in the desired direction can be controlled.
Select and install
Before purchasing this type of faucet, we recommend that you carefully familiarize yourself with its characteristics and features.
- diameter of the connection point of the device to the pipe;
- what is the pipeline capacity;
- Is it possible to install a servo drive if you need to install a faucet that will operate in automatic mode.
We also recommend taking into account the other device characteristics described above.
- When installing fittings, it is necessary to take into account the direction of water flow. There is an arrow on the valve body for this purpose.
- The faucet can be screwed horizontally or vertically; its position does not in any way affect the performance of its direct functions.
- If it is necessary to weld the valve, the internal cavities should be closed as tightly as possible so that scale and welded soil do not get into them.
- At the junction of the pipes with the tap, the temperature of the water flow should not exceed 100 °C.
Stage #3 – leveling the washing machine
In order for the automatic machine to serve with maximum efficiency, the installation and connection of the washing machine should be approached with the utmost care.
The floor base requires special attention, which must meet a number of criteria:
- strictly horizontal surface;
- durable structure;
- sustainability;
- protection from vibration and other influences inevitable during operation of the unit.
If the foundation does not meet these criteria, it is better to take measures to meet them.
In addition to levelness and reliability, the base for installing the washing machine must also have anti-vibration properties. If you are going to install it on a tiled or wooden floor, then it is better to carry out the whole process using devices that dampen vibration:
On fragile surfaces, it is advisable to make a cement-sand screed or strengthen the existing floors in the place where the washing device is supposed to be installed.
Adjustment of the position of the washing unit is achieved by changing the height of the support legs: to increase the distance from the floor they can be unscrewed, and to decrease they can be screwed in
After making sure that the base meets all the previously mentioned requirements, you can begin installation. The fully unpacked machine with the fasteners removed is placed in the selected location.
The horizontal installation is determined by the top panel, while the angle of deviation, which is checked by the top cover, should not exceed two degrees. Exceeding this indicator leads to a sharp increase in vibration, which has a very negative effect on the condition of the components and significantly reduces the service life of the machine.
Placing improvised materials under them that could slip out from under the supports during work is strictly prohibited. This may lead to an emergency situation. At the same time, it is allowed (and even recommended) to place a thin rubber mat on the sliding tiled surface.
As soon as the body of the machine is in a perfectly horizontal position, you should tighten the locknuts counterclockwise, fixing the optimal height of the support legs.
When leveling the machine, it is recommended to consider the following factors:
- The greatest degree of stability of the unit is achieved with the adjusting supports screwed in as much as possible, but this option is only permissible on a perfectly flat surface.
- When installing the machine on an inclined floor, it is advisable to use fixing parts to secure the supporting structures.
- To check whether the unit is installed correctly, you need to try to swing it diagonally. If the process is done correctly, there is no free play or its amplitude is the same for different diagonals.
Once you are sure that the unit is in the correct position, you can proceed to the next steps.
How to install a faucet
There are several ways to connect a washing machine to a cold water supply line, depending on which different types of plumbing fixtures are purchased; the following components and tools are used during the operation:
Between the water socket and the mixer
One of the simplest ways to connect a washing machine is to install a screw (a swivel head looks more aesthetically pleasing) tee tap in the gap between the wall and the water socket on a set of pipes purchased in advance from a retail chain. One of them has a three-way tap built into it and through it cold water is supplied to the mixer to the washing machine, and the other has a similar length and is designed to supply hot water to the mixing unit. The connection method is quite simple and consists of the following operations:
The main disadvantage of this connection method is the unaesthetic appearance of the structure due to the distance of the mixing unit from the wall; also, the remote location can cause some inconvenience when using the bathroom.
In the mixer
Sometimes a tee assembly, one of the outlets of which is connected to the inlet hose, is mounted in the mixer itself; the main options for its installation are: between the gooseneck and the mixer body or between the body and the shower head hose. The main difficulty in this case is to select a tee pipe with a tap with a suitable thread; due to the abundance of goods, this is not too difficult if you correctly measure the fitting dimensions before purchasing.
Options for placing a tap integrated into the mixer
The main disadvantage of this design is the worst aesthetic appearance of all options due to the presence of parts in the mixing unit that violate symmetry and harmony.
To the pipeline from the sink
One of the popular and common options is to connect a tee to the pipe to which the flexible sink line is connected. The work does not present any difficulties even for a housewife when purchasing a tee ball valve of standard diameter. To install it:
Thanks to the American design with O-rings, all connections do not require the use of sealing materials.
Inlet hose under the sink
Into a water socket on a wall or pipe
Sometimes, to connect the inlet hose, a special outlet with a water socket is made in polypropylene PP water pipes, which is placed under the bathtub or walled up in the wall, placing the water supply in grooves.
In this situation, the water socket has an internal thread, a pass-through or corner fitting with a tap is screwed into it using an adjustable wrench, using flax fiber or sealing Fum tape, and the connection on the wall is closed with a decorative cover (disc).
Tapping into the pipeline
In the bathroom, the inlet hose is rarely connected to the water supply pipeline to the handwash faucet, since the sink is usually located on the opposite side and an extended hose will create some inconvenience. Connecting to a faucet in the bathroom is an unaesthetic and inconvenient option, since the hose from the washing machine interferes with water procedures.
If water sockets are not made in advance in the pipes and are not placed on the walls, you can cut a polypropylene pipe under the bathtub and solder (embed) a polymer tee with a tap into the gap, but for this you will have to call a plumber and pay a considerable amount. If the pipe is metal, inserting into it without welding or using special expensive couplings and adapters is not an easy task.
In this situation, one of the best options for cutting into a pipeline made of any materials is to use an overhead clamp with a central threaded outlet. The operation is carried out in the following sequence:
The abundance of plumbing fittings on the market from domestic, Chinese, and European manufacturers makes the task of choosing a faucet to connect a washing machine quite simple; you don’t even need to measure its parameters with a unified design of the units. Even a housewife can handle connecting the tap and inlet hose to the washing machine; in the most difficult case, using overhead clamps will require minimal construction experience and skills.
Source
Connecting the water supply hose
Usually, when installing a water supply system, during the renovation of an apartment or house, installation locations for household units whose operation is related to the use of water are provided in advance. These are primarily washing machines and dishwashers. In these places, an experienced installer must install special connection taps. Special hoses for supplying water are subsequently connected to them.
The usual sizes of taps are ½ and ¾ with external thread. Hose nuts also have this dimension. The connection is made with the tap closed.
Before screwing the tube, you need to make sure that there are sealing gaskets. It happens that they come included and require installation. In some cases, they are simply lost during transportation. After making sure that the gaskets are present, you can connect the water hose.
Usually, on the side of the connection to the fitting of the machine, the tube is L-shaped at 90 degrees for easy connection. While holding the tube from twisting, you need to screw the nuts onto the connection tap and onto the fitting. The sequence does not matter in this case. The main thing is that when installing the unit, the pipe does not twist or bend. With the opening of the water tap, the connection can be considered complete.
Criterias of choice
When selecting a shut-off valve for connecting household appliances to the water main, we are guided by the following principles:
1. Ball valves are best suited for quickly stopping and turning on the water supply, in which a shut-off mechanism in the form of a ball with a through hole instantly shuts off the water flow when the handle is turned 90 degrees.
2. For an aesthetic appearance and to prevent unplanned rotation of the handle, products with a compact butterfly-shaped rotary lever should be used. In places where access is difficult and it is impossible to correct the situation, it is more rational to use a model with an asymmetrical long lever, which is lighter and easier to turn.
3. The best material for making shut-off valves is brass, which is not subject to corrosion and has a service life of tens of years; household valves of this type have a chrome coating, which gives it a beautiful aesthetic appearance. Brass taps are installed in a steel metal or polymer (polypropylene PP) pipeline, and an adapter from plastic to metal is soldered into the latter.
4. The choice of faucet body design depends on the connection option - if it is installed in a gap or pipeline to which sinks, a mixer or its outlet, or a shower hose are connected, a triple design is used. When a water socket comes out of the wall, the best option is a corner housing; the straight pass-through version is not used too often and is connected to pipelines or water sockets located below the floor.
Note: In the retail chain there is a design type of a walk-through faucet, specially designed for simultaneous connection to a faucet and a washing machine; during installation, the faucet and extension pipes are screwed between the water sockets and the mixing unit.
5. When purchasing, sometimes you should pay attention to the position of the handle in which the faucet is open or closed; for example, it is more convenient for a valve with a long lever located close to the wall covering to close closely parallel to the wall, and open perpendicular to its plane, protruding outward - this will prevent involuntary turning and unwanted opening of the channel for water flow.
6. When choosing a suitable model in a hardware store or on the market, you should pay attention to the manufacturer (for branded fittings, the company logo is printed on the body). The sanitary fittings of the following Russian and European brands are of high quality and have proven themselves in the domestic market: Bosch, Bugatti, Elsen, Grohe, Itap, Valtec.
Leveling with feet and level
A common mistake when installing an automatic washing machine on an uneven floor is the lack of adjustment of the legs, as a result of which excessive vibration and loud noise occur during its operation.
Leveling
In order to correctly adjust the machine, you need a special key and level. The level is placed on the machine and the legs are unscrewed/twisted to the required height. Then you need to press on the corners of the machine from above to evaluate its stability. In addition, you can purchase special anti-slip stands in the store.
After you have connected the washing machine to the water supply and sewerage, and also leveled it, you need to move on to the next stage. We'll talk about this later.
Conclusion
If you need to distribute coolant in the heating system, connect a washing machine to the water supply, or supply water to your garden plot, a three-way tap will help you. It has a valve installed at one output, which allows you to perform the tasks you need manually or automatically.
Installation of the device does not cause problems, as does its maintenance. The video in this article will give you the opportunity to find additional information on the above topic.
Related article: Good bathroom faucets
Washing machine installation
Before installation, the washing machine is freed from packaging, inspected to check its integrity, and the locking bolts are removed. They are installed by the manufacturer at the factory and are intended to secure the drum during transportation. But you cannot leave them in the car after installation, as this leads to damage to the chassis. The bolts are twisted with an open-end wrench and removed from the body along with the plastic bushings, and the plugs included in the kit are inserted into the holes.
On a new machine you need to unscrew the transport screws and remove the plugs
Transport bolts hold the entire drum suspension in a fixed state, so as not to damage it during transportation
Stub
Now you can start installation.
Step 1. Place the washing machine in the chosen place, place a level on the top cover, and adjust the height using the legs. The machine should stand level, without distortions, and not too close to the wall. There should also be at least small gaps on the sides between the walls of the machine and the furniture or plumbing fixtures.
The machine needs to be leveled
Machine legs
Step 2. After making sure that the placement is correct, the machine is pushed forward a little to facilitate access to communications.
Step 3. Connect to the water supply. Take a water supply hose, insert a filter on one side (usually it is included), screw it to the fitting on the back wall of the machine, and screw the other end to the inlet tap on the water pipe, after inserting the gasket.
The filter can be installed in the form of a mesh in the hose or in the body of the washing machine
Filling hose
One end of the hose is screwed to the machine
Connecting the inlet hose
Step 4. Next, connect the drain hose: insert its end into the drain hole and screw the nut tightly. The length of this hose should not exceed 4 m to ensure normal drainage of used water.
Connecting the drain hose
If it is necessary to extend the water supply hose, use a second hose and adapter coupling
Step 5. Both hoses are tucked into the corresponding recesses on the back wall of the machine to avoid kinks. After this, the washing machine is installed in a permanent place and the location is again checked for level. Now all that remains is to connect the washing machine to the outlet and check its operation in test mode.
Plug in the machine
Trial run
Trial run
First, you need to take the device passport and place it in front of you to check the data during the verification process. A test run is performed without loading laundry, only with water and a small amount of powder. So, they turn on the water supply to the machine’s tank, while simultaneously timing the filling time to the specified mark. Immediately after this, all connections are inspected, and if a leak is detected, the water is drained and the problematic connection is resealed. If no leaks are visible, you can turn on the machine.
The water should heat up to the desired temperature within 5-7 minutes, so note the time and check the device data sheet. While the water is heating up, listen carefully: the device should operate almost silently, and any rustles, creaks, or knocks indicate a malfunction. If there are no extraneous sounds, check the operation of other functions, including the drain. After turning off the machine, once again inspect the hoses, connections, and the floor around the body. Everything should be dry and clean. Read the drain in the bathroom on the website.
Sectional view of triple tap ↑
Description and characteristics ↑
A water tee with a tap consists of a brass body coated with nickel, a ball valve, a rod - also made of brass, a handle (usually plastic), rings (rubber and Teflon) and a clamping nut.
A standard household triple water tap is intended for connecting household “devices” to the water supply system (cold and hot), as well as for installation on other pipelines through which liquids compatible with the materials of the tee are transported. The device is connected using a union nut using the union connection method. The faucet can be installed in any installation position convenient for you.
The part can be used to move liquids with temperatures from −10 to +85 degrees Celsius. The pressure in the pipes should not exceed 8 bar. The rotation angle of the tee handle is 90 degrees. Weight - about 100 grams. A plumbing tee with a tap comes with outlets of ½ and ¾ inches (15 and 20 mm). The thread of the outlets may also differ and be internal or external. Handles for such devices are produced with red or black coating. The product lasts approximately 4 thousand cycles, is usually not subject to repair, and costs moderately.
Meet one of the models on the market
How to choose a quality part ↑
To avoid a flood or premature failure of equipment, you should carefully choose a tee so as not to become the owner of a fake or defective product.
Remember professional advice from experienced plumbers:
- the logo on the part must be clearly depicted, the letters must not be smeared;
- purchase only a brass body with a locking ball made of the same material; steel analogues lead to floods, scandals with neighbors and payments of compensation for their damaged property;
- ask the seller for a certificate to make sure that the part is not made from recycled brass, which contains a number of impurities that pose a threat to the health of households;
- if possible, choose the highest quality grade of brass, regardless of the price (so that small savings do not come out, as they say, sideways);
- the locking ball must be smooth, with a mirror shine after diamond grinding (a product with a cloudy and rough surface is a defect);
- if the pressure in the pipes of your house often fluctuates, take a model with a rod inserted from the inside, which, holding on to the last, rarely breaks out.
Let's try to connect this beauty?
Replacing the inlet hose
If the water supply hose has visible damage and is leaking water, there is no need to repair it. These attempts will lead to nothing. You need to buy a new one and replace it. Before purchasing, be sure to check the length of the filler tube and the dimensions of the connection elements. It’s even better to take the old hose with you and the sales consultant will select an analogue. Before replacing, it is necessary to turn off the connection valve to reduce the pressure in the hose. To do this you need to wait for a few minutes. If this is not done, the forces applied to unscrewing can lead to damage to both the tap and the fitting. After dismantling the damaged element, a new one should be installed as described above.
Opening and closing valves
You can determine whether a valve is open or closed by several criteria, depending on the type of device installed.
Determining Ball Valve Position
To determine the state of the ball valve, you can use:
The ball valve can be equipped with two types of handles:
The valve closes if the handle is turned perpendicular to the device and the direction of the pipeline, and opens if the handle is turned in the direction of the axis of the device and, accordingly, the pipeline.
Determining the valve status by the handle installed on the device
The following video will help you determine the condition of the valve by looking at the handle.
If the handles are broken or completely missing for some reason, is it possible to find out the position of the valve? To determine the condition of the device under the circumstances under consideration, you can use the groove located on the rod.
Element by which the valve position can be determined
If the recess is located parallel to the pipeline, then the valve is open and allows liquid (gas) to pass through. If the recess is located perpendicular to the direction of the pipes, then the valve is closed and the movement of liquid through the system is impossible.
Determining valve position by groove
Plumbing connection
Steel pipe
What you will need:
- Saddle coupling.
- A drill with a radius equal to half the hole in the coupling.
- Tap.
- Tow.
- Spanners.
What to do:
- Turn off the water supply and drain the remaining residue using the faucet located nearby.
- Select a part of the pipe for inserting the coupling that is freely accessible close to the machine.
- Clean and polish the pipe using a knife or sandpaper
- Try on the coupling by turning it and positioning the tap correctly.
- Install the bolts, tightening with a wrench, and the gasket.
- Place a cloth or container under the pipe to allow water to drain into it.
- Drill a hole in the pipe through the sleeve located inside the coupling.
- Wrap the tap with a piece of tow, wrapping it lengthwise in the direction of twist. Apply sealant.
- Screw the coupling onto the tap.
- Connect the hose from the washing machine to the tap and tighten it by hand.
Pipe tapping
Metal-plastic pipe
What you will need:
- Tee with single internal thread.
- Pipe cutter
- Pipe calibrator.
- Tap.
- Spanners.
- Fum tape.
What to do:
- Turn off the water and drain off the remainder.
- Select a part of the pipe for inserting the coupling that is easy to reach.
- Cut the pipe and spread its ends, bending them carefully.
- Calibrate the two ends of the pipe and remove the chamfers by inserting the device and turning it a small number of times.
- Remove the nuts and rings from the tee.
- Place the nut, and then the ferrule, on both ends of the pipe.
- Screw the pipe into the tee hole all the way and tighten the nuts by hand.
- Hold one nut with a wrench, tighten the second, and then also tighten the first nut.
- Wrap the faucet with fum tape, placing several turns along the entire length in the direction of winding
- Screw it all into the fitting.
Connect the washing machine hose to the tap, twisting it by hand.
Polypropylene pipe
What you will need:
- MPV tee with a thread of the required radius.
- Faucet for washing machine.
- Pipe cutting device.
- Soldering iron.
- Fum tape.
Actions:
- Turn off the water and drain the water.
- Select a part of the pipe that is freely accessible for a soldering iron, close to the washer.
- Cut a piece 3 cm smaller than the tee.
- Wipe the pipes free of water and dry them to prevent defects from appearing during sealing.
- Place a suitable size nozzle on the soldering iron and heat it to the desired temperature.
- Place the soldering iron on the pipe and one end of the tee and wait about 6 seconds.
- Quickly remove the device, connecting the hot elements, and wait approximately 10 seconds.
- Repeat the same steps for the second end of the pipe.
- Wrap the faucet with fum tape, placing the turns on the thread where it will be screwed.
- Combine it with a tee.
Next, connect the washing machine hose to the tap, tightening it.
Useful articles, news and reviews on our Yandex Zen channel
Troubleshooting tips ↑
Triple taps sometimes fail due to old age or improper installation. Let's look at several breakdown situations and ways to solve them.
- The handle is leaking. This means that the stuffing box seal has worn out. The best solution to the problem is to replace the tee.
- The coupling connection is leaking. This malfunction occurs due to poor sealing. To eliminate the leak, you should disassemble the mount and change the seal.
- The faucet is leaking. A similar problem occurs due to a loose clamp nut. The situation can be resolved simply by tightening the nut.
Well, you've completed the theoretical lessons, it's time to start practicing. Start by purchasing a tee
The tee tap is a tiny but important detail for the household that increases the level of comfort in the house.
Connecting an automatic washing machine to the water supply with your own hands
This stage is the most important and difficult. Therefore, you need to look at a few important points.
- Assess the place where the machine will stand. The connection method and the selection of the necessary parts will depend on this.
- It must be remembered that water hoses should be located behind furniture or interior parts. Their length will depend on this.
- It is necessary to estimate in advance the approximate length of the water hose. Very often the kit comes with very short ones.
- To connect to the water supply system you will need: pipes, a valve or a regular tap.
Faucet for connecting an automatic washing machine
The most common connection method is to connect it to a flat section of the water pipe. To do this you will need a tee. Or this can be done on a special branch of the pipe. The connection to the tee or branch is made through the toilet cistern.
Stages of direct connection to the water supply.
You may need some special tools during the connection process. When working with metal piping, you will need a variety of wrenches. You will also need some kind of seals. Fumlenta or flax. It is better to choose linen, as it swells during use and prevents leaks.
When working with a water supply system made of polymers, especially if you have to make a new insert into it, you will need special equipment. tools for soldering polypropylene pipes. You will also need a calibrator and special fittings.
Types of tee taps
Depending on the control method, the tee can be manual or automatic. Models of the first type are similar to a regular ball valve, only with three outlets. This is the most common option today. Electrical devices are usually used to distribute coolant in the private sector. With their help, you can, for example, adjust the temperature separately for each room.
According to the principle of operation, three-way valves can be:
You can understand the main purpose of the devices by the names themselves, but still, let's look at each of the designs in more detail.
Separating
Tees of this type serve to separate the main flow. They are usually used in hot water supply systems, and they are also often used in air heater piping. The design is very simple: one hole is the inlet, the rest are the outlets.
The main difference between these triple water taps and mixers is the number of valves on the stem. There are two of them here and they are located in the outlet openings. When one valve blocks the passage, the second one immediately opens.
Faucets
Externally, these faucets look exactly the same as separating models. The difference can only be seen by disassembling the structure. The stem is equipped with only one ball valve that closes the only outlet. The mixers have two inlets. The purpose of the device is to combine two water flows in order to reduce the temperature of the coolant to a certain level. To achieve the desired indicator, it is necessary to correctly calculate the proportions of each of the flows based on their temperatures.
The advantage of three-way mixing valves over models of the second type is that they can also be used to separate water. This will require minor changes to the design. If you only have theoretical knowledge on this issue, it is better to contact a specialist, as is the case with installing a faucet.
By leaving a comment you agree to the Privacy Policy
Related article: Mixer design
Characteristics
There are no special requirements for connecting home washing machines, so ball valves are almost always used: sealed, reliable, simple, quickly shutting off the flow of the medium, and having a low cost. Valves with diameters of 15-20 mm are not installed in everyday life; valves that require longer turning to close and open water and which reduce the pressure somewhat more than ball designs are also practically not installed. Conical structures are also practically not used in everyday life.
Frequent errors and problems during installation
In order to avoid mistakes when installing a faucet yourself, you must follow the advice of experts and follow the general installation rules.
- Do not overtighten the nuts, as this can lead to stripping of the threads and a leak.
- Do not neglect the use of sealing materials - linen thread and FUM tape.
- When installing a faucet on polypropylene pipes, the fastening clips cannot be placed further than 10 cm from the faucet. Otherwise, when turning the butterfly valve or lever, the pipe will move from side to side, which will negatively affect the quality of the connection.
- When installing a faucet on a pipe, you must ensure that the arrow stamped on the fitting coincides with the direction of movement of the water flow, and in no case should you install the faucet in the opposite direction.
- When cutting out a section of pipe and installing a tap, the ends of both parts should be thoroughly cleaned of burrs. Otherwise, they will begin to gradually separate under the influence of water and lead to clogged pipes.
- The machine must not be connected to a heating system. This is due to the fact that the water in radiators is technical and is not suitable for washing clothes.
You can find out how to repair a washing machine faucet below.
Various crane installation schemes
Let's look at popular connection options that you can do yourself using a minimum of tools and additional parts.
Installation of the flow element
To install a faucet of this type (regular or tee), you must first shut off the cold water supply, which can be done using a faucet on the riser. After this, the remaining liquid is drained from the pipes, which may interfere with further manipulations.
The easiest way is to install a flow valve on a separate branch of the pipe. As a rule, in this case a threaded bushing is already provided, to which you can easily screw a faucet with a two-outlet system connected to the filter. This element is attached to the inlet hose.
After completing all the manipulations, it is necessary to check the fasteners for leaks. If water is noticeable, all connecting nodes should be redone by installing additional gaskets.
End valve installation
If a special branch of the water supply is connected to the washing machine, you can connect the end valve using a tee (mortise clamp). This part is carefully screwed to the pipe so that the guide sleeve faces outward. After this, holes are drilled in the pipe through which a connection is made to the clamp or section of pipe where the tap is supposed to be installed.
At the end of the pipe, a thread is cut that matches the size and type of grooves applied to the tee. The external thread is wrapped with a sealant (FUM tape) or flax, after which the valve is screwed onto the outer pipe.
A hose (attached to the automatic machine or purchased specially) is connected to the second end of the tap. The other end of the hose is installed in a special hole, which is located on the back side of the washing unit (the transport valve must be removed from it).
The assembled structure is checked for leaks. Typically, the angled end of the hose is connected to the washing unit, while the straight end is connected to the water supply. This option is more convenient because the washing device is usually installed next to the wall.
Installation of tap with pipe insertion
A more complex process is to install the tap directly on the pipe, since in this case you will have to cut out the section.
For plastic structural elements, this can be done relatively easily using special scissors. Such an operation will require much more effort if we are talking about a metal pipeline: in this situation you will have to use a grinder.
To determine the size of the cut section, you need to add the length of the tap and the size of the filter. After this, you can make an incision and cut threads at the ends of the pipes that match the parameters with those on the tap. Following this, a filter is installed that will protect the machine mechanism from impurities contained in tap water.
Then a tap is installed to regulate the water supply. To do this, you need to remove the mounting nuts from the part that are used to connect to the pipe. If the installation is carried out on a polymer structure, this part should be expanded using a calibrator before starting manipulation.
The joints are fixed with tightening rings. The shut-off faucet compartment is connected to the inlet hose of the unit. After this, all nuts are tightened with an adjustable wrench.
It is important to pay attention to the fixation force: a poorly tightened or overtightened bolt can cause enormous damage to the structure, becoming a source of leaks
All joints are well sealed with O-rings, which are included with the faucet and/or filter, as well as with fum tape, flax fibers or other materials. The final stage is checking the assembled structure.
Life time
The service life of brass products depends on the frequency of opening and closing (other conditions are stable - cold water, operating pressure in household networks 1.6 MPa). If you don’t turn the tap every day, you can count on 15-20 years. If you have ten children and you spend the whole day loading things into the washing machine, sorted by all the colors of the rainbow, and at the same time opening and closing the water supply every time, then the faucet may die before the washing machine.
In general, it is advisable to change the shut-off valves along with the washing machine (i.e., once every 10-12 years).
Advantages and disadvantages
Brass ball products have many advantages, while household taps have practically no disadvantages:
- very compact dimensions;
- reliability;
- durability;
- simplicity of design and maintainability;
- low cost;
- good tightness;
- low hydraulic resistance;
- corrosion resistance.
There are virtually no disadvantages when used in home plumbing systems. You just need to pay attention that when a faucet with a cantilever handle is located along the wall, there may not be room to turn the handle - you should think about convenient placement at the planning stage.
Pros and cons of such an accession
When there are no alternatives to connecting the washing machine to the water supply, then there is little point in discussing whether this is right or wrong - it still needs to be done. However, we will outline the advantages and disadvantages of this method of integration into plumbing communications for the purpose of connecting a washing machine to give you a little additional food for thought. You may come to the conclusion that it is better to remodel the bathroom than to “trash” something like this. Let's start with the cons.
- The adapter and hose extending from the faucet will somewhat spoil the appearance of the bathroom. Even if you choose prettier adapters, it still doesn’t look respectable at all.
- If previously your faucet was attached close to the wall and looked neat, now, thanks to the adapter, it protrudes strongly forward, which is also dangerous. If you accidentally hook such a faucet as it should, the faucet can be torn out with all the ensuing consequences.
- If you have a “scoop” type mixer installed, that is, Russian or even Soviet-made, where the main fastening nuts hang on eccentrics and not on the mixer itself, then connecting the washing machine in this way will be difficult or even impossible.
- If the pipes under the mixer were initially routed crookedly, and then during the normal installation of the mixer this curvature was compensated with the help of eccentrics, it will come out again when you install additional taps and extension adapters. As a result, the faucet mixer and extension cord will no longer fit straight and you will have to come up with something so that the crooked connection does not allow water to pass through and maintains pressure.
One of the advantages of connecting a washing machine to a mixer is its relative simplicity. There is no need to climb somewhere under the sink or bathtub, break tiles, “damage” pipes, the connection is quick, relatively simple and convenient. You also need to take into account that if problems arise with the washing machine, you can turn off the water very quickly, since the main tap will be located right next to the mixer.
Accessories and tools
Before you start connecting the washing machine to the mixer, you need to stock up on basic components and the appropriate tools. There will be no problems with tools, since they are almost not needed. In fact, you can get by with just a screwdriver and an adjustable wrench. No drills, grinders, hammers or pliers are needed here; the connection is made quickly, accurately and without noise. You won't need any fancy components either; here's a list of what you'll need to purchase.
- A 3/4 tee tap with two main outlets and one outlet for the inlet hose.
- Main extension 3/4 corresponding in length to the taken tee.
- 3/4 silicone gaskets.
- High-quality expensive FUMka.
When you buy a tee, make sure that it matches your faucet in appearance. After all, you must admit, there is no point in buying a part with a golden coating and placing it on a chrome-plated faucet, allowing for such “color and aesthetic heterogeneity.” The general logic, we hope, is clear; we will not go into details.
Installation of the flow element
There are various faucet connection diagrams available for DIY. One such option is to install a flow element. Before starting any manipulations, you must turn off the cold water supply.
A tee and a regular tap will need to be installed. The remaining liquid is drained from the pipe. It will interfere with the future work process, so you should get rid of it. The easiest way is to install it on a separate branch of the pipe. The package usually includes a threaded bushing onto which you can screw a faucet with a two-outlet system. It is connected to the filter. This element is attached to the inlet hose.
An angle valve can be installed using the same algorithm as a flow valve. The difference lies only in the design features of these products. It is necessary to control the location of the valve. It should be comfortable for users. At the end of all actions, you should inspect the fasteners to determine if there are any leaks in them. If water drops appear, the connecting nodes must be re-secured.