Main nodes
Let's start with the general structure of the Ardo family automatic washing machine. The vast majority of the structural elements of these washing machines are no different from the structural elements of other washing machines.
For your information! Modern models of Ardo washing machines have the technical ability to connect to hot water supply, so instead of an electric valve they have a block of electric valves.
Other elements
We talked about the main components of the Ardo washing machine, now we will give a list of additional elements. We note right away that the composition, appearance and functional purpose of the elements may differ depending on the specific model of Ardo brand washing machines. So, what elements are we talking about?
Older Ardo washing machines have springs installed on the tank that dampen vibration; new models have hydraulic struts instead of springs.
In addition to all the main and additional elements of the Ardo washing machine, which ensure its operation. It would be nice to say a few words about the body of the washing machine. The housing also ensures the operation of the washing machine, since its task is to protect the mechanism from any external influences. Part of the body of the Ardo washing machine is made of plastic, and part of metal. The body consists of the following elements:
Engine characteristics
Most Ardo washing machines are equipped with asynchronous three-phase electric motors. These engines are distinguished by their low cost and simple design, they operate almost silently and are quite easy to maintain. An important plus is that after the machine breaks down, it is easy to adapt them for household needs. The main thing is that the device is in good working order.
There are many options for using the motor from the Ardo washing machine - it all depends on its power and the needs of the master. First of all, we pay attention to the characteristics of the asynchronous engine, which must be indicated on the factory labeling sticker. Thus, a model with the following parameters is often found:
- power: 450V (at low speeds - 280V);
- speed gained: maximum accelerates to 2830 rpm, minimum – 300;
- capacitor: 16 µF.
From the motor of a broken Ardo washing machine you can make a grinding machine, a crusher, a concrete mixer, a vibrating table and a mini mill.
The simplest thing that can be made from a working washing engine is a machine for sharpening knives and scissors. It is enough to securely fix the electric motor on the workbench, and attach a sharpening stone or grinding wheel to the shaft. Afterwards, all you have to do is connect the device to the power supply and start working.
The motor can also become the basis for:
- concrete mixers (a tank from Ardo is also useful here, in which you need to close all the holes);
- a vibrator for concrete shrinkage (you will additionally need a metal pin and a thick wire);
- vibrating table (it is enough to attach the connected engine to a metal table structure);
- miniature mill, grain grinder or crusher (you just need to equip the electric motor with blades and a tank).
The motor from the washing machine, when properly connected to the electrical network, can drive almost any mechanism. You just need to think through the design of the future invention, find components and correctly connect the terminals. We'll talk about the latter in detail below.
Design features
There are not many design features of modern automatic washing machines of the Ardo brand, but they exist. Let's talk about them briefly. Firstly, washing machines of this brand in 98% of cases have a metal tank installed. Perhaps this is the reason why Ardos make so much noise during washing. But this is also a plus, since a metal tank is much more difficult to damage. He is not afraid of bra wires or the “crazy hands” of novice masters.
Secondly, Ardo’s heating element is located not at the very bottom of the tank, but slightly to the side. This, on the one hand, makes it easier to dismantle and install, and on the other hand, increases the water capacity of washing in hot water. After all, in order for the machine to start heating water for washing, the heating element must be completely hidden under water, and this is 1/6 of the total volume of the tank.
In case of repair, you can get to the heating element of the Ardo washing machine through the service hatch, which is located on its rear wall.
Thirdly, the programs embedded in the control module of the Ardo washing machine are unique in many ways. There is a program for washing in water without heating, washing shirts and neat washing. But at the same time, Ardo has a rather unclear interface. In other words, you need to experiment a lot before you can adapt to all the washing modes of this machine.
Types of malfunctions of ardo washing machines
They can be of the physical type, where the parts are worn out and cannot be replaced. It could also be an electronic fault, such as improper connection or operation of the device.
The owner can handle simple problems on his own. The main thing is to follow the instructions for troubleshooting the machine. Other malfunctions of the Ardo washing machine can only be fixed by a specialist.
Water does not heat up
Most often, the heating element in these washing machines fails. You can determine the problem while washing at 60 degrees. If you put your hand on the glass of the door and the glass is cold, it means the electric heating element has burned out.
You can change the electrical device for heating water yourself. To do this you need:
No water flow after turning on the washing machine
Water may not flow into the washing machine after it is turned on, especially often in Ardo top-loading washing machines. The owner of a horizontal loading device is unlikely to suffer from this breakdown. In the latter case, the maximum that can happen is that he forgot to turn on the supply tap.
The vertical can have two variants of the problem:
Unscrew the inlet hose and remove the filter with pliers. Take it out and clean it with water and a toothbrush. Do the same with hoses if they are equipped with mesh filters. Install everything back in the same sequence.
The water supply limit is exceeded
Another common problem with Ardo washing machines is excess water supply. There can also be two ways to fix it - if the drain hose is connected incorrectly to the sewer pipe, or the electronics may be faulty. The last error can only be corrected by a qualified specialist. An ordinary owner can cope with the first problem.
Upgrading the washing machine control module
The first time I encountered replacing the MINISEL module was when water and foam got on the lock of the hatch door locking device (UBL). The microcontroller in the module has failed.
It turned out that it is very difficult to purchase a separate microcontroller with the required version of the program, since modern washing machines only provide modular replacement of blocks. Therefore, the failed module had to be replaced entirely.
Of course, this is justified when we are talking about sensors, valves, pumps and other relatively inexpensive elements and components of the machine. It is impossible to repair them, and the price is low, even taking into account the replacement work. But if the electronic control module is faulty, this approach is categorically not justified.
The price of the module plus the cost of a specialist to replace it can reach half the cost of the washing machine itself. Radio engineers and radio amateurs understand that this price is greatly inflated. It is also clear that this is due to the desire of manufacturers of household appliances to make their post-warranty repairs economically unprofitable and thereby push consumers to buy new ones.
After another control module of a similar washing machine failed due to water ingress, I realized that it needed to be modified so that such failures would not recur.
Studying online forums and literature immediately made it clear what should be done. It turned out that for the entire family of MINISEL modules, the microcontroller outputs are connected almost directly to triacs, control valves for water inlet, drain pump (pump) and UBL and are completely unprotected from possible emergency situations.
In such situations (malfunction of the actuator or short circuit in its circuit, water (foam) getting into the actuator or the connectors through which it is connected to the module), not only inexpensive triacs, but also the microcontroller itself can be damaged.
The first, most common emergency situation due to which the MINISEL module fails is water or foam getting on the UBL lock. This can happen, for example, if washing powder intended for hand washing is mistakenly put into the washing machine, or if the rubber door seal breaks.
In this case, water (foam) may also get onto the electronic control module board if it is located below. And since, as it turned out, the printed circuit board of the electronic module is galvanically connected to the power supply network, if the plug is incorrectly plugged into the socket, the 230 V mains voltage will be present on the elements of the board and on its printed conductors. Naturally, if water or foam floods the board, the mains voltage can also reach the pins of the microcontroller and damage it.
A few words about plugging into a socket. The instructions for washing machines do not say a word about the fact that the power cord L (“phase”) must be connected to a specific socket of the power socket. However, when studying the diagram, it is clear that on the module board one of the network wires is connected to the +5 V power circuit. If the plug is inserted into the socket incorrectly and water gets on the board, damage is likely possible.
Another emergency situation occurs when the drum bearing seals wear out. In this case, flowing water damages not only the bearings, but also the electronic control module, since the tachogenerator contacts are located on the connecting block of the drive motor next to the power circuits. If water (foam) gets on this block, the mains voltage passes to the input of the microcontroller and disables it.
I modified the MINISEL (800 RPM) 546080900-02 electronic module installed in the ARDO TL85S washing machine on the MC908JL8CDWE microcontroller. Various modifications of this module are very common. They are installed in washing machines of many brands.
The proposed modification consists in introducing galvanic isolation between the microcontroller outputs and the triacs that control the actuators, as well as between the tachogenerator winding and the microcontroller input. It can be done in any module that does not have such a decoupling.
To become familiar with the operating principle of the washing machine and its control module, as well as to study the location of valves, pumps, connectors and other elements, books [1] and [2] were enough for me. Revision was carried out based on the information contained therein.
Before starting to describe this modification, I would like to draw the readers’ attention to the fact that on the diagram of the MINISEL module given in [2], the sign 4g “grounding” indicates the circuit connected to the N wire (“neutral”) of the power supply network and to the power line module with a voltage of +5 V. The common wire of the module is indicated in the diagram with the sign _L “connection to the body”!
Control modules come in many varieties, although the basic composition of their elements is almost the same. Naturally, this does not mean that the modules are interchangeable. For example, they use different versions of microcontroller programs. The use of a module of one modification or another also depends on the functionality of the washing machine, for example, differences in spin speed, number of programs, etc.
The sets of actuators included in a particular type of washing machine and their connection diagrams may also differ. But having studied the operating principle of the washing machine, you can understand the logic of its control module. It is only at first glance that it seems that washing machines are designed differently.
In fact, they all have water inlet valves (although their number may vary), UBL. pump, engine. I will describe the principle by which I modified the MINISEL module. Parts of his diagram are on pages 6 and 7 in [2]. In the fragment shown in Fig. 1 shows triacs TR2, which controls the UBL, TR3 and TR4, which control the water supply valves, and TR6, which controls the pump.
I used a circuit for decoupling the outputs of the microcontroller and power circuits with optocouplers, shown in Fig. 2. Resistors R12—R14 and R18, triac TR6, diode D1 and connector CNB are elements of the module, so their positional designations are left original. Newly installed elements have the prefix 1 added to them.
Low-power triacs TR2-TR4 (Z00607) are replaced by triac optocouplers 1U1-1U3 (MOS3023), and the same optocoupler 1U4 controls the powerful triac TR6 (VT134). Now, in the event of an emergency, only optocouplers will fail. Since the input response current of the MOS3023 optocouplers is only 5 mA, there is no need to change the values of resistors R12—R14 and R18.
If you cannot find the exact diagram of the control module used in your existing washing machine, you will have to find the triacs to be replaced on its printed circuit board, relying on descriptions of similar modules.
First, locate the water valves to find out their number. For example, in my washing machine there were not two of them, as in the diagram from [2], but three. Then trace the wires from the valves to the module’s printed circuit board connector and, following their continuations on the board, find the required triacs.
Typically, the valves are controlled by low-power triacs Z00607 or similar in TO-92 housings. Their maximum current in the open state is 0.8 A, and the maximum voltage in the closed state is 600 V. The same triac controls the UBL lock. Then you need to find a triac that controls the pump. It is more powerful (4 A, 600 V) and is usually in the SOT-82 package.
To make sure that these are exactly the triacs that are needed, “ring” the circuits from the electrodes of 2 triacs to all the valves, the pump and the UBL. Then unsolder these triacs from the module board. Optocouplers MOS3023, triac VT 134 and resistor 1R1 can be mounted on a small printed circuit board. It is advisable to install optocouplers in panels so that they can be easily replaced in case of malfunction.
Then you need to find a place to install the board. It is convenient to connect it to the module using a flat cable with the required number of wires. These wires are soldered directly into the holes from the terminals of the remote triacs. Optocouplers can be any triac type, either with or without a zero detector. The main thing is that the input current that opens them is no more than 5 mA. For example, MOC3043, MOC3063, MOC3Q83.
As mentioned above, the tachogenerator of the drive motor also needs galvanic isolation from the microcontroller. To do this, the tachogenerator must be included in the circuit, as shown in Fig. 3, transformer 1T1 with a transformation ratio of about one.
If you cannot find the wires coming from the tachogenerator according to the diagram, find them by “testing” the wires coming from the electric motor terminal block to the module printed circuit board. Since the frequency of the alternating voltage generated by the tachogenerator lies in the audio range, a matching transformer from the ultrasonic frequency of any old transistor receiver can be used as a 1T1 transformer.
I don’t even know which transformer I’m using from which receiver. To obtain the required transformation ratio, it was necessary to use only half of its primary winding (before tapping). You can even wind such a transformer yourself.
How and where to place this transformer depends on the design of the particular washing machine. Since the wires going from the tachogenerator to the connector are quite rigid, I simply cut them in the places indicated in the diagram in Fig. 3 crosses, and soldered the transformer leads directly to the ends of the wires.
To consider the modification complete, make sure that the control module is located in the washing machine so that water (foam) cannot get on it. If such a possibility cannot be excluded, do not be lazy and make a protective casing for it, because it is unlikely that you will be able to move the module to another place.
Well, be sure to check that when you plug the washing machine plug into the power outlet, its contacts are connected to zero (N) and phase (L) as shown in Fig. 4 (the plug shown is designed for a “French” type E socket).
Since almost all apartments have type C (without a grounding contact) and type F (with grounding contacts on the sides) sockets installed, which allow the plug to be plugged into them in two positions, you will have to somehow mark the correct position on them. And, of course, it is necessary to warn everyone who uses the washing machine that they cannot plug the plug into the socket in any other way.
It is quite obvious that exactly what is shown in Fig. 4 connecting network wires to a plug is a standard for manufacturers of electrical appliances in which it matters which contact the phase is connected to. This was confirmed by testing several washing machines. And powerful Protherm gas boilers do not start at all if the N and L wires are mixed up.
Unfortunately, sockets that allow you to plug them in only in one position are practically not used in everyday life. I found them only in an online store, and at a fairly high price. I have never seen such sockets in electrical goods stores (even quite large ones), and the sellers had never even heard of their existence. sincerely not understanding what they want from them. And this is even more incomprehensible - after all, almost all imported electrical appliances have plugs with a central grounding contact.
Ardo fault codes
Error codes will help determine the location of the problem: E00/E01, E02, E03, F2, F4, F5, F6/F9/F12, F8, F13/F14. The control board diagnoses the system in the event of a breakdown and displays a set of symbols on the display. Each one points to a different problem. Error explanations can be found in the operating instructions and our article.
Typical faults
Ardo washing machines are divided into two main categories based on loading type:
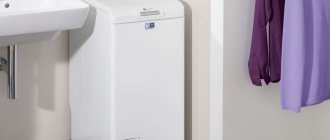
The Ardo top-loading washing machine has a compact body that easily occupies the space between the bathtub and sink. But it doesn't come without its drawbacks.
Here's what users are complaining about:
Other problems are similar to front-facing models. Here are the most common ones:
Let's figure out how to make your own repairs.
SM "Ardo": do-it-yourself repairs
Some breakdowns can be fixed without the help of a specialist if you follow our recommendations.
The SMA hums, makes noise, vibrates
Is your car recently purchased? When you first started the unit, did it start jumping and rattling? Check that the shipping bolts have been removed. They secure the tank in place to prevent damage during transit.
Also make sure that the equipment is level and stable on the surface. The floor must be level and hard. Tighten the legs of the machine if necessary.
The most serious failure is bearing wear. In this case, not only a hum is heard, but also a grinding sound (with severe wear). Replacing a bearing is considered a complex repair. How to disassemble the Ardo SM and install a new bearing, watch the video:
The new thermistor is simply inserted into its original place and a terminal is connected to it.
You will not be able to repair the electronic module yourself unless you have special skills. The electronic board is an expensive part, so it is better to contact a service center.
We looked at the main breakdowns of the Ardo SM, now you know how to repair the equipment yourself.
Typical malfunctions of Ardo washing machines and options for eliminating them
Water does not fill into the car.
Solutions: 1. It is necessary to check the presence of water in the water supply. It’s trite, but very often the cause of an imaginary problem is such funny things.
2. The inlet hose is squashed or clogged. We check visually for the absence of compression. We unscrew the hose from the washing machine, open the tap and see if the water will come through? Of course, you need to make sure that the water does not flow onto the floor. If the water does not come out, we find and remove the blockage. The hose with the leakage valve will have to be replaced with a new one after the protection is activated.
3. Clean the inlet filter mesh on the back wall of the washing machine. The mesh is quite fine and often becomes clogged with rust or other particles from tap water. The filter can be easily removed using pliers and cleaned thoroughly.
4. You need to make sure that the fill valve is working properly. It is located immediately behind the filter. The valve becomes accessible after removing the top cover of the washing machine. Perhaps the power wires have come loose or frayed. To check its functionality, the valve itself can be removed and connected to the voltage indicated on its body. Must open. If it doesn't work, you'll have to replace the valve with a new one.
5. The problem may be due to a faulty water level sensor. Or in other words, a pressure switch. You can also find it under the top cover. It comes off quite easily. It is held on the washing machine body with screws or latches. We check the integrity of the wires and their connection to the sensor. A tube fits from below to the pressure switch. It may be clogged. The simplest test for the functionality of the sensor after removing it is to blow into its tube. If you hear a click, the pressure switch is most likely working. Otherwise you will have to replace it with a new one. It is important not to mix up the wires when installing a new one.
Water does not drain.
Common causes and solutions: 1. Again about the banal - you need to make sure that the sewer pipe is not clogged. Maybe the car simply has nowhere to drain the water. Of course, this is possible for machines with a permanently connected drain. We also check the drain hose of the washing machine. It should not be bent or twisted. In principle, you can disconnect the hose from the sewer and check whether water comes out of it when draining? If it comes out, we clean the sewer. If not, check the hose for blockages. Problem still exists? Let's look further.
2. The drain filter is clogged. A simple, but most common reason for the lack of drainage. The filter is located at the bottom of the washing machine under the door or decorative panel. It is a screw plug screwed into the machine body using a standard right-hand thread. Accordingly, the filter is unscrewed counterclockwise. Don’t forget to place a tray under the washing machine to collect any leaking water. After removal, the filter is cleaned of contaminants. You will need to remove excess in the place where the filter was installed. Next, reverse the process and check the drain. Most often it helps.
3. The drain pump is blocked or faulty. A common problem with Ardo washing machines is the pump blocking due to foreign objects getting into it. Various coins, buttons and other objects left in the pockets of clothes being washed, getting inside the drain pump, prevent it from performing its functions. A symptom of blocking a working pump is that when the drain is turned on, the pump hums and tries to expel water, but cannot. Another option is that the pump has become completely unusable. In any case, it will have to be removed. In Ardo washing machines, it is very easy to access the drain pump through the bottom of the machine. They have no bottom or are covered with an easily removable plastic strip. It is enough to lay the car on its side and access is open. Before removing, you can check the functionality of the pump with a multimeter. Next, the clamp of the rubber pipe is loosened and it is separated from the pump. Same procedure for the drain hose. The power cords are disconnected. All that remains is to unscrew the screws that hold the pump in place and remove it. A working pump is disassembled. And foreign objects are removed from it. The faulty one is replaced with a new one.
4. Lack of drainage may be caused by improper operation of the pressure switch. It simply may not send a signal to the control module about the need to drain. We have already discussed what needs to be done with the water level sensor above.
The water does not heat up.
2. A rare but possible breakdown is a malfunction of the temperature sensor. It is checked by measuring resistance at room temperature and when heated with hot water. A non-working sensor is simply replaced.
3. You need to make sure that the contact group of the heating element relay on the control module is not “sticking”.
Extraneous noise when the drum rotates.
Control block
Video - Ardo repair instructions
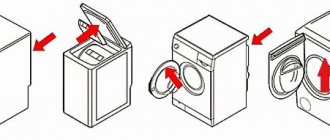
Before you start repairing an Ardo automatic washing machine, you need to get acquainted with its structure. It is important not only to know the general structure, namely, where the main components and assemblies of this washing machine are located, but where its additional structural elements are located, and what their features are. Let's talk about all this.
REPAIR OF ARDO WASHING MACHINE
The Ardo washing machine has been in the house for a long time, the service life specified by the manufacturer has expired, but is still in operation. Three years ago it already broke down. The renovation turned out to be a whole epic. I had to study its components and operating algorithm almost thoroughly. I managed to cope with the repairs, but it was not easy. Therefore, you can imagine how “delighted” I was when they told me in an insinuating voice: “But the washing machine is not working.”
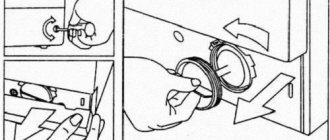
When I removed the side panel I saw that the belt had come off. But this is not a cause, this is a consequence. But the consequence of what had to be sorted out. The flange misalignment is obvious. Upon closer inspection (I looked inside the drum), I saw that there was a misalignment relative to the washing tank, but there was none relative to the washing drum.
During the last renovation, when I opened the panel, I saw this “picture”. The mounting location of the washing drum flange support in the side cover of the washing tub has collapsed.
I took off the cover, removed all the elements from it, bought a new one and installed it on it. I also purchased a new flange with a support for the drive belt pulley.
When disassembling a washing machine, it is imperative to take a photograph of the connection of wires coming from various components to the elements installed on the side cover of the washing machine tank. Otherwise, during assembly you will have to call a specialist from the service department.
You also need a photo of the bearing (necessarily with a number) to buy a new one if the machine has been in use for more than 3 years. The culmination of the renovation came with the start of assembly work. The thing is that it is often possible to remove a part that has become unusable without completely disassembling the equipment being repaired, but it is simply impossible to reassemble it. Moreover, as expected, I mean qualitatively. I had to completely disassemble the washing machine and then reassemble it. Everything would have been simpler and faster if I hadn’t tried to philosophize slyly from the very beginning.
This time I behaved correctly. I took everything apart right away. Here is the flange with a support for the pulley that I replaced last time.
It's still quite well preserved. I decided to leave it.
This is a flange with a support on the opposite side.
It was a shame that I didn’t listen to the advice and didn’t replace it last time (I was being greedy). It turned out to be deformed in the plane of the flange.
Moreover, its appearance is not very presentable - metal corrosion. Definitely needs replacement. I ran around half the city, to all the spare parts stores and workshops, but couldn’t find a new one anywhere. In one place they offered a used one, but I have one myself, only a little crooked. In one of the workshops, my attention was drawn to the center of the flange, or more precisely, to the screw. If you unscrew it, the support is disconnected from the flange. That is, the unit is repairable.
I made a sketch indicating the dimensions for further production of a normal drawing and began to look for a turner. But it’s always like this, when it’s necessary, “the brick runs out, then the mortar has dried up.” I realized it won't work quickly.
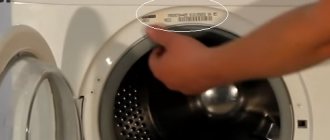
I took a photo of the nameplate on the back wall of the washing machine (its information is a great help for searching on the Internet) and set out to find what I needed in the virtual space. It turned out that this may be possible (50 x 50 chances), but it will take a long time to wait for the result.
Then I picked up a brass hammer (to reduce the deformation of the metal of the part being repaired), placed the flange with its flat side on a flat, smooth and thick metal surface and slowly, with gentle blows, straightened it (made it smooth). I put everything back together in reverse order. There was no distortion. The drive belt did not fall off during operation. The washing machine has been working for three months. The washing lady received clear instructions about the inadmissibility of pushing things into the drum in clumps and in large quantities. These are the main reasons why a washing machine fails. But you still need to make a drawing and sharpen a stainless steel flange, and as thick as possible. For anyone who has to carry out such repairs, start with the operating instructions:
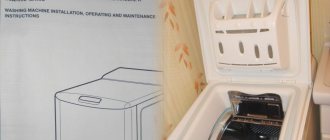
- page 3 – Machine description
- page 10 – Solving emerging problems
This will greatly speed up the process. Babay iz Barnaula is mastering washing machine repair.
Repair forum
- REPAIRING A PHONE THAT WILL NOT CHARGE
- CIRCUIT REPAIR: DISASSEMBLY-INSTALLATION, SELECTION OF ANALOGUES
- REPAIRING BROKEN PLASTIC
- SEARCHING FOR THE CAUSE OF DEVICE MALFUNCTION
Main nodes
Let's start with the general structure of the Ardo family automatic washing machine. The vast majority of the structural elements of these washing machines are no different from the structural elements of other washing machines.
For your information! Modern models of Ardo washing machines have the technical ability to connect to hot water supply, so instead of an electric valve they have a block of electric valves.
Other elements
We talked about the main components of the Ardo washing machine, now we will give a list of additional elements. We note right away that the composition, appearance and functional purpose of the elements may differ depending on the specific model of Ardo brand washing machines. So, what elements are we talking about?
Older Ardo washing machines have springs installed on the tank that dampen vibration; new models have hydraulic struts instead of springs.
In addition to all the main and additional elements of the Ardo washing machine, which ensure its operation. It would be nice to say a few words about the body of the washing machine. The housing also ensures the operation of the washing machine, since its task is to protect the mechanism from any external influences. Part of the body of the Ardo washing machine is made of plastic, and part of metal. The body consists of the following elements:
Simple connection diagram
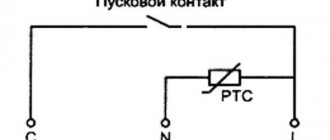
Regardless of the use of the engine, the connection diagram to the 220 V electrical network will remain the same. The asynchronous electric motor from Ardo has five chips through which the connection to the supply wire is configured. We take the power cord with a plug, evaluate the markings and prepare to start the mechanism.
To start the engine at low speeds, proceed as follows:
- attach the white terminal to the uppermost left chip;
- We place the second white terminal below;
- We fix the yellow wire in the uppermost right groove;
- We connect the blue thick wire to the condensate (through the condensate the rotation of the motor is adjusted to the left or right side);
- insert the plug into the socket.
Before connecting the engine to the electrical network, understand the markings of the wires by checking their purpose with a multimeter.
To change the direction of rotation, you need to move the terminal on the capacitor from the left chip to the right one or vice versa. To start the engine at high speeds, you need to move the white wires from the leftmost slots to the central ones.
When directly connecting the Ardo engine to a 220 V power supply, you should be extremely careful. It is strongly recommended to follow safety precautions and securely fix the electric motor to the surface before starting. Otherwise, the overclocked device may jump, break, or harm the health of the technician.
Interesting:
- How to make a sharpening machine from a washing machine engine...
- Where can I use the motor from an automatic washing machine?
- Technical characteristics of the washing machine motor
- How to make a machine from a washing machine engine
- Wood lathe from a washing machine engine
- What can be done from an old washing machine
Reader comments
- Share your opinion - leave a comment
Design features
There are not many design features of modern automatic washing machines of the Ardo brand, but they exist. Let's talk about them briefly. Firstly, washing machines of this brand in 98% of cases have a metal tank installed. Perhaps this is the reason why Ardos make so much noise during washing. But this is also a plus, since a metal tank is much more difficult to damage. He is not afraid of bra wires or the “crazy hands” of novice masters.
Secondly, Ardo’s heating element is located not at the very bottom of the tank, but slightly to the side. This, on the one hand, makes it easier to dismantle and install, and on the other hand, increases the water capacity of washing in hot water. After all, in order for the machine to start heating water for washing, the heating element must be completely hidden under water, and this is 1/6 of the total volume of the tank.
In case of repair, you can get to the heating element of the Ardo washing machine through the service hatch, which is located on its rear wall.
Thirdly, the programs embedded in the control module of the Ardo washing machine are unique in many ways. There is a program for washing in water without heating, washing shirts and neat washing. But at the same time, Ardo has a rather unclear interface. In other words, you need to experiment a lot before you can adapt to all the washing modes of this machine.
In conclusion, we note that the Ardo automatic washing machine is externally and internally very similar to its counterparts - washing machines of other brands, the device of all automatic washing machines is approximately the same. However, this machine still stands out in some ways, namely, the material of the tank and the location of some important components.
Source
Electronic module JANUS for ARDO washing machines
Our magazine regularly publishes materials describing control systems for ARDO washing machines (WM) (see [1-3]). In 2007, the Antonio Merloni Spa company (in Russia its products are manufactured under the ARDO brand) began producing the HEXAGON SM line with a new electronic module (EM) on the JANUS hardware and software platform. Material has already been published in [4], which provides the basics of programming this module using the specialized JANUS PALM programmer, and also describes diagnostic procedures, self-testing of the SM, and provides error codes. In this article, the author examines in detail the electrical circuit diagram of the JANUS EM.General information
As of the beginning of 2009, the Antonio Merloni Spa company produced more than 100 SM models with JANUS EM around the world. At the same time, there were only three varieties of this module.
ARDO SM with new EVs have in their names the initial abbreviations FLO (not all models), FLSO, FLZO, etc. Some models with “new filling” are no different in appearance from the old versions, only the production code has been changed in them. Article [3] provides data on ARDO SM models supplied to Russia, which use JANUS EMs (custom module code numbers - 546089103 and 546089203). Since the beginning of 2010, a third type of EM JANUS (code 546126903) has appeared in Russian trading companies.
In Fig. Figure 1 shows the appearance of the JANUS EM (MINI QCP_E AC, code 546089103), it is designed to work with an AC commutator drive motor. In this figure, the EM is shown with the drive motor triac radiator removed. The manufacturer of such modules - the Italian company ELMARC SPA (https://www.elmarc.com) - produces other types of JANUS EMs, one of them - MINI QCP_E DC (code 546089203) - is designed to work with a DC commutator drive motor. The latest version of the EM differs from the previous one in that the module board additionally includes a diode bridge, an interference suppression choke, and elements in the drive motor power circuit. In addition, these versions of EM have different software, which is located in the Flash memory of the microcontroller (MC).
The JANUS PALM programmer mentioned in [4] is also manufactured by ELMARC SPA.
JANUS modules can be conditionally classified as generation “3+”. The main difference between JANUS and classic 3rd generation modules (for example, MINISEL) is that on a SM with new modules, you can configure EVs, carry out testing and diagnose faults only using a specialized PDA JANUS PALM.
Compared to the well-known MINISEL module, JANUS EM has the following fundamental differences:
– it uses a switching power supply (PS). To be fair, we note that in the MINISEL family there is one version of EM (code 546080200-06), in which a pulsed power supply is used. Older versions of this module (546080200-01/02/03/04) use a conventional linear power supply with a network transformer;
– the ability to program EVs, as well as testing and diagnostics using a specialized PDA;
– no SM controls are directly connected to the EM (including the program selector or spin speed regulator). All these functions are provided by a control and display board (CU), which is installed on the front panel of the SM. Data and control commands are exchanged between these boards via a serial bus.
Most of the module's circuitry solutions are no different from its predecessors. JANUS EVs are designed for installation in SMs that have a standard set of budget class components:
–electromechanical pressure switch;
– commutator drive motor;
– inductive type tachogenerator;
– hatch blocking device (UBL) with a thermoelement, etc.
More “advanced” SM models from other manufacturers have long used new solutions such as Hall sensors (tachogenerator), electronic inductive pressure switches, inverter-controlled drive motors (including direct drive motors), etc...
The full article can be read in the paper version of the magazine
The emergence and development of the Ardo brand
The history of the company is inextricably linked with the name of Aristide Merloni, who laid the foundation for the industrial development of a provincial town called Fabriano. This happened in 1930. At that time, young people were leaving the agricultural region, and Senator Merloni took a step towards progress by opening a factory for the production of scales. The product quickly gained popularity, and the company expanded.
In 1968, the concern Antonio Merloni S. p. A. the Ardo brand was registered. The first washing machines were released after a thorough study of market needs. This determined the further direction of development. Already in the 70s, the factory turned into a large industrial center for the production of washing equipment.
In the 2000s, the company encountered a number of difficulties; it sold off some of its capacity. The Ardo brand business was acquired by the Italian company JP Industries S.p. A. This fact did not affect either the pricing policy or the quality of the products.
Today, Ardo is a large manufacturer of household appliances, which produces 3 million units of products per year. Thousands of workers work in several factories to produce household appliances. The brand’s washing machines have become the standard of reliability and quality.
The use of innovation and careful testing at all stages of production has made it possible to create elegant and durable devices that operate quietly and demonstrate high washing performance. The machines are designed for the middle price segment and are not inferior to products from the world's leading brands. The quality of products is confirmed by international certificates.
Brand Features
The sales floors offer a wide range of models, which allows you to choose a device in accordance with the buyer’s needs. The manufacturer pays special attention to quality, ease of use, and energy saving issues. Ardo washing machines delight their owners with their laconic design, functionality, and reliability.
This is durable and compact equipment at an affordable price. There are several features that distinguish the products from those of other manufacturers.
The quality of work is affected not only by the set of options, but also by the material used to make the parts and assemblies. The most important element of any washing machine is its tank. The composition from which it is made is a key criterion affecting the service life of the device. uses the following materials:
Metal tanks heat up and cool down quickly and do not make noise. The company's engineers invented a unique combined type of tank.
It combines a stainless steel base and a heat-resistant plastic coating. This product heats up quickly and retains heat for a long time, reducing electricity consumption.
Washing machine tank
A special technology is used in production. The metal blank is thermally treated at a temperature of 800 o C to combine the base with the enamel. This guarantees reliable corrosion protection and increased service life.
The coating effectively absorbs noise. For its production, the original Eco-Carbon development is used. This is a durable and strong material that has passed all the necessary tests.
Drum Features
The part experiences increased loads during operation and must be made of a durable material that can withstand the increased pressure of liquids, objects and the action of centrifugal force. Ardo uses only stainless steel to make the drum. The material fully meets the specified criteria.
Operational safety
The machines are equipped with an information display, which shows everything you need to evaluate operation and control. If problems occur, an error number is displayed on it. The manufacturer is responsible for ensuring a high level of safety, using several systems:
Electronic brain
The newest devices are equipped with two additional options. The built-in Janus system gives the SMA the ability to perform self-diagnosis and detect faults. Easy Logic is designed to automatically regulate the volume of water, calculate cycle time, and determine energy consumption depending on the amount of loaded laundry.
I work in the household appliance repair industry. Extensive experience in restoring washing machines and dishwashers.
Electronic module SMA
Washing quality SMA Ardo
The brand's products are famous for their consistently high performance results. Most products have a wash class higher than A. This is determined by design features and the use of innovative developments.
The Eco Ball option is responsible for the effective use of chemical compounds. It controls the consumption of powder and additives, limiting itself to the minimum required quantity.
The programs are selected in such a way that the laundry is evenly treated with a soap solution, and the effect on things is gentle. Water at the desired temperature is smoothly fed into the drum. This allows you to achieve clean laundry with minimal consumption of resources.
The highlight of the brand is “vertical”
Top-loading machines are in demand among buyers.
They are easy to use and demonstrate the following advantages:
Compared to other types, models exhibit low vibration levels. Like any device, Ardo verticals have disadvantages:
Innovative new items have been introduced into vertical type devices. The technical development of Smart Stop makes it possible to make amendments to the selected program after starting, and Soft Opening allows you to open the lid in one motion. Housewives whose hands are always busy will appreciate this.
The machines have a large number of programs and modes. This ensures care for clothes made from any materials. Such units wash not only linen and cotton, but also cope with fabrics that require careful handling.
I work in the household appliance repair industry. Extensive experience in restoring washing machines and dishwashers.