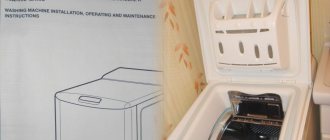
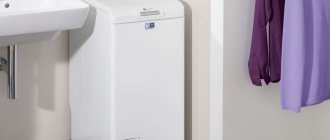
It is no secret that in many apartments the bathroom is small and there is practically no space to install a washing machine. In this case, a top-loading washing machine is perfect. It takes up little space and can be installed in even small rooms.
However, vertical machines, like all machines, can break down over time. And some malfunctions are unique to washing machines of this type. How to repair a vertical washing machine with your own hands will be discussed later in the article.
Malfunctions of vertical washing machines
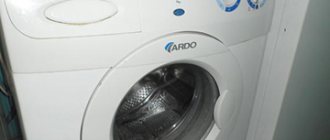
For washing machines with vertical loading, be it Ardo, Indesit or a device of another brand, the following malfunctions are typical:
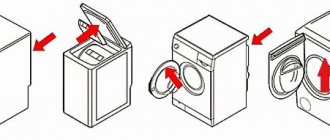
- The drum hatch opens spontaneously during the washing process.
- Corrosion of a metal block.
- Imbalance of the main driving element during washing.
- Bearing deformation.
To fix these problems, the washing machine will need to be disassembled. This process is labor-intensive and time-consuming. If you do not have confidence in your own abilities, it is recommended not to do the work yourself, but to turn to specialists. This will prevent you from aggravating the situation with careless erroneous actions.
Types of breakdowns and reasons for their occurrence
A washing machine is a rather complex piece of equipment, so malfunctions of the unit can be caused by many reasons. But some of them are much more common than others. Here is a sample list of them:
User forgot to remove shipping bolts
If this is not done, then after shaking on a long journey, the unit will end up in a warehouse or shopping center in very poor condition.
Before the first start, these bolts must be removed, which some buyers do not do due to forgetfulness. Of course, in this state of affairs, the unit will not be able to work properly.
The machine was installed askew
All washing machines must be installed in a strictly horizontal position. The correct installation is controlled by the building level. If there is a misalignment, the rotation of the drum, especially in the spin mode, is accompanied by excessive vibrations and noise.
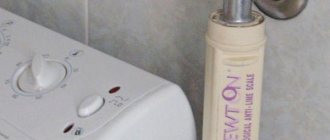
Poor water quality
The scourge of all washing machines, like boilers, is scale - a hard, porous deposit of calcium and magnesium salts (hardness salts), which forms especially actively in hot water. The heating element becomes covered with deposits, as a result of which it initially loses its ability to quickly heat water, and then completely fails.
Violations of operating rules
Many users themselves create problematic situations by ignoring the instructions given in the instructions.
For example, overloading the machine with laundry or, conversely, starting an almost empty unit leads to undesirable consequences.
Also, do not overfill the distribution container for detergents - powder and other chemicals must be poured in the quantities specified in the instructions.
Problems often arise because powder left in a container for a long time cakes, making it difficult for the machine to absorb it.
Some models react painfully to switching a washing program before the current one has completed.
And another emergency situation - the user started the machine, forgetting to close the drum.
Water getting into “where it shouldn’t”
Incompatible things - water and electricity - have to be combined willy-nilly in a washing machine. No matter how hard manufacturers try to seal electrical contacts, water often manages to short-circuit them. Moisture shows particular insidiousness in the form of ubiquitous steam, which easily penetrates into the most inaccessible places and immediately cools down and turns into condensate.
Preparing for disassembly
Before you begin disassembling a top-loading washing machine, the equipment needs to be prepared for repair work.
The device must be disconnected from the network, as well as from the sewer and water supply, and moved to a spacious room where it will be convenient to disassemble. Nearby it is necessary to place one or two large tables on which the removed parts and body parts will be placed.
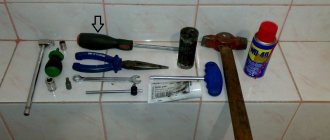
Next, you need to assemble the necessary tools. To disassemble a vertical washing machine you will need:
- Phillips and slotted screwdrivers,
- set of spanners with ratchet,
- set of socket heads with ratchet,
- pliers,
- wire cutters,
- flashlight,
- WD-40.
You also need to prepare a container to drain the water remaining inside the machine and dry rags.
During disassembly, it is recommended to take photographs of each part that is disconnected, especially the wiring, before disconnecting. This will allow you to avoid making mistakes during subsequent assembly of the washing machine and not aggravate the situation.
How to change the bearing in the Ardo SMA?
To replace the bearing you will have to completely disassemble the washer. Some users are put off by this amount of work, but if everything is done step by step, the repair will end successfully.
Overloading the drum with laundry contributes to rapid wear of the internal part. Deformation of the oil seal, which protects the bearing from moisture, also causes wear and destruction of the element. Here are the signs that accompany a breakdown:
You can also open the hatch and shake the drum with your hand. If there is a large gap between the tank and the drum, the bearing is damaged. To change a part, start by disassembling the SMA.
How to disassemble an Ardo machine?
Start by preparing for the renovation. Take these tools:
Start by turning off the water inlet valve and unplugging the washer from the outlet. Further:
So, the panels are removed. Now proceed to dismantling the internal elements. Follow the instructions:
The rear tank is freed. Go to the heating element. Disconnect the heater wiring, twist the central nut (not all the way) and push the bolt inward. Remove the element from the slot.
Now inspect the upper part of the SMA body. Under the cover there is a counterweight, which is secured with a metal plate. Take a socket wrench, unscrew the mounting bolts and remove the counterweight.
Returning to the back of the machine, secure the metal flywheel (the wheel on which the belt is attached) with a screwdriver or a piece of wood. This is necessary so that the flywheel mounted on the flange does not rotate. Using a 13mm socket, remove the retaining bolt and remove the wheel from its seat.
Next, use a little trick. Tighten the bolts around the perimeter of the tank that hold the two halves together. Now you can remove one part of it with the drum through the rear wall without affecting the engine and shock absorbers. Proceed with caution as the sharp edges of the housing may injure your hands. Therefore, alternately push one side or the other.
At this stage, disassembly is complete. Next you will learn how to install a new drum bearing.
How to remove and replace the bearing in the Ardo SMA?
To avoid damaging the elements during dismantling, install half of the tank on an old tire or brick support. To make the replacement as easy as possible, coat the center of the tank with WD-40, which eats away rust. Subsequently, it will be easier to remove the parts from the seat.
Then proceed like this:
Now it's a matter of small things. Replacing bearings in an Ardo washing machine proceeds in the reverse order. Immediately install the inner ring into the socket (also tapping the edges with a chisel), then the lubricated oil seal. Turn the tank half over and install the outer ring. Then clean the drum shaft, lubricate it with grease and assemble the structure together.
The video shows how parts are replaced in a workshop:
What bearings are needed for the Ardo washing machine?
The bearing, as well as the oil seal, should be selected based on the model of the machine. For example, Ardo a400, a600x, a800, a1000x require parts of different sizes. It is impossible to accurately provide uniform standards for suitable elements, because the manufacturer may change the characteristics of spare parts.
To avoid making a mistake in your choice, take the old item and go to the store with it. Each spare part has a serial number, which you will use to purchase a new part. This applies to all Ardo washing machines.
We hope our recommendations will help replace broken elements and restore the operation of your equipment. To extend the life of the bearings, do not load more laundry into the drum than specified in the instructions. Run preventative programs using anti-scale agents, which will protect internal parts from damage.
Source
How to disassemble a top-loading washing machine
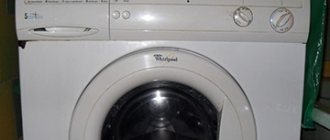
Disassembling vertical washing machines made by Bosch, Whirlpool and other companies is performed in approximately the same way. There may be only minor differences, but the general procedure is very similar and looks like this:
- Unscrew the fasteners on the sides, pry them off with a screwdriver and disconnect the control panel.
- Tilt the panel back a little, disconnect the wiring after photographing it. Remove and store the assembly.
- Remove the board: disconnect the remaining wiring and unscrew the screws.
- Disconnect the fill valve. First, you should open the clamps and separate the rubber hoses, turn off the power and press on the special holes to squeeze out the part.
- Unscrew the fasteners holding the side panels. Slide them down, remove and put away.
- Now there is access to the fasteners securing the front panel. Unscrew it and remove this part of the housing.
- Now the user has access to such important components as a belt, motor, pump, pressure switch.
- Next you need to lift the cover, unscrew the fasteners and remove it. It is necessary to disassemble the lid in very rare cases, for example, if the latch holding the door after closing is broken.
- The upper part of the case is held in place by several self-tapping screws under the rubber seal; to remove it, you will need to unscrew them.
- Now you have access to the hatch locking device and the cuff.
- To replace bearings on vertical washing machines, the tank cannot be pulled out, unlike front-facing ones. But if such a need nevertheless arises, the shock absorbers and counterweights should be disconnected.
- The tank is held in place by four springs. After all interfering parts have been removed, it can be pulled out of the case.
Disassembly of the top-loading washing machine is complete.
After replacing faulty components, assembly is carried out in the reverse order; if photographs were taken during disassembly, it is better to check them. It is worth remembering that incorrectly connected wiring will, at best, lead to the machine not working, and at worst, to a short circuit.
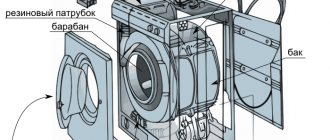
Design and operation of an automatic machine
To decide to repair a machine yourself, you must first of all have a good understanding of its structure and operating principle.
Main parts of the unit:
- engine;
- electric heater;
- drain pump;
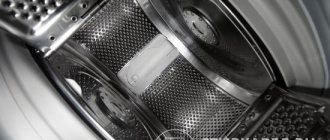
- water tank and laundry drum;
- electronics (control panel);
- water intake valve;
- frame.
After selecting a program and starting it, the first wash cycle begins. It includes drawing water and heating it. Water can be heated to a certain temperature, which is controlled using a sensor and timer. Detergents are added.
The place where dirty laundry is loaded is the drum. When washing, it swings and rotates in both directions. The amount of water is also controlled by a separate sensor
Water is drawn in through a valve. When a signal is received that there is enough water, the valve closes. Depending on the selected mode, several cycles of filling and draining are carried out. After the last rinse, the spin cycle begins. Here the drum spins at full power.
The diagram shows all the main elements. Draining is carried out through a drain pump. It is equipped with a filter that will prevent debris from entering the pump, protecting it (+)
The housing includes not only the walls of the washing machine, but also a hatch. The round door on the front wall allows you to observe the movement of the laundry in the drum and has protection against turning on if it is not closed tightly.
After switching off, the door does not open immediately. This protection is based on a bimetallic sensor. The latch opens only after the sensor has cooled.
Troubleshooting the most common problems
The most common breakdowns that occur with vertical washing machines from Ariston, Zanussi and other brands are all kinds of leaks, as well as bearing deformation.
Repairing leaks
To eliminate most problems that cause leaks in a vertical washing machine, it is not necessary to completely disassemble the body. To find out where the water is leaking from, you need to:
- Unscrew the drain filter, check how tightly it is installed and what condition the seal is in. If necessary, this unit must be cleaned; over the years of operation, a large amount of dirt accumulates in it.
- The next thing to check is the rubber seal on the washing machine lid. Over several years of service, it could become deformed. As a result, water flows under the rubber band, gets under the car, accumulates under the control panel, and flows into the sunroof locking device. This type of problem leads to serious damage, so the leak should be fixed as quickly as possible. There is no need to completely change the seal; just find the deformed area and place a small piece of rubber under it.
For further work, you will need to remove the side panels of the washing machine to gain access to the internal components.
- Check the tightness of the hose connection to the fill valve. If drops of water are detected, it is necessary to remove the tube, inspect it for integrity, treat it with silicone and install it in its original place, tightening the clamps further. In the same way, it is necessary to check and treat the drain pipe and hose, as well as the tank pipe.
- Next, you need to inspect the rubber cuff, check its integrity and make sure that it is securely held by the clamp.
- The leak may be in the tank itself. If its halves are held together with screws, you need to tighten them; you can try soldering small holes.
Replacing bearings
Unlike front-loading washing machines, top-loading equipment does not require removing the tank from the housing to replace bearings. Here you need to do the following:
- Remove side panels.
- Remove the linings on the sides of the drum, behind which there are calipers with bearings.
- The first thing you need to do is replace the bearing and oil seal on the side where there is no pulley. Classic right-hand carving.
- Then you need to remove the belt, pulley and grounding block, and then replace the oil seal and bearing. In this case, the thread will be left-handed.
When installing a new bearing, the seat must be thoroughly lubricated.
Possible difficulties
When disassembling a Kandy washing machine, you may encounter a number of difficulties. Most often these are the following problems:
| Possible problem | Ways to solve a problem situation |
| Difficulty with assembly sequence | When disassembling a washing machine, all stages of the process must be photographed. |
| There are missing parts during assembly | Parts removed during disassembly of the device must be placed in a certain place so as not to be lost |
| No matching key | To repair a washing machine, it is advisable to prepare a set of screwdrivers and a set of keys in advance. |
| Worn clamps detected | Worn fasteners are replaced with new ones |
| It’s impossible to detach the fasteners, a self-tapping screw is welded, etc. | It is necessary to apply lubricant to the threads/joints of the parts; this will help to unscrew the screws and self-tapping screws. |
| The tank does not pull out | It is necessary to check that all fasteners are disconnected, including paying attention to the shock absorbers that are located below. It should also be taken into account that the counterweight to stabilize the tank is quite heavy |
| The drum was damaged when the tank was cut carelessly | The damaged drum is replaced with a new one |
| Leaks, seal failure | The cause of the leak is a broken seal of the components that come into contact with water. To fix the problem, you should re-inspect the washing machine to determine where the water is leaking. |
| The new replacement part does not fit into its intended place | Most likely, the new part does not match the washing machine model. It is also worth making sure that the part is installed in the correct position. |
Ardo does not heat water
In this situation, you need to act like this:
Heating element (bent heating element) for ARDO washing machine (Ardo)
At the same time, make sure that the contacts of the heating element relay (located near the control module) are not jammed.
If power is supplied, the heater is burnt out and needs to be replaced. Having disconnected the wires, unscrew the fasteners in the middle of the shank and carefully remove the heater, rocking it in different directions.
Having cleared the installation site of dirt, screw on the new heating element and connect the wires to it.
DIY repair basics
Here are general instructions regarding repairs:
Tool
Most of the operations are performed using the most common tools - wrenches, screwdrivers, pliers, wire cutters, knife, etc.
To check the condition of the electrical part, you may need a multimeter and a phase indicator screwdriver.
In addition to the standard tool, sometimes it is necessary to use a magnet on a nylon thread or a nylon cord (helps to remove screws or some metal debris that have fallen into it from the machine), as well as a flexible metal ruler 70 cm or more long. The ruler is indispensable if you need to turn the drum into its normal position after it has been put into operation with the loading hatch open.
A non-professional repairman may only need a special tool to replace bearings - this operation is performed using a special puller. It should be noted that it is better to entrust such repairs to a specialist, since in the absence of experience the axle shafts can be damaged.
Safety precautions
Before starting repairs, you need to turn off the power to the machine and turn off the tap that supplies water to it.
Connection to the network during repair work is allowed only in special cases, when, for example, it is necessary to verify the presence of voltage at the contacts of the heating element. When starting to assemble a unit after repair, novice repairmen sometimes encounter a problem: it is difficult to remember which connectors are connected to which wires.
To avoid such situations, the wires and fastening diagram of various components must be photographed before the next stage of disassembly.
Well, the theoretical training course is over. Now let's see what failures we encounter most often.