Unusual behavior of the washing machine during operation indicates its malfunction. If your home helper starts creaking, making noise, rattling, or even “dancing” on the floor during washing and spinning, most likely the problem lies in a broken bearing assembly. It is necessary to respond to such a malfunction without delay. To fix it, first of all, you need to find out what bearings are on the washing machine. Our article will help you understand this.
How to replace a bearing: preparation
Replacing a bearing in a Samsung washing machine is the only correct solution in case of a breakdown, since repairing this component is often impossible.
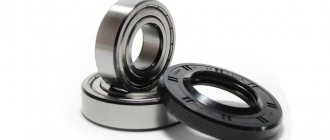
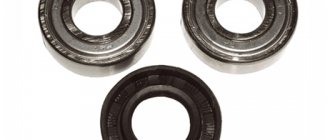
You should start preparing for work by searching for suitable spare parts. Now the market (both stores, service centers, and on the Internet) offers a huge selection of bearings for any model of Samsung washing machine. In the kit you will receive:
- the bearings themselves;
- oil seals;
- lubricant
To avoid confusion and to avoid buying the wrong set, tell the seller the exact model and year of manufacture of your washing machine. To make it easier to navigate, look at the table of spare parts for Samsung machines:
In addition to the part itself, you need to prepare a small set of tools. To dismantle the fasteners, unscrew the tank into 2 parts, knock out the bearings, arm yourself with:
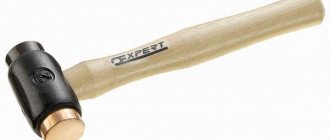
- small copper hammer;
- lubricant or WD-40;
- bent hex key;
- marker;
- metal pin;
- pliers;
- adjustable wrench;
- keys of various modifications;
- indicator, negative and positive screwdrivers;
- sealant.
All this will help you replace the bearing yourself according to all the rules.
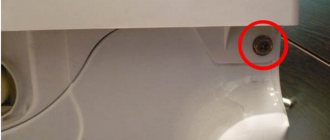
How to identify a malfunction
It is possible to preliminarily determine the presence of bearing failure by external signs, without disassembling the washing machine. To be sure that the malfunction has been diagnosed correctly, you will need to partially dismantle the equipment housing.
Factors that indicate incorrect functioning of the washing machine bearing include the following:
Extraneous sound during washing and rinsing clothes When spinning, it is more difficult to distinguish the uncharacteristic noise of the machine, so you should pay attention to operation in other modes. As a rule, as a result of bearing failure, knocking, grinding, and clanging sounds are heard on metal elements. Poor-quality spinning Due to mechanical damage to the bearings, the drum does not spin fast enough, which impairs the spinning of the laundry. Visual imbalance. A bearing failure causes the washer to become unbalanced, causing it to sway more in different directions.
The imbalance will be subtle, so it is important to observe carefully and take into account that the problem is especially noticeable during spinning. Violation of the integrity of the cuff. If you notice damage on the edges of the cuff of the machine, it is worth diagnosing the washing machine, since this problem is associated with broken bearings.
Removing the tank from a Samsung car
Having collected all the necessary tools, you can begin to figure out how to replace the bearing in a Samsung washing machine.
Prepare a convenient place in which you will disassemble the machine - it may not be enough in the bathroom, so if possible, move the equipment to a workshop or garage.
Next, you need to remove the “extra” parts that interfere with dismantling the tank. You need to disassemble sequentially so as not to lose spare parts and fasteners, so carefully sort and lay out everything that you remove from the car.
Disassemble the SM housing according to this scheme:
- Remove the top panel. To do this, unscrew the two fasteners located in the corners of the back wall. Then take the lid with both hands and pull it towards you and then up. After removing the panel, set it aside so that it does not interfere.
- Remove the detergent receptacle. It's as easy as shelling pears:
- pull out the tray to the maximum;
- press the valve located in the middle;
- With your second hand, slightly lift the tray and pull it towards you;
- If you did everything correctly, the receiver will jump off.
- Having removed the powder receiver, unscrew the hoses that supply water to it, as well as the pipe through which the dissolved powder is poured into the tank. Unclench the clamps using pliers.
- At the top of the washer you will see a counterweight. It looks like a large brick or stone. Select a suitable socket to unscrew the fasteners.
Carefully! The counterweight is heavy, do not drop it on yourself or the machine.
- Next you will need to dismantle the rubber seal.
Removing the rubber cuff on a Samsung washing machine is easy:
- Unscrew the two bolts that hold the hatch lock.
- Remove the sensor - this is necessary so as not to break the wiring when removing the cuff.
- Using a thin screwdriver, pry up the wire tie.
- Move the screwdriver under the clamp until you hit the fastener. Your job is to weaken him.
- Loosen the bolt and remove the clamp.
- Place your fingers under the cuff and pull it towards you.
You may not be able to remove the seal completely. The point is that it does not interfere with the removal of the front panel.
Next, lay the machine on its side to gain access to the bottom of the MCA. Remove the bottom by unscrewing the 4 bolts holding the cover in place. Set it aside.
Get started with electronics:
- Locate the motor and drain pump. Remove all wiring connected to these parts. If possible, record the disassembly process on video so that you don’t mix up all the wires later. If this is inconvenient, then label everything using a marker.
Important! The contacts that connect the wire to the sensors are very weak, so try not to damage them. If you find burnt contacts or wires, replace them immediately.
Now you need to remove the racks - replacing the bearing of a Samsung washing machine is impossible with them. The ends of the stands are attached to the tank with four bolts, on the other side of the stand they are screwed to the body of the machine.
Don't remove anything else at the bottom except the motor. The pump will also not hurt you - you just need to remove the pipes going to it.
Leave the washer in a horizontal position - this will make it more convenient for you to remove the water inlet valve along with the tubes and sensors going to it.
Remove the wire connected to the valve sensor, then unscrew the fasteners that hold it in place. Remove valve, set aside. Finally, remove the 4 springs on which the tank hangs.
Removing covers
Now there is nothing left to get to the tank - you only need to remove the wall and the front cover. The control panel is held on by 5 bolts. By unscrewing them, you can easily remove it.
The main thing is not to damage the control panel wiring!
The front wall is held in place by about a dozen fasteners. Find them all and unscrew them. Remove the lid and set aside. By the way, under the front cover there is another counterweight smaller than the main one. Take the socket wrench and unscrew it.
Now everything that previously prevented you from getting the tank has been eliminated. You can take out the engine and tank. It is important not to damage wiring and other vulnerable components, so as not to add more work to yourself.
- Turn the tank over.
- Remove the belt from the pulley.
- Use a hexagon to unscrew the pulley. If the pulley fastener is tight, add a little WD-40 to prevent stripping the bolt.
You have completed the routine work and disassembled almost the entire machine. Now, you can disassemble the tank to see in person what bearings are in your Samsung washing machine and make sure that they need to be replaced.
Compliance of components with machine models
It’s easy to avoid making a mistake when choosing components – just study the corresponding size table first. It lists all the popular machines from Samsung and the bearings and seals that go with them. At the same time, the key characteristics of the spare parts are given: width, diameter of the internal and external holes. Thus, it is recommended to observe the following “combinations”.
- Bearing 203-204 fits Samsung S621, S801, P1091, WF 7522S8R, P8091, F1013J, F1015J, WF-F1061/YLW, S803J, S821, S832, S 852, S1005J, S1021, S1043, SWF-P12 models , WF 6458N7W and WF 7520S8C. This number is also used in bearing units of Samsung S815, S813, R833, P843GW, P843 GWIYLP and R1031 GWS1U\YLW. The oil seal here is required in dimensions 25x50.55x10 or 25x50.5x10/12.
- Size 204-205 is installed on Samsung washing machines of the WF0592SRK brand. The kit includes an oil seal 30×60.55×10.
- Rings marked 205-206 are suitable for Samsung WF-B1062, SWF-P10, P1043GW/YLP, WF B1061 brands. Also, numbers 205 and 206 are used when repairing washing machines SWF-P10 IW/YLW, WF-B1061, R833 and R1031. The cuff is purchased in the size 35x65.55*10*12 or 44.7*65.55*10\12.
- Single row bearings 305-306 are installed on Samsung WF-R105 AV washing machines. The largest oil seal is needed - 35*75.5*10/12.
For most Samsung washing machines, a bearing marked 203-204 is suitable.
It’s easy to see that rings 203-204 are more often in demand. The fact is that number 203 has the most universal dimensions. Its internal diameter is 17 mm, external - 40 mm, and the width of the ring does not exceed 12 mm. The mounting chamfer takes 1 mm, and the part weighs about 0.073 kg. If we consider imported analogues, then brand 6203 is suitable.
The next one in the size range is bearing 205. As an imported analogue, there is number 6205. It has larger sizes. Thus, the internal diameter increases to 25 mm, and the outer line - to 52 mm. The width is 15 mm, the mounting chamfer is 1.5 mm, while the weight is limited to 0.129 kg.
The largest typical single row bearing is listed as “305” or “6305” in the international designation. The inner diameter of the ring is 25 mm, while the outer diameter reaches 62 mm. The width of the spare part is 17 mm, which also affects the size of the mounting chamfer, which is set to 2 mm. The weight also increases - about 0.23 kg.
Bearings 6201, 6202, 6207 are used extremely rarely in Samsung machines.
If you don’t want to compare the serial number of your existing washing machine with the table, you can take a different route. Disassemble the washing machine, remove the worn bearings and show them to the service center consultant. A specialist can easily measure the ring and select a replacement ring. At the same time, he will help you with choosing a suitable oil seal and other tools, parts and materials necessary for repairing the bearing assembly (marker, sealant, WD-40 cleaner, hexagon, lubricant). The main thing is to look only among original components and check the markings.
Disassembling the tank
Since the racks had already been unscrewed earlier, all that remained was to remove the clamps and brackets. Tools will help you with this. There are usually no special subtleties or difficulties with this work.
Remove the top of the tank housing so that the drum is visible. Then remove the bottom part. As a result, you should be left with:
- The upper half of the tank with a hatch hole in the center.
- The lower half of the tank with the heater.
- Drum and axle.
Since you have done such work, do not focus only on the bearings - along the way, check everything that you have access to.
For example, you can check the inside of the tank for damage or check the heating element for dirt and scale, short circuit and breakdown to the body (the last two checks are done with a tester). If you find problems with the heater, you can clean it of limescale or completely replace it with a similar one.
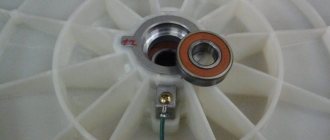
Bearing unit design
Incorrectly selected bearings will jeopardize the operation of the washing machine. The bearing assembly “connects” the drum and pulley together, which allows the washing machine motor to accelerate the machine to specified speeds. Therefore, the coherence of the entire mechanism depends on the correct installation of the “rings”.
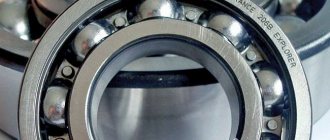
For most machines from Samsung and other manufacturers, the bearings are mounted in a crosspiece, which in turn is mounted on the back wall of the drum. The knot consists of two rows of “rings”. The first, internal, more powerful due to the increased diameter and thickness, takes on the main load and is located closer to the tank. The second one is several times smaller, located at the end of the shaft and performs an additional function.
Modern Samsung washing machines are equipped with a mono-bearing - a solid ring consisting of two rows of balls.
In some models there is no division into large and small bearings, since mono-bearings are mounted there. These are rings that include two rows of balls at once, so there is no need for a second set. In this case, one two-row element is installed instead of two standard ones.
Dismantling and installing bearings in a Samsung car
Before replacing the bearing on the washing machine, you need to remove it. Proceed as follows:
- In the tank bushing you will find 2 bearings of different sizes.
- To get a large one, you need to knock it out from the outside towards the tank using a pin.
- The smaller one is knocked out from inside the tank.
- Take a pin, place it against the edge of the bearing and lightly tap it with a hammer. Place the pin against the second edge and lightly tap again - go around the entire circumference of the bearing until it pops out.
Attention! When knocking out a part, never hit in the same place. There must be at least 3 points for hitting. Otherwise, the bearing will come out crooked or may get stuck in the bushing, and you will have unnecessary problems.
By the way, you can remove the bearings at any auto repair shop - mechanics have special pullers. Therefore, if possible, you can contact specialists. They usually do this kind of work for a nominal fee.
Don't forget about the seals:
- remove the used elements;
- take a clean cloth and wipe the inside of the bushing;
- lubricate the new oil seals with the grease that comes with the bearings;
- install the seals.
After this you can seat the bearings. Do it this way:
- install the part into the bushing and use your fingers to seat it there;
- Place a wooden block on the second bearing;
- hit the part several times until it sits.
Thermal clearance in bearings The internal clearance of a bearing is the distance by which one of the bearing rings moves relative to the other in the radial or axial directions. In fact, any bearing has this gap, otherwise the rolling elements would jam between the rings due to thermal expansion of the metal. Actually, for bearings operating in conditions of elevated temperatures or possible sudden temperature jumps, there is an option with increased clearance. For bearings whose internal clearance differs from the standard, special suffixes C1-C5 have been introduced. Suffix Radial internal clearance C1 is less than C2 (practically not found on the market, as a rule, this is a special order for the factory) C2 is less than normal (also quite rare) CN normal, used only in combination with letters indicating a reduced or shifted field gap Most often, the standard gap is not included in the marking. The most common execution. CM clearance for electric motor bearings. Interchangeable with standard and in some cases with C3 C3 is larger than normal. The second most common type of execution. C4 is larger than C3 C5 is larger than C4 (practically not found on the open market, as a rule it is a special order for the factory). The radial internal clearance, as one of the components affecting the service life of the bearing, is generally considered to be zero, but in fact it has a value of several micrometers. Although cylindrical, spherical bearings always have a small minimum clearance due to their design features. There are exceptions among bearing units, units where increased rigidity is required, where the bearing is installed with preload (for example, gear supports). Internal clearances of bearings Clearance tables for individual types of bearings are usually given in the catalogs of manufacturers. For paired single row angular contact ball bearings, tapered roller bearings, double row angular contact ball bearings and four-point contact ball bearings, axial internal clearance values are given instead of radial clearance because the axial clearance value is more important for these types of bearings. There are many examples, in particular, bearings for spindle units of machine tools, gear supports for automobile axles, bearing units for small electric motors or bearing units for oscillatory movements where a negative operating clearance is required, i.e. preload (“preload”) to increase the rigidity of a bearing assembly or improve its rotational accuracy. Creating preload, for example, using springs is also recommended in cases where bearings rotate under very light loads at high speeds. This is necessary to ensure a minimum load on the bearing and to prevent damage to the bearing due to slippage of the rolling elements. In the case of spindle angular contact ball bearings, there is a division according to the type of preload - light medium and heavy. This is reflected in the markings of the bearing itself, for example the SNR 7005CVUJ74 bearing has a light preload (suffix J7). Accordingly, incorrectly applied preload directly affects the durability of the bearings and the assembly as a whole, because the rotation speeds of such bearings are by no means small - tens of thousands of revolutions per minute. Overheating, vibration, noise, this is not a complete list of the consequences of improper bearing preload. To ensure stable operation, ball and roller bearings must always be subject to a certain minimum load. A bearing without a load will be destroyed by vibration very quickly. Practice shows that roller bearings must be subject to a minimum load corresponding to 0.02 C, and ball bearings - 0.01 C. C refers to the standard static and dynamic load from the catalog or technical description of the bearings. The importance of applying this minimum load increases in applications where the bearing is subject to high accelerations and its rotational speed is 50% or more of the maximum speed specified in the bearing table in the manufacturer's catalog. The situation is more complicated with angular contact ball bearings installed in a pair (the so-called duplex). The importance of correct preload in this configuration increases manifold. In the practice of Podshipnik.ru there were a great many cases when such a pair was tightened, as they say, “from the heart,” resulting in overheating. Or they overtightened one bearing, but the second of the pair was undertightened, which led to overheating of the overtightened bearing and vibration of the undertightened bearing from the pair. Ultimately, the bearings either jammed or the assembly collapsed. Therefore, the selection of bearings, especially in cases where it is not known which bearings were installed initially, must be approached with maximum responsibility. In addition to the dimensions of the bearings, it is a good idea to clarify the operating conditions - temperature (of the bearing, not the environment in which the bearing operates), speed, load, environment. Only in this case can you select a bearing with maximum efficiency. Types of clearances, basic information The clearance in a rolling or sliding bearing means the amount of movement generated when one bearing ring shifts relative to another in the radial (radial clearance) Gr or axial (axial clearance) Ga directions. The internal clearance has a great influence on the performance characteristics of bearings (fatigue life, vibration, noise, heating, etc.), therefore, a correctly selected clearance is of third importance when selecting bearings after determining its type and size. We often have to deal with the erroneous opinion of some consumers who, apparently having no idea what a gap is and why it is needed, check the “quality” (in their opinion) of the product by moving the rings relative to each other and how much this displacement is possible (axial clearance), they draw a conclusion about the quality of the bearing. In this ridiculous procedure, bearings with obviously increased clearance or of such a design (for example, angular contact balls) are often subjected to, where, by definition, the rings are required to move relative to each other.
In addition to radial and axial, three other types of gaps are also distinguished: initial, landing and working. Why is radial clearance needed in rolling bearings? The heat generated during bearing operation is transferred to the shaft and housing. Since the thermal conductivity of housings is almost always higher than that of shafts, the temperature of the inner ring of the bearing and its rolling elements is often 5 - 10 ° C higher than the temperature of the outer ring, and can increase, depending on operating conditions, to very high values. Due to thermal expansion, the existing radial clearance is reduced to unacceptably minimal values, which can lead to an increase in the friction force and bearing failure. In order to prevent this from happening, products with a deliberately increased gap are produced. This is where the accepted expression “increased thermal gap” comes from. It is believed that the most favorable condition for radial ball bearings (the most common group) is a working clearance close to zero or even a small interference. But if these bearings support high axial loads, then they must have increased clearance, which makes it possible to increase the operating contact angle and, thereby, increase the axial load capacity. Initial clearance in bearings The initial (or theoretical) radial clearance refers to the clearance of the bearing as delivered. Measurements are carried out using a device by displacing one of the bearing rings to its extreme position under a certain load. For some types, radial clearance measurements are performed by selecting a feeler gauge of thickness corresponding to the gap. Different design groups of radial bearings have their own groups (rows) of radial clearances. Each group is limited by the minimum and maximum values of the permissible radial clearance and is designated by a number (see Table 1). The most widespread are the normal group, which is not coded in any way in the number, 3 and 7. Groups 6 and 8 are slightly less common (the latter, as well as 3, is typical for railway bearings). Let's look at several bearing type designations using examples: 76-180306У1С2Ш2У Radial clearance group - 7 (increased), the accuracy class is indicated immediately after the designation of the radial clearance group, this is 6. Next comes the bearing number - 180306, and after it the design features are coded - У1С2Ш2У. 30-3610N In the number of this double-row roller bearing you can see the designation of clearance 3 (also increased, see the table below), accuracy class (0) and H - groove. The following is a table of groups of radial clearances for different types of bearings according to the domestic designation system.
Not only numbers, but also the letter H can be used to designate radial clearance in a bearing - it indicates special requirements for the amount of radial clearance not provided for by clearance groups according to GOST or other standards. This letter is placed in second place in the DUOL and denotes a non-normalized radial clearance, for example, N0-32330MU1. Clearances in imported bearings According to the international system of symbols, a much smaller number of radial clearance groups are accepted; there are 5 of them, while in fact consumers are faced with only three - normal CN (not indicated in the number), C3 (incomplete, but an analogue of our designation 7) and C4 (8th group). Below is a table of clearances for ball bearings (using Japanese NSK as an example). Recently, bearings from Japanese manufacturers (KOYO, NSK) with CM clearance are increasingly becoming available on sale - this is a special clearance for electric motors, which does not appear in ISO and is slightly larger than normal, but significantly smaller than C3 or 70 in our opinion (allows reduce noise level). For information on radial clearances (same tables) for self-aligning ball bearings, bearings for electric motors, cylindrical roller, needle, spherical and tapered roller bearings, download the NSK catalog here. Fitting clearance The radial clearance is understood as the clearance established after mounting the bearings. The reasons for its change are elastic deformation of the rings caused by seating interference and errors in the shape of the seats. Working clearance Working radial clearance is the clearance in the bearing at steady temperature and operating cycles of the machine. Moreover, due to temperature differences, it can decrease or increase due to which of the rings is hotter. Thermal elongation of the shaft can increase or decrease the clearance depending on the design of the bearing and its installation scheme. The clearance increases in proportion to the load on the bearing. Taking into account the above, it is necessary to select the appropriate group of radial clearance of the bearing. Roller bearings with cylindrical, tapered and spherical rollers, as a rule, must have a small operating clearance in units for general use. But in some cases they are also installed with preload, such as cylindrical roller bearings in precision machine spindles or tapered roller bearings in the final drive of a car. To perform satisfactorily, spherical roller bearings must always have a positive operating clearance. A bearing with a tapered bore has slightly larger initial radial clearance than a bearing with a cylindrical bore. This is due to the specifics of creating a mandatory interference when installing bearings on tapered journals of shafts, or on adapter and withdrawal sleeves. Clearances in plain bearings The clearance values of one-piece plain bearings are given in this table:
Split plain bearings must have clearances between the shaft journal and the liner given in this table:
Clearances in one-piece sliding bearings are determined with a feeler gauge from the end sides of the bushings or by measuring the diameters of the bushings and shaft journals when disassembling electrical machines. In sliding bearings with detachable liners, the clearances are determined by the “impression” method using pieces of lead wire with a diameter of 1-1.5 mm, placed on the shaft journal, and pressed by the upper liner while both halves are fully tightened. The gaps between the cover and the body of the liner are measured in the same way. The gap should be within 0.05 - 0.1 mm, the tension of the cover and liner is unacceptable.
Common mistakes made by amateurs
If you don’t yet know how much a bearing for a Samsung washing machine costs, then we warn you that a good part costs about 600 rubles. And if you do something wrong, you will have to buy again and again or contact a specialist.
We will list the typical mistakes made by amateur craftsmen so that you can see what not to do. Most often, home craftsmen make the following mistakes:
- cut off the UBL wiring;
- tearing the cuff;
- damage the pulley by removing it from the axle;
- break off the mounting bolts;
- cut off the wiring of the temperature sensor or heating element;
- tear off the pipes if you forgot to remove or loosen the clamps;
- the bushing is broken when the bearings are knocked out (in this case the drum needs to be replaced).
You need to know these mistakes so as not to repeat them yourself during the repair process. If something doesn’t work out or is forgotten, it’s better to read the article again or print out the instructions and follow them strictly.
Bookmark our site so as not to lose valuable tips on replacing bearings.
Causes
There are two main reasons that contribute to bearing wear.
- Natural wear and tear is common to all washing machines . It is impossible to protect yourself from this process. On average, bearings last about 5-6 years. If a part fails after so many years of operation, then the failure is reclassified as natural wear and tear.
- The situation is different with premature failure. There may be several reasons for this situation to arise.
- Wear of the seals occurs due to a violation of the tightness of the structure, as a result of which the parts come into contact with water, which washes away the lubricant. Their protective functions are reduced, which leads to the formation of corrosion phenomena on the bearings.
- Violation of the norms for the weight of loaded laundry creates an increased load on the drum and bearings.
- Incorrect installation of the machine in violation of the rules and regulations reduces the performance of all parts and shortens their service life.
We take out the drum and remove the old bearings
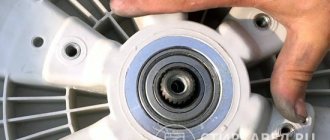
Further repairs will be made after removing the washing machine drum. You have to loosen the pulley and remove the drive belt. We act carefully.
- We unfasten the back wall of the Beko washing machine body; it is secured with five self-tapping screws located around the perimeter.
- Remove the drive belt.
- Unscrew the nut holding the pulley.
- Carefully remove the drum from the housing.
At this stage, you should inspect the drum cross for wear. If no traces of it are found on the shaft, repairs can continue as planned. If the crosspiece is in poor condition, you will have to purchase or repair the part, and only then continue working.
You can proceed to the important stage - knocking out the bearings from the tank. To do this you will need a regular hammer and a special drift. The algorithm of actions is quite simple.
- Remove the oil seal (rubber sealing ring).
- Place the end of the drift in the center of the rear bearing and tap the metal rod with a hammer.
Be sure to change the direction of the punch, do not hit the same place.
- Go around the back of the machine and start knocking out the second bearing.
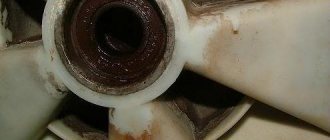
After the parts requiring replacement are knocked out, the tank will look like this:
Now you should clean the seat from liquid, rust, dirt, and plaque. Be sure to clean the drum shaft. After disassembling the drum of the Beko machine, you can press in new bearings.