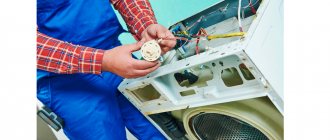
DIY Samsung washing machine repair at home. Samsung Corporation is a world leader in the production of household appliances. It also produces washing machines of good quality, which are durable and rarely need to be repaired. Nevertheless, this happens.
Consider doing it yourself. Please note that our country is currently supplied with machines that are manufactured in China. But this did not affect reliability.
- Breakdowns
- heating element
- Pump
- Motor
- Control block
- Hatch handle
- Drive belt
- Water fill valve
- Bearings
- Shock absorbers
- UBL
- Catalog SMA Samsung
Breakdowns
An automatic washing machine from any manufacturer can fail, and Samsung is no exception. There are certain parts that, for a number of reasons, break over time. Here are typical ones:
- heat electric heater;
- drain pump;
- engine;
- control module;
- hatch handle;
- drive belt;
- water fill valve;
- bearings;
- shock absorbers;
- UBL.
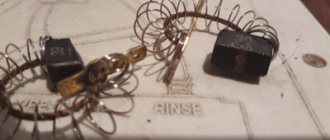
Pressostat
Note that the pressure switch is a reliable part and rarely fails. All of the listed components break down only after a certain wear and tear, usually after 10 years of operation. Or in case of violation of the use of the machine.
This is not to say that this SMA has weak points. Except for the electrical wiring. The length of the wires is precisely calculated, and they are laid without reserve. Everything is tied into bundles very tightly. Sometimes this causes the wire to break at a bend. Therefore, in the event of a malfunction, we call all the loops.
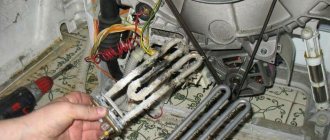
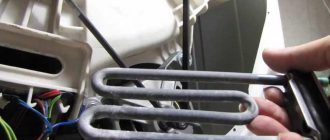
heating element
Hard water causes the heater to break down, resulting in scale formation. On the heating element, due to constant heating, it turns into stone and damages the surface. Note that in regions where there is soft water, for example, in St. Petersburg and the surrounding area, heaters practically do not fail. Moscow has hard water, and such damage is a pressing issue.
Removing the heating element
In order to extend the service life, use anti-scale products: Calgon, professional converters, or folk ones in the form of citric acid.
The malfunction manifests itself in two ways:
- The heating element burns out;
- leakage occurs on the housing.
In both cases, diagnosis is carried out with a multimeter. In order to gain access to the contacts, you must remove the front panel. See the disassembly sequence here. Unhook the wires. We put the tester to check the resistance.
First, we examine the contacts that receive voltage. If there is infinity between them, then replacement is necessary. Then we set the maximum limit.
Expert opinion
I work in the household appliance repair industry. Extensive experience in restoring washing machines and dishwashers.
Ask a Question
Important! Reliable results can be obtained if the multimeter measures up to 40 MΩ.
We look at the resistance between ground and each contact. If the value is different from zero, then the heater must be replaced. Operation with current leakage will lead to incorrect operation and damage to the control module.
Water doesn't heat up
Sometimes during washing you suddenly discover that the water in the machine stops heating. There are main reasons leading to this situation:
- Water level sensor malfunction. For various reasons, it stops letting water through and it, in turn, stops heating because the heating element does not turn on.
- The heating element does not work and does not heat the water. This can happen due to an open circuit and a malfunction of the heater. It is necessary to replace the burnt wires, and, if necessary, the heating element.
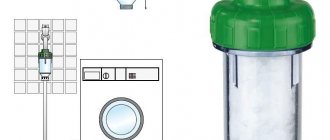
- Formation of a large layer of scale on the surface of the heating device. It must be removed using hot water with citric acid and then undergo regular inspections and preventive maintenance. One solution to the problem may be to install a water purification filter.
- A faulty thermostat that sends signals to the control system to turn the heating on and off. If there is a breakdown, the water does not heat up at all or heats up to very high temperatures.
- Control module failure. This happens when contacts break or moisture gets inside the unit. Most often, it cannot be repaired and is replaced with a new element.
Pump
The drain pump must be in use for 8 years or more. Constant blockages lead to malfunction. They occur in the following elements:
- drain hose;
- pipe branch;
- pump.
The pump itself and the filter must be periodically washed and foreign objects removed. To carry out this procedure, open the small hatch on the lower right and unscrew the lid. There is a filter under the cover. We take it out and rinse with running water. We look inside and make sure that nothing is wound around the impellers. Otherwise we delete it.
Snail with drain pump
Important! There is always a small amount of water in the pump, so apply a cloth before cleaning!
With a clogged pipe or drain hose, everything becomes more complicated. To eliminate it, dismantling is necessary. There are two options:
- remove the front panel;
- turn the car on its side.
Both cases have their pros and cons.
Expert opinion
I work in the household appliance repair industry. Extensive experience in restoring washing machines and dishwashers.
Ask a Question
Important! If you turn it over, be sure to cover the electric motor with plastic wrap!
Types of technical malfunctions of the drain pump
There are only two of them, if you do not take into account filter contamination and possible disconnection of electrical contacts.
Deformation of the impeller casing due to regular contact with hot water. In this case, the blades cling to the casing, and normal operation of the machine is not possible.
The pump has reached the end of its working life and needs to be replaced.
In both cases, it is possible to fix it yourself, provided that you have minimal technical knowledge and experience in repairing such equipment. Otherwise, the best solution to the problem would be to call a professional washing machine repairman to your home. It should be noted that this service is not cheap. Therefore, read our article to the end. And you may not have to resort to servicing your automatic machine.
Motor
Quite a reliable item. It is characterized by the following malfunctions:
- interturn closure;
- brush wear.
The first problem is caused by improper use, namely: constant overload of laundry. Another reason for the occurrence is frequent use during the day. You must understand that you bought a household machine, not an industrial machine. And it is designed for 2-3 washes per week. Repair of this fault is unlikely. We change the motor.
Washing machine motor
In the second case, simply change the consumables. This problem is inherent only to commutator motors. But in washing machines, in 80% of cases they are used. The procedure requires certain skills, but it can be done independently. Read more about replacing electric motor brushes.
Expert opinion
I work in the household appliance repair industry. Extensive experience in restoring washing machines and dishwashers.
Ask a Question
The service life depends on the intensity of use, and it can be estimated by the following period - 8-12 years.
How to repair Samsung equipment?
Obligations for repairs and free service apply to products intended for supply and sale in the Russian Federation, purchased in the Russian Federation, certified according to GOSTs.
Exceptions to the general rule are laptops and cameras. The warranty also applies to products purchased abroad. When purchasing, please fill out a warranty card, similar to goods purchased in Russian stores.
Where to contact?
Warranty repairs of equipment are carried out by Authorized Service Repairs. The list of ASCs of the required profile, addresses and telephone numbers are specified in the appendix to the warranty card, as well as on the official website in the “Help and Support” section.
Attention. Information about customer service is available in stores that sell Samsung products.
Qualified advice can be obtained by calling the “Consumer Information Center” listed on the manufacturer’s website.
- If there is no service center in your locality, you should contact the store where the product was purchased.
- If the ASC and the store are equally accessible, it is recommended to return the product for repair through the store. In this case, the trade organization will bear the blame for all violations associated with repairs. She will be interested in monitoring the timing of repairs.
- If after the technical examination you decide to return the money or exchange the goods, then the store will perform this operation. Service centers are not authorized to return money or exchange goods. Violations committed by the ASC will have to be resolved in court.
Required documents
The transfer of equipment for repair is confirmed by an act drawn up in 2 copies.
The act reflects the following information:
- Data of the legal entity receiving the goods (ACS or store).
- Full name, address, contact phone number of the buyer.
- Name, model, brand, serial number (IMEI code for smartphones).
- Product description: presence or absence of physical damage.
- The complete set of the product is indicated: headphones, remote controls, cables, etc. The lack of original packaging is not a reason for the store to refuse to accept the goods.
- Purpose of delivery: warranty repair, exchange of goods, technical expertise.
- Detected defects and complaints regarding the operation of the product are indicated in detail.
- Warranty card.
- Sales receipt: in practice, the receiving party requires the original receipt. Be sure to make a copy for yourself.
- At the end of the document, the date of delivery of the goods is indicated - all repair periods will be calculated from it.
We do not recommend completing the documents yourself. Save time - contact our lawyers by phone:
8 (800) 350-14-90
Reference! Delivery of goods weighing more than 5 kg is carried out to the ASC or store at their expense. If you are required to personally deliver large cargo, keep the receipt for payment of delivery services and loaders. These amounts relate to your losses and must be reimbursed by the service or store.
For the period of warranty repairs, there is a “replacement fund”. If necessary, the buyer has the right to write an application addressed to the manager of the organization (store or service) with a request to provide a product similar in consumer properties to the one submitted for repair.
Deadlines
The legislator indicates that product defects or warranty repairs must be carried out immediately, that is, in the shortest possible time. The wording is vague, leading to delays in stores and service centers.
The maximum period for compulsory free repairs has been established - 45 days. The period is calculated from the date of delivery of the goods: the first day will be the day following the date of acceptance.
During this period, the organization that accepted the goods is obliged to:
- establish the cause of the malfunction;
- order, purchase spare parts and perform repairs;
- notify about completion of work.
If the 45 days have expired and the organization has not completed the repair work, it is recommended to file a Claim. It is possible to make another demand in return for the failed repair: exchange of goods or refund of money, and also demand a penalty for each day of delay in the amount of 1% of the cost of the goods.
If a “peaceful solution” to the problem is not found, the conflict situation is resolved in court.
Attention. During repairs, the warranty period is suspended until the product is returned to the consumer. If repair problems were resolved in court, then the period of legal proceedings is not included in the warranty period.
Control block
Characteristic symptoms of a malfunction:
- all buttons are lit;
- nothing turns on;
- the board error code is displayed;
- One of the elements does not receive 220 volts.
Electronic control module
Note that the module is a reliable part of a Samsung automatic washing machine. A breakdown occurs when there is a power surge both internally and externally. This can also be caused by incorrect connection.
You can partially protect yourself from external surges by unplugging it from the socket in standby mode!
An internal surge occurs due to damage to a peripheral device, usually: UBL, heating element or motor. In this case, we check everything. Repairing the control board yourself is not recommended. According to Western standards, the module is not repaired, but replaced. In Russian realities there are specialists who restore them.
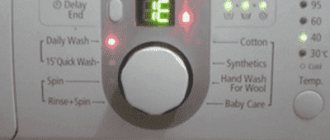
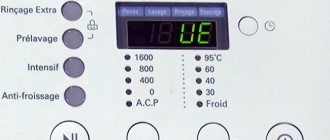
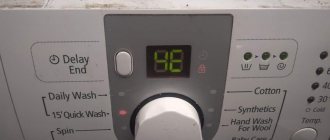
Samsung washing machine error codes
It is much easier to determine damage if there is a display on the control panel. In case of malfunctions, symbols are displayed on it, each of which corresponds to a specific breakdown.
| Basic error codes | Corresponding fault |
| 4C | Water does not fill or fills too slowly (the filling process takes more than 20 minutes) |
| 4С2 | Make sure that the inlet hose is connected to the cold water pipe |
| A0,B0,C0,D0,E0 | Diagnostics of the washing machine is enabled (test mode, which is used at the factory) |
| 5C, 5E, E2 | Water does not drain |
| dC | Door is open |
| O.C. | Excess water, you should spin the machine and restart it |
| LC,LC1 | Problems with the inlet hose |
| Ub | Spin does not work |
| U.C. | No power supply, low voltage, check connection |
| 3C | Engine doesn't work |
| NS | The heating temperature has been exceeded; the thermostat may be faulty |
| 1C | The water level sensor is not working correctly |
| DDC,ddC | Appears if the Add Door (for loading forgotten laundry) is opened without pressing the Start or Pause button. |
| DC3 | Add Door lock does not work correctly |
| Sd | Too much foam |
| DC1 | The main door lock did not work correctly |
| Sun | The unit cannot start the engine |
| PoF | There was a power outage during the washing process |
| Hot | During the drying process, the temperature inside the drum exceeded 700C |
| LE,LC,E9 | Spontaneous drainage of water due to a low-lying hose or a leak. |
Please note that the listed fault codes are periodically modified and new ones are added. Therefore, before starting repair work, you should check the list of errors specified in the instructions.
Source
Hatch handle
Trivial breakdown. This is caused by improper use. Most inexpensive models are equipped with thermal plate locks. It is she who blocks the hook and prevents the hatch from opening during the washing period.
But after the end of the cycle, the plate needs time to cool down - 2-3 minutes. If you read the instructions carefully, it is written there. But people usually don’t wait and pull the handle. Since it is plastic, it breaks over time.
Handle in a disassembled hatch
Actions:
- remove the hatch;
- unscrew the screws in a circle;
- divide into halves;
- changing the hatch handle.
Important! Different repair kits for different models! We select by serial number!
Are you using citric acid?
Oh yes! No
Drive belt
Over time, it “breaks apart” and tears. Overloading with laundry speeds up this process. Please note that the belt may stretch. In this case, it scrolls and washing will be impossible.
Replacement instructions:
- Remove the cover from the back, first unscrew the screws.
- Pull the belt towards you and at the same time rotate the pulley. We're filming.
- It's more difficult to install. First we put it on the motor shaft and hold it.
- With the other hand we place it on the pulley, twisting it at the same time.
Expert opinion
I work in the household appliance repair industry. Extensive experience in restoring washing machines and dishwashers.
Ask a Question
Important! Select the belt exactly the same!
Belt pulley
DIY repair
Repairing high-tech equipment is expensive. You can pay more than a thousand rubles just for a visit and troubleshooting. However, fatal malfunctions are rare. If you identify them correctly, you can do the repairs yourself. Modern block diagrams of equipment allow this - the main thing is to correctly diagnose the malfunction.
Replacing bearings
To replace the bearings, remove the front panel with the hatch and cuff. We pull off the cover from the plastic capsule of the drum, unscrewing the screws. The following works with the tank and drum:
- After releasing the tank, unscrew the pulley with a spanner. Let's take it off.
- We knock lightly on the shaft, tightening the bolt until it stops, releasing the bearing.
- We remove the drum.
We pay attention to the shaft wear and bearing stroke. If there is wear and tear, then even installing new bearings and oil seals will not help. If there is no output or it is small, we proceed further.
We pry off the oil seal with pliers. Then we take out the outer bearing and knock it out with a metal rod. To knock out the inner bearing, turn the cover over.
The following bearings are suitable for replacement: 204 for the main bearing, 203 for the internal bearing. Oil seal - 25*50.55*10/12.
The original oil seal is coated in white grease, which extends service life. It is heat resistant and moisture resistant.
The bearing is pressed using the hammering method or a special mandrel. You only need to hit the clip that we are hammering in, and not the lid. Avoid distortion when inserting.
The oil seal can also be knocked out with a hammer, the main thing is not to damage it. It's better to use a mandrel.
Lubricate the bushing on the drum shaft and insert it into the bearings. It should fit in without any effort, without any play. Reassemble in reverse order.
Shock absorber repair
Shock absorbers soften drum vibrations and stabilize it. They seem to be inexpensive, but if you have time, you can restore them yourself. They are installed on opposite sides - for stretching and contracting mechanisms. Effort absorption force – 16-20 kg. For repair:
- open the plug insert that holds the inner rod;
- take an unnecessary piece of leather belt 3 mm thick;
- try it on manually along the hole and increase it by 2-3 mm;
- Using a caliper we measure the seating depth of the liner;
- we reduce the seating depth by the size of the plug, and cut out the remainder of the belt with an overlap of 1 mm to increase the density;
- push the belt inside the tube, block it with a plug, inserting it all the way;
- After lubricating the new bushing, the rod will work tightly, like on a new mechanism.
During operation, it is recommended to drip grease into the existing holes once a year. Regular synthetic motors will do.
Replacing the pump
If after starting the machine the door is blocked and the remaining water does not pour out, the pump has failed. The same malfunction occurs if there is no drainage when setting to “spin”.
To replace the pump, remove the front panel, release the pump hose from the plug, and drain the remaining water into a low container. There is not much of it there - up to a glass. After this, unscrew the lid with the filter. We put the machine on its side - it’s more convenient. To remove the pump:
- loosen the clamps, remove the pipes;
- Unscrew the fastening screws from the front panel;
- remove the chip with wires from the power supply;
- remove the entire assembly with the electric motor, unscrew the motor;
- we adjust, screw on the protection, and assemble in reverse order.
If the electrical connector does not have foolproof protection, be careful. The main thing is to maintain the polarity correctly. After installing the pipes, we twist everything and put on the front panel. Check: fill up with water and turn on the drain. The water will drain.
Replacing the heating element
If the water does not heat up as usual, this means that the heating element is not working. It happens that removing the heater is necessary when passing water through the gasket of the heating element. To replace it, disconnect the machine from electricity. We remove the back cover, pull off the plastic connectors from the power wires, and the temperature sensor chip. Using a screwdriver, unscrew the fastening screws of the heating element. Remove the plastic junction box and disconnect the cable.
Now the heating element is right before your eyes: 2 electrical outlets and a mounting bolt with a nut in the middle. We unscrew the nut, press on the bolt, wiggle it slightly by the connectors and the heating element comes out of the socket.
To prevent water from leaking, apply sealant to the gasket and reassemble in reverse order. After assembly, the water should warm up and not leak through the gasket.
Electronic module repair
You can repair the electrical circuit of a Samsung washing machine yourself. To check the electronic components, we first call the power part. The voltage must come from an external power supply. Now you can get to checking the components:
- We check the power capacitor for capacity. It is more convenient to shake the board out of the case.
- We call diodes, transformer;
- We check the input keys - the cables connecting the board. Because of them, the display may not work.
Cables are a sore point of the equipment. Solder the contacts using a hair dryer or carefully with a soldering iron. All breakdowns are mostly trivial, but take a lot of time. When soldering, it is important to be careful so that the contacts do not intersect.
When connecting the electronic module, do not reverse the polarity of the chips.
Belt replacement
The belt on all Samsungs changes the same way.
- Unplug the machine.
- First, unscrew the screws from the back cover of the washing machine. They hold the top cover, which cannot be easily removed.
- It is necessary to lightly hit the top of the machine several times towards the back cover with the palm of your hand to displace the upper module.
- Remove the top cover and tilt the washing machine forward.
- To remove the old belt, we help by twisting the drum with the other hand. When a break occurs, remnants of the belt cord remain on the motor shaft and pulley. They need to be removed.
- We insert the new belt into the hole and put it on the engine first. You can help from the bottom side.
- We pull the belt onto one side of the pulley and place it in its groove with rotation.
When purchasing, choose belts in dark colors—they last a long time. After putting on the belt, the drum should rotate together with the motor shaft in 1 plane. If it "writes out eights" - straighten it below on the pulley.
Replacing the drum cross
If the drum is actively playing, and the crunch of a collapsed bearing is not heard, there is no howling, then most likely the drum cross has “flyed”. You can verify this by looking into the hatch from behind. There is no trickle of water, the bearing looks good. Together with the absence of unnecessary sounds, the immobility of the shaft indicates its serviceability.
Further actions:
- Remove the pipe from the drum cover.
- Unscrew the screws that connect the capsule to the drum and the lid to the cuff. Remove the cover.
- Pull out the tank, helping if necessary with a rubber hammer.
- Unfold the back and inspect it.
Before repairing the crosspiece, we will repair the tank capsule with a homogeneous material, melting it with a construction hairdryer.
The crosspiece is secured with special bolts, so we unscrew them without damaging them. We remove the old cross using powerful wrenches. Do not use an open-end bolt - the bolt may break. The shaft sleeve must be polished. We tap with a rubber hammer, put the cross in place, and tighten it.
Coat the bolts with oil paint before screwing them in - they will hold tightly. When seating the tank, lubricate the shaft mounting hole and the bushing on the drum with oil. The installed bank is locked at the back - a pulley and bolt are installed. We also coat the pulley bolt.
Replacing the drain pump
The drain is located at the bottom, closed with a hatch or panel. Snap off the panel with a screwdriver. To drain the water from the drain filter, place the bottle and drain the remaining water from the hose with the plug. Or unscrew the filter cap slightly and drain onto a rag. The filter protects the impeller from large objects entering.
Next, we place the machine on its side.
De-energize and remove the terminals from the pump. Unscrew the fastening bolts. We slightly break the base of the motor and remove it. The impeller should rotate easily.
The seal on the new pump must be present - pay attention. We install the pump exactly as it was. After installation, check the tightness of the filter, put the hose and plug in place. If the pump does not drain, measure the voltage at the terminals during the spin or drain program. It should receive 220 V. If the voltage does not arrive, the problem is in the module.
Water inlet valve repair
The solenoid valve changes when water constantly begins to flow into the machine without cutting off its flow. To start work, turn off the water supply with the tap. Then:
- We remove the top cover by unscrewing a couple of screws on the back and sliding it back with light taps.
- Unscrew the water supply hose of the inlet valve and the valve mounting screws.
- Disconnect the electrical connector.
- Remove the clamps and the valve itself.
- We disassemble the valve, clean the inside from rust and dirt.
- After cleaning, dry it and put it back together.
When disassembling, carefully remember the order of disassembly. You can even take a photo. Install the unit and hoses in the reverse order.
Water fill valve
The fill valve is a fairly reliable element, but breakdowns do occur. The nature of the faults is as follows:
- liquid is not poured into the dispenser tank;
- water flows even if the machine is turned off and the program is not selected.
To make sure that the fill valves are faulty, check that there is no blockage in the fill hose. We will also clean the mesh on the valves themselves. If this does not help, and the control module is working properly, then we replace it.
Actions:
- We unfasten the rubber pipes, having first removed the metal clamps with pliers.
- We remove the chips with wires.
- Unscrew the screws from the back wall.
We replace them with similar ones.
Washing machine fill valve
Other problems and their solutions
The following troubles also happen:
- The paint on the body has become stained, changed color, or started to peel. Rust has appeared on metal parts: similar phenomena occur if the machine is installed in a room with high humidity. It is necessary to either move it to another location or install a dehumidifier in the room.
- The display does not light up or does not work at all, or the image on it has stopped changing.
The cause of the latter phenomenon may be increased humidity or water getting inside. The front panel should be dried and the car should be left overnight in a dry place. If drying does not help, you will have to call a professional.
The types of breakdowns of all washing machines are similar. In the next article we will talk about Kandy brand devices. Kandy washing machine - do-it-yourself repair of basic faults.
See this link for common breakdowns of Indesit washing machines and how to fix them.
Bearings
On Samsung washing machines, such repairs occur after the service life has expired - after 10-15 years of operation. Signs of wear:
- Rattling, clanging sound - especially when spinning clothes.
- If you move the drum in different directions, play is visible.
Changing bearings is a difficult job that requires skill and the right tools. But it is possible to do it yourself. We recommend replacement instructions for Samsung SMA.
Bearing seat after heavy wear
Shock absorbers
This element is a consumable material that is produced over time. The period of use depends on the intensity of use. It can be estimated over a period of 5 to 10 years. A characteristic sign is that during the push-up cycle the machine jumps and also moves around the room. Buying shock absorbing pads does not solve the problem.
The manufacturer has provided for proper operation without them. In this case, it is necessary to replace the shock absorbers. There are two of them in the Samsung washing machine. Convenient to carry out repairs. They are attached with removable pins to the body and tank.
Access can be obtained in two ways:
- remove the front panel;
- turn the car on its side.
Washing machine shock absorbers
How the vacuum cleaner works
Structurally, its device can be represented in two diagrams:
- kinematic;
- electric.
Mechanics
The design is based on the operation of a fan or, in other words, an air pump.
The engine impeller, when rotating, takes in air with its blades and compresses it, throwing it out. Inside the housing, at the inlet and outlet of the pump, suction lines with low pressure and pressure lines with high pressure are connected, hermetically separated by gaskets from each other.
Discharged air through a special nozzle with a hose draws in dust and directs it into the dust collector container, where most of it settles and the smallest particles are blown out. The motor and vacuum cleaner filters catch them, but not completely.
A simple household vacuum cleaner passes microparticles of dust through itself and returns them back into the room. They are also able to penetrate the electric motor. To reduce their harmful effects on bearings, closed-type structures are used.
A household vacuum cleaner is designed to work during normal regular cleaning of apartment premises. He can't cope with other tasks. Collection of construction waste and concrete dust is a common cause of breakdowns of such equipment, even from branded manufacturers. For these purposes, special equipment is produced.
Electrics
To drive the fan impeller, a conventional commutator electric motor with a 220-volt AC brush mechanism is used. In old vacuum cleaners it was created at one armature rotation frequency.
In new models with increased power, a thyristor voltage regulator is installed, which makes it possible to limit the suction force at the brush input for gentle cleaning of apartment premises. Its operation is controlled by an electronic board with a microcircuit built into the case.
UBL
Changing the lock is quite simple. Let's take a closer look:
- We open the hatch and pull off the metal clamp with a spring that secures the cuff to the body.
- We pull back the rubber at the location of the UBL and hold it from the inside with our hands.
- We unscrew the screws that secure the lock and pull it out.
- We pull out the chip with the wires.
- We install a new one.
- We tighten the cuff and clamp. Screw it on.
Burnt UBL
We check the operation of the SMA.
We have described typical malfunctions that can occur in washing machines. Most of them can be repaired with your own hands without calling a specialist. It's not always that simple. And if you cannot cope, or the breakdown is unclear, then contact a specialist.
Table of correspondence of spare parts to certain models.
Video
There is no filling of water and starting the engine on a Samsung washing machine
Why does the Samsung washing machine not start washing?
I will divide this article into several parts, in the first part I will talk about launching programs, or rather, why washing does not start, and then we will talk about the motor and everything else.
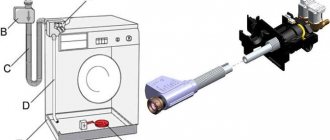
First, let's look at why a Samsung washing machine may not be drawing water. Of course, first of all you need to check the water supply, then you need to check the water supply valve and the filter, which is located in the valve body. Usually everyone does this, but in most cases, the water pressure is normal, the resistance of the coil on the valve is normal, and people simply don’t know what to do next. Now let's look at a few more reasons why water may not flow into the tank of a Samsung washing machine. First of all, you need to make sure that the hatch door on the SMA is closed; if the lock does not give a signal that it is closed, then there will be no water filling. There is one catch here, it happens that the hatch is blocked, the indicator shows that the blocking has worked, but there is no water. The culprit for this behavior may well be a tablet, that is, a thermistor that is in the lock. I recommend watching a video in which I talk about exactly this problem Watch the video why a Samsung washing machine does not fill with water
We have more or less sorted out the lock, now we can talk about the next reason - which concerns the pressure switch. Unlike many brands, Samsung has an electronic water level sensor, I can’t judge whether it’s good or bad, it has its pros and cons. Although the pressure switch fails quite rarely, it still happens and it is practically impossible for an ordinary person to check it with his own hands. As a master, I simply change it and look at the behavior of the machine; if water begins to accumulate, then the sensor is unusable.
There is another problem that is associated with this spare part - the pressure hose to the pressure switch membrane. This malfunction is more characteristic of Samsung and LG, the essence of the problem is that the channel or the hose itself becomes clogged with dirt, as a result, something like a valve may form in the channel or hose and then the sensor will generate a signal that the tank is full - the motor may start to rotate, but water will not fill in; in general, blowing out this hose helps
Watch the video, problems associated with the pressure switch in the washing machine
And so we looked at the most basic malfunctions of a Samsung washing machine related to water filling. Of course, there are cases when a part burns on the control module, but I think that it makes no sense to cover such repairs in this article. In this case, it is better to contact a specialist, since the control unit is a rather complex part and its repair requires fairly good knowledge of electronics and experience in this field. Believe me it will be cheaper
Why doesn't the motor on a Samsung washing machine rotate?
Of course, the first thing to do is check the brushes, but according to my observations, on Samsung brushes fail much less often than on other brands, therefore, I will not delve into the process of replacing these components. A much more common situation is when the reason lies in the wiring itself. The fact is that, especially on older models, water often leaks from under the powder container; as a result, the inside of the washing machine is constantly in moisture, as a result of which the terminals on the motor oxidize and eventually rot. You can see a similar example in the video below, I think many owners will find it informative to watch
Watch the video why the motor on a Samsung washing machine does not start
We've dealt with brushes and water, now let's look at other parts that may cause the drum to not rotate. Our brand has one more weak point and it is located on the drum, we are talking about the cross. When the crosspiece breaks, the drum stupidly jams, so just try to turn it by hand, if it doesn’t spin, then change the crosspiece or bearings, if it spins, then read on. I thought about it and decided that it was better to take examples from life, or rather, I will now answer the questions that visitors to my YouTube channel ask me about this
Greetings. I have a Samsung Diamond car, it doesn’t want to work at all. The program is selected, but the wash does not start. I also think that less water is being poured than it should be, or rather, almost no water is pouring at all, I hear it babbling for a few seconds and that’s it
First of all, you need to check the water inlet valve. If there is no required water level in the machine, the motor and, accordingly, the drum will not spin. If the valve is working properly, the problem must be looked for in the control module, there can be different malfunctions, from the relay to the ULN microcircuit - a specialist should understand this
Please help me figure out the problem. Water is constantly filling and draining, while the pump is constantly running, the engine does not start. In general, program modes are selected as expected, but as soon as I press start, the water fill and pump immediately turn on. Washing machine 3 kg without display, I think S821
The fact is that repairing a control module is a rather complicated and troublesome task, so I’m not going into too much detail on this topic, since for this you need to take certain measurements, and it’s simply advisable to hold the module in your hands, and not at a distance of 1000 km . Apparently, in your SMA the problem is in the block. In general, try changing the triac that controls the pump, as well as the varistor and resistor. Along with these parts, the ULN must also be changed.
Photo of a pump triac on the control module of a Samsung washing machine
Photo of ULN on Samsung board
The listed spare parts must be changed all together and there is no need to look for any substitutes. Place only originals. When the author of this question changed these parts for the first time, the machine still filled and drained water. As I later found out, he changed each part separately, and then checked how it worked, it was impossible to do that. After I told him that everything needed to be replaced together, he agreed with difficulty, and as a result the machine worked fine. Of course, this is not a panacea, since it happens that some other parts fail, so you need to check the entire chain, from the microprocessor to the drain pump. This is a simple example of why I do not recommend repairing the control module. People who want to repair this spare part with their own hands for the first time do not even imagine that all the parts are interconnected and one spare part can lead to a chain of breakdowns. In general, I recommend not to waste your time and mine too, especially for those who don’t even know what a resistor or diode is
On a Samsung washing machine, you can hear the motor turning, but the drum does not spin. When we turn on the spin cycle, the noise becomes noticeably louder.
This is the simplest thing that can happen, most likely the belt has broken. Usually this picture occurs on 3 kilogram washing machines
On my Samsung, water is filled as expected, but for some reason the engine does not start. I looked at the brushes, their length is about one and a half centimeters - I think this is quite enough. I removed the engine and started it directly, followed the instructions in your video, in general it turns normally. I cleaned the pressure switch tube, but it still didn’t help. I removed the water level sensor from my neighbor’s car and installed it on my own, the motor stands stock still. The machine does not give any errors, I don’t understand the reason
If water is filled to the required level, the pressure switch clearly has nothing to do with it; if it were broken, then the water either would not be filled, or there would be a lot of it. You have checked basically everything related to the motor except the heating element. Although the Samsung washing machine rarely reacts, such an infection as current leakage to the body still happens. You can see how to properly check the heating element and motor in the video below.
Watch the video on how to check the heating element on a washing machine
If the heating element is working properly, you need to look at the control module. First of all, it is advisable to change the engine control relay, then act according to the circumstances - if you have little understanding of electronics, then it is better to take it to a specialist. So little by little, but the article is already acquiring quite impressive dimensions, so with the last comment we will end this topic. Of course, I will also talk about the repair of this brand, it’s just impossible to talk about all the faults in one article, I think in the future you will find a lot of material that will reveal this or that breakdown