Automatic washing machines are indispensable and the main assistants of our housewives. They save a lot of our time, which we can additionally spend on work, our hobbies or family.
Automated units save energy, water and washing powders with great precision, thereby justifying their considerable cost. When washing in a machine, many times less water is used than in labor-intensive manual processes, and accordingly, less powder is consumed to achieve the washing solution of the required concentration.
But like any equipment, washing machines require periodic maintenance and repair.
Despite the direct contact of many parts of these products with water, many components of washing machines are protected from moisture getting on them.
Many components are protected by special sealing gaskets, cuffs and oil seals, and if these safety elements are damaged or worn out, other parts are subject to rapid deterioration. To avoid additional costs for repairing your assistant and to correctly carry out preventive maintenance and maintenance of the product.
- At the first sign of a malfunction, you need to take measures to eliminate it. In case of leaks, it is necessary to eliminate the tightness of the connections of the prefabricated units, and if noise occurs, pay attention to the bearing unit.
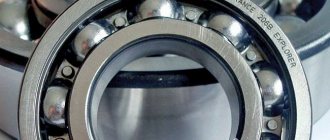
- Noise at high speeds or the appearance of grease on things indicates that the bearings need to be changed in the washing machine. The ring-shaped rubber band serves the function of insulating the bearing assembly from possible moisture ingress due to bearing corrosion and failure.
- A common reason for rapid wear of the oil seal is frequent washing at high temperatures. The rubber from which the part is made requires such heating, but due to frequent heat treatments it loses its elasticity.
- When replacing bearings, the oil seal must also be replaced with a new one, which in turn is lubricated with a special lubricant. The composition of washing machine lubricant for oil seals should make it water-repellent and not change its properties at high temperatures. In this article we will look at how to properly lubricate a washing machine part and with what.
What is the seal used for?
The role of this element cannot be underestimated; it acts as a kind of seal between the drum and the shaft. The oil seal prevents liquid from entering the washer shaft and bearings.
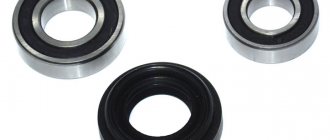
The part looks very simple - it is a rubber ring with a certain diameter.
Manufacturers of washing equipment use oil seals of various sizes when equipping machines; the diameter of the ring depends on the specific model of the washing machine and on the design features of the unit’s tank. Therefore, before purchasing an element, it is recommended to disassemble the machine, remove it from the body, this will allow you to understand what diameter oil seal you need for installation.
Types and design of oil seals
Each model requires individual selection, since the seals are very different. Therefore, it is advisable to purchase a part after disassembling the equipment and removing the old part. Table 1 shows the parameters of seals for washing machines of different brands.
| Washing machine brand | Oil seal type |
| Samsung | 25*47*11/13 |
| 30*52*11/13 | |
| 35*62*11/13 | |
| "Atlant" | 30*52*10 |
| 25*47*10 | |
| Candy | 25*47*8/11,5 |
| 30*52*11/12,5 | |
| 30*52/60*11/15 | |
| Bosch Siemens | 32*52/78*8/14,8 |
| 40*62/78*8/14,8 | |
| 35*72*10/12 | |
| Electrolux Zanussi AEG | 40,2*60/105*8/15,5 |
| 22*40*8/11,5 | |
| 40,2*60*8/10,5 |
The seals are different:
- size (width, internal and external diameter);
- profile outlines (they can have from 1 to 3 connection points, additional edges);
- manufacturing method (reinforced with a molded edge or with a mechanically processed edge);
- material (fluororubber, silicone, etc.).
What and how to lubricate the seal?
The oil seal, due to its location in the system and its role, is constantly exposed to friction and temperature changes. This effect is negative for the seal; after long use, cracks may appear on the rubber, this will undoubtedly lead to loss of function of the part. That is why the oil seal should be protected in a timely manner, namely by lubricating its surface. Periodic use of special lubricants will significantly extend the service life of the element.
How to lubricate the ring? When choosing a suitable composition, be sure to carefully study its properties. A high-quality lubricant must meet certain requirements.
- Be moisture resistant. It must contain organic particles characterized by a water-repellent effect.
- Have good heat resistance. The side of the seal adjacent to the drum will overheat during friction, so it is very important that the lubricant does not lose its properties after heating.
- Do not have aggressive components: chlorine and other elements that can damage or destroy the surface of the ring.
- Have a thick consistency. This is necessary for dense coverage of the rubber seal and the oil seal bushing. Bearings can also be processed.
Answering the question from users: “How to lubricate a part?”, we will present several options for lubricants for washing machines.
The lubricants indicated in this list have excellent characteristics, tested and recommended by professionals.
Timely treatment of the oil seal will increase the service life of not only the seal, but also the bearings of the washing machine.
The role of the omentum in the design of the SMA
The design of the washing machine is such that the drum is located in the tank. To ensure that the mechanism rotates normally and evenly, a bearing is installed in the center of the tank. To protect the bearing from moisture and lubricant washout, a rubber seal - oil seal - is installed on top of the ring. The part evenly covers all holes through which water can penetrate.
If you remove the rubber ring, then the lubricant will be washed away from the bearing, causing friction and wear of the components. This will lead to destruction of the shaft and damage to the washing machine. Moreover, the malfunction is very serious, so sometimes it makes sense to buy new equipment rather than repair the old one.
How to correctly determine the problem?
No matter how hard the manufacturer tries, over time soapy water gets onto the moving elements. As a result, the oil seal shrinks and becomes unusable. You can tell that parts need replacing by hearing a strong grinding sound, vibration, or unusual sounds during washing.
- When the drum rocks, a backlash (space between the tank) is formed. Also, rotations occur non-uniformly.
- At the last stage, the drum does not rotate at all, the bushing is destroyed.
- The machine makes a loud noise and vibrates during the spin cycle.
How do you know when it’s time to change the seal?
Several signs may indicate that the oil seal has failed. First of all, during the washing process you will hear an uncharacteristic noise, an unpleasant grinding sound. In addition, the inoperability of the part is indicated by:
- vibration of the machine and an incomprehensible knocking sound coming from inside;
- drum play, you can check it yourself; after finishing washing, rotate the drum manually;
- When the drum stops rotating, it stops spinning completely.
Having noticed at least one of the described signs, it is better to immediately examine the condition of the oil seal. If you ignore the symptoms and continue to use the machine, the likelihood that the bearings will completely fail will be almost one hundred percent.
Work progress
To install a new oil seal, you will have to completely disassemble the washing machine. To do this, you will need a standard set of tools available in every home. The parsing algorithm includes the following steps:
- disconnect the top cover from the housing; to do this, unscrew the bolts holding it located on the rear wall of the unit;
- unscrew the bolts located around the perimeter of the rear part of the case and carefully remove the back wall;
- tighten the drive belt, the procedure is easiest to perform by rotating the shaft with your free hand;
- remove the cuff surrounding the hatch door; to do this, disconnect the metal ring holding the rubber seal;
- disconnect the wires from the heating element and the electric motor, not forgetting to disconnect the ground;
- remove all hoses and pipes attached to the tank;
- separate the water intake level sensor;
- remove the shock absorbers and springs supporting the drum;
- remove the counterweights located inside the housing;
- remove the motor of the machine, to do this, unscrew the mounting bolts and move the engine forward;
- remove the tank with the drum from the machine;
- open the tank body, gaining access to the drum, using a hexagon, unscrew the pulley.
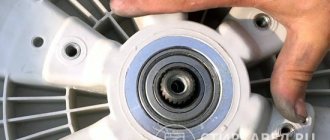
After disassembling, you will gain access to the oil seal, bushing, and bearings. Removing the O-ring is very simple; just pry it off with a screwdriver. Next, you need to inspect the system elements; if replacement is necessary, install a new oil seal. To do this, it is advisable to well lubricate not only the installed parts, but also the seat.
It is important to install the removed ring correctly. The question may arise, which side should the oil seal be placed on? This issue is really important, so inspect the seal carefully. If there are no factory marks on it, install it so that it most tightly covers the niche in which the moving elements of the bearing are located. Water should not get inside.
Should I use silicone sealant in my work? It will come in handy in cases where the washer tank was non-separable and had to be cut to gain access to the seal and bearings. Sealing and re-gluing the tank will be a necessary measure during the subsequent assembly of the machine.
Despite the fact that the washing machine is constantly in contact with water, there are parts in it that should not get wet. To a large extent, this applies to drum bearings, which quickly wear out when the lubricant is washed out. The bearing is protected from water penetration by an oil seal - a hermetic seal.
Some users are wondering: do I need to lubricate the washing machine oil seal? Let's figure it out.
First, let's look at the structure and operating principle of the oil seal. Not a single washing machine is complete without this part.
This rubber o-ring serves to protect the bearing at the joints from water. For high-quality sealing, the washing machine tank seal must fit as tightly as possible. That is why it is recommended to replace it at the same time as the bearings.
A metal bushing passes through the central axis of the tank, which, when rotated, contributes to wear of the oil seal. To prevent this from happening, it is necessary to use a water-repellent lubricant for the oil seals.
Some users use folk remedies such as oil or fat. Of course, this seems more economical, since lubricant that meets all standards is expensive.
Dear users! Do not forget: by saving on lubrication, you reduce the service life of the oil seal. Subsequently, you will have to spend money on new parts and replace them.
Before replacing the oil seal, let's figure out what lubricant to choose.
Properties that a lubricant must have:
- Moisture-repellent.
- Without aggressive chemical components. Otherwise, machine parts will be destroyed under their influence.
- Resistant to temperature changes.
- Viscosity – for long service life.
Experts recommend using silicone water-repellent lubricant for LIQUI MOLY “Silicon-Fett” oil seals. It can withstand temperatures from -40°C to +200°C. It is considered the most effective of all presented.
Other means are also popular. How else you can lubricate the oil seal in a washing machine, read below.
Italian-made lubricant has a neutral chemical composition and water-repellent properties. Withstands temperatures up to +190°C. Perfectly retains its properties when heated. Suitable for all types of seals.
Amblygon is a lubricant for oil seals from an Italian manufacturer. The product perfectly retains its properties when exposed to temperatures from -28 to +192°C. It has water-repellent properties and is chemically inert. It is packaged both in portions in syringes of 2 ml and in packages of 100 g.
Multi-purpose lubricant is water resistant. Unlike non-professional products, it does not harden when heated. Able to withstand temperatures from -40°C to +120°C. Chemically and mechanically stable.
The product has a moisture-repellent effect, reliably protecting components from corrosion. Withstands temperatures ranging from -40°C to +120°C. Compatible with other lubricants, does not compact in water, and is mechanically stable.
Homogeneous grease with multi-purpose applications.
Replacing the oil seal in a washing machine requires that the lubricant must withstand temperature changes. CIATIM-221 can withstand from -60°C to +150°C. It is successfully used in friction units and does not lose its properties when boiled.
However, there are also disadvantages: the lubricant is hygroscopic, therefore, when it absorbs moisture, it thickens and loses its properties. In addition, it cannot be used together with other means. Chemically inert.
Make your choice and purchase the appropriate lubricant.
Now let's look at how to change the oil seal.
Let's figure out how to get to the oil seal. Here are the step by step steps.
- After disconnecting the machine from the network and communications, drain the remaining water from the drain filter. It is located under the front panel, behind a small hatch.
- Remove two screws from the back to remove the top panel. Now unscrew the screws around the perimeter of the back panel and set it aside.
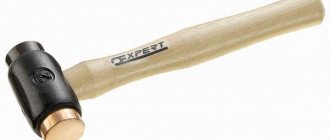
- Remove the drive belt from the drum. Using the hammer handle to lock the pulley, unscrew its central bolt and remove it from the tank.
- Disconnect any wiring that may be attached to the drum. It is usually secured with plastic clamps, so use wire cutters.
- After disconnecting the motor wiring, unscrew the fastening bolts and pull the electric motor out of the housing. Also unfasten the wires from the heating element.
- Remove the tank top counterweight bolts. Put it aside.
- Pull out the detergent dispenser by pressing the central latch. Remove all bolts that hold the control panel in place. Unlock the plastic latches, remove it and place it on top of the case.
- Loosen the filler valve clamp and disconnect it from the tank. Pull out the powder hopper along with the filling valve. To do this, unfasten the wires from the valve and unscrew the mounting bolts from the back.
- Remove the pressure switch hose, which is usually attached to the tank.
- Open the hatch door, bending the sealing rubber, remove the outer clamp. Tuck the cuff inside the tank. Unscrew the screws of the UBL lock, placing your hand behind the SMA body, pull out the lock and unfasten the wiring.
- Unscrew the screws around the perimeter of the front panel, pull it up and set it aside.
- Remove the counterweights from the tank by unscrewing the bolts.
- After unscrewing the shock absorbers, remove the tank from the hooks and pull it out.
You have completed the removal of the tank. Now let’s figure out how to properly remove and install the oil seal in the washing machine.
A washing machine is usually purchased with the expectation that it will last at least ten years, but this does not always happen. The service life of a washing machine depends on many factors: the integrity of the manufacturer, frequency of use and compliance with operating rules.
Careful care includes not only the selection of high-quality laundry detergents, timely cleaning and prevention of scale formation, but also monitoring the condition of the internal elements of the washing machine.
One of these elements is the oil seal. You can find out what it is and how to keep it in working order by reading this article.
Replacing the oil seal yourself
To replace the seal, the washing machine will have to be almost completely disassembled. After all, the part is located inside the tank, which has yet to be removed from the body. The disassembly process is labor-intensive, since the washing machine device includes many different parts. In order not to get confused in them, it is necessary to record all stages. You can use photography and video for this. Another option is to describe everything in detail on paper, making schematic sketches and brief explanations.
If you are planning to disassemble the device, you should not purchase a seal in advance. You can make a mistake with the type of part, because manufacturers use seals of different diameters. Therefore, it is better to remove the oil seal at the first stage. Make your purchase based on the type and size of the old seal. Having received a part of a suitable diameter, assembly can be carried out.
The disassembly process should not cause difficulties; it can be easily carried out using a standard set of tools. Problems may arise due to the type of tank, which can be split or solid. In the second case, you will have to saw it to get to the faulty part. This requires experience and dexterity, so inexperienced users should entrust this task to specialists.
Replacing the oil seal includes the following steps:
- Ensuring work safety. Before any manipulations, the equipment must be disconnected from the power supply. The water supply also needs to be shut off until disassembly.
- Removing the top panel. The fastening parts for all internal parts are hidden under the cover. To detach the top, you need to pry it off using a special protrusion. It is located on the back; dismantling is best done using a medium-sized screwdriver.
- Removing the front and rear panels. To dismantle, you need to unscrew the bolts located under the top cover.
- Disconnecting the drive belt. It is easier to do this by simultaneously moving the shaft and removing the part.
- Removing the cuff separating the drum from the tank. It surrounds the hatch; to remove the part, just pry off the metal ring. It holds the cuff in place, but the rim is easy to pry off with a screwdriver.
- Disconnecting contacts from the heater and motor. To remove the heating element, you need to twist the central nut and press the bolt inward. Dismantling the heating element is not necessary, but this will protect the part from possible damage. You can remove the engine from the housing after removing the mounting bolts.
- Disconnecting all hoses and pipes going to the tank.
- Removing the water intake sensor.
- Dismantling the upper and lower counterweights located inside the housing.
- Removing the shock absorbers and springs supporting the drum.
- Removing and disassembling the tank. After dismantling, you need to unscrew the screws and open the latches. Then, using a hexagon, you need to unscrew the pulley.
Now, after disassembling the tank, it is necessary to inspect the internal parts: the shaft and the cross. If the oil seal is worn out, these parts are the first to suffer. Chips, cracks or scuffs will indicate the need for replacement. After all, damaged parts will not be able to ensure normal operation of the washing machine.
After disassembly, access to the oil seal, bushing and bearings will open. The process of removing a worn part is simple: just pry it off with a screwdriver. Another option is to knock out the bearing along with the seal using a chisel and hammer.
After removing the old seal, you need to thoroughly clean the place where it is installed. To do this, use an alcohol solution; before installing the new part, everything is thoroughly lubricated. The oil seal must be installed based on the factory marks.
If they are not there, then you need to mount the part as tightly as possible. It should tightly cover the bearing surface. After this, you need to reassemble in reverse order. It’s easy to check the success of the repair; just test run the washing machine.
It is better to start the device without underwear - this will allow you to get a complete picture of the condition of the device. During operation, you need to pay attention to the presence of extraneous sounds. The absence of loud knocks or strong crackling sounds will indicate the success of the repair work.
What is an oil seal and why is it lubricated?
An oil seal (or, as it is more correctly called, an oil seal device) is a part of a mechanism that serves as a sealing element between its two parts, one of which is movable and the other is not. The seal is usually made of rubber, so it not only seals, but also seals the connection.
In a washing machine, oil seals are needed to protect the bearings from water ingress. They are located on top of a bronze bushing, which, in turn, is fixed along the axle shaft. The seals must be replaced along with the bearings so that the connection always remains tight and airtight.
The axle shaft is a rotating shaft on which the tank and drum of the washing machine are attached. While rotating, the shaft comes into contact with the inner surface of the oil seal. Constantly exposed to friction, this part wears out quickly. To slow down this process, a special lubricant is used for the oil seals, which ensures sliding, thereby reducing friction. If the lubricant is not renewed in time, the oil seal will dry out and begin to leak water, which will lead to bearing failure and malfunction of the washing machine.
Why does the oil seal fail?
The oil seal is fixed to the shaft, separating it from the drum. The part plays the role of an intermediary, experiencing constant pressure. Contact of the inner surface of the oil seal with the rotating shaft provokes abrasion of the rubber. As a result, the part becomes unusable, wearing out from constant friction.
To avoid this, the part must be lubricated periodically. After all, under the influence of moisture seeping in during the cycle, it is constantly washed away. Left without protective lubricant, the oil seal dries out and allows soapy liquid to pass through. Water falls directly on the internal parts, gradually destroying them.
Lubrication requirements
There is a category of washing machine owners who, instead of specialized compositions for caring for oil seal devices, prefer to use folk remedies, for example, vegetable oil or fats. This solution is certainly more economical, but it does not have the best effect on the condition of the mechanism.
- are moisture resistant, that is, they do not lose their properties when in constant contact with water;
- have a non-aggressive chemical composition that does not destroy the surface of the oil seal and metal shaft;
- resistant to temperature changes, do not disintegrate and do not lose their qualities when exposed to heat;
- have sufficient thickness and viscosity to not be washed off with water for a long time.
Oil seal lubricant is usually sold in stores that specialize in selling washing machines or spare parts for various types of household appliances. The price of this consumable may unpleasantly surprise you: this is due to the fact that this is a narrow-purpose product that is quite difficult to find on sale.
Often, manufacturers of household appliances produce oil seal lubricants that are intended specifically for a given brand of washing machine, but in reality are suitable for all models. Most lubricants are interchangeable; you just need to pay attention to the main component of the composition. Silicone and titanium lubricants are popular, they repel water well and can withstand temperatures up to 200 degrees.
Good substitutes
If you cannot find an original lubricant recommended by washing equipment manufacturers, you can find a worthy replacement. Fortunately, today the market is replete with professional tools for servicing machines.
The lubricant must be resistant to high temperatures, of high quality, not harm equipment, and retain its properties throughout the entire period of operation.
You can pay attention to the following products:
- Grasso is a silicone-based lubricant with good water-repellent characteristics. The composition is completely suitable for processing seals and bearings of washing machines of any brand.
- A German development by Liqui Moly, which has earned the trust of washing machine repair specialists. The lubricant can perform its functions at temperature changes from –40C° to +200C°. Practically cannot be washed off with water.
- This Russian universal lubricant is characterized by increased water resistance and can withstand chemical and mechanical influences. Does not lose its properties during its service life. Excellent resistance to temperature changes.
- "Litin-2" is produced by SHELL, which indicates the high quality of the product. This highly specialized formulation was originally developed for use in harsh environments. The lubricant is considered a worthy alternative to products made to coat seals and bearings of washing machines.
- "Ciatim-201" is an anti-friction lithium grease developed back in the USSR. The product can be used when servicing automatic machines. The composition is still used in the aviation industry, so the quality of the product is beyond doubt. The substance will withstand high thermal stress and will not lose its properties throughout the stated shelf life.
If it is necessary to process the parts of the washing machine, it is allowed to use the specified lubricants. The quality of the described compositions is undeniable. They will reliably protect bearings from the harmful effects of moisture and premature wear.
Instructions for use
To replace the oil seal or update the lubricant, you will first have to almost completely disassemble the washing machine, pull out the tank and remove the drum from it. We talked in detail about how to do this in the article “How to remove a bearing from a washing machine drum?”
Having replaced worn-out bearings and seals with new ones, you need to make sure that they last as long as possible. To do this, we need to properly apply lubricant to the oil seal. First, the lubricant is applied to the outer surface of the oil seal in an even, thin layer. Then we proceed to processing the inner surface. Here the layer should be a little thicker. After this, the oil seal can be installed in place.
For a clear and more detailed look at this entire process, see the following video.
Replacement process
It is worth preparing for the fact that the car will need to be almost completely disassembled. After all, the drum is the heart of the device, and its connection is deeply hidden in the body. If you are performing actions for the first time, you should take care of the additional ability to record steps. It is very important to disassemble and reassemble the device in strict sequence, without deviating from it. Otherwise, you can completely break the unit, and then the repairs will become tens of times more expensive.
For notes, you can take a pen and a piece of paper, making schematic drawings. You can also film the process on a video camera, focusing attention on what is important.
- Remove the top panel. This is where you should start, since it hides all the fasteners of the remaining parts of the machine. To remove the top panel, you need to take a medium-sized screwdriver and carefully pry the cover off the back of the machine (there is a special protrusion for this).
- We remove the front and back walls. There are several bolts under the cover for this purpose. Attention! It is important to remember (write down) which bolts belong to which sockets.
- Remove counterweights.
- Remove the shock absorber springs.
- Turn off all electronics. To do this, remove the wires of the main control units. It is especially important to remember the sequence here.
- Remove the tank and disassemble it into 2 parts.
- Inspect the shaft and crosspiece. In cases where the device operates “dry” for a long time, these parts are subjected to particularly heavy stress, which leads to their damage. Chips, abrasions, cracks and other defects may appear.
- Knock out the bearing and oil seal. This is done with a small hammer and a chisel or a mild chisel.
- Clean and lubricate the oil seal area. To do this, all remnants of the old part are removed, everything is washed well with an alcohol solution and lubricated.
- Install the new oil seal back and press it firmly.
After these steps, the machine is assembled in the reverse order. Once everything is completed, you can make the first launch. Preferably without laundry, and, if the device has programming capabilities, set it to rinse. Then the drum will spin idle, without load, and it will be possible to understand its condition. Important! After turning on and operating the machine, there should be no extraneous noise: crackling, tapping or other sounds. This is a sign of a job done correctly.
How useful is the information provided?
Source
What can replace lubricant with?
Sometimes it is not possible to find a special lubricant for oil seals. In this case, craftsmen replace it with similar oil-based products, for example, grease or lithol. Experts warn against using these products, as they contribute to rapid wear of the seals. Such lubricants are used in the automotive industry, but they cause more harm than good to household appliances. Therefore, it is better to spend time and money purchasing specialized products that have a lasting effect and are completely safe for washing machines.
The washing unit, like all household appliances, requires care and maintenance. Many parts come into contact with water during operation, so they need high-quality protection from moisture penetration: for this purpose, the designers installed special cuffs that require regular lubrication. We will tell you how to lubricate or replace the seal for a washing machine at home.
Cuffs made of moisture-resistant rubber are used in different techniques, so they have different shapes and sizes. The design is similar, only the appearance is slightly different. Quality and density
rubber: in some cases, oil seals are made of silicone rubber, fluorine rubber and other elastic materials.
These cuffs are made of a special waterproof material with a metal insert, which is very brittle, but it is this that helps keep the oil seal in the desired shape. When lubricating, you must be extremely careful not to break it.
How to lubricate the oil seal?
Contact specialized stores for lubricants. Specify why you are taking them, and the seller will suggest a suitable option. But keep in mind that such a product is not cheap, as it is highly specialized.
Anderol for washing machines
Lubricant made in Italy. Chemically neutral. Excellent moisture resistance. Maximum operating temperature: + 190 degrees. Not afraid of heating. For any seals.
Amblygon - lubricant for oil seals
This is another Italian version. Works at the same temperatures as Anderol. Repels water, not aggressive. Packaged in syringes with a capacity of 2 ml, as well as in 100 gram tubes.
Litol-24 and 24 M
A universal product - suitable for different purposes. When heated, it does not become harder or stronger. High stability in mechanical and chemical terms. Range: minus 40 – plus 120 degrees. Properties of modification 24M - no compaction in an aqueous environment, mechanically stable, can be combined with other lubricating compounds.
Where are the seals located?
To get to them and carry out lubrication, it is necessary to disassemble the entire washing machine, with the exception of those models where a solid stainless steel tank is installed. Frontal type
Machines, the drum is mounted on a special bracket with a steel axle shaft in the middle: it is necessary to secure the drum body to the bearing assembly.
Thanks to this design, the drum can rotate at different speeds, carrying out washing modes. Oil seals in the washing machine are installed in a special sleeve
, together with which they protect the bearing assembly from water penetration.
Important! This part is very important - if it fails, the bearing will rust from moisture, and urgent replacement is required, and this is labor-intensive work.
All dismantling operations can be performed independently if you are technically competent, know how to handle various tools and have a lot of free time.
Oil seal in a washing machine - what functions does it perform?
This part has the form of a rubber ring, which plays the role of a seal between the static and moving parts of the unit. It is the tank seal that prevents water from entering the bearings. In addition, it prevents water from penetrating between the tank and the shaft.
You can see the appearance of the oil seal in the photo below. Thus, the oil seal functions as a kind of sealant between certain groups of parts. If water gets into some parts, they quickly fail and can significantly deteriorate the operation of the entire device.
Lubrication requirements
During maintenance, the bearing housing and oil seal must be washed and cleaned, followed by filling them with new lubricant. Various lubricants are used for the cuffs, which are recommended by the manufacturer of household appliances, but often these samples cost a lot, which is beyond the means of many users.
Do not use automotive lubricants, choose a more viscous consistency: you must remember that water washes the low-viscosity lubricant out of the oil seal and penetrates into the bearing assembly.
The basic requirements for the quality of lubricants are as follows:
- stable water resistance
so that during operation of the machine it is not washed out by water; - in order not to corrode the rubber of the cuff, thereby reducing the service life of the oil seal, it must be non-aggressive
; - good heat resistance
- during operation the bearings heat up, especially in spin mode, when the drum rotates at maximum speed; - the constant consistency
should not change so as not to leak from the place of application.
Poor quality lubrication can ruin all your efforts and after a fairly short time you will have to disassemble the machine again.
What are the requirements?
Sunflower or other household oil is not suitable here. The substance used to lubricate the sealing ring has special requirements.
- High moisture resistance. Otherwise it will quickly wash out.
- No aggression towards rubber - it should not corrode or soften. By choosing the wrong substance, you will shorten the life of the seal.
- Heat resistance. Due to the friction of the shaft and the operation of the bearing unit, the rubber heats up. Hot water should also not affect the properties of the sealing element.
- Sufficient thickness. Liquid consistency is not suitable - it will leak out after some time.
Lubricant selection
It is better to purchase lubricant in special stores that sell spare parts for washing machines. Experts consider silicone-based lubricant to be good - it has decent water resistance and meets all the necessary requirements. The tube has the following parameters: water resistance, viscosity and maximum temperature of use.
When purchasing, pay attention to Liqui Moly Silicon-Fett
from a German company considered a leader in the production of lubricants for various purposes. Thick silicone grease resembles jelly, retains the elasticity of rubber and plastic up to +200 ° C, and is available in 100 g tubes. It is expensive, but the quality justifies all the costs. This tube will be enough for you to use the automatic machine for the entire time you use it.
It is worth paying attention to Anderol
, it is produced by the company that produces Indesit machines. Packaging comes in 100 g jars or disposable syringes containing two doses.
If you save on the purchase, you will lose money on subsequent repairs: poor-quality grease for the oil seals will quickly wash out of the bearing assembly, and extraneous noise or creaking will begin in the washing machine.
Tips for choosing
When choosing a lubricant for an automatic washing machine, you need to consider a number of important factors.
- Moisture resistance must be included in the list of lubricant characteristics. This feature will determine the rate at which the lubricant is washed out. The longer it remains on the seal, the more time the bearings will be protected from the harmful effects of water.
- Heat resistance is also very important when choosing a lubricant. During the washing process, the water heats up, and accordingly, the lubricant is exposed to high temperatures, at which it must retain its original properties.
- The viscosity must be high so that the substance does not spread throughout the entire period of operation.
- The softness of the composition allows you to maintain the structure of rubber and plastic parts.
A good lubricant that meets all the characteristics described above will not be cheap. You need to come to terms with this and accept this circumstance. It is better to buy such substances in specialized stores that sell parts for household appliances or in service centers for servicing automatic washing machines.
You can see lubricant in disposable syringes. This option can be considered as a potential purchase, and it even has some advantages.
The amount of substance in one syringe is enough for several uses, and the price of such a purchase is much more affordable than a full tube.
Correct algorithm of actions
After completely dismantling the machine, we begin to lubricate the oil seal.
-apply it evenly over the entire area of the outer contour of the cuff. After this, insert the oil seal into the workplace and carefully lubricate its inside.
As you can see, the process is quite simple, but it must be done slowly and carefully so as not to damage the fragile metal insert
. After finishing the lubrication, we begin assembling the washing machine.
If it is necessary to urgently replace the oil seals due to damage or wear of their housing, a similar dismantling
washing unit in the following sequence:
- remove the top cover, remove the back and front panels;
- disconnect the wiring, pipes and fasteners from the tank to take it out;
- we disassemble the tank into two parts to open access to the bearing assembly.
You can do the disassembly yourself, but for the first time it is better to invite a technician from the service center - he will carry out all the manipulations quickly and with a guarantee. For those who are confident in their abilities, we attach the following video to help, where the master explains all the nuances of correct installation of the oil seal.
Having purchased and installed a washing machine at home, many owners pay attention to such a characteristic as quiet operation. Typically, the installation location of the washing machine is the bathroom, but often the machine is located in the kitchen either separately or as a built-in element. Increased noise during the washing process can create significant discomfort.
Products manufactured under well-known brands actually carry out the washing and rinsing process for a long time, creating virtually no increased noise levels. When a characteristic hum is heard when the washing machine drum rotates in various modes, especially at high spin speeds, this is the first signal for repair.
Replacing bearings and seals in a washing machine
Replacing bearings in a washing machine is a rather complex and responsible repair that requires experience, the skill of a craftsman and special devices for pressing in and out of the machine’s tank bearings.
The question arises: Should I replace the bearings or buy a new washing machine?
At this time, almost all manufacturers of washing machines increase the spin speed of the drum ( up to 2000 rpm ), which significantly reduces the service life of the bearing assembly. Therefore, after 4-5 years of intensive use, this unit objectively requires replacement . But the machines were purchased in the mid-1990s, where the spin speed did not exceed 800 rpm. , still work without the need to repair the bearing assembly.
After replacing the bearing assembly, your machine will work like new.
We replace bearings in washing machines with horizontal and vertical loading.
The cost of replacing bearings depends on the make, model and complexity of disassembling the machine.
If the car does not have a collapsible tank , two repair options are offered:
The first will be associated with the need to purchase and replace the entire tank, which will include a tank, a drum, already with new bearings and an oil seal, a pulley, and drum activators. (most often these are cars manufactured after 2010: Hotpoint-Ariston, Indesit, Candy, Electrolux, Zanussi, Aeg, Gorenje and others)
The second option is manual cutting of a non-dismountable tank and its subsequent connection.
The procedure for replacing bearings is generally inexpensive and relatively quick, which will save you time and money. The technician will come to you with all the necessary tools, a set of original bearings and an oil seal specifically for your washing machine; will replace worn bearings and oil seals in 3–4 hours. at your home (or will take you to the workshop); will issue an official receipt (strict reporting form) with a repair guarantee for a period of 12 months. The warranty covers both the replacement service itself and the new bearing group.
Bearing replacement cost:
The cost of replacing bearings (for a collapsible tank) starts from 3,300 rubles,
and the cost of replacing bearings (not a collapsible tank) is from 5,500 rubles.
The approximate cost of bearings is from 90 rubles. up to 2860 rub., oil seal from 70 rub. up to 2250 rub., tank cross from 1370 rub. up to 6820 rubles, tank assembly with drum from 4540 rubles to 38230 rubles.
A more accurate cost depends on the complexity of disassembling the washing machine, as well as its make and model.
Included in the price:
1. Disassembly and assembly of the washing machine.
2. Disassembling and assembling the washing machine tank.
3. A set of original bearings and oil seal (external and internal - for washing machines with horizontal loading, right and left calipers with fused bearings - for machines with top loading), lubricant, sealant and screws for the tank.
4. The work of a master to replace the oil seal and both bearings.
5. Checking the operation of the bearing unit.
How to call a specialist?
Applications for replacement of bearings are accepted daily, from 8 a.m. to 10 p.m. by phone or using an online application.
8 (985) 181 – 08 – 88
8 (985) 181 – 02 – 88 (Whatsapp)
Leave a request for repairs
Important! When contacting, please provide the following information: Your contact information: name, phone number and address, make of the machine, if possible, send a tag with the serial number and product code of the machine and the day and time of arrival of the technician that suits you.
To carry out repairs and select spare parts for your washing machine, you need to know its model and serial number.
The exact model of the machine is indicated on the tag on the body of the washing machine or stickers, as well as in the operating instructions. If you have already purchased replacement bearings yourself, please indicate only the make of the machine. For example, ELECTROLUX EWT 1367 VDW.
places where washing machines may contain a sticker with all the necessary service information.
1. Under the hatch door on the body. Most often, on front-type washing machines, the serial number is located on a sticker under the hatch door. Either on the door itself or on the body. In most cases, the number consists of numbers, less often of numbers and letters .
2. On the back side of the pump filter hatch. On vertical models, a sticker with a service number is most often located on the inside of the small hatch that covers the pump filter.
3. On the back wall. The back wall of the washing machine is a traditional place for all kinds of service information. If you couldn’t find a sticker with a number on the front, then it was probably preserved on the back wall.
4. In the passport or instruction manual. Finally, the serial number can sometimes be found in the documents that come with the purchase of the washing machine. As a rule, the number is located in the passport or warranty card.
The arrows show the location of the tags.
washing machine manufacturers encode on a tag (sticker) what they produced, when, where and from what parts. This information is encoded in two sequences of numbers (letters) product and serial numbers. Their combination is unique and applies only to one specific instance of the washing machine.
Please take a photo of these tags
Technology for replacing bearings and oil seals:
Attention! Regardless of the degree of wear, the outer and inner bearings need to be replaced.
Top loading washing machines:
1. Remove the side walls, drive belt, and unscrew the pulley. The two bearings are located inside removable plastic supports on either side of the tank. Both bearings are replaced (assembled with plastic calipers).
2. The plastic calipers (hubs) are unscrewed.
3. After dismantling the caliper, the bearing seal is removed.
4. The seat of the oil seal and bearing on the shaft is thoroughly cleaned.
5. The new caliper and the oil seal seat on the shaft are lubricated with waterproof lubricant.
6. The lubricated new caliper with bearing and oil seal is reinstalled.
7. The entire machine is assembled.
Washing machines with horizontal loading and with a collapsible tank:
1. The top cover, the detergent tray, the instrument panel with the control module are dismantled and all connectors are disconnected.
2. The water level sensor, detergent dispenser, filler pipe and water supply valve are dismantled.
3. The rear or front wall, counterweights, drain pipe, shock absorbers, belt, pulley, noise filter and electric motor are dismantled.
4. The hatch cuff, bottom panel and front strip are dismantled.
5. The tank is removed, disconnected and the drum is removed.
6. Old bearings are pressed out from the forecastle body or sometimes from the shaft: external and internal.
7. Places where the oil seal and bearings fit on the shaft, as well as in the forecastle body, are thoroughly cleaned.
8. The production of the bushing and crosspiece shaft is checked. ( if the bushing diameter is 1-2 millimeters smaller than the inner diameter of the oil seal, the tank crosspiece will need to be replaced ).
9. New bearings are pressed into the forecastle body and an oil seal is put on the inside (the oil seal is completely filled with lubricant, and lubricant is also applied to the bushing of the drum crosspiece)
10. The forecastle tank with new bearings is put on the drum shaft and sealed with sealant to the second half of the tank.
11. The washing machine is assembled and checked in the rinse-spin mode.
Direct drive washing machines:
When drum play occurs due to bearing wear, the stationary Hall sensor and motor coils (stator) are very vulnerable because they are located close to the rotating permanent magnet cover (rotor). The rotor can damage the motor coils or damage the Hall sensor.
Attention! If the bearings are noisy in these car models, you need to replace them immediately; if you delay replacement, repairs will be more difficult and expensive.
Signs of bearing failures:
Important! If the washing machine is no more than 4 years old, then these signs may indicate another malfunction, which most likely does not relate to the bearings.
1. This has never happened before: strong noise, rumble, knocking, creaking, crackling, loud buzzing or whistling during the spin cycle.
2. Leaks at the bottom in heating modes (lubricant residues with water). Rusty stains on the tank body inside the car. If this water drips onto the electric motor, the washing machine may smoke and break plugs.
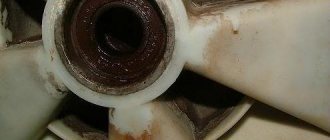
3. Stains appeared on the linen: oil stains, when the lubricant was not washed out of the oil seal, and rusty stains from bearing corrosion.
4. Jumps or vibrates strongly during the spin cycle.
5. The drum rotates poorly or does not rotate at all, the bearings are badly worn or destroyed and the drum jams from contact with the tank.
6. The spin does not work well or the machine does not spin at all.
7. Metallic grinding noise during operation or the drum is jammed or has fallen into the tank.
8. The drum wobbles when pressed by hand, not together with the tank, but separately (strong play)
9. The drive belt constantly falls off and there may be a smell of burnt rubber.
10 Stops during washing, programs are not executed.
The choice between self-repair or seeking help from a specialist depends on the complexity of the breakdown and the presence of associated damage, which can only be identified based on thorough diagnostics and many years of experience. If you have no previous experience in repairing such equipment, then it is better not to try to disassemble the machine. Such actions can only worsen the problem, and repairs will cost much more. Moreover, repairs are not so expensive that you waste your time buying the necessary tools, studying technical documentation and searching for the necessary spare parts.
After the repair has been completed, a receipt must be drawn up with a contract, a work acceptance certificate and a guarantee (Strict Reporting Form), which will indicate your details, the make and model of the washing machine, the work performed and the warranty period for them. Using this receipt, you can apply for warranty repairs at any time. The warranty period for work performed is from 2 to 12 months, depending on the type of repair and the part being replaced.
Washing machines from manufacturers that we repair
Cause of bearing and seal wear
Typically, the cause of the characteristic hum is excessive wear of the bearings through which the washing drum rotates. The design of bearings varies and depends on the model, device and manufacturer. The main reasons for failure of washing machine bearings are corrosion and natural wear. For both machines with vertical and horizontal loading, seals are installed on the drum shaft or shafts to prevent water leakage. The usual material for making oil seals is rubber.
The oil seal comes into direct contact with water during operation. Detergents in combination with high temperature affect the oil seal, as a result of which the rubber loses its elastic properties and the machine begins to leak. First, water penetrates into the bearing module. If characteristic noise occurs from the shaft-oil seal-bearing assembly, it makes sense to contact experts in their field for repairs.
The sooner the worn parts of the machine are replaced, the fewer problems can be expected during operation of the machine. Violation of the integrity or destruction of the bearing during operation of the machine can lead to its silting. This, in turn, entails deformation and breakage of associated parts and assemblies.
Symptoms of oil seal problems
A malfunction of the oil seal can lead to more serious damage. After all, rubber, as it wears over time, begins to leak fluid. As a result, metal parts rust due to constant exposure to moisture. As a rule, bearings fail, but oxidation can also affect the shaft. Fortunately, the process of rubber abrasion is not fast, so the oil seal can last for a very long time without replacement. However, at the first sign of trouble, the seal should be replaced.
The following symptoms will indicate problems with the seal:
- squeaks and noises when starting the cycle;
- presence of play when turning the drum;
- vibration and knocking during washing emanating from a working appliance;
- the drum stops, rotation becomes unavailable due to a damaged bushing.
If at least one sign is present, a diagnosis must be made. Timely inspection will avoid additional cash injections. If you ignore the symptoms, the water will destroy the bearing.
How to change a bearing
Replacing the bearings of a washing machine is quite a difficult task, and its high-quality replacement is only possible with specialized knowledge and special devices. To replace bearings in some models you have to completely disassemble the machine. Replacing the oil seal of a washing machine involves replacing the bearings. For this purpose it is necessary:
- Remove the side panels (for top-loading machines) or disassemble the machine;
- Remove the drum;
- Remove the old oil seal and bearing from the drum seat or flange (for machines with vertical loading);
- Install a new oil seal and press the new bearing until it stops;
- Fill the oil seal with special lubricant;
- Assemble the machine following the required sequence.
When repairing automatic washing machines designed for vertical loading, the bearing module is often changed. It is made in the form of a flange with bearings pressed into it industrially and seals installed. As a rule, the required amount of high-temperature special lubricant is placed in the oil seals. It can withstand temperatures exceeding 100*C without losing its viscosity and reliably protecting the oil seal and bearing module from water leaks. In addition, repairs carried out in a modular manner eliminate the need for additional operations and significantly reduce time costs.
After the repair, the drum should rotate on the shaft freely and without jamming. Any sound that occurs when the drum rotates indicates a poorly performed repair or installation of unsuitable spare parts.
The service life between repairs ultimately depends on the spare parts used during repairs. Long-term and trouble-free operation can only be guaranteed by the use of high-quality spare parts installed by specialists in compliance with repair technology.
If you decide to change the bearings and oil seal yourself, then you should consider some nuances:
- Among craftsmen, washing machine tanks are conventionally divided into collapsible and non-collapsible. With collapsible ones everything is clear, but non-dismountable ones have to be carefully sawed along certain marks, without touching important structural elements. After replacing the bearing in such a tank, it must be hermetically sealed, secured with self-tapping screws or bolts.
- It happens that not only the bearing assembly itself fails, but also the bushing from the drum. In this case, it is necessary to at least break it in with an experienced turner. If the bushing is very deformed, then it is worth replacing it.
- Pay attention to the quality of the spare parts you buy and purchase them only in specialized stores.
- Before you do any repairs yourself, study this topic thoroughly from various sources. Be sure to watch some videos. In our VKontakte group there is a detailed video about the inspection and replacement of bearings:
Features of adding lubricant
When changing the oil seal and bearings with your own hands, it is important not to forget about lubrication. Processing parts before installation is an integral stage of repair. In your work you need to use professional lubricants approved by the manufacturers of automatic machines.
The bearings are generously lubricated before pressing, the oil seal is processed only from the outside. Since professional products are quite expensive, home craftsmen try to use automotive lubricants when repairing washing machines. Saving in this way, they do not think that “non-core” compositions do not have all the necessary properties and are quickly washed away with powder and water. Therefore, after a year or two, the bearings will again become unusable and will need to be replaced.