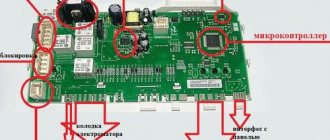
The programmer is a knob on the control panel of most washing machines.
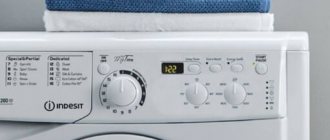
It looks simple, but in reality it is a complex mechanism that controls turning on and off different washing programs, adding and draining water. This is a whole control unit consisting of many parts. Looks like a protruding knob on a control panel. Its role is undoubtedly important, since the final result depends on its performance. This mechanism is located near the handles, displays, and buttons. Some people call it a command device or a timer programmer for a washing machine.
What is a programmer
Programmers are reliable and less sensitive to voltage changes than mostly premium machines with electronic control panels, which undoubtedly have their advantages.
Machines with the fuzzy logic function can handle washing processes without a programmer. There are two types of programmers : hybrid (mechanical) and electronic.
Electronic ones have a more advanced mechanism with a wider range of functions.
Their disadvantage is that, like all electronic devices, they are sensitive to network surges.
Hybrid ones are more modest, but they are distinguished by long-term performance and reliability, and, if necessary, quick and cheap repair of the washing machine programmer. The service life of the programmer is not short - from 10 years.
And if we consider the frequency of component failures in washing equipment, then it will be in last place.
However, exposure to external factors can accelerate the process of wear and tear. If there are children in the house, they often speed up the process of breaking down the programmer without any malicious intent.
This part does not like interference during operation, otherwise the cycle is disrupted and the control unit itself is damaged.
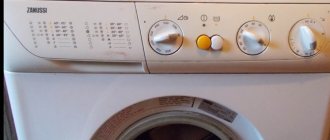
Diagnostic mode for ELECTROLUX/ZANUSSI washing machines with EWM 2000 control system
The article contains information on the procedure for entering the diagnostic mode, testing modes, reading error codes and entering the configuration code of Electrolux/Zanussi washing machines with the EWM2000 control system. Electrolux/Zanussi washing machines (WM) based on the EWM2000 control system have a developed diagnostic system that allows you to record errors that occur during the operation of the WM, as well as check the functioning of the main components in various operating modes. To read the full error code (or, if necessary, reset the error code), as well as run built-in tests, you must first put the SM into diagnostic mode.
Activating the diagnostic mode For vehicles with different types of control panels (with and without a program selector), the procedure for entering the diagnostic mode is different. The procedure for activating the diagnostic mode for a SM with a program selector The control panel (CP) of the SM can be with a display and LEDs or only with LEDs. The selector can be located on the left or right of the control panel. Variants of the control panel with a program selector are shown in Fig. 1 and 3. To activate the diagnostic mode in the SM with a program selector, perform the following actions: • set the program selector to the OFF (RESET) position; • simultaneously press and hold two buttons, as shown in Fig. 2 and 3 (in Fig. 3 - with buttons 2);
Rice. 1. PU SM with program selector and display (option 1)
Rice. 2. Activation of the diagnostic mode for the vehicle with a program selector
Rice. 3. PU SM with program selector and display (option 2)
• turn on the SM (in Fig. 3 - with button 1); • continue to hold the two function buttons until all LED indicators on the control panel begin to flash (this will happen in approximately 4 s). Flashing indicators mean that the SM is in diagnostic mode. The procedure for activating the diagnostic mode for a SM without a program selector. Options for the SM without a program selector are shown in Fig. 4 and 5.
Rice. 4. PU SM without program selector (with display)
Rice. 5. PU SM without program selector (without display)
To activate the diagnostic mode in the SM without a program selector, perform the following actions: • simultaneously press and hold two buttons, as shown in Fig. 4 and 5 (in Fig. 5 - buttons 1); • turn on the SM (button 2 in Fig. 5); • continue to hold the two function buttons until all LED indicators on the control panel begin to flash (this will happen in approximately 4 s).
Testing the SM in diagnostic mode
In the diagnostic mode, you can check the functionality of the SM user interface, as well as test its main components in various operating modes. Let's look at this in more detail. After activating the diagnostic mode, checking the user interface is that when you press any function button on the control panel, the corresponding LED indicator should light up. When you press the button again, the indicator will go out. Testing the SM with a program selector In the diagnostic mode, you can check the performance of the SM in various operating modes. To do this, you need to sequentially turn the selector knob clockwise, one step in each of which the SM will perform a specific operation. They can be chosen at random. It should be noted that when all operations are performed, the hatch door is locked. The serial number of the operation will be displayed on the display and in binary code on the wash phase indicators L5-L8 (see Fig. 1). Accordingly, the indicator L8 displays the 1st digit, L7 - the 2nd, L6 - the 3rd, and L5 - the 4th digit of the binary operation code. We list these operations: 1. Checking the user interface (buttons and indicators), the position of the program selector corresponds to the RESET state. 2. Check the water supply through the main wash compartment. In this case, the main wash water inlet valve is turned on. 3. Check the water supply through the pre-wash compartment. In this case, the pre-wash water inlet valve is turned on. 4. Check the water supply through the air conditioner compartment. In this case, the water inlet valves for the preliminary and main washes are turned on. 5. Checking the water supply through the bleach compartment (not for all SM models). In this case, the hot water inlet valve or bleach valve is turned on. 6. Checking water heating and recirculation mode. The last mode is valid for SM models equipped with a water recirculation system (JetSystem). 7. Checking the tightness of the tank-drum system. In this case, the drum with water in the tank rotates at a speed of 250 rpm. 8. Checking the water drainage. In this case, the pump turns on and the drum rotates at a speed of 10 rpm. At the same time, the readings of the pressure switches (analog and protective) are checked. 9. Checking the drying operation (for SM with drying). Note. On different SM models, 12- and 24-position switches are used as selectors. This difference does not affect the order in which the diagnostic mode is activated, nor the selection of test operations. Testing the SM without a program selector The sequence and content of the operations for testing the SM without a program selector are similar to the operations for the SM with a selector. The only differences are in the order in which these operations are selected. By pressing button 1 (Fig. 6), select the corresponding testing operation - each press of the button increases the serial number of the operation being performed by one (see above). Accordingly, using button 2, the serial number of the operation is reduced by one.
Rice. 6. Selecting testing operations on the SM without a program selector
The execution of each step (number) of the operation is accompanied by a corresponding indication on the display or LED vertical bar.
Procedure for reading error codes in diagnostic mode In diagnostic mode, you can read the last error code and reset it. Error codes can also be displayed when the SM is operating in normal operating mode. The difference is that in user mode, errors are displayed without detail, or rather, general group errors. For example, in user mode configuration error E90 may be displayed, while in diagnostic mode you can determine a more detailed code from this group (E91, E92, etc.). Many error codes are readable only in diagnostic mode - these are errors of groups E30, E40 (partially), E50-E80, as well as EAx, EFx (partially). The main error codes and the reasons for their occurrence were described in [1]. Also, only in diagnostic mode can you reset (zero) the last recorded error code. Such an operation is necessary so that even after the cause of the error has been eliminated, the code is stored in the memory of the electronic module - therefore, the electronics can operate in normal mode only after resetting the code.
Let's look at the procedure for reading error codes and resetting them.
In a SM with a program selector, turn the selector knob two steps counterclockwise (from the RESET position). After this, the last recorded error code will be displayed on the control panel with a display, and the code in the binary number system will be displayed on the control panel with LED indicators (Fig. 3 shows groups of indicators 3 and 4). The translation of binary code into alphanumeric is explained in the table (in it, a red circle means the indicator is lit, and a white circle does not). Since the error code is 2-digit (in hexadecimal), the four lower indicators (4 in Fig. 3) display the first digit, and the four upper ones display the second digit (3 in Fig. 3). To reset (zero) the last recorded error code, you must simultaneously press the buttons, as shown in Fig. 7 (in this case, the code is reset when performing test operation 2) and Fig. 8.
Rice. 7. Resetting the error code (option 1)
Rice. 8. Resetting the error code (option 2)
In a SM without a program selector, the last recorded error code is displayed after performing test operations. The code indication is no different from SM models with a program selector. Rice. 9 illustrates the indication of error code E41 (on the display and LED bar) of the SM without a program selector. To reset the error code during any test operation, press buttons 2 and 4 simultaneously (Fig. 10).
Rice. 9. Indication of error code E41 on the SM without a program selector
Rice. 10. Resetting the error code on the SM without a program selector
The procedure for entering a configuration code Before we dwell on configuring the SM (entering a configuration code), we will dwell on why this is needed and what types of SM encodings still exist. Everyone for the most part knows the “consumer” names of washing machines, in which manufacturers, using alphanumeric designations, reflect their main parameters - for which country or region it is intended, spin speed, maximum load of laundry, case material and color, tank material, layout ( vertical or horizontal loading of laundry), etc. In fact (in particular, for customer service) this is not enough. For each SM model (and its varieties) a different encoding is used. For Electrolux/Zanussi/AEG SM there are product (Prod. No or PNC) and serial numbers. They contain the necessary information for service departments - they can be used to find the necessary documentation and other information distributed by the manufacturer. As for the configuration code, everything is somewhat more complicated here. Let's start with the fact that some types of electronic modules for Electrolux/Zanussi/AEG CMs (in particular, EWM2000) are supplied to service departments “not tied” to a specific model of washing machine. Entering the configuration code into the non-volatile memory of the electronic module provides the necessary “tuning” of the electronics. This is due to the fact that each SM model has its own characteristics (functionality and not always with a positive result), if the SM displays an error code from the E90 group. Configuration consists of entering a hexadecimal 16-bit code from the SM control panel. Using the example of a SM with a program selector, the code is entered in the following sequence: • activate the diagnostic mode (see above); • turn the program selector knob one step counterclockwise (to the left relative to the OFF position, see Fig. 11);
Rice. 11. Switching the program selector knob one position counterclockwise
By pressing any of the mode selection buttons (one of seven, except START/PAUSE), the digit number of the configuration code is sequentially changed. In Fig. Figure 12 shows a change (increase) in the code bit number by one (A is the contents of this bit);
• by successively pressing the START/PAUSE button, the contents of the selected digit are changed (see Fig. 13);
Rice. 12. Changing the digit number of the configuration code
Rice. 13. Changing the contents of the selected bit of the configuration code
similar operations are performed with each of the 16 bits of the configuration code;
• the entered configuration code data is saved by simultaneously pressing the START/PAUSE button and any of the mode selection buttons (Fig. 14); • exit the diagnostic mode by pressing the ON/OFF button - the button is shown by an arrow in Fig. 14.
Rice. 14. Saving configuration code data
Rice. 15 illustrates the correspondence of bits for the configuration code A2A7808080E691F2.
Using the method described above, the contents of the source configuration code are also checked. If necessary, it is corrected.
Rice. 15. Correspondence of configuration code bits A2A7808080E691F2
If, after switching on, the SM does not generate error code E90 (E93 in diagnostic mode), the configuration code was entered correctly.
Literature 1. P. Tsibochkin. “Features of diagnostics and repair of Electrolux and Zanussi washing machines with the EWM 2000 control system.” Repair & Service, No. 5, 2005, p. 50-53.
Author: Andrey Kashkarov (St. Petersburg)
Source: Repair and service
Programmer malfunction
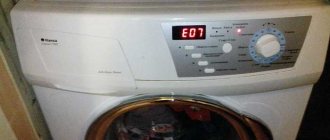
What characterizes a programmer failure?
The machine refuses to turn on, but the electrical network is fine.- The equipment turns on, but there is no response to the timer control.
- There is no washing time on the electronic display.
- The indicators are flashing and there is an error.
- The wash starts, but the program and wash time go up or down.
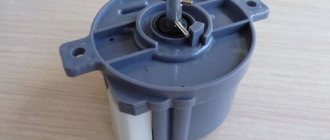
Programmer parts may break. The mechanical programmer of a washing machine consists of:
- synchromotor;
- contacts;
- cams responsible for the operation of the synchromotor;
- gearbox;
- gears.
What parts does the programmer consist of?
Having decided to repair the program selector yourself, you need to find out what parts the device is assembled from. The mechanism includes the following elements:
- motor;
- fee;
- contacts;
- gears;
- gearbox;
- cams (these are special protrusions and recesses that activate the synchromotor).
On modern automatic machines you can find two types of programmers: mechanical or electronic.
Mechanical (hybrid) program selectors are considered the most reliable; they rarely break down. If necessary, they are easier and cheaper to repair. Electronic parts are more modern, but more often they become unusable, as they react sharply to changes in the electrical network.
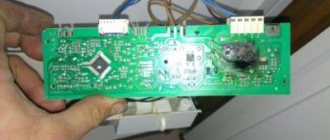
Disassembly and repair of the programmer
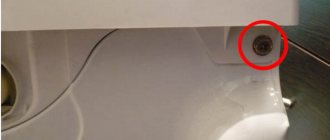
To repair it, you must first properly remove the washing machine programmer and disassemble it.
It depends on the model of the washing machine. There are some features that need to be taken into account when disassembling. If, for example, we talk about the Ariston machine, then:
- The removed programmer must be thoroughly inspected. On the side you will see the latches that secure the cover. They snap off with a screwdriver. Under the cover there are many springs that try to scatter in different directions when removed.
- Removing the cover, you will see the board from the wrong side. You need to take it out and put it aside.
- Next, the gear is taken out and the gears are carefully examined. If there is debris, clean it up.
- Let's turn our attention to the board. If damage, burnt parts or tracks are noticeable, they need to be soldered again.
- If there is no damage, then use a multimeter to check the resistance on the contacts.
- Next, all the gears and the motor core of the part are taken out. The winding on the engine is checked to eliminate burnt areas. If found, replacement will be required.
- The integrity of all elements and contacts is checked.
- The programmer is assembled in the reverse order.
Repair of programmers for German washing machines
Do-it-yourself repair of a washing machine programmer in German models cannot be done without knowledge and experience in electronics, which may affect the performance of related parts.
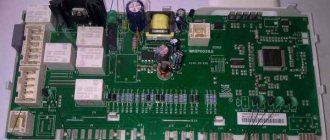
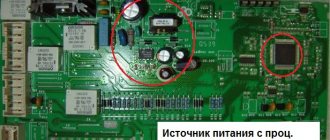
The device of the washing machine programmer is very complex in design.
And if we talk about Gorenie, then they generally have a soldered-in control board and it is recommended to replace the programmer in the washing machine.
Even many professionals do not undertake to repair it. You can repair it yourself, if it is due to a malfunction of the buttons and switches or the programmer handle of the washing machine, you can solve the problem yourself. For this:
- use a screwdriver to unfasten the fasteners;
- The powder receptacle extends;
- By unscrewing the mounting bolts, the control panel is removed.
You can replace the program switch without disassembling the machine; to do this, just remove the top cover.
Repairing a part
First of all, you need to dismantle the programmer, and then disassemble it. The main difficulty is that there are a lot of types of selectors, even on machines of the same brand they differ. And each device has its own characteristic features.
We will explain how to disassemble the Ariston CMA programmer. The algorithm of actions will be as follows:
- turn off the power to the automatic machine;
- remove the command device from the “dashboard”, having dealt with the fastenings;
- find the latches that press the back wall of the device;
- pry up the latches and remove the cover of the programmer housing. Proceed with caution, there are small springs hidden underneath that can fly apart and get lost;
- carefully remove the board “hidden” under the programmer cover;
- remove the largest gear located in the center;
- look to see if debris is clogged in the small gears. Often the reason for the programmer not working is just clogged “stars”;
- inspect the board, look for traces of carbon deposits on it. If semiconductors or traces are damaged, it will be necessary to arm yourself with a soldering iron.
It happens that there is no visible damage inside the selector. You can check the functionality of the SMA programmer using a multimeter. Attach the probes to the board contacts and measure the resistance between them.
If the readings are normal, you need to disassemble the device further. Follow these steps:
- take out all the gears;
- remove the selector motor core;
- assess whether there are any defects on the extracted elements;
- wipe the contacts of the parts with alcohol;
- put the programmer back together.
When disassembling the synchromotor, be sure to inspect the motor winding - it may burn out or break.
It is better for owners of Miele or Siemens machines not to start repairing parts with their own hands. Programmers for German washing machines have a very complex structure - they are based on several plates compressed in pairs. During disassembly, these plates fly apart, and it is difficult to restore the structure later. In this case, it is more advisable to entrust the matter to the service center specialists.
But even German programmers are considered “trifle” in comparison with the devices that are equipped with Scandinavian Gorenje and Asko washing machines. Manufacturers supply selectors with a soldered control board. Only a master who works well with a thin soldering iron can fix them.
The specialists themselves almost never agree to repair the program selectors of Gorenje and Asko machines. Therefore, in this case, it is more advisable to buy and install a working programmer. When choosing a device, consider the model of your washing machine.
Is it possible to repair the element?
It is worth noting that damage to the module in most modern washing machines rarely occurs, and often this occurs after the end of the warranty period. Many craftsmen report that in some cases it is possible to carry out repairs that involve replacing damaged parts, but this can rarely be done if the machine model is old and spare parts are not sold separately for it. The cost of a new electronic board depends on the manufacturer, the seller’s pricing policy and prevalence; a comprehensive replacement will be more rational and will extend the service life of the equipment. If you can’t complete the process yourself, you can contact a service center where they will dismantle and replace the spare part.