This article describes options for replacing bearings in Bosch washing machines of the main series, namely Maxx, Classixx and Logixx. Even though the arrangement of the bearing assembly and shaft are identical, the replacement process is slightly different.
Please note that all the information described below is for informational purposes only, and we do not recommend changing bearings yourself if you do not have such experience.
If you need repairs, you can call a technician from our service center. In this case you receive the following services:
- Free visit of a specialist to your home in Moscow and the Moscow region.
- Installation of new components: bearings, oil seal.
- Free maintenance of the washing machine - cleaning of all components during disassembly.
- Cost of service: from 1200 to 3000 rubles turnkey.
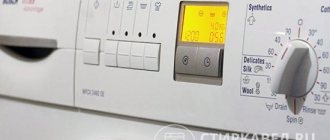
It is easy to check that the old bearings are rusty - rotate the drum in different directions, if you hear a knock or grinding noise, then repairs are needed.
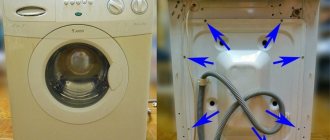
We disassemble the washing machine to get to the bearing assembly
Before you start disassembling the washing machine, we strongly recommend clearing out an area for this task where it will be convenient to turn around, and also laying unnecessary fabric on the floor so as not to stain it.
A standard set of tools that may come in handy is a screwdriver, lubricant, and a hammer with a rubber sheath.
❶ Regardless of the series of the washing machine (unless we are talking about vertical devices), first of all you need to remove the belt. To do this, unscrew the back cover, carefully pick up the belt with a screwdriver and remove it.
❷ Next, we will need to disable the control module. To do this, disconnect the wires and use a screwdriver to unscrew the screws that hold the motherboard.
❸ The third stage is to turn off the heating element and drain pump. To do this, tilt the washing machine at an angle of 45 degrees, and dismantle the above components from below.
❹ The last thing to do in the preparatory work is to disconnect the shock absorbers. There is no need to remove them completely, just loosen the fastening between the shock absorbers and the tank.
That's all, then you need to get the tank and the platform prepared in advance, and start removing the bearings.
How to replace?
The new spare part is pre-lubricated and a retaining ring is installed. The new spare part is installed into the landing site using a rubber mallet. When the part stops moving, it means it has taken its place and the installation can be completed. Similar actions are performed to replace the second element.
Liberally lubricate the new oil seal with special grease and replace it with the old one.
Removing bearings, disassembling the tank
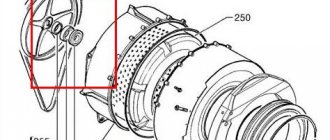
The bearing assembly is located inside the drum, and the drum is inside the tank. Therefore, the first thing we need to do is remove the tank body and remove the drum. Please note that some models of Bosch washing machines are delivered to us in Russia with a soldered tank, which, unlike standard ones, cannot be easily disassembled.
Dismantling an unsoldered tank.
The tank consists of two completely symmetrical halves. In a standard tank, these halves are bolted together around the body. Unscrew these bolts and remove the drum. It will also be necessary to remove the protective sealant with a thin blade.
Dismantling the soldered tank.
Many manufacturers save on the production of washing machines and make some components difficult to replace. An example of this is a plastic tank, which is secured not with bolts, but with spot soldering. On the one hand, it’s reliable, but when it comes to repairs, you have to work hard. In this case, if you have no idea how to do it, it’s better not to even take on the repair. Since the tank can be damaged, and buying a new one will cost 12,000 rubles, no less. Using special tools (micro jigsaw, mini grinder), the tank is carefully and slowly cut along its axis.
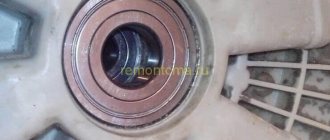
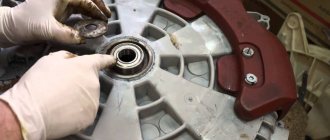
The next step is to remove the bearings. In the center of the drum you will see a bushing and bearings. If the bearings are in more or less normal condition, pull out the bushing and use a lift to remove the bearings. If the bearings are rusty, you will need to knock them out.
It is not always easy to knock out bearings, and there is a risk of injury. Take a hammer, a thick chisel, an unnecessary rag. Place a cloth around the bearing and dampen it with water. Then, with gentle blows of the hammer on the chisel, begin to tap the bearings in a circle. If everything is done correctly, then after 20 minutes the bearing assembly will be knocked out.
The essence of the problem
If during operation of the Bosch washing machine you hear extraneous noise similar to a hum, this means that it is time to change the bearing. However, along with it, the shaft seal will also need to be updated.
Bearing wear is caused by corrosion resulting from oil seal leakage. The service life of the latter is on average from 6 to 8 years. As a result, the operation of the washing machine will be accompanied by various malfunctions, such as a loose drum and destruction of other components of the mechanism.
And these consequences will ultimately force you to either choose new equipment or spend money on very expensive repairs.
Tool requirements
Worn seals and bearings can only be removed by disassembling the washing machine. These parts are located in a plastic tank. In order to get to it, you need to have the following tools on hand:
- Slotted and Phillips screwdrivers
- Pliers and round nose pliers
- Tubular wrench 10
- A dull chisel (needed during the process of removing and seating the bearing)
- Metal hammer (weighing 800-1000 g), chisel and metal rod
- Special bearing grease
- Waterproof sealant
A camera or phone with a camera will also be useful. It is recommended to capture on them all parts of the mechanism that will be dismantled. Such pictures will greatly facilitate the task during the final stage of reassembly.
Replacing bearings and oil seal
Some Bosch washing machines, such as the Logixx, use a double row bearing. Therefore, before replacing it yourself, contact the service center for advice.
Lubricate the areas inside the bearing bores. Then put the new bearing back in and place the seal on top. The seal is needed to prevent water from getting onto the bearings.
By the way, most often bearings rust ahead of time precisely because of a burst seal.
All that remains is to reassemble the washing machine to its original state, and you can continue washing things in absolute silence. If the knocking and noise during the spin cycle does not stop, it means you have installed the bearings incorrectly.
How to choose new parts, at what price to buy?
You can buy the necessary spare parts in a specialized store.
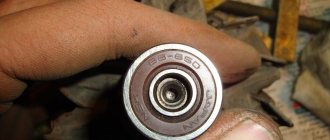
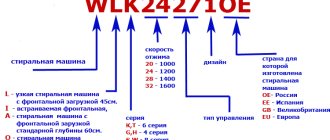
To do this, you need to know the model of your washing machine, since even the same manufacturer uses different bearings in different versions of washing machines. Bearings are available in plastic and metal . The latter are in greater demand and are more popular. Their exact quantity can be clarified in the instructions for the washing machine; the size of the parts is also indicated there.
Bosch washing machines, depending on the model, can use different bearings. Most often this is 6306 or 6203. There is an alternative option for purchasing a suitable part. To do this, they go to the store with the old removed bearing and purchase a similar one.
The cost of the part depends on the manufacturer, place of purchase and model . In the online store, the price of bearings starts at 300 rubles. Some Bosch models have double-row monobearings. In this case, it is needed to replace one. On average, the price for such a part will be higher – from 1200 rubles.
How to find out about a breakdown
Failure of the SM bearing is associated with strong noise and rumble during operation: you can hear grinding and rattling.
After bending the rubber cuff of the hatch, move the drum by hand: if it is very loose, then there is a problem.
What bearings are on a Bosch washing machine, and how can they be replaced? To make the right choice in the store, remove worn parts and show them to the seller. This is a rather complicated repair, but it is worth it.
Required Tools
Before you begin, prepare your tools.
- Socket, slotted, Phillips screwdrivers.
- Socket heads 8-32 mm.
- Hammer.
- Bit.
- Pliers, needle nose pliers.
- Puller to remove the bearing.
- Repair kit Bosch.
- WD-40 product.
- Rubber mallet.
- Sealant.
To disassemble the SMA, you will need free space, so clear some space around the machine in advance. Unplug the washing machine, turn off the water supply, and disconnect the water supply hose.
Tools
Before changing a spare part, you need to prepare the necessary tools and materials. The order of preparatory actions:
- The SM is disconnected from the power supply.
- They turn off the water.
- Unscrew the inlet hose from the sewer.
- The device is pulled out to make it easier to work with.
Disassembly tools:
- Screwdriver Set. Stock up on the Phillips and Spline versions.
- Pliers and needle nose pliers. It is better to have two options - larger and smaller.
- Hammer.
- Rubber mallet.
- Bit.
- Socket heads - from 8 to 32 mm.
- Special device for removing bearings.
- WD-40 lubricant.
- Sealant - glue the halves of the tank together.
- Awl.
- Bolt 16 mm.
- BOSCH repair kit.
Progress
Now you are ready to start repairing your Bosch washing machine and replacing the bearing.
- Remove the top cover CM.
- To do this, unscrew the two mounting screws on the back.
- Remove the detergent dispenser tray.
- Remove the three screws behind the tray, as well as the one on the other side, that secure the control panel.
- Once you remove the panel, you will see wires leading to the main module. If you decide to detach them, it's best to take a photo of the correct placement. Otherwise, just place the panel on top of the case.
- Remove the bottom panel.
- Unscrew the fixing bolts.
- Open the hatch door.
- Remove the outer cuff clamp.
- To do this, bend the cuff, prying it with a tool, and remove the clamp.
- By bending the cuff, remove the hatch lock.
- To remove the UBL, unscrew the mounting bolts.
- Disconnect the wires and remove the blocker.
- Lift and remove the front panel.
Great, you have completed the first stage. Set the panel aside and proceed with further steps.
- Pull out the inside of the detergent tray.
- When you lift it up, you will notice a hose that supplies detergent.
- Remove the spring hose clamp using pliers.
- After removing the tray, proceed to the counterweights.
- Using a 13mm socket, remove the bolts.
- After removing the top and front counterweights, switch to the heating element (located under the tank).
- Disconnect the wires leading to it.
- Unscrew the central nut (not all the way).
- Push the nut inside the tank and pull out the heater.
- Remove the pipe from the tank to the pump.
- Place a flat container as remaining water may spill out of the spout.
- Remove the pressure switch hose from the side of the tank.
- Loosen the pipe clamp by unscrewing one bolt and remove it.
- Remove the harnesses attached to the tank.
The work on the front of the car is complete for now. Move to the back.
- After unscrewing the screws, remove the back panel.
- Pull the drive belt to the side and, turning the pulley, remove the belt.
- Release the clamps on the engine wires.
- After unscrewing the bolts, remove the motor.
- Release the fastener and remove the pressure tap chamber.
- Remove the shock absorber by unscrewing the pin at the bottom.
- Remove the tank with the drum from the housing by removing it from the springs.
see also
Comments 261
Will a cast one ruin the seals? He ruins the tires
Since the repair, the machine has been working flawlessly. Tfu three times.
That's good, well done! This will happen to me soon too, but will I decide...
The price tag and term of services will motivate