How to change the bearing in the Ardo SMA?
To replace the bearing you will have to completely disassemble the washer. Some users are put off by this amount of work, but if everything is done step by step, the repair will end successfully.
Overloading the drum with laundry contributes to rapid wear of the internal part. Deformation of the oil seal, which protects the bearing from moisture, also causes wear and destruction of the element. Here are the signs that accompany a breakdown:
- Strong noises during washing and spinning: creaking, knocking, clanging.
- Low spin speed, resulting in wet laundry at the exit.
- Frequent imbalance. When rotating, the drum dangles, which leads to imbalance.
You can also open the hatch and shake the drum with your hand. If there is a large gap between the tank and the drum, the bearing is damaged. To change a part, start by disassembling the SMA.
How to disassemble an Ardo machine?
Start by preparing for the renovation. Take these tools:
- slotted and Phillips screwdrivers;
- a set of open-end and socket wrenches;
- adjustable wrench;
- rubber hammer;
- chisel;
- spare parts;
- lubricant "Litol-24".
Start by turning off the water inlet valve and unplugging the washer from the outlet. Further:
- Prepare the container and disconnect communications from the housing. Direct the hoses directly into the container, as water will flow out of them.
- Turn the machine with the back wall towards you.
- After unscrewing the two bolts at the back, remove the top cover.
- Remove the back panel by unscrewing the screws around the perimeter.
So, the panels are removed. Now proceed to dismantling the internal elements. Follow the instructions:
- Carefully remove the drive belt from the engine and tank.
- Disconnect all sensors and wires (may be attached with plastic clamps) from the tank.
- A ground connection is also attached to the base of the shaft. It must be removed by unscrewing the nut.
The rear tank is freed. Go to the heating element. Disconnect the heater wiring, twist the central nut (not all the way) and push the bolt inward. Remove the element from the slot.
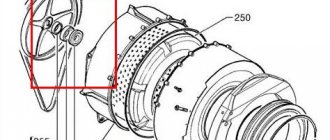
Now inspect the upper part of the SMA body. Under the cover there is a counterweight, which is secured with a metal plate. Take a socket wrench, unscrew the mounting bolts and remove the counterweight.
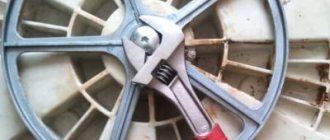
Returning to the back of the machine, secure the metal flywheel (the wheel on which the belt is attached) with a screwdriver or a piece of wood. This is necessary so that the flywheel mounted on the flange does not rotate. Using a 13mm socket, remove the retaining bolt and remove the wheel from its seat.
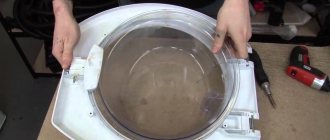
Next, use a little trick. Tighten the bolts around the perimeter of the tank that hold the two halves together. Now you can remove one part of it with the drum through the rear wall without affecting the engine and shock absorbers. Proceed with caution as the sharp edges of the housing may injure your hands. Therefore, alternately push one side or the other.
At this stage, disassembly is complete. Next you will learn how to install a new drum bearing.
How to remove and replace the bearing in the Ardo SMA?
To avoid damaging the elements during dismantling, install half of the tank on an old tire or brick support. To make the replacement as easy as possible, coat the center of the tank with WD-40, which eats away rust. Subsequently, it will be easier to remove the parts from the seat.
Then proceed like this:
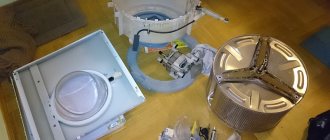
- Using a rubber mallet, tap the drum shaft until it comes out of the tank hole.
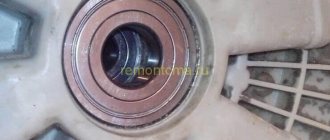
- In the tank opening you will see the old bearing and oil seal (seal). Remove the rubber seal and knock the ring out of its seat. To do this, place a chisel on the outer ring and, tapping with a hammer, knock out the inner and outer bearings.
- Clean the nest from scale and dirt with a rag and sandpaper. Treat the inside of the tank in the same way.
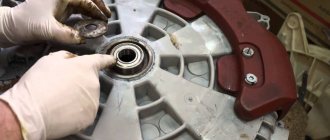
Now it's a matter of small things. Replacing bearings in an Ardo washing machine proceeds in the reverse order. Immediately install the inner ring into the socket (also tapping the edges with a chisel), then the lubricated oil seal. Turn the tank half over and install the outer ring. Then clean the drum shaft, lubricate it with grease and assemble the structure together.
The video shows how parts are replaced in a workshop:
What bearings are needed for the Ardo washing machine?
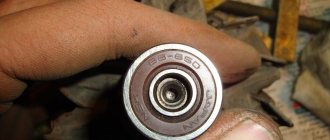
The bearing, as well as the oil seal, should be selected based on the model of the machine. For example, Ardo a400, a600x, a800, a1000x require parts of different sizes. It is impossible to accurately provide uniform standards for suitable elements, because the manufacturer may change the characteristics of spare parts.
To avoid making a mistake in your choice, take the old item and go to the store with it. Each spare part has a serial number, which you will use to purchase a new part. This applies to all Ardo washing machines.
We hope our recommendations will help replace broken elements and restore the operation of your equipment. To extend the life of the bearings, do not load more laundry into the drum than specified in the instructions. Run preventative programs using anti-scale agents, which will protect internal parts from damage.
Another ARDO model
In this photo we see the model AE1010 EasyLogic class A
. As in most models, the tray for SMS synthetic detergents is on the left. Control knobs, regulators on the right. In the center and in the middle. Buttons: Start, Preliavaggio, Risciacque supplementary. Speed control: 500, 600, 700, 750, 800, 900, 1000 rpm. Mode indicator: Prelavaggio, Centrifuga, Lavaggio, Fine/End. Temperature control from 90 degrees for Cotone cotton, up to 30 Celsius for delicate wash and linen. Button: on/off.
Top view: we see a concrete counterweight to reduce vibration. Detergent dosing valves, pressure switch, electronic control circuits with electrical harnesses connected to them.
Side view - 1000 rpm 45SX-45DX 220-240V/50Hz, MINISEL CF 42 03/14/2003 546042300 -03 S1-20300679 on a getinaks board. On the electrical board made of getinax there is a transformer and resistors, triodes and microcircuits, capacitors and power control switches. The connectors are soldered onto the board, the wires are collected into bundles and wrapped with electrical tape.
Two brown push-button switches are logic elements that, depending on the occupancy, switch on one mode or another. Plastic levers, spring, screws.
Bottom back of the washer. At the bottom is a motor connected to the drum by a V-belt. A heating element and temperature sensor are installed nearby. The motor and ten are reliably grounded with a yellow-green wire.
The tank is made of white plastic, an element with 18 stiffeners. The five-point wheel accepts the V-belt and ensures the desired rotation speed of the drum.
Stainless steel drum cover. The shaft and bushing did not oxidize or rust at all - a well-chosen steel composition with a low content of impurities.
Article on the topic: How to replace the pump on an Ariston washing machine
The disassembled back cover is at the feet of the master.
Some rust stains are visible here and there. In general, the design is reliable, but some parts still rust due to intense friction. When in great abundance, rust can contaminate laundry, leaving red or yellow marks and dots.
City service center VM
repairs at home brands • models of household appliances
"Vash-Master" repair of automatic washing machines in the Moscow region
. Service center. Spare parts department: +7 (495) 782-66-02. Address: 141109, Shchelkovo, st. Talsinskaya, 59, p. 5. Phone: 8(496 56) 9-63-39
Instructions for replacing the drum bearing in a washing machine with your own hands
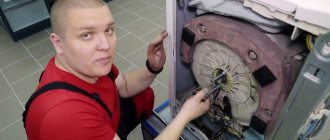
A washing machine is an invariable attribute of comfort in the home. Without it, washing would turn into a whole set of physical exercises, taking both strength and time. Therefore, its repair in the event of a breakdown is an urgent matter, which, moreover, does not tolerate a superficial attitude at all. But here’s the problem: the services of a master are very expensive, and finding a smart professional is not so easy. So isn't it better to go ahead and do the repairs yourself? Moreover, if you are quite familiar with the structure of your washing machine and have all the necessary tools at hand.
Drum bearing: the weak point of the washing machine
A washing machine is a rather complex household appliance and it operates under high loads. The most vulnerable point of this home worker is the drum bearing - the part thanks to which the washing process in the machine actually takes place. It is very easy to understand that the time has come to change it: if there is a faulty bearing, the unit begins to emit extraneous sounds during operation, which, if nothing is done, intensify over time.
Offers a large selection of high-quality bearing products - https://termopolis.com.ua/
But this is not the most unpleasant thing. If the bearing fails, the drum stops working normally. And this means that very soon the washing machine will completely break down, and you will have to pay quite a lot of money for its overhaul.
The average service life of a quality drum bearing is 6-8 years. However, due to improper operation of the machine, destruction of the oil seal, corrosion due to leakage, etc. it breaks much faster. That is why the unit should not be overloaded: in most cases, the causes of bearing failure are increased friction intensity and, as a consequence, excessive heating of the structural elements of the part.
If you decide to replace the drum bearing yourself, you will have to do this together with the oil seal. You can buy them in a store or on the market, carefully monitoring the quality of the parts and their compliance with the model of your washing machine.
What is needed to replace a bearing in a washing machine?
The procedure for replacing a drum bearing involves almost complete disassembly. For this you will need:
- pliers;
- slotted and Phillips screwdrivers (preferably of different sizes);
- a set of open-end and ring wrenches;
- blunt chisel;
- hammer and rubber mallet;
waterproof sealant.
Repairing a washing machine is best done with two people: some parts of this household appliance are quite heavy. In this case, it is advisable to use a camera: by photographing the disassembly process, you will never make a mistake when reassembling it after replacing the bearing. As a last resort, you can check the procedure for installing structural elements and connecting electrical components on the Internet or from familiar specialists.
Before starting repairs, you need to disconnect all communications of the unit (electricity, water supply and drainage), and install it itself so that free access is provided from all sides. The procedure for disassembling a washing machine is determined by its design features. It is best to carry it out armed with detailed instructions from the manufacturer.
Removing the drum bearing in an ADRDO washing machine
Let's take an ARDO washing machine about ten years old with an obviously old, creaking and knocking bearing. In order to replace it, you must perform the following steps:
- Remove the back cover. To do this, you need to unscrew the fastening bolts and remove the clips that hold the water hose.
- Remove the V-belt from the motor and drum pulleys.
- Disconnect the electrical terminals, be sure to remember, or better yet, photograph the order in which they are located.
- Disconnect the water temperature sensor. It is located in a rubber bushing, the edges of which need to be bent with a screwdriver. The sensor is removed from the socket and carefully moved to the side.
- Loosen the nut securing the heating element to facilitate the procedure for removing the tank cover.
- Unscrew the drum rim pinch bolt and remove the latter.
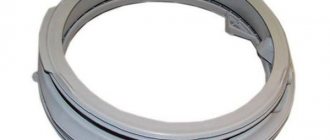
- Disconnect the cover from the drum and remove the rubber gasket.
- Remove the cover with the drum from the body by pulling the tank down on the spring suspension.
- Unscrew the nut securing the pulley and remove it from the transmission shaft.
- Place the tank lid on the stand so that the drum is suspended. To prevent damage to the thread, place a plate on the shaft shank and carefully knock the drum axis out of the bearing with a hammer.
A rubber mallet is best for this job. The blows should be applied measuredly to prevent the bearing seat from flaring.
- Using a screwdriver, remove the oil seal and then the failed bearing. The latter is removed from the back of the cover using a blunt chisel and hammer. When lightly hitting the bearing housing, you need to make sure that it does not warp.
- In the same way, the second bearing from the tail side of the cover is removed.
The washing machine rattles when washing
- The unit is installed skewed (checked using a building level).
- The laundry load was too small, causing the weight to be distributed unevenly in the drum.
- Drum bearings are damaged.
To replace these parts, the machine must be completely disassembled and the drum removed from the tank.
In the absence of a puller, the axle shaft can be knocked out of the bearing with careful blows of a hammer, but you need to hit not on the axle shaft itself (this can damage the threads), but on a placed board. The bearing itself can be knocked out of the cover using a blunt chisel and hammer. The blows must be applied evenly so that the bearing does not warp.
Article on the topic: Is it possible to pour vinegar into the washing machine?
New bearings must be lubricated with lithol before pressing. Let us note once again that if you have no experience in metalworking, you should not take on this almost jewelry task.
Installing the drum bearing and reassembling the ARDO washing machine
New bearings are lubricated with lithol and, together with the seals, pressed into their seats in the reverse order. After this, you need to put the tank cover on the drum shaft, put the pulley in place and install the cover with the drum on the body, not forgetting about the sealing gasket. Next, the lid is fixed on the tank and the clamping rim is put on.
Lubricating the bearing seat Pressing in a new bearing Installing the oil seal
Tightening the rim tightening bolt is done by lightly tapping the rim around the perimeter in the direction of the lugs every 1.5-2 turns of the nut. This will ensure an even fit of this part.
Next, you should tighten the fastening of the heating element, not forgetting to put it in place. After this, the temperature sensor and electrical terminals are mounted, and the next step is to install the belt on the engine and drum pulleys. Next, you should begin installing the back cover of the washing machine, upon completion of which the latter can be considered ready for use.
Indesit washing machines: features of replacing the drum bearing
To replace the bearing in a washing machine of this brand, you must:
- Open the back and top covers.
- Remove the drive belt from the engine and drum pulley.
- Block the pulley.
To do this, you will need a wooden block, which allows you to carefully unscrew the screw that holds the pulley and remove the latter without damaging it.
- Remove the counterweight and spacer bar, which blocks access to the clamp and tank cover.
- Turn off the heating element.
- Remove the bearing assembly fasteners and the grounding strip, then loosen and remove the clamp.
- Open the tank lid without throwing out the seal.
The screws that secure the bearing assembly are often supplied by the manufacturer to be excessively long, so they are simply cut off. The tank cover should be removed so as not to damage the temperature sensor wire - no one needs extra work and costs due to its breakage.
- Remove the tank and bearing assembly. To remove the latter you need to remove the oil seal. The bearing is removed using a hammer and chisel.
The bearing assembly seat should be carefully inspected. If there are traces of rust or debris, they must be removed, and if leaks are detected, their sources must be eliminated. After this, you can begin reassembling the washing machine.
Installation of new parts
All that remains is to change the bearings yourself. First, we take a ring with a smaller diameter, place the tank with the hole for the drum facing up and insert the part into the seat. We lower the chisel with a blunt base and tap it with a hammer in a circle until it shrinks completely. Then we install a suitable oil seal, lubricate it with a special compound and turn it over.
Next in line is the external bearing, which is mounted in a similar way: we place it in the hole and compact it with blows. After that, generously coat the shaft with lubricant and screw the drum into the tank. It would be a good idea to apply sealant over the bearing assembly.
Now we have to correctly reassemble it. We return the tank to its place and connect the two halves of the tank together with the previously unscrewed screws. At this stage, we recommend checking the quality of the work by turning the container left and right. If there is no extraneous noise, the installation is completed perfectly.
Next, we fix the pulley, tighten the counterweights, attach the heating element and connect the two removed sensors. Be extremely careful with the capillary one - the gas tube is easily damaged by the slightest pressure. At the “finish” you need to put on the drive belt and tighten both covers. Don’t forget to “run” the machine through a test wash, choosing the shortest mode.
Interesting:
- Ardo washing machine device
- How much does an Ardo washing machine weigh?
- Reviews of Ardo washing machines
- Ardo washing machine does not spin - reasons
- How to change the seal of a Bosch washing machine?
- How to tighten the drum in a washing machine
Reader comments
- Share your opinion - leave a comment
How to replace the drum bearing of an Ariston washing machine?
Installation of a new bearing assembly in washing machines of this brand is carried out in the order already familiar to us. Of course, after disconnecting her from all communications. So:
- We unscrew the tension screw of the clamp holding the drain pipe and disconnect the latter from the tank.
- We open the contacts of the electric motor of the machine and remove the drive belt.
- We loosen the screws securing the engine, then carefully move it from the runners and hold it and remove it, having first unscrewed the screws.
- We disconnect the contacts from the heating element and the electrical wiring from the tank.
- Unscrew the screws securing the top cover and remove it from the body.
- We remove the dispenser and unscrew the screws that secure the control panel.
- We disconnect the second pair of fixing screws and remove the panel. You should start from the hopper side of the dispenser, and then remove the lower part.
- Remove the tension spring.
To do this, you need to find it by feeling the cuff around the perimeter. The spring needs to be pryed up with a screwdriver, carefully pulled on it and removed along with the pre-loosened clamp. After this, the cuff should be disconnected from the body and the hatch lock should be removed.
- We disconnect the base panel using a screwdriver. This allows access to the fastenings on the front wall of the washing machine. Its screws need to be unscrewed and it needs to be removed.
- We unscrew the front bolts of the lower counterweight and remove it, after which we proceed to remove the upper one.
- We remove the plastic clamp, and then move the dispenser hopper to the back wall of the machine.
- Remove the pressure switch relay tube from the tank.
- We disconnect the suspension system, which consists of shock absorbers and springs.
You should start with shock absorbers, which are attached with the upper end to the tank, and the lower end to the bottom of the body. You only need to remove the top one.
- We remove the tank and disassemble it, starting with the pulley.
- We remove the bearing block and replace them with new ones, while not forgetting about lubrication and uniform fit.
After pressing the bearing assembly, you can begin reassembling the Ariston washing machine. If everything was done correctly, you will not have any “extra” parts left, and the equipment itself will serve for a long time and properly.
Ardo does not heat water
In this situation, you need to act like this:
- Remove the back panel by unscrewing the fasteners that hold it in place.
- Using a multimeter, check the presence of voltage at the contacts of the heating element, the shank of which protrudes from the tank in its lower zone (the machine should be operating in heating mode).
- If there is no power, you need to check the temperature sensor. Measure its resistance at room temperature and after heating with hot water. If it remains constant, the sensor needs to be replaced.
Heating element (bent heating element) for ARDO washing machine (Ardo)
At the same time, make sure that the contacts of the heating element relay (located near the control module) are not jammed.
If power is supplied, the heater is burnt out and needs to be replaced. Having disconnected the wires, unscrew the fasteners in the middle of the shank and carefully remove the heater, rocking it in different directions.
Having cleared the installation site of dirt, screw on the new heating element and connect the wires to it.
Replacing bearings for an Ardo washing machine in Moscow
Open the loading hatch and identify the machine model on the sticker.
Unscrew the drain filter from the front bottom and clean it.
We change the pump, which is located at the bottom right on the back side.
Loosen the clamp on the drain pump pipe.
We check the pump, clean it, and if it malfunctions, replace it.
Over time, mechanical wear appears on the shaft. The impeller dangles and does not pump out water well.
- 20% malfunction of the electronic control board:
MINISEL board:
Ardo models FL1000,FL1202,FLS81S,A800XEL, AE810, AE800X, SE810, FLS81S, AED1000X,TL1000EX, TL1010E ANNA610, ANNA 600X, A410, A610, A500, A1000.
We look at the power source and the level of constant voltages (5 and 12 V) at its outputs. If there is no voltage at the output of the IP, check the corresponding elements - power switch, power filter, power transformer T1, rectifier (D11-D14), microcircuit U1.
module :
Models A800, A804, A810, A814, WD800X, S1000X, T80, T800, TL800X, TL804, etc. Malfunctions in the DMPU module For the power supply module:
break in resistance R51 (A, B); stabilizer U3; Zener diode D24 (short circuit); varistor VDR5 is broken.
For engine control:
relay K1, K2; rsimistor TR2. Diodes D1-D6, D9-10, D15, D23.
Legacy DMPA module:
They are used in machines that include an asynchronous drive motor and a mechanical command device.
Models A1000PL, A1000XCZ, A1000XPL, WD1000PL, TL1000X, etc.
The wear of the heating element increases with “hard” water.
Overgrown with scale (scabs), it transfers heat poorly and burns out.
You need to pull out the elastic band and not the heating element. Since when pulling out the heating element you can wedge the elastic band.?
This is important to avoid further leakage under the seal.
- 10% wear on the commutator motor brushes, loose contacts, broken drive belt
Remove the belt, unscrew the screws and remove the engine. There are two brushes on the engine, each secured with two screws. Unscrew the screws and remove the brushes.
Inspect the motor power supply terminal from the board and the ground wire.
Very often the contacts oxidize due to humidity and the machine gives an error because of this.
Each brush is installed in a brush holder. It can be disassembled into two halves. Pay attention to how much the brush protrudes.
This size should be at least 1 cm. The optimal option is 1.5 cm. After that, we assemble everything and install it in place.
- 10% - extraneous noise (bearings, shock absorbers, foreign objects)
Having jammed the pulley, unscrew the upper shaft clamping nut counterclockwise.
If the oil seal is not filled with specialized lubricant and the crosspiece bushing is not lubricated with it during assembly, the oil seal will wear out very quickly, regardless of its quality, this has been proven in practice.
There is no need to save money and improvise with lithol, grease and other lubricants; it is better to purchase specialized lubricants that are used to lubricate oil seals.
Standard sizes of bearings and seals Ardo:
This applies to modern technology - starting from 2000 (models AE800X, AED1000X, TL1ОООEX).
Thanks to it, you can perform diagnostics (DMPU control module):
Close the hatch (without laundry). Set the program selection to 30°C until it clicks. Temperature regulator to 0°C. Turn it on. The drum rotates at 250 rpm. To check the buttons for half load, extra rinse and others, press them. The spin speed increases from 250 to the maximum provided for in this model. If there are no additional functions, press the spin button.
When faults are detected, the indicators will flash.
Ardo Error Codes
- E00 |
E01 – Drain.
Clean the drain filter and drain pipes. E02
– Water flows or drains incorrectly.
The drain hose may not be positioned correctly. E03
– Water does not drain from the tank, and the drain time has exceeded 3 minutes.
F2
– Temperature sensor.
F4
– Displayed on the display if there is no water drain.
A possible cause is the drain pump. F5
– The water is drained and immediately refilled.
The problem is usually in the water supply filter. F6 |
F9 | F12 – Electronic module.
F8
– The water in the tank has exceeded the available level.
Suspicion of the aquastop valve. F13 |
F14 – Critical.
Breakdowns are a fairly rare occurrence, usually associated with improper operation. Italian technology is distinguished by its high technology and versatility.
How to carry out a service test equipped with a MINI-SEL board:
Control panels have different appearances
The steps to enter the test mode are shown in the figures - move the program selector knob to the “6 o’clock” position - press button 4 - POWERFUL WASH and, while holding it, press the POWER button. After this, the SM should go into test mode.
With temperature control knob:
— turn the program selector knob to the “6 o’clock” position — move the temperature selection knob to the “9 o’clock” position — press and hold the ENERGY button (for at least 6 s), at the same time turn on the power supply to the CM with the NETWORK button.
After this, the SM should go into test mode.
By turning the selection knob we check the devices:
Knob in position 1 (autotest) - NTC temperature sensor (sensor circuit for open or short circuit), pressure switch, display (if equipped), door lock and main function buttons on the control panel
Types of malfunctions of ardo washing machines
They can be of the physical type, where the parts are worn out and cannot be replaced. It could also be an electronic fault, such as improper connection or operation of the device.
The owner can handle simple problems on his own. The main thing is to follow the instructions for troubleshooting the machine. Other malfunctions of the Ardo washing machine can only be fixed by a specialist.
Water does not heat up
Most often, the heating element in these washing machines fails. You can determine the problem while washing at 60 degrees. If you put your hand on the glass of the door and the glass is cold, it means the electric heating element has burned out.
Article on the topic: How to integrate a washing machine into an IKEA kitchen
You can change the electrical device for heating water yourself. To do this you need:
- Turn off the machine and remove the plug from the socket, remove the drain hose from the sewer pipe, and disconnect the water supply hose from the water pipe.
- Unscrew the bolts from the back of the washer.
- You need to disconnect all the wires under the drum and unscrew the bolt that holds the heating element.
- Carefully remove the heating element without damaging nearby parts.
- Remove scale from the heating element holder.
- Insert the new heating element into the holder and place it back in the same place.
- Connect the wires and tighten all the bolts.
No water flow after turning on the washing machine
Water may not flow into the washing machine after it is turned on, especially often in Ardo top-loading washing machines. The owner of a horizontal loading device is unlikely to suffer from this breakdown. In the latter case, the maximum that can happen is that he forgot to turn on the supply tap.
The vertical can have two variants of the problem:
- The filter is clogged. To clean it, unplug the machine and close the tap of the water supply pipe. Filters for water inlet are usually located on the back side, where the hose and valve for water supply are located.
Unscrew the inlet hose and remove the filter with pliers. Take it out and clean it with water and a toothbrush. Do the same with hoses if they are equipped with mesh filters. Install everything back in the same sequence.
Article on the topic: How much does it cost to change the pump in a washing machine Kyiv
Important! Do not damage or lose the rubber gasket.
- The control unit may be faulty. In this case, only a qualified technician can repair it.
- The requirements for the drain hose are as follows: it should not be too long, otherwise there will be a heavy load on the pump. It will fail ahead of schedule.
- The connection to the sewer siphon must be located at a level of at least 50 centimeters from the floor.
- If connected to a sewer pipe or to a drain point below 50 centimeters, automatic drainage will occur continuously.
The water supply limit is exceeded
Another common problem with Ardo washing machines is excess water supply. There can also be two ways to fix it - if the drain hose is connected incorrectly to the sewer pipe, or the electronics may be faulty. The last error can only be corrected by a qualified specialist. An ordinary owner can cope with the first problem.
Instructions for eliminating the increased water supply rate:
Liquid accumulates under the machine
If water collects under the machine, in this case the problem is also divided into two types. In the first case, the owner pours a lot of washing powder. Foam is formed, which seeps out through some holes in the machine, and then turns into water on the floor.
In the second case, water accumulation may be caused by a broken pipe or torn cuff, or poor hose laying. Sometimes the drum itself can leak. In any case, only a specialist will help here.
Article on the topic: How to replace the pump on an Ariston washing machine
Drain line clogged
If the drainage path of the washing machine is clogged, water may not drain and remain in the drum. In rare cases, the water level sensor becomes damaged.
The blockage is determined as follows. The washing machine stopped working and the error “No drain” appeared on the display.
First of all, try setting the machine to drain by moving the switch to the desired position. If it doesn’t work, then proceed to troubleshooting the following scheme:
- Disconnect the drain hose from the sewer pipe.
- Take a bucket and place the hose in it at a minimum distance from the floor.
- Most of the water should drain out.
- Unscrew the filter and drain the remaining water.
- Then remove the plug and clean the filter.
If the problem is not a blockage, then it is better to call a specialist. Since in most cases, solving this problem can lead to the breakdown of an expensive part.
Extraneous noise
Extraneous noise during operation of the washing machine may occur due to improper installation. The washing machine must be leveled. It is advisable that it be on a flat, hard tile surface.
Typically, washing machines are installed in the bathroom or kitchen.
The cause of rattling noise in the drum can be foreign metal objects. They must be removed from pockets when preparing to wash items.
In rare cases, the bearings may be faulty. In order to repair this problem, you need to call a technician.
Malfunction of the electronic control board
If the electronic board does not work or some control buttons are out of order, this means that it is time to replace the electronic module. It is recommended to call a professional to replace it.
Article on the topic: How to put an elastic band on the drum of a washing machine
Most often, errors are signaled by indicators on the control panel. ardo error codes
In order to determine the error and eliminate it, you need to remove all the laundry from the drum and run it in a 30-degree wash mode.
The following numbers indicate a specific breakdown:
- E00, E01 – drain does not work. Clean the filter.
- E02 – drainage and water supply does not work. Check the hose connection.
- E03 – water does not leave the drum.
- F2 – temperature sensor does not work.
- F4 no water drain.
- F5 – the water supply filter does not work.
- F8 – problems with aquastop.
- F13, F14 – critical errors.
- F6, F9, F12 – problems with the electronic module.
Front loading models
If you have ever dealt with machines from other brands, then disassembling Ardo front-loading appliances will not be difficult. The front panel is removed after unscrewing all the fasteners, removing the detergent tray and disconnecting the loading hatch cuff. The main thing is to correctly remove old bearings and install new ones. Worn parts may be in poor condition and even fall apart during disassembly. You can use a special puller or a metal pin to knock out the old bearings. During disassembly, pay attention to the condition of the shaft and bushing - they should be smooth. They need to be cleaned of scale and other contaminants using a special metal cleaner.
New bearings will be inserted into the cup intended for them quite tightly. To press them evenly into place, you need to take two wide washers, two nuts and a threaded metal rod. The rod is inserted into the glass through the bearings, washers and nuts are put on it, which are gradually tightened. As a result, the structure will apply even pressure on the bearings, and they will fit perfectly into place.
Ardo fault codes
Error codes will help determine the location of the problem: E00/E01, E02, E03, F2, F4, F5, F6/F9/F12, F8, F13/F14. The control board diagnoses the system in the event of a breakdown and displays a set of symbols on the display. Each one points to a different problem. Error explanations can be found in the operating instructions and our article.
- Serviceability of the heating element and its wiring.
- Temperature sensor performance
Typical faults
Ardo washing machines are divided into two main categories based on loading type:
- Vertical (Ardo TLN 85 SW, T80X, TLN 106 SA).
- Frontal (Ardo SE 810, FLN 126 LW, A 1033, WDO 1485 L).
The Ardo top-loading washing machine has a compact body that easily occupies the space between the bathtub and sink. But it doesn't come without its drawbacks.
Here's what users are complaining about:
- Machines with a long service life (more than 5 years) spontaneously open the drum doors. This leads to jamming and tearing of the valves.
- The top cover of the drum is often subject to corrosion because the water supply is carried out through the top.
- Close the doors more tightly. Clean the latch from debris and adhering powder.
- Do not overload the tank with laundry.
- Observe the dosage of detergent to prevent foaming.
- Wipe the drum with a dry cloth after washing to avoid corrosion.
Other problems are similar to front-facing models. Here are the most common ones:
- The Ardo washing machine is noisy and makes strange sounds.
- The equipment does not drain water.
- No water heating.
- The drum does not rotate.
- After switching on, there is no water intake or it comes in excess of the norm.
Let's figure out how to make your own repairs.
SM "Ardo": do-it-yourself repairs
Some breakdowns can be fixed without the help of a specialist if you follow our recommendations.
The SMA hums, makes noise, vibrates
Is your car recently purchased? When you first started the unit, did it start jumping and rattling? Check that the shipping bolts have been removed. They secure the tank in place to prevent damage during transit.
- Turn the case towards the back wall.
- Remove the bolts around the perimeter.
Also make sure that the equipment is level and stable on the surface. The floor must be level and hard. Tighten the legs of the machine if necessary.
The most serious failure is bearing wear. In this case, not only a hum is heard, but also a grinding sound (with severe wear). Replacing a bearing is considered a complex repair. How to disassemble the Ardo SM and install a new bearing, watch the video:
The drum does not spin
Ardo technology uses direct drive motors. The engine has a small pulley and the tank has a large pulley. They are connected together by a drive belt. When the engine starts, the small pulley rotates and transmits torque through the belt to the tank. Therefore, if such a problem occurs, inspect the belt:
Observe safety precautions: unplug the machine before starting work.
- Turn off communications.
- Remove the two top cover bolts. They are located at the back.
- Remove the screws around the perimeter of the back wall.
- Behind it you will see a belt. If it falls out of place, restore its position. Place the part first on the small pulley, then, turning, on the large one. If worn, torn, or stretched, replace the belt.
No water intake. Overflow in the tank
Other problems and their solutions
Another commonly observed symptom is the slow flow of water into the machine or its complete absence. To resolve the problem, do the following:
- First you need to open the cold water tap on any of the mixers and make sure that there is sufficient pressure in the pipeline.
- If there is water, you need to inspect the filling hose. It may be twisted or severely bent.
- At the next stage, you need to turn off the water supply to the machine, disconnect the filling hose from it, place its end over the bathtub or some other container and open the tap again. If the water barely drips, the hose is clogged and needs to be cleaned. Some washing machine models have hoses equipped with a safety valve that automatically closes in the event of a leak. It is disposable, so after operation you will have to install a new hose.
- If the hose is still coping with its duties, you need to inspect the mechanical cleaning filter on the rear wall of the unit. You need to remove it with pliers and clean it.
- If water does not flow after this, you need to check the operation of the fill valve by removing the top cover from the machine. The valve is attached behind the filter. First of all, inspect the wires and their connections to the valve contacts. If everything is in order here, the valve must be dismantled and the voltage indicated on the body must be applied to its terminals. If it does not open, the unit has failed.
Article on the topic: How to put an elastic band on the drum of a washing machine
If the sensors, valves, heater and other elements are in good condition, but the unit does not work properly, then the control module, which “conducts” this entire system, has failed. To repair electronics or replace them, you must contact a service center.
Many owners of washing machines try to repair them themselves in order to save money. Do-it-yourself Bosch washing machine repair - typical breakdowns, their elimination and prevention.
How to choose the optimal model of a pumping station for a summer residence, we will consider in this material.
Let's disassemble the machine
The process of replacing the unit is quite labor-intensive, since you can only get to the bearings by pulling out the tank and drum. To do this, you will have to disassemble the machine almost entirely, which often scares away home craftsmen. But in fact, by acting consistently and carefully, anyone can cope with the task. The main thing is not to deviate from the following instructions:
- disconnect the machine from all communications, power supply, water supply and sewerage;
Attention! Don’t forget to record the location of the wires connected to the camera parts to avoid errors during reassembly.
- provide free access to the rear wall of the machine;
- unscrew the corresponding bolts and remove the rear panel;
- remove the belt (in older Ardo models it is V-belt);
- reset the sensors attached to the tank by prying up the rubber bands with a flat screwdriver and bending each group of wires;
- remove the grounding from the shaft by unscrewing the nut at the base;
- release the wiring on the heating element, loosen the bolt holding the heating element, push the rod inward and remove the part;
- unscrew the two screws on top and lift the front panel up from the back;
- take the head 13 and remove the metal plate intended for tightening the tank;
- fix the flywheel with a screwdriver, unscrew the central nut and remove it;
- Unscrew all the screws located at the middle circular joint of the tank;
- grab the top tank with both hands and, moving it in different directions, pull it out through the existing hole.
If you act in this way, there will be no need to remove the counterweights, engine, shock absorbers, dispenser and other untouched elements of the machine. Only the drum with less than half of the tank is pulled out. We place it on an old car tire and begin dismantling and subsequent replacement.
Ardo washing machine, DIY repair
The Italian brand of household appliances Ardo has long become very popular and popular among a wide range of consumers. Automatic washing machines are considered a unique calling card of this brand. The model range is represented by machines of various sizes - from compact to full-size. And Ardo top-loading machines are considered one of the most convenient for rooms with limited size.
The only pity is that, like any complex equipment, Ardo washing machines cannot be fully insured against malfunctions. Some problems are quite easy to fix on your own without interfering with the internal world of the machine, while others may require some repairs to fix. Many types of repair work are also quite accessible to carry out on your own.
Typical malfunctions of Ardo washing machines and options for eliminating them
Water does not fill into the car
A fairly common problem that is usually quite easily solved with simple actions.
1. It is necessary to check the presence of water in the water supply. It’s trite, but very often the cause of an imaginary problem is such funny things.
2. The inlet hose is squashed or clogged. We check visually for the absence of compression. We unscrew the hose from the washing machine, open the tap and see if the water will come through? Of course, you need to make sure that the water does not flow onto the floor. If the water does not come out, we find and remove the blockage. The hose with the leakage valve will have to be replaced with a new one after the protection is activated.
3. Clean the inlet filter mesh on the back wall of the washing machine. The mesh is quite fine and often becomes clogged with rust or other particles from tap water. The filter can be easily removed using pliers and cleaned thoroughly.
4. You need to make sure that the fill valve is working properly. It is located immediately behind the filter. The valve becomes accessible after removing the top cover of the washing machine. Perhaps the power wires have come loose or frayed. To check its functionality, the valve itself can be removed and connected to the voltage indicated on its body. Must open. If it doesn't work, you'll have to replace the valve with a new one.
5. The problem may be due to a faulty water level sensor. Or in other words, a pressure switch. You can also find it under the top cover. It comes off quite easily. It is held on the washing machine body with screws or latches. We check the integrity of the wires and their connection to the sensor.
A tube fits from below to the pressure switch. It may be clogged. The simplest test for the functionality of the sensor after removing it is to blow into its tube. If you hear a click, the pressure switch is most likely working. Otherwise you will have to replace it with a new one. It is important not to mix up the wires when installing a new one.
Ardo washing machine does not drain water
The solution to the problem must be sought in the following sequence:
- It is necessary to check for kinks or twists in the drain hose.
- If the drain hose is connected directly to a sewer pipe (fixed connection), you must ensure that it is not clogged. The easiest way is to disconnect the hose and see if water flows out of it. If not, check the hose for blockages.
- If everything is in order with the sewer and drain hose, you should check the condition of the drain filter. It is made in the form of a threaded plug and is located at the bottom of the unit on the front side - behind the door or decorative panel. Before unscrewing the filter, place a container under the machine to collect water. It is necessary to clean not only the filter itself from debris, but also the place where it is installed. After this, you can screw the part into place and check the results of the work.
- The next suspect (if all else fails) is the drain pump. Most often, this unit breaks due to small objects getting inside - coins, buttons, etc. The pump is installed at the bottom and is easiest to reach by tilting the car on its side. Some models of Ardo washing machines are not closed at the bottom; others have an easily removable protective cover in this place. First, use a multimeter to check the presence of voltage at the pump contacts. If everything is in order with the electrical circuit, turn off the power to the machine and disconnect the pump.
Article on the topic: How to properly wash white sneakers in a washing machine
The clamps holding the drain hose and pipe from the machine tank do not need to be completely removed - just loosen them slightly. Then the wires are disconnected and the pump itself is unscrewed. After removing foreign objects, the assembly is assembled in the reverse order.
Washing machine drain pump
If the pump turns out to be serviceable, we move on to the last link in the chain - the level sensor, also called a pressure switch. It is he who sends a signal to the controller about the need to start the drain pump. To get to this element, just remove the top cover of the machine by unscrewing the screws and slightly pushing it back. Next, you need to check the condition of the connections of the wires to the sensor contacts. If there are no complaints about them, the pressure switch should be dismantled and the tube connected to it from below should be inspected for blockages.
Next, you need to blow into the tube - this way the functionality of the device is checked. If it is in working order, you should hear a click. If you cannot hear any clicks, you need to purchase and install a new level sensor.
There is no reason to complain about the quality of Zanussi washing machines, but no one is immune from unpleasant surprises. Zanussi washing machine - do-it-yourself repair of the mechanical component of the unit.
You will learn how to fix some types of failures of Indesit washing machines here.
It doesn’t always make sense to contact specialists if your washing machine breaks down. Some problems can be fixed on your own. If you are the owner of a Kandi washing machine, the following article https://aquacomm.ru/cancliz/mnogokvartirnyie-doma/santehnika/kandi-stiralnaya-mashina-remont-svoimi-rukami.html will help you deal with its repair.
Article on the topic: Sink that is installed above the washing machine
Types of breakdowns and reasons for their occurrence
A washing machine is a rather complex piece of equipment, so malfunctions of the unit can be caused by many reasons. But some of them are much more common than others. Here is a sample list of them:
User forgot to remove shipping bolts
At the factory, all elements of a freshly manufactured washing machine, installed on springs or elastic suspensions, are rigidly fixed with bolts. If this is not done, then after shaking on a long journey, the unit will end up in a warehouse or shopping center in very poor condition.
Before the first start, these bolts must be removed, which some buyers do not do due to forgetfulness. Of course, in this state of affairs, the unit will not be able to work properly.
The machine was installed askew
All washing machines must be installed in a strictly horizontal position. The correct installation is controlled by the building level. If there is a misalignment, the rotation of the drum, especially in the spin mode, is accompanied by excessive vibrations and noise.
Poor water quality
The scourge of all washing machines, like boilers, is scale - a hard, porous deposit of calcium and magnesium salts (hardness salts), which forms especially actively in hot water. The heating element becomes covered with deposits, as a result of which it initially loses its ability to quickly heat water, and then completely fails.
Violations of operating rules
Many users themselves create problematic situations by ignoring the instructions given in the instructions.
For example, overloading the machine with laundry or, conversely, starting an almost empty unit leads to undesirable consequences.
Also, do not overfill the distribution container for detergents - powder and other chemicals must be poured in the quantities specified in the instructions.
Problems often arise because powder left in a container for a long time cakes, making it difficult for the machine to absorb it.
Some models react painfully to switching a washing program before the current one has completed.
And another emergency situation - the user started the machine, forgetting to close the drum.
Troubleshooting
If the washing machine does not wash clothes well, then the drum may have been overloaded during washing, or an insufficient amount of detergent was added. It is recommended to put in the amount of powder that is required and review the number of things put in the machine.
If the spin cycle was poor, a low speed may have been selected, or the items may have been unevenly distributed in the drum. The last problem occurs when washing a small number of items. It is necessary to properly distribute things in the drum.
Removing pump blockage
To remove the blockage, you need to open the drain pump cover and unscrew the screw that holds it in place.
- Unscrew the drain filter cover. Drain the water.
- Then turn the pump counterclockwise, pressing it into the inside of the machine.
- Then pull it out through the bottom of the washer. Place the machine on its side and remove the pump.
- Disconnect the wires, clamps and remove the fittings suitable for it.
- Now you can clean the pump and put it back in the same way.
Article on the topic: How to clean the filter in a Zanussi washing machine
Replacing parts
Repairing an Ardo washing machine is not always limited to just cleaning the parts. Sometimes it is necessary to replace failed elements. In addition to the heating element, it is better to have parts replaced by a washing machine repair specialist, since an unqualified person can only harm the unit.