One of the most common problems with washing machines of all brands is bearing wear. This also applies to Candy machines.
By replacing the bearing, you can extend the service life of the machine for some time, postponing an expensive purchase for several months or even years.
We will tell you below how to replace the bearings of a Candy washing machine.
Causes of malfunction
Bearings on washing machines not only from Kandy, but also from other companies fail for a number of reasons. Firstly, this happens if the equipment has been in operation for many years. Components have a certain service life, after which they break.
Secondly, the culprit of bearing failure may be a damaged oil seal. When holes and cracks appear on it, moisture begins to seep through it. It washes away the lubricant, resulting in much stronger friction, which leads to damage to the part.
Thirdly, the bearing breaks due to the design features of belt-driven equipment. In such devices, serious loads are placed on small elements, which is why they gradually collapse.
Also, bearing failure can be a consequence of improper operation of the washing machine. Overloading and improper loading of laundry lead to breakdowns and failure of equipment.
If you do not replace the damaged part and seal at the first sign of a malfunction, the situation may worsen. More serious components will fail, the cost of repairs will increase significantly, in some cases it will be easier to buy a new washing machine.
Call a specialist and price of work
Without having the skills to repair household appliances, it is better to entrust the bearing replacement to a qualified technician. But this option comes with certain risks.
Firstly, the master may damage something in the process if his qualifications are not high enough. Secondly, his services may be too expensive. Thirdly, he can quietly replace any “original” part of the car with a low-quality, cheap analogue.
To protect yourself from all this, you need to call a specialist from a well-known, well-established company. Or use recommendations from friends.
The final amount of the service must be agreed upon before the technician begins work . And during the process of replacing a part, it is advisable to be nearby.
The cost of such repairs depends on the level of the technician, the inclusion of additional services (diagnostics, replacement of other parts, etc.) Prices may vary significantly in different cities. On average, replacing a bearing costs from 1 to 3 thousand rubles.
Preparation for repair
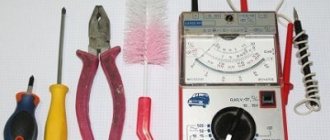
Before repairing, it is necessary to assemble the tool and purchase spare parts. To disassemble the Kandy washing machine and replace the bearing, the owner of the device will need:
- hammer;
- pliers;
- metal rod for knocking out bearings;
- screwdrivers;
- set of open-end wrenches;
- sealant;
- WD-40;
- bearings and seals.
You can purchase spare materials in specialized stores, service centers or order online. Seals and bearings should be selected strictly in accordance with the model and brand of the washing machine. It is better to buy branded components or similar ones of good quality. Purchasing cheap, low-quality materials will soon lead to repeated repairs of equipment.
After everything necessary is prepared to disassemble the equipment and change the bearing, it is necessary to disconnect the Kandy washing machine from the network, water supply and sewerage system and move it to a spacious place so that there is no interference during repair work.
When disassembling a Kandy washing machine, it is recommended to photograph the equipment before removing each component, especially when disconnecting the wiring. This will allow you to assemble it correctly and avoid mistakes that could lead to costly repairs.
Do-it-yourself car repair Kandy
First of all, if you notice an error code, reboot the washer. Unplug it for 10-20 minutes.
If after switching on the code does not disappear, you need to continue searching. The photo shows the structure of the Candy washing machine to make it easier for you to navigate.
You can also look at the operating instructions for the Kandy washing machine.
Solving drainage problems
Let's figure out how to get rid of the blockage. DIY repair:
- Cleaning the drain filter. It is located below: on the front panel, behind a small hatch. Unscrew the filter and inspect for blockages.
- Checking the drain pipe. It is necessary to lay the washing machine on its side and reach the nozzle through the bottom. For more information about cleaning and replacement, watch the video:
Along with the pipe, inspect the drain hose, which could also be clogged. To clean, you can rinse it under water pressure.
Checking the pump (pump) is performed after inspecting the impeller. Take out the drain filter and look into its hole
Using a flashlight, notice whether the impeller is spinning or not. If it stays still, it means there is a problem with the pump, or a thread or piece of fabric is wound around the impeller axis
To remove the error from the screen and return the SM to functionality, you need to get to the pump.
DIY repair:
- Disconnect the SM from the network and communications.
- Place the washer on its side with the bottom open.
- Unscrew the pump mounting bolts.
- Open the connectors by disconnecting the wires.
- After removing the pump, inspect the impeller for blockages.
If the pump malfunctions, you can install a new part in the reverse order.
How to turn on the Kandy machine
If your washing machine does not turn on or display an error code, do the repair yourself:
- Check the power cord and extension cord (if connected through one). Connect any household appliance to the extension cord. If it works, then the extension cord is working. If the wire is damaged, it must be replaced.
- To find out if there is voltage in the network, connect one of the devices to the outlet. If it doesn't work, you need to call an electrician.
- To inspect the power button and its contacts, you need to remove the front panel.
What to do:
- Remove the top cover of the washer by unscrewing the bolts at the back.
- Remove the dispenser tray.
- Unscrew the screws holding the receiving tray.
- Unfasten the latches and remove the panel.
- Disconnect the wires coming from the control module.
Now inspect the button contacts. They may need to be replaced.
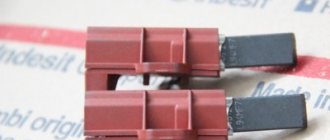
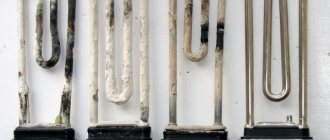
Replacing the heating element in a washing machine
When using low-quality powders and hard water, the heating element becomes covered with scale. Subsequently, scale may cause the heater to burn out. If the heating element breaks down, the corresponding error code will appear on the display.
To replace the element, you need to remove the back panel of the SM Kandy. Make your own repairs:
Visually assess the condition of the heating element. Additionally, you can check the heater while it is in the car. To do this, attach the multimeter probes to the contacts of the heating element and measure the resistance. A working part will show from 20 ohms to 30 ohms.
If broken, install a new element.
How to check the heating element and its thermostat, watch the video:
Bearing replacement
To replace the bearings, you need to know how to disassemble a Kandy washing machine. Getting to them is very difficult, and not everyone can do it.
Watch detailed video instructions:
Solving electronics problems
What are the signs of this breakdown in the Kandy automatic washing machine? You are trying to start the wash, but the process does not start. An error code lights up on the display.
The reason may be an open hatch door. If the locking device fails, the hatch is not electronically locked, so the wash does not start. Do-it-yourself repair involves replacing the UBL:
- De-energize the CM, open the door.
- Bend the rubber cuff and use a screwdriver to remove the metal clamp.
- Unscrew the bolts securing the locking device.
- By bending the cuff, disconnect the lock from the panel.
- After disconnecting the electrical connectors, remove the lock and move it to a new part.
Electronic problems can be caused by a broken wire circuit between the control board and the rest of the machine. Therefore, you need to inspect everything sequentially. For this you will need a Candy washing machine wiring diagram.
If there were sudden voltage changes, the board itself or its elements could burn out.
It is better not to repair the main component of the Kandy automatic washing machine yourself, but to entrust it to a professional.
Disassembling the washing machine
To replace the bearing, you first need to disassemble the Kandy washing machine. The process looks like this:
- Unscrew the screws, slide the top cover back and remove it.
- Remove the top counterweight plate.
- Unscrew the fasteners and remove the back panel.
- Pull up to remove the left and right top side panels.
- Unscrew the two bolts on the sides, turn off the wiring, photograph it, and remove the control panel. It is held on by several plastic latches, which are very fragile. They need to be squeezed out with caution.
- Remove the hoses for filling water into the detergent dispenser.
- Turn off and remove the pressure switch.
- Unscrew the fasteners holding the control unit, remove the board, photographing the wiring.
- After removing the bolt, remove the rheostat.
- Disconnect the outer and inner clamps and remove the cuff on the hatch door.
- Remove the screw and remove the detergent tray.
- Disconnect the pipes holding the powder receiver and the tube from the rheostat.
- Remove the belt, heating element, motor, temperature sensor.
- Disconnect the remaining wiring.
- Disconnect the hose from the tank to the pump.
Now you need to make sure that all wires and hoses are disconnected and all parts that may interfere with the removal of the tank are removed. The washing machine door must be open. To remove the tank, you need to remove it from the side springs and pull it up.
Do-it-yourself car repair Kandy
First of all, if you notice an error code, reboot the washer. Unplug it for 10-20 minutes.
If after switching on the code does not disappear, you need to continue searching. The photo shows the structure of the Candy washing machine to make it easier for you to navigate.
You can also look at the operating instructions for the Kandy washing machine.
Solving drainage problems
Let's figure out how to get rid of the blockage. DIY repair:
- Cleaning the drain filter. It is located below: on the front panel, behind a small hatch. Unscrew the filter and inspect for blockages.
- Checking the drain pipe. It is necessary to lay the washing machine on its side and reach the nozzle through the bottom. For more information about cleaning and replacement, watch the video:
Along with the pipe, inspect the drain hose, which could also be clogged. To clean, you can rinse it under water pressure.
Checking the pump (pump) is performed after inspecting the impeller. Take out the drain filter and look into its hole
Using a flashlight, notice whether the impeller is spinning or not. If it stays still, it means there is a problem with the pump, or a thread or piece of fabric is wound around the impeller axis
To remove the error from the screen and return the SM to functionality, you need to get to the pump.
DIY repair:
- Disconnect the SM from the network and communications.
- Place the washer on its side with the bottom open.
- Unscrew the pump mounting bolts.
- Open the connectors by disconnecting the wires.
- After removing the pump, inspect the impeller for blockages.
If the pump malfunctions, you can install a new part in the reverse order.
How to turn on the Kandy machine
If your washing machine does not turn on or display an error code, do the repair yourself:
- Check the power cord and extension cord (if connected through one). Connect any household appliance to the extension cord. If it works, then the extension cord is working. If the wire is damaged, it must be replaced.
- To find out if there is voltage in the network, connect one of the devices to the outlet. If it doesn't work, you need to call an electrician.
- To inspect the power button and its contacts, you need to remove the front panel.
What to do:
- Remove the top cover of the washer by unscrewing the bolts at the back.
- Remove the dispenser tray.
- Unscrew the screws holding the receiving tray.
- Unfasten the latches and remove the panel.
- Disconnect the wires coming from the control module.
Now inspect the button contacts. They may need to be replaced.
Replacing the heating element in a washing machine
When using low-quality powders and hard water, the heating element becomes covered with scale. Subsequently, scale may cause the heater to burn out. If the heating element breaks down, the corresponding error code will appear on the display.
To replace the element, you need to remove the back panel of the SM Kandy. Make your own repairs:
- After unscrewing the screws and removing the panel, you will see a heating element below the tank.
- Disconnect all connectors.
- Unscrew the central nut and push the bolt inward.
- Carefully prying at the edges, pull out the element.
Visually assess the condition of the heating element. Additionally, you can check the heater while it is in the car. To do this, attach the multimeter probes to the contacts of the heating element and measure the resistance. A working part will show from 20 ohms to 30 ohms.
If broken, install a new element.
How to check the heating element and its thermostat, watch the video:
https://youtube.com/watch?v=51545UYwwds
Bearing replacement
To replace the bearings, you need to know how to disassemble a Kandy washing machine. Getting to them is very difficult, and not everyone can do it.
Watch detailed video instructions:
Solving electronics problems
What are the signs of this breakdown in the Kandy automatic washing machine? You are trying to start the wash, but the process does not start. An error code lights up on the display.
The reason may be an open hatch door. If the locking device fails, the hatch is not electronically locked, so the wash does not start. Do-it-yourself repair involves replacing the UBL:
- De-energize the CM, open the door.
- Bend the rubber cuff and use a screwdriver to remove the metal clamp.
- Unscrew the bolts securing the locking device.
- By bending the cuff, disconnect the lock from the panel.
- After disconnecting the electrical connectors, remove the lock and move it to a new part.
Electronic problems can be caused by a broken wire circuit between the control board and the rest of the machine. Therefore, you need to inspect everything sequentially. For this you will need a Candy washing machine wiring diagram.
If there were sudden voltage changes, the board itself or its elements could burn out.
It is better not to repair the main component of the Kandy automatic washing machine yourself, but to entrust it to a professional.
Source
Tank disassembly
To disassemble the tank, you must:
- Remove the second counterweight and the rubber cuff from it.
- Unscrew the bolts and remove the upper part of the tank, and also remove the gasket that ensures tightness.
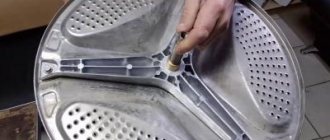
- Turn the tank upside down and remove the pulley.
- Use a screwdriver to block the pulley so that it does not rotate and unscrew the nut.
- Remove the pulley. Access to the shaft will open.
- Find a similar nut so as not to spoil the original one, screw it back on and knock out the shaft with light blows of a hammer on the nut. The blows are applied strictly at right angles so as not to bend the shaft.
- After the shaft is knocked out, unscrew the nut and remove the lower part of the tank, freeing the drum.
- Inspect the crosspiece for damage. If there is play, it needs to be changed.
- Clean the shaft from dirt and grease. If defects are found, it is also better to replace it. Particular attention is paid to the shaft sleeve. If it is worn out and there are transverse grooves, it should be replaced. Otherwise, moisture ingress will cause the new bearing to fail.
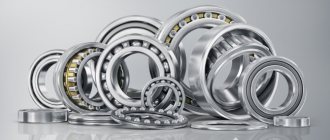
Changing the bearing in the Candy washing machine
When using household appliances, even from the most well-known, reputable manufacturers, there is a risk of breakdowns and failure of individual spare parts. Very often, the cause of breakdowns in Candy washing machines is wear of the bearings. Eliminating such a breakdown requires certain knowledge and experience.
For specialists professionally involved in repairing washing machines, such repairs do not pose a problem. The work of replacing the bearing takes very little time, but after it is completed you receive a post-repair guarantee, which will allow you to contact the service center for help in case of possible troubles.
Instructions for replacing the bearing in a Kandy washing machine
Replacing a bearing in a Candy washing machine begins with dismantling the tank. Let's look at the whole process in more detail.
After you remove the tank, unscrew the main nut using a wrench. In this case, it is necessary to hold the crosspiece to avoid its scrolling. A hammer handle is quite suitable for this purpose. Now you can remove the pulley.
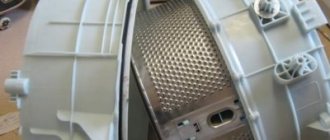
Using an ordinary screwdriver, you need to free yourself from all fastening elements and screws that connect the halves of the tank. Once you are sure that all the screws have been removed, carefully pry the tank halves apart. Remove the iron tank of the washing machine from the body and clean it of scale and dirt.
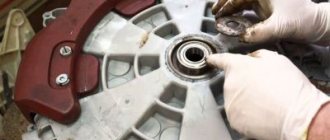
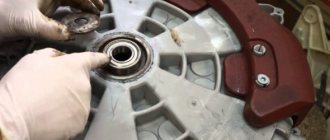
washing machine tank with bearing
Now it's the turn of the bearings. Carefully, so as not to damage the seats, knock out or squeeze the worn bearings out of the tank. In order to prepare the new set for operation, connect the second bearing to the oil seal, carefully lubricated with special bearing grease.
Slowly insert the first bearing, carefully beating it around the circumference with a wooden block using a hammer. Press it into the socket, again using a hammer and screwdriver. Proceed in the same way with the second bearing with an oil seal.
Place a new gasket on the tank that connects both halves. Coat its surface with connecting sealant. Place the pulley on the tank and secure it carefully with a wrench. Don't forget to tighten the screws connecting the tank halves. This is how to replace a bearing in a Candy washing machine. Now you need to put the tank back, that is, carry out the reverse set of works.
Of course, if you have at least some idea of the design of the washing machine, you can replace the bearings yourself. But such repair work is considered a rather labor-intensive and complex process. Therefore, repairs should be entrusted to professionals. After all, the design of different models provides for its own individual approach.
Quite often it is necessary to completely disassemble the washing machine in order to remove the tank and drum from the unit. There are models in which a non-separable tank is installed. In order to replace the bearings in such a washing machine, you need to cut the tank and then connect its parts using a blowtorch. Here you cannot do without contacting a service center with high-level specialists.
For more detailed instructions, watch the video below:
What results from untimely replacement of bearings?
So, if you notice grinding, rustling or other extraneous sounds while your washing machine is operating, this is a signal that it is time to replace the bearing. Such problems usually occur after using the washing machine for quite a long time. This is five to seven years.
Extraneous sounds that increase over time indicate that the problem is getting worse and the destruction of the elements of the unit begins. Various defects in the bushings and shaft seating occur. The drum becomes very loose and cracks and grooves appear in its leading edge. Therefore, the sooner the operation of faulty equipment is stopped, the greater the likelihood that the breakdown will not lead to damage to the drum, pulley and other functional elements of the unit.
If you contact the service center in a timely manner, you will receive a washing machine that can function fully. Before carrying out repair work, the specialist will carefully examine the tank in order to identify possible cracks and damage, and will also inspect the drum shaft. Such careful diagnostics will allow you to receive a unit after repair that will delight you with trouble-free operation for a long time.
It should be said that all manufacturers usually include in their warranty service a complete replacement of the rear segment of the tank. Such repairs are carried out absolutely free of charge throughout the warranty period. After the warranty period has expired, service organizations offer to replace the bearing block. This is done to minimize the cost of repairs.
Please rate the article:
Loading…
Source: https://tehnika-soveti.ru/menyaem-podshipnik-v-stiralka-candy/
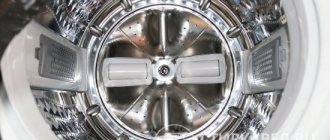
Bearing replacement
The bearings are located in the rear wall of the drum. Before you take them out and replace them, you need to pry up and remove the oil seal with a flat screwdriver. It will also need to be replaced with a new one.
Next, you need to knock out the inner and outer bearings in turn. These actions are performed using a hammer and a metal rod. First, the bearing installed outside is knocked out. The blows are applied evenly in a circle until the part comes out of the seat. Next, remove the second oil seal and knock out the inner bearing.
After the bearings are knocked out, you need to clean the drum and bearing seats. It is necessary to remove dirt and wipe these parts dry.
Now you need to change the bearings - first the internal, then the external. They are driven in evenly in a circle; this process must be monitored very carefully to prevent the part from skewing.
Next you need to change the seals. Before this, they should be thoroughly treated with a lubricant that has water-repellent characteristics.
Getting access to the tank
Disassembling the Candy machine should begin by removing the top cover. To do this, it is necessary to free the rear panel of the unit from the screws holding it. The top panel gently slides back and slowly releases. At this stage there should be no difficulties. To get to the drum you need to disconnect:
- top counterweight;
- side top panels on the left and right (loose, pulled out with a slight upward movement);
- front panel (held by two bolts on both sides of the structure), carefully disconnect the connected wires;
- hoses connected to the powder tray;
- pressure switch;
- control unit (held by two bolts, pay attention to the correct disconnection/connection of the main wires);
- rheostat (held by one bolt);
- a cuff on the tank door, held in place by a latch clamp;
- receiving tray for detergents (held with a screw);
- pipes holding the powder receiver (bottom left, behind the cuff);
- tube leading to the rheostat;
- Heating element, tube, motor, temperature sensor (bottom, near the tank);
- a wire that reads the number of rotations of the drum;
- mounting bolt (bottom left);
- drain pipe with a barrel held by a clamp.
Assembling the tank and washing machine
Before assembling the tank, both halves must be thoroughly cleaned of scale and dirt. The joints should be carefully treated with silicone sealant. The gasket between the tank halves should be replaced with a new one. The bolts should be tightened crosswise.
Reassembling the Kandy washing machine is done in the reverse order. If the user took photographs at the disassembly stage, you should check them, especially when connecting the wiring. Installed parts must be inspected, cleaned if necessary, or replaced if damaged. Be sure to descale the heating element.
After the equipment is assembled, it is necessary to leave it for the time required for the sealant to completely harden. Next, you need to connect the washing machine to communications and electricity, add a small amount of detergent and run a test wash. This is necessary to remove dirt, grease and unpleasant odors remaining after the repair. If during the test wash the Kandy washing machine operates quietly, no extraneous noise is heard, and no moisture appears under the machine, this indicates that the bearing repairs were carried out successfully and the equipment was assembled correctly.
Possible difficulties
It is not recommended to replace bearings yourself without basic knowledge of the design of such equipment. Since the part being replaced has a complex location, to get to it you need to remove many other components, and this is a complex technical process.
But the main difficulty lies in reassembling the machine. What is easy to disassemble can cause a lot of trouble when installing in its place. It is especially difficult to return all elements of the machine's electronics to their original state.
There are other difficulties in this event. The task of removing old bearings and installing new ones is not an easy one. If this fails, you will need to call a technician, and the car will remain in a disassembled state until he arrives.
In addition, without the necessary experience, you can easily make a mistake in choosing the bearing size; this can only be clarified after complete disassembly. Another important nuance - when disassembling the car, it is advisable to take the opportunity to inspect all the components being removed and, if necessary, replace them.
But it is quite difficult for a non-specialist to assess the condition of the parts . As a result, it may happen that immediately after replacing the bearing something else will fail.
Recommendations for using technology
To ensure that bearings fail as rarely as possible, it is necessary to operate the Kandy washing machine correctly. The equipment should not be overloaded; there should be no more things in the drum than is allowed by its characteristics and the selected program. Bulk items should be placed inside the drum carefully and distributed evenly there. Imbalance and overload negatively affect the condition of the bearings.
If the owner of the equipment detects the first signs of bearing failure, there is no need to aggravate the situation. It is recommended to change them immediately, otherwise this will lead to failure of more important components and more expensive repairs.
How to call a specialist
To call a home appliance repair specialist:
- Call: in Moscow4
- in St. Petersburg
When contacting by phone please provide:
- Type of equipment, brand and, if possible, model;
- What exactly broke - describe in your own words;
- Indicate the date and time convenient for the repair;
- Contact information: phone number, address, full name, nearest metro station.