We repair the “brains” of washing machines of any design:
- programmers (command devices or KSMA) in models with electromechanical control;
- control boards in electronically controlled washing machines.
We provide services in Moscow and the Moscow region. The technician arrives at your home within 24 hours of the call with all the necessary tools and components.
Repair of the control unit in simple cases is carried out at home, in complex cases - in a service center. You receive working equipment:
- 24 hours after contacting – for home repairs;
- after 2-3 days - if the module can only be repaired in a workshop.
After repair, a receipt with a 6-month warranty is issued.
How the repair works - general procedure
A RemBytTech specialist comes to the call:
- on the day of your call, if you called our service center before 11-12 noon;
- for the next one - if you applied later;
- on another day for which you scheduled the repair.
At your home, a technician disassembles the washing machine and checks whether the control unit is really faulty. During the diagnostic process, the specialist finds out whether the faulty board can be repaired at home, whether it will have to be taken to a workshop, or whether the module cannot be repaired at all and requires replacement.
Note! Even if you yourself or with the help of another technician find out that the board is faulty, diagnostics are still necessary. Firstly, in order to understand the extent of the module failure, and secondly, because we bear warranty obligations and financial responsibility for repairs and cannot rely on the diagnostic results of third-party specialists.
If repairs are possible at home
The specialist resolders the faulty elements of the control unit and checks that the module is working. After this, the washing machine is assembled. The entire repair takes from 40 to 90 minutes.
If the module can only be repaired in a workshop
In case of complex breakdowns, a specialist takes the board to a service center, where it is “handled” by a special master electronics engineer who has been repairing only electronic control modules and programmers for 20 years. After 1-2 days, a working unit arrives back to you, the technician assembles the washer, and you enjoy washing again.
In both cases, after checking the operation of the washing machine, the technician issues a check with warranty obligations.
How to change?
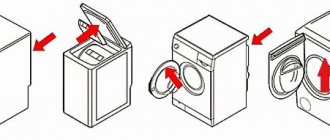
Replacing the rubber seal on the hatch door of a Bosch washing machine consists of three main stages: dismantling the old cuff, installing a new seal, and reassembling the washing machine.
How to remove?
To quickly get to the desired element - a worn cuff, you need to carry out a series of sequential actions:
- Using a Phillips screwdriver, unscrew the fasteners holding the top panel of the washing machine.
- Gently pushing forward, remove the cover from the washer body.
- Remove the detergent dispenser. To do this, you need to press a special latch inside the tray, after which the powder receptacle is very easily pulled out of the grooves.
- In the opened niche of the detergent dispenser, unscrew the fasteners holding the control panel. Carefully, trying not to damage the wiring contacts, remove the panel from the washing machine body.
- Using a flathead screwdriver, press out the latches holding the decorative panel located at the bottom of the washing machine.
- Open the hatch door of the washing machine. Feeling the edge of the rubber seal with your fingers, find the retaining clamp (thin metal ring).
- Using a flat-head screwdriver, carefully pry the clamp off the cuff.
- Place the rubber seal into the washing machine drum.
- Unscrew the fasteners holding the hatch lock device (located on the right side of the loading hatch), disconnect the UBL wiring.
- Unscrew the fasteners around the perimeter of the front panel and remove it from the washing machine body.
- Using a flat screwdriver, carefully pry off the second clamp (metal ring) together with the rubber seal.
On the cuff, in the upper part, the manufacturer provides a special mark, which must coincide with the mark on the tank.
If there are no additional marks, before dismantling the old cuff, the point of contact of the tank with the rubber seal must be marked with a marker. This will help avoid mistakes when installing a new cuff.
Installation of a new part
Installing a new rubber hatch door seal yourself will not be difficult , provided you follow a clear sequence of actions:
carefully inspect the new part, turn the rubber with the drain holes down;- lubricate the grooves of the cuff and the seat with a soap solution (sliding simplifies the process of tightening the rubber seal);
- placing the cuff in a special recess located along the edge, evenly stretch the rubber seal to the right and left sides, pulling it onto the seat;
- secure the new cuff with a metal clamp.
It is necessary to ensure that the drain holes are located clearly in the center, otherwise problems with draining water may occur.
Reassembly
The process of reassembling a Bosch washing machine occurs in the following order:
- The UBL contacts are connected.
- The front panel is attached to its original place.
- The hatch locking device is secured with fasteners.
- The rubber cuff is fixed with a metal clamp.
- The lower decorative panel returns to its original place.
- The control panel is attached, the lid is mounted, and the detergent dispenser is inserted.
The reassembly process is completed, the washing machine is connected to the communications, after which a test wash is started.
How to change cuffs - in the video:
How to call a specialist
To repair the control board, contact the control room by phone (calls are accepted from 8.00 to 22.00) or send an electronic request at any time.
When applying, you must indicate in the application or inform the dispatcher the following information:
- Make and model of the washing machine, if you know. For example, Samsung Fuzzy S821 Bio Compact, Indesit WISL 82 or LG E-1091LD. Look for information about the model on the sticker plate with characteristics. It is usually located on the posterior wall of the MCA, but can also occur in the front. The information is necessary so that the technician takes with him the necessary components to repair the board and a new module if a replacement is suddenly required.
- Convenient repair time.
- Contact information: address, phone number and your name.
On the agreed day, the specialist will call you in advance to confirm the time of arrival.
Step by step work
Prepare your SM for repair: disconnect it from the network and communications, disconnect the intake hose, and drain the water from it. Unscrew the drain filter - it is located behind the hatch, at the bottom of the front panel. Take out the filter and drain the water, first replacing the container.
Now move the car away, giving yourself access to the rear panel. Start removing the engine:
- Use a Phillips screwdriver to unscrew the screws around the perimeter of the back cover.
- Remove the panel and set aside.
- The motor is located under the washing machine tank. To get to it, you need to remove the drive belt. Pull forward slightly while turning the drum pulley.
- Take a photo of the motor wiring for further connection.
- Disconnect all wires.
- Remove the bolts (usually three to four) that secure the motor.
- Pull slightly towards you and remove the motor from the MCA.
Our advantages
- Free diagnostics and specialist visit. Only repair work and necessary components are paid for. We give diagnostics, visit of a technician, and in rare cases, removal of the board to the workshop and delivery back as a gift.
- Experienced craftsmen with 5 years of experience. When hiring a service center, we select specialists with at least 5 years of experience in repairing washing machines and recommendations from other reputable technicians or service centers. These are our internal corporate rules.
- Urgent repairs at home or in a service center. You can wash your clothes within 24 hours after you contact us for repairs at home. Or in 2-3 days, if complex repairs of the electronic unit are required in the workshop.
- Convenient work schedule from 8 am to 10 pm. Finding a comfortable time to “receive” a specialist will not be difficult for even the busiest citizens.
- Discounts up to 10% on work for socially vulnerable citizens. To receive a discount, you must present the appropriate document: pensioners - a pension certificate (10% discount), low-income citizens - a social card (5% discount).
- 6 month warranty on repaired module based on receipt.
Preparation
Provided proper preparation, replacing the rubber seal of the hatch door with your own hands will not be difficult.
The first thing you need to do is assemble the tool:
- keys,
- screwdrivers (two flat, one Phillips),
- marker.
It’s also worth taking care of a new cuff for your Bosch washing machine in advance.
After the necessary tools are collected:
- the washing machine is disconnected from the sewer and water supply,
- unplug the power cord from the socket,
- Place the household appliance on a flat, stable surface, away from walls and furniture.
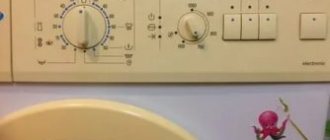
About the control board design
“If the motor is the heart of a washing machine, then the board is its brain,” as washing machine repair specialists say. And indeed, even from the name “control module”, it follows that this node controls something. And not just something, but the operation of the entire washing machine.
In automatic washing machines, there are two main types of control boards - a programmer (also called a command device or KSMA) and an electronic control module .
Commando apparatus
The programmer in the classic version consists of a synchromotor, a gearbox, program disks with cams and biscuits with pusher levers and actuator contacts. The synchromotor, through a gearbox, transmits rotation to the disks, the cams of which interact with the pusher levers on the biscuit and switch the actuator contacts. In this way, all components of the washing machine are mechanically turned on and off: motor, heating element, fill valve, drain pump, etc., therefore washing machines with a programmer are also called machines with an electromechanical control type . Program cam disks are divided into "fast" and "slow". “Fast” ones are responsible for turning on and off the SM executive units, and “slow” ones are for switching washing modes.
The electronic unit
It is a microcircuit with a processor and memory, which contains a microprogram with an algorithm for the operation of the washing machine. Sometimes the processor and memory are combined in one chip. The closing and opening of the contacts of the executive units is performed by electronic components (relays, triacs and other radio components) according to a signal from the processor, which is why this technique is called electronically controlled .
Almost all modern automatic washing machines come with an electronic module. Electromechanical control type is the last generation. Now it is used mainly only in semi-automatic machines. However, we often come across “old” machines with a programmer from clients and we know how to repair them.
How to repair if the warranty period has expired?
If the warranty period has expired, free repair of the equipment will not be possible. There are two possible ways to solve the problem: disassemble the machine yourself and fix the problem, or seek help from a specialist.
Disassembling a household appliance
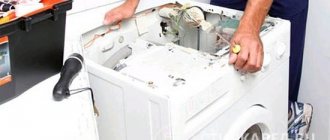
To understand that the electronic module has broken down, it must be removed and inspected. Upon closer examination, you can see oxidized areas and traces of burns on the microcircuit.
Instructions for removing the block:
disconnect the machine from the network;- turn off the water supply tap;
- remove the cover - it is attached to the self-tapping screws located on the back side;
- press the central stop and remove the powder dispenser;
- Unscrew the screws that are located around the perimeter of the control panel;
- disable chips;
- Unfasten the latch and remove the cover.
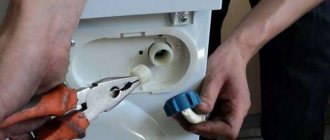
Removing and diagnosing the board
Once access to the board is gained, the terminals need to be disconnected from it. It is important to record this process on video or photo. If after repair you connect the electrical circuit incorrectly, it will not work.
Main stages of diagnosis:
- Damaged areas have scorching or darkening.
- In the place of the crystal notch, the caps of the capacitors are swollen or completely torn.
- The area next to the processor has darkened, and the color of the legs on which the microcircuit is attached has changed.
It will be possible to cope with the repair yourself if the person has experience working with a blowtorch. You should not experiment with an expensive board; it is better to call a specialist.
Troubleshooting Methods
To understand whether you can repair the board yourself, you need to carefully inspect it. You will have to test the parameters of the elements and evaluate which circuits have violations. Only a specialist with experience working with microcircuits can handle this task.
Provided that the board is intact, you can repair it yourself. Basic troubleshooting methods:
The program installation sensors have failed . Reason: clogged regulator contacts. It will be difficult to turn, and you won't hear a click when scrolling. To solve the problem, you need to remove the handle and clean it.- Removing carbon deposits . It appears on washing machines that have been in use for a long time. You can remove accumulated soot with a brush or brush.
- Interference with the sunroof lock sensor . The most common cause of malfunction is soap residue that accumulates over time. Dealing with the problem is simple - just clean the block.
- Loose belt drive . The problem can be corrected by tightening the pulley.
On this forum they share their experience in repairing washing machine circuit boards.
This video discusses the repair of a Samsung washing machine module:
Part replacement
If the board is faulty, then it is simply replaced . To do this you need to purchase a new part. You can buy the module in online stores. The price for a part starts from 5,500 rubles and above. The more modern and intelligent the model, the more expensive the module.
You can purchase a used working board. Such parts may be available in service workshops or private repairmen. However, it is impossible to guarantee their long-term uninterrupted operation.
Checking work
The technician checks the operation of the repaired control board elements using a multimeter. The probe is applied to the part and the values shown by the tester are evaluated. If it is powered or outputs 0, then a short circuit has occurred, if 1 - an open circuit.
After eliminating the breakdowns, soldering the circuit, replacing sensors, resistors and varistors, the controller is installed in place and the washing cycle is started. Provided that everything is done correctly, there should be no failures in the program.
Reasons for failure of the control module
In general, the command apparatus in the SMA is more reliable than the electronic control unit. That is why electromechanics successfully “survives” to this day. But the reasons for breakdowns of both types of boards are almost the same.
- Water getting on board. Leads to a short circuit and burnout of radio components in the case of an electronic board or failure of the synchromotor or burnout of contacts for KSMA.
- Voltage fluctuations in the network. The electronic components of the control module are damaged. Programmers are more resistant to surges; in rare cases, the synchromotor may burn out. The problem mainly affects washing machines located in facilities with poor-quality power supply: in private houses, dachas, and utility rooms.
- High humidity in the room where the washing machine is used. Promotes oxidation of contacts of components of modules of both types. The contacts subsequently stick, burn and/or short-circuit.
- Mechanical damage to the disc cams in the programmer due to mechanical wear or inaccurate switching of washing modes (for example, the program selection knob was turned counterclockwise with force). The plastic physically wears off or chips.
Why change the cuff in a Bosch washing machine?
During diagnostics, several causes of problems with the hatch cuff may appear. Too frequent washing and excessive force when closing the door lead to damage to the structure of the cuff. The service life of this hatch element declared by the manufacturer is from 5 to 7 years. But this period may end earlier if the rules for using the Bosch washing machine are violated:
- too hot water is poured into the drum;
- a lot of washing powder is added;
- a large volume of laundry is loaded;
- Poor quality water or counterfeit detergents are used.
The cuff can be damaged by solid microparticles and sharp objects that fall out of clothing pockets during washing.
Basic malfunctions of the programmer
Command devices fail less often than electronics. Here are the main breakdowns that RemBytTech specialists encounter during repairs.
- (usually the heating element or motor) burn out or stick The most common malfunction, detected in 70-80% of cases when there is a problem with the programmer. It can be solved by washing the contacts or replacing burnt out contact groups.
- The synchromotor burns out. It is replaced with a new one.
- The gearbox fails. Replaced with a new one.
- Mechanical damage to disc cams . Program disks are made of plastic and over time their “cams” wear out. In addition, inaccurate rotation of the program selection knob can lead to pieces of the disc's plastic breaking off. Damaged program disks are replaced with new ones.
They don’t sell spare parts for programmers, so we use components from old washing machines that were sent for disassembly.
Repair of electronic units – guarantees
The electronic unit is responsible for controlling the washing processes and spin mode. The work occurs thanks to electronics, which can easily be damaged by incorrect use. Restoring the control units will return the functionality of the washing machine.
The following will work effectively:
- Drain pump;
- Fill valves;
- AC motor commutator;
- Programmer;
- Reception of signals from temperature sensors;
- Signal from water level switch;
- Signal from timer contact groups.
The functions of the module include ensuring the operation of two boards. One of them is responsible for the constant operation of all systems. The second board indexes modes, works with signals from control systems and analyzes them. A malfunction of electronic modules can be noticed by incorrect data of a certain node. Repairing or replacing the module will correct this problem and ensure understanding between the owner and her assistant.
Possible breakdowns of the electronic module of the washing machine
Most electronic units are very sensitive to voltage surges, and in networks with surges they require the installation of a voltage control relay or stabilizer. These are the electronic components that usually fail when a module breaks down.
- Radio components responsible for controlling one or another unit of the washing machine. For example, the failure of a triac is visually manifested as a machine refusing to turn the drum; if the heating element relay burns out, then the washing machine has problems heating the water. And so on. During repairs, burnt out elements are replaced with new ones.
- Treasure the microcircuits through which the signal is transmitted. The tracks almost always burn out (visually turn black) along with the radio elements. The circuit is restored by soldering.
- The “firmware” —the microprogram with the algorithm for operating the washing machine on a special chip with memory—goes wrong. It is necessary to reprogram the memory using a special device or program on a personal computer (pins are soldered to the memory chip and it is connected to the computer). Sometimes the microprogram is embedded in the central processor of the board, then it is “flashed” in the same way.
- The module processor , a key element of the electronic board, is faulty. The processor can be resoldered if you find exactly the same one. But usually, if the processor is faulty, the electronic control board must be replaced.
Note! We do not repair electronic units with a failed processor, since this is a labor-intensive process with an unpredictable result.
Rules for reassembling a Bosch washing machine
After installing the new brushes, the Bosch motor is ready to be placed in the washing machine body. Procedure:
- put the engine in place in the mounting socket;
- fix the motor with screws;
- we connect all the connectors - for this you can use the photographs taken earlier;
- To completely grind in the brushes, it is advisable to carry out the first start without load - the washing machine is plugged into the socket, the “spin” mode is set to the minimum possible speed, the belt is not put on;
- this cycle is run without laundry (without load);
- disconnect the washing machine from the power supply;
- put the drive belt on the motor;
- put the drive belt on the large pulley, turning the wheel slowly, making sure that the belt does not come off the motor;
- install the back cover of the washing machine;
- secure its position with screws;
- put the washing machine in place;
- connect disconnected communications.
Why is it impossible to repair the electronic control module yourself?
Repairing the board yourself requires soldering skills, knowledge of electrical engineering, and knowledge of the electrical circuit diagram of the module of your particular washing machine. If you only picked up a soldering iron during labor lessons and have no idea how a diode differs from a transistor, then “messing with a soldering iron” into the control unit absolutely makes no sense. You'll only make it worse. Even our experienced electronics specialists from the television industry do not risk doing this without a circuit diagram.
Attention! We do not recommend attempting to repair the electronic module yourself. Because if you fail to do this, the master will demand double payment for repairs or will not undertake the work at all. Not because of the harmfulness, but because of the possible additional difficulties that your initiative may lead to.
Principle of operation
The principle of operation of the pump is simple. It comes into play after the wash is completed, pumping out and draining dirty water and detergent residues.
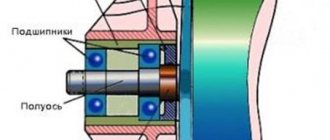
The part is represented by the following elements:
- a motor that consists of 2 parts: a rotor with a magnet and a starter with a core and winding;
- rotor shaft with bushing;
- impeller;
- frame;
- seal;
- inlet and outlet pipes.
Pump operating principle
- To be activated, the pump must receive a signal from the control module to which it is wired.
- After receiving the command, the impeller begins to rotate, pumping water from the tank into the sewer pipe.
- First, the liquid enters a rubber pipe, which is connected with clamps to the tank and the volute.
- Then, through the filter on the volute, the water flows onto the pump impeller. The role of the filter at this stage is very important, as it protects the part from small debris. If there was no filter, the impeller would jam after just a few wash cycles.
- The liquid then enters the drain hose and passes further: into the sewer pipe, bathtub or toilet.
- Pumping is carried out until all waste water is pumped out of the machine.
When there is no water left in the tank, the pressure switch will send a signal to the electronic module, and it will command the pump to stop working.
Symptoms of control unit malfunction
More than 60,000 repaired washing machines allow us to unequivocally state that there are no exact external symptoms that indicate a board failure. If "experts" tell you about flashing lights, no spin cycles, or program crashes, avoid them. On the contrary, any of the signs casts suspicion, first of all, on another unit of the machine. And only when suspicions are not confirmed should the control unit be checked. For example, when a washing machine does not drain, most often the pump is faulty, it hangs on the wash - you should suspect the heating element (heating element), the indicators are blinking - you should look for an explanation of the error, which is shown by a combination of blinking lights. Any professional technician, before diagnosing a “module malfunction,” first checks all other components and peripherals.
When the board fails, the washing machine does strange things. This is how our clients' RemBytTech washing machines with a faulty programmer or electronic unit were fooled. And this is not a complete list.
- Doesn't turn on at all, just doesn't respond to the power button
- Gives an error code and refuses to execute the program
- The modes are confused or, on the contrary, the machine does not switch the program
- The drum does not spin
- Water does not fill
- Doesn't work at all, the indicator doesn't light up at all
- Knocks out traffic jams: automatic or RCD
- Freezes: stops during washing or, conversely, washes for a long time without stopping
- The washing machine smells burnt, there is smoke coming out, perhaps there was a bang before or there was a flash (the SMA sparked)
- Lights, buttons, indicators on the control panel are on or flashing: all or some (for models without a display), the machine refuses to execute / continue the program
- Water does not drain
- Switches off when washing, rinsing or spinning
- Doesn't wring things out
- The water doesn't heat up
- The display or indicators light up, but the machine does not start washing
- The door does not close because the hatch lock does not work
- Water is poured in and immediately drained
- After washing the door is locked and does not open
- The SMA does not work at all after the lights are turned off (at such moments power surges occur)
- The machine display is blinking
- SM is leaking
- Rattling, noisy, crackling or clicking
- Doesn't drain or wring out
- Doesn't rinse clothes
For clarity, we grouped the symptoms according to the frequency of mention by the client in the treatment, and depicted them in the form of a diagram. This is what happened.
How to understand that an element has failed?
You can understand that the module is faulty by the following signs:
The machine takes in water and immediately drains it.- The device does not turn on and an error code appears on the screen.
- If there is no screen, the LEDs light up and blink.
- Programs do not work or crash.
- The water does not heat up or overheats.
- The drum is spinning too fast or too slow.
The following error codes will indicate a breakdown of the control board
- E1;
- ;
- 4C;
- CH.
In general, any code can indicate a controller malfunction. It all depends on where exactly the breakdown occurred.
Sometimes the board doesn’t break or burn out, it’s just a one-time failure in the operation of the equipment. In this case, there is no need to disassemble the machine; just turn it off for 15 minutes and then restart the wash.
And yet there may be reinforced concrete signs of board failure
Yes, there are, but they appear quite rarely. If there was a bang in your washing machine or sparking in the area of the control unit and a burning smell appeared, then the module has definitely burned out. And it is very likely that there will be something else in addition. Were you not near the machine and missed the flash-pop? No problem. Disassemble the machine and look at the board. Visual traces of burning, blackened tracks, melting of plastic always indicate a malfunction. Unfortunately, this failure cannot always be eliminated; the module may need to be replaced.
Technology
LG Direct Drive washing machines were the first to lack a belt and drum drive pulley. The result was a new technology with 3 distinctive features:
- Inverter motor – characterized by the absence of brushes.
- Direct drive - the motor is mounted directly to the drum shaft, and it is located behind the tank.
- A modernized washing drum - its surface has a unique texture. Various bubbles seem to be scattered on it. This also made it possible to increase the grip of the drum, giving it a wave-like configuration.
This solution received the prestigious VDE award from the German Association Verband der Elektrotechnik Elektronik Informationstechnik.