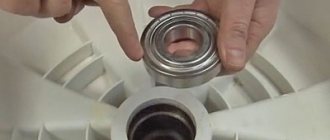
The bearing assembly is one of the main parts of an automatic washing machine, since it connects the pulley and the drum shaft. Using a pulley and a drive belt, torque from the engine is transmitted to the drum of the washing machine.
The bearing is installed on the axis of the washing machine drum and acts as a connecting link between its shaft and pulley
Typically the assembly includes two bearings. One of them is located on the outside of the drum and carries the main load, the second has a smaller load and is located inside the drum. An important part of the assembly is the oil seal - a sealing rubber collar that protects the bearings from contact with water.
To replace the bearing, you will have to remove almost all the parts from the washing machine, so if you have never repaired household appliances or are simply not confident in your abilities, entrust the work to professionals.
The bearing replacement kit includes a rubber seal that is installed at the same time as the metal parts.
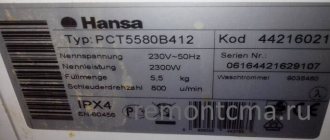
In this article we will tell you how to replace the bearing in an Ariston washing machine, for example, in the Avsl 109 or Margherita 2000 models. The same recommendations apply to household appliances manufactured under the Hotpoint brand. First, let's figure out why the part fails and how to determine its malfunction.
Causes and symptoms of bearing wear
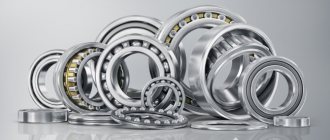
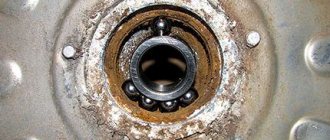
The bearing consists of two rings of different diameters with balls in the space between them - due to this, they rotate relative to each other. The bearing is needed to rotate the washing drum, so the load on it is heavy. The part is protected from water by an oil seal - a rubber seal; its tightness is extremely important for the “health” of the bearing.
The oil seal can be damaged due to water hardness, detergents and other unfavorable factors. If its integrity is damaged, water gains access to the bearing - the balls between the rings begin to rust. That is why the first symptom of bearing wear is creaking and whistling during the washing process. A problem may also be indicated by slow rotation of the drum and play between it and the tank. If you do not start repairs at this moment, the condition of the part will only worsen further - when the bearing crumbles, the drum will stop rotating.
The service life of the part is 6-10 years, it all depends on the brand of the washing machine and its operating conditions. Some factors can cause it to wear out quickly:
- load of laundry exceeds the permissible norm. If you overload the drum, the load on the bearing increases;
- hard water and detergents. They change the composition of the water surrounding the drum and seal, which can cause damage to the seal surface;
- too frequent washing. This is especially true for new washing machines - there should be an interval of several hours between washes.
Replacing bearings in an Ariston washing machine is not an easy task; you will have to disassemble almost the entire washing machine. It is difficult for a beginner to do this, but with due attention it is quite possible. Before starting repairs, you need to find a new part, because the old bearing is no longer suitable.
Bearing defects are extremely rare, and if they occur, squeaking and whistling will be heard during the first wash.
Video
In the video below, you can once again familiarize yourself with the procedure for replacing bearings in Ariston washing machines.
About the author:
Mom, wife and just a happy woman. She draws inspiration from travel and cannot imagine life without books and good films. She strives to become an ideal housewife and is always ready to share her experience.
Found a mistake? Select it and click the buttons:
Ctrl + Enter
Interesting!
Astronauts, while in Earth orbit, solve the problem of dirty things using an original method. Clothes are dropped from the spacecraft and burn up in the upper atmosphere.
Which bearings are best for an Ariston washing machine?
Bearings for washing machines come in two types - single-row and double-row; most Ariston machines have the latter option installed. When buying a new part, you need to rely on the model of the washing machine - this is the only way to choose the right option. Usually you need not only a bearing, but also an oil seal - in most online stores you can find model matching tables for both of them.
If you have the opportunity to go to a spare parts store, then you should definitely take the old bearing with you and rewrite the model of the washing machine. The serial number on the part will allow you to determine the exact details for purchasing a replacement.
If the washing machine is old and the store does not have the corresponding part, you need to look in online stores - sometimes the latest copies are in stock.
Universal tips
If you decide to repair the unit yourself, then you need to follow some tips that will be useful during the work process:
- Washing machine tanks are either collapsible or non-collapsible. With the first option everything is clear - you will need to dismantle the fastenings. In the second case, everything is more complicated, because you will need to cut the drum evenly along the marks, without affecting the internal filling. After replacing the bearing and oil seal, such a tank will need to be connected with self-tapping screws and glued to restore the tightness.
If repairs are necessary, the non-separable tank is sawn apart
- It happens that not only the bearing assembly, but also the bushing on the drum becomes unusable. Sometimes a part can be restored if you turn to a turner. If the bushing is deformed too much, then all that remains is to purchase a new one.
- It is worth noting that all non-original low-quality parts quickly fail, so you should not save on purchasing such items. It is better to purchase spare parts from specialized service centers.
- Before you begin repairing your washing machine, it is advisable to study in detail the instructions that come with it. If it has not been preserved, then information can always be found on the Internet by the name of the model.
- When replacing the bearing, experts advise checking other elements of the washing machine that may have been damaged by a faulty part. Sometimes they have a dense layer of scale on them, which is best cleaned with special means.
Preparing for work
When disassembling the washing machine, you will have to turn it on its side, which means you will need free space. It’s good if it’s in the kitchen, but if it’s in the bathroom, you’ll have to free up space or move the washing machine outside of it.
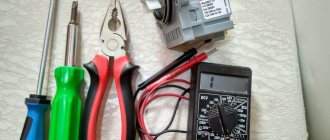
You also first need to disconnect it from all communications and drain the remaining water. Disassembly will require several tools in addition to a new bearing and seal. As a rule, they are replaced at the same time - this is an economically sound decision, because the oil seal is already damaged.
- hammer;
- flat and Phillips screwdrivers;
- thick metal rod;
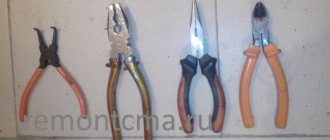
- pliers;
- bit;
- open-end wrenches;
- sealant (waterproof);
- waterproof lubricant;
- bearing puller;
- marker.
It would be best to take photographs of each stage of work so as not to confuse anything during assembly after replacing the bearing. And you may need help to remove the drum - pulling it out alone is not easy.
Removing Covers and Control Panel
The intermediate goal when replacing the bearing in Ariston washing machines is to remove the drum, for which you need to remove the panels and covers that secure many parts. It is recommended to start from the top cover. To do this, you need to turn the back of the machine towards you (or go around it yourself) and unscrew the two bolts that secure the top cover. After this, tilt it forward and remove it - you need to act carefully, not jerkily.
Then you can proceed to removing the back panel - it is usually secured with bolts around the perimeter, there are at least six of them. Having unscrewed everything, it is easy to remove the cover - behind it a view of the pulley and drive belt will open. The latter must be carefully removed by turning the pulley - the belt must be pulled towards you.
Now it's time for the control panel - here you need to start with the detergent dispenser. Having pulled out the tray, you need to press the latch in the middle and remove it. There will be two bolts behind it, two more on the opposite side - everything needs to be unscrewed.
After this, disconnect the latches and remove the wires that hold the panel on the right. They need to be disconnected from the connectors (the location should be photographed or recorded) and thrown up. After this, the panel can be easily detached from the body.
The drum will be removed through the top, so anything that might get in the way must be removed and disconnected from the top of the tank.
- counterweight. Unscrew the bolts (a rod may be required) and remove it;
- pressure switch Disconnect its hose from the tank, otherwise it may break;
- powder receptacle. Loosen the pipe clamp and remove it, then disconnect the inlet valve contacts by unscrewing the bolts. Remove the powder receiver itself along with the valve.
Now only the door and sealing rubber interfere with removing the drum - they also need to be disconnected. To remove the latter, you need to pry the spring under it and pull it off. The door can be easily removed by unscrewing the screws (they are easy to see).
Behind the body, you can remove the hatch lock wiring by unscrewing the fastening bolts. The last step is to unscrew the rear panel screws and the lower counterweight bolts. Remove both parts when finished.
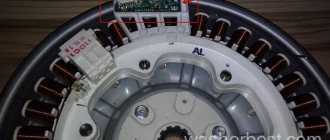
The next step - disconnecting the wiring and shock absorbers - can be done first. To do this, you need to disconnect the wiring from the electric motor (lower part of the housing). Then it was the turn of the engine - after unscrewing the bolts, you need to pull it forward, and then slide it back and remove it from the housing. Disconnect all the wires with wire cutters, including the heating element wiring; you do not need to remove the heating element itself.
All that remains is to remove the shock absorbers and hooks - they are the ones that hold the drum. After this, you can remove it - it may not work the first time, so it is advisable to have an assistant with you.
Replacing bearings and disassembling the drum
You can change the bearing on an Ariston Hotpoint washing machine or another model only by disassembling the drum. For some models, you will even have to saw it - this is done very carefully with a saw, and then the parts are fastened with self-tapping screws or bolts. Before starting work, you need to place the drum on a flat surface, and then begin to remove the pulley. You need to stop it and unscrew the bolt - to improve sliding, you can spray it with lubricant from the list of tools.
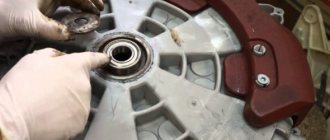
Now you can start disassembling the tank itself - unscrew the bolts and screws around the perimeter, release the latches and remove the upper part of the part. Now you need to separate the tank and the drum, they are connected by a bushing - you need to hit it several times. The drum will fall out of the tank and you can proceed directly to replacing the bearing. Most often the outer bearing gets damaged; it is better to start the inspection there. To do this, turn part of the tank over with the outer side facing you and equip yourself with a chisel. Having installed it on the outer ring, you need to hit the chisel with a hammer.
You can use a puller instead - this way there is less chance of damaging the inner rings, which should not be allowed. Spray the seat with lubricant, wait and install the new part into the socket. Place the tool against the bearing again and drive it into place; it should be firmly seated. Pre-lubricate the oil seal and install it on top. After this, mount the drum back (it is best to use sealant and fastening with bolts or screws) and assemble the washing machine itself in the reverse order. This is where photographs taken during the disassembly process come in handy.
Replacing a bearing in Ariston machines is difficult - you will have to remove and disassemble the drum. Before starting work, you need to purchase new parts and acquire tools - one screwdriver will not be enough. When replacing a bearing, it is very important to act mechanically only on the outer ring, without touching the inner ones.
Complex non-separable parts
The two elements that make up the Ariston washing machine cause the most problems:
- Counterweights.
- Tank complete with drum.
The tank and drum are nominally not at all possible for disassembly. This was originally intended by the manufacturer himself. But, if you have the right skill, you can still first disassemble the models and then put them back together.
As for the counterweight on top, it is screwed to the surface with special spring-loaded screws. Such parts are not like ordinary screws; rather, they are special types of fasteners. Users are recommended to use a special wrench to unscrew it. Otherwise, the operation will become impossible altogether. And it will be impossible to disassemble the drum.
Tools can be asked to be rented for a while, or purchased separately. Pliers and other similar devices must not be used to remove counterweights. This will only lead to additional problems due to the fact that the counterweights break.
Video
In the video below, you can once again familiarize yourself with the procedure for replacing bearings in Ariston washing machines.
Mom, wife and just a happy woman. She draws inspiration from travel and cannot imagine life without books and good films. She strives to become an ideal housewife and is always ready to share her experience.
Found a mistake? Select it and click the buttons:
There is a washing machine “for bachelors”. Linen washed in such a unit does not need to be ironed at all! The thing is that the device does not have a drum: some things can be placed inside the container directly on hangers (for example, jackets and shirts), and smaller things (for example, underwear and socks) can be placed on special shelves.
There are a variety of balls that are used in the washing machine. Antistatic ones will prevent the fabric from sticking to the body after washing, balls with special loops will “comb” the lint and prevent the appearance of pills, and silicone ones with pimples will prevent fluff from matting when washing outerwear.
The expression “soap opera” (“soap”) did not arise by chance. The very first series and shows that had a female audience were broadcast on television at a time when housewives did cleaning, ironing and laundry. In addition, to attract female viewers to the screens, commercials for detergents: soaps and powders were often played on air.
Washing machines have something to do with the origin of the expression “money laundering.” In the 1930s, American gangsters used a network of laundries as a cover for their illegal activities. By passing off the proceeds of crime as proceeds from cleaning clothes, they turned “dirty” money into “clean” money.
Washing machines equipped with the “No Iron” or “Easy Iron” functions can wash clothes with little to no wrinkling. This effect is achieved through a special approach to spinning - it is performed at low speeds, with long pauses, and a small amount of water is retained in the tank.
The first officially patented washing machine was made of wood and was a box with a frame, half filled with wooden balls. Laundry for washing and detergent were loaded inside and the frame was moved using a lever, which, in turn, made the balls move and grind the laundry.
For washing small items on the road or in a hotel, it is convenient to use a regular plastic bag. Socks or tights are kneaded inside a tied bag along with water and a small amount of detergent. This method allows you to pre-soak things and wash them without damaging the fabric or wasting a lot of powder and water.
Astronauts, while in Earth orbit, solve the problem of dirty things using an original method. Clothes are dropped from the spacecraft and burn up in the upper atmosphere.
History knows the fact that a kitten fell into the drum of a washing machine and, after going through a full wash cycle on the “Wool” program, got out of the unit unharmed. The only trouble for the pet was an allergy to washing powder.
What will you need?
If the problem is diagnosed and a new container has been purchased, you can get to work. The first step is to prepare for the upcoming replacement - collect the required tools. Let us remind you that to dismantle the drum you will have to completely disassemble the washing machine, which cannot be done without:
- pliers;
- screwdrivers (flat and Phillips);
- an adjustable wrench or a set of wrenches.
This is the minimum set. It is possible that when disassembling the machine, other defects will be discovered, to eliminate which additional devices will be needed. It’s better to play it safe and bring all available tools to the workplace.
Before any repair operations, the washing machine must be de-energized and disconnected from the water supply!
Special attention should be paid to the workplace. To make it more convenient and easier to change the tank yourself, you need to move the washing machine to a spacious room, garage, workshop or corridor. It is recommended to cover the space around the equipment with rags, oilcloth or old newspapers.
Required Tools
The drum can be removed from the washing machine only after complete or partial disassembly of the equipment.
In this case, the user will need the following tools:
- a set of screwdrivers of different sizes depending on the fasteners used;
- hammer;
- a hacksaw for metal (if a non-separated tank is installed);
- mites;
- screwdriver;
- a set of wrenches for the required fasteners or a universal adjustable tool.
You can also order new parts for repairs in advance. However, it will be very difficult for an inexperienced user to accurately formulate the cause of the breakdown before removing the tank.