The average service life of a bearing in a washing machine is 10-15 years. If they wear out earlier, then the operating conditions were violated - loading laundry above normal or washing shoes. A characteristic sign of wear is noise during spinning. It increases with each cycle.
Do you wash your shoes in the machine?
Oh yes! No
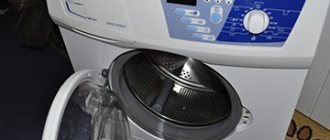
There is a visible play of 1-2 cm. And the electric motor drive belt often starts to slip off. Diagnosing this malfunction is not difficult, but if you are in doubt, call an AMS repair technician. Let's consider replacing the bearing in a HANSA washing machine, model PCT 5580B412, with your own hands at home. Note that devices from this manufacturer are characterized by good reliability and can be recommended for purchase. In terms of price-quality ratio, this is a good product to purchase.
- Disassembling the Hansa washing machine
- Tank and bearings
- Assembling the Hansa washing machine
- Hansa washing machine catalog
Product number on the tag
Self-replacement of bearings in the Hansa PC 4580B422 washing machine
Phew.
))) collected. the machine will live again. All this cost me XXX rubles (the price of the seal) and a bunch of invaluable experience! The rumblings in SM began two months ago. I realized that it was a bearing, but I didn’t understand where. to delay further means to run into the family budget, and there is already a hole after the vacation))). Having removed the belt from the electric motor, it became clear that the bearing was covered on the drum, since the motor itself was working exclusively. I'll try to make a photo report.
The bearing size for my machine was unknown to me. the bearings turned out to be 204, 205, but I got 203, 204 (good thing you can exchange them), and, accordingly, the oil seal (cuff) is also not the same. I'll change it tomorrow. The seal generally costs a penny.
I'll start. the top cover has already been removed
and moving to the side of the control panel. I didn’t fasten it with anything, I just put it on the body.
The next step was to remove the powder container. By the way, it’s easy to disconnect, but the reverse sequence is different, almost all the rubber bands had to be disconnected.
I also had to unscrew the threaded tube from the body where the water supply hose is screwed on in order to completely remove the container.
Then photographing or memorizing all the wires and connectors, although in my opinion they cannot be confused. They are all just the right length.
And here is a completely incomprehensible substance. ))
And this is the work of the heating element. The water needs to be softened. ))
It is the same. Subsequently, all this was washed, scrubbed and cleaned..
The engine can be easily removed; it is secured with two front screws, and the rear “ears” are inserted into the guides. You need to apply a little force to pull it towards you.
An inspection showed that both the slats and brushes would still serve.
then he unscrewed the top and front stones.
LYING! I unscrewed the front panel first after the powder container, then the stones...
Well, when all the wires and hoses are disconnected, you can carefully pull out the drum. ))) The lower stone turns away when the drum is removed.
Already with the drum removed, the heating element was turned away. Unscrew the nut flush with the stud and press it in slightly with a hammer (I had a copper hammer) and slowly pull it out. scale soooo. in bulk. so you'll have to work hard to get him out of there. )))
Now look how I put it back. )))
The back of the drum on the pulley side looks like new. bearing, nut without traces of rust or dirt. Suspicion fell on the internal bearing.
I unscrewed the nut by sharply hitting the wrench with a hammer (experience in removing an engine cooling fan on a foreign car. There was also nothing and nothing to fasten the moving part to). By the way, the nut came off relatively easily, the main thing is not to be afraid to hit it.
Having removed the pulley, I screwed the nut onto the thread (not completely) and again, as in the case of the heating element, moved the shaft from its place with blows of a copper hammer. the drum itself was in a vertical position. the blows must be clear, strong, if your hands are shaking))), then it is better to wait out this moment, otherwise you can miss and hit the body.
The rear bearing is Polish and looks new.
After the shaft was moved (I expected that I would spend more time. It gave in after 3-4 blows) I began to halve
But the inside was less pleasing.
First, the inner bearing was knocked out, and of course the oil seal was knocked out as well. hairpin 40 cm and the same hammer. I had to work hard. He placed half of the drum on a flat surface and beat it from the outer side. There were concerns, but when I started hitting harder, the result immediately appeared. the bearing went. )))
As you can see, the bearing and cuff are covered! Later, I saw a defect on the cuff, I think only because of this a leak formed, which killed the bearing.
Cross shaft without any development
The bearing seats are also without drilling.
Could still work, but will be replaced.
On the first day of repair, one bearing was replaced, the rear one, as there was a mistake with the other. no one suggested. Well, that's just a plus. free time was spent on polishing the car. )))
In theory, the internal one bears more of the load; it is also one size larger.
The next day the seals and bearing were obtained. why seals, because there was an idea to install two narrow ones instead of one seal.
And this, according to my estimates, is a Polish marriage. ))
And these are estimates of replacing one oil seal with two. nothing came of this, although this idea can be completed. one comrade (turner) voiced one thought. )
Front bearings - old and new
Well, everything is in place. Yes, I hammered them into place (the oil seal too) using the old bearing and struck the outer ring again with a copper hammer.
Before installation, the oil seal must be lubricated with a special waterproof lubricant.
Well, one more thing. the upper (what should we call it) part to which the spring clings due to shaking (I think) or due to the weakness of the material has worn through. I had to come up with a bushing.
By the way, the spring had to be threaded first into the bushing, then into the eye, and then into the body of the machine.
Here's all the tool I needed. I almost never used the VD.
All the best, write to Elremont © 2008
Source
How to replace bearings on a Hansa washing machine
The average service life of a bearing in a washing machine is 10-15 years. If they wear out earlier, then the operating conditions were violated - loading laundry above normal or washing shoes. A characteristic sign of wear is noise during spinning. It increases with each cycle. There is a visible play of 1-2 cm. And the electric motor drive belt often starts to slip off. Diagnosing this malfunction is not difficult, but if in doubt, call a repairman. Let's consider replacing the bearing in a HANSA washing machine, model PCT 5580B412, with your own hands at home. Note that devices from this manufacturer are characterized by good reliability and can be recommended for purchase. In terms of price-quality ratio, this is a good product to purchase.
The bearings are located inside the tank. It needs to be pulled out and disassembled. It's plastic.
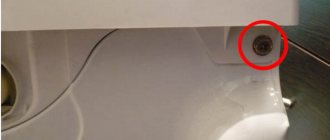
Disconnect the car from electricity and water! Remove the top cover by first unscrewing the bolts. Remove the panel from below. To do this, unscrew the screws from the end of the machine - on the right and left, as well as the self-tapping screw next to the drain pump.
Take out the powder container. Unscrew the screws under it.
We unscrew the two screws from the top that secure the control panel to the body.
Carefully pull it out and leave it on the side. She won't interfere. Attach with tape if desired.
We dismantle the transverse metal bar and unhook it.
At the back, unscrew the screw securing the incoming water fill valves. We remove them and at the same time check the filter mesh for clogging. If there is debris, then remove the mesh using a screwdriver and pliers. Rinse under running water and put back in place. In the picture below you can see the sand.
We dismantle the upper counterweights. Be careful with them - they are heavy and made of concrete.
None We remove the dispenser, but first remove the clamp from the pipe from below. From any point of view, it doesn’t matter. We take out the rubber.
Open the hatch and tighten the clamp that holds the cuff. We detach the rubber. Unscrew the screws securing the front panel and remove it.
We are carefully preparing for repairs
To replace the bearings on Hans’ machine yourself, you need to have a full set of tools, as well as new parts that will be needed during the repair process. Let's figure out what to prepare:
- small hammer;
- open-end wrenches of various sizes;
- grinder (grinder);
- pliers or pliers;
- gas key;
- two types of screwdrivers: Phillips and slotted;
- sealant;
- lubricant intended for processing SMA bearings (can be replaced with lithium grease);
- a smartphone with a good camera or camera. It is advisable to record the process of disassembling the washing machine, disconnecting wiring and other things on camera, so that at the end of the process all the parts and cables are correctly connected to their places.
As for spare parts, you should purchase two new bearings and an oil seal. After visiting a specialized store, you can tell the manager the model of the washing machine and ask to select the parts. If you order components via the Internet, we advise you to disassemble the machine before purchasing, remove the elements and use their numbers to find analogues in the online store.
Try to find original spare parts, they will function much longer, also choose bearings specifically for automatic washing machines (closed type).
Before starting the main work, you should prepare the washing machine itself. Unplug the machine's power cord from the outlet, turn off the tap responsible for supplying water to the apartment, and disconnect the inlet hose. After this, drain the remaining water in the tank.
Then you need to remove the drain hose and drag the washing machine to a place where it will be convenient to repair it, this can be a spare room, a spacious corridor or a garage. You can carry out work in the entrance, but you need to make sure that you do not disturb your neighbors. The preparatory process is complete, you can begin the main repairs.
Step-by-step replacement instructions
Any equipment can be disassembled with your own hands according to a single scheme:
- The side panel is released, the screws are unscrewed using a screwdriver. Remove the support and release the pulley. Release the belt by removing the side panel.
- The locknut is unscrewed and the pulley is removed.
- The shaft grounding elements are removed.
- To consider the direction of unwinding, parts are cleaned with special paper, similar to sandpaper.
- The oil seal is released using calipers of different threads.
- The seals are treated with a special lubricant included in the kit.
- The new caliper is wrapped, attention is drawn to the arrow indicators. They show the sides of the twist.
- The bearing and oil seal are replaced in a similar way.
Important
All work is carried out with equipment disconnected from electricity.
You can view instructions for disassembling washing machines of different brands here.
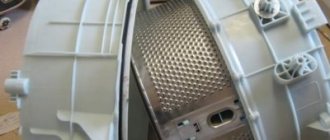
Removing the tank with the drum
The parts that you have to replace with your own hands are located deep in the machine body, so in order to get the failed bearings you will have to completely disassemble the washing machine. It is necessary to remove many of the main parts of the unit to provide free access to the tank of the machine, then pull out the tank with the drum, disassemble the tank body and only then change the non-functioning bearings. The scope of work may seem huge, but if you strictly follow the instructions given, you will be able to cope with the repair in a time or two.
So, the algorithm for removing a tank with a drum from an automatic washing machine will be as follows:
- remove the top cover of the washing machine body; to do this, unscrew all the fastening bolts holding it;
- disconnect the false panel located at the bottom of the washing machine from the front wall;
- remove the tray intended for washing powder and other detergents from the body;
- Unscrew the screws holding the main control panel of the machine, carefully move it away from the body and leave it hanging on the side. If desired, you can secure the panel with mounting tape;
- dismantle the transverse metal strip and carefully unfasten the pressure switch;
- Unscrew the bolts located on the back of the body, which are responsible for holding the water intake valves;
- check the inlet filter mesh, if the mesh is clogged, use a screwdriver and pliers, pull it out, rinse it well and put it in its original place;
- pull out the counterweights - concrete blocks responsible for the stability of the equipment, they are very heavy, so remove the parts carefully so as not to damage the remaining elements of the system;
- unfasten the spring, keep in mind that Hansa washing machines are equipped with one spring and three shock absorbers;
- remove the dispenser, not forgetting to first remove the clamp from the pipe from below;
- open the hatch door and begin dismantling the cuff - an elastic band located around the circumference. To do this, tighten the outer and inner clamps holding the gasket and carefully, without damaging it, pull out the cuff, unscrew all the bolts holding the front wall of the case, and remove it.
At this stage, pay special attention to the hatch locking device; it must either be unscrewed or the chip removed from the UBL. We continue to approach the tank.
- Dismantle the counterweights located near the cuff.
- Disconnect the contacts and ground from the engine.
- Unscrew the bolts, carefully pull off the drive belt and remove the washing machine motor from the housing.
- Disconnect the contacts from the heating element (heating element).
- Using special wire cutters, bite off the plastic clamps that attach the wiring harness to the tank of the machine.
- Disconnect the pump terminals and unfasten the pipe.
The cable cable should be carefully routed to the side to prevent unintentional disruption of the connection.
After the manipulations described above have been completed, you can begin to remove the tank with the drum. It is quite heavy, so it is better to call someone for help. Reach your hand into the drum and gently lift the part. Since the main parts of the washer have been removed, the tank will be safely removed from the SMA body.
Advice from the experts
Experts advise adhering to the following recommendations:
- Independent replacement is possible when the model of the machine is precisely determined and the necessary elements are selected for it. You also need tools for dismantling and replacing spare parts.
- Before disassembling the machine, you need to prepare the room. All unnecessary elements are removed, and space is freed up in the room for storing the removed elements.
- To avoid damaging the hatch, it is disassembled separately. First, disconnect the lock mechanism and its wiring. Then remove the hatch door, having first unscrewed the screws that hold its hinges. Only then do they remove the bolts and dismantle the necessary part of the body.
- It is easier to change flanges and bearings on a top-loading machine than on a horizontal-loading machine. The side panels are removed first, and only then the shaft of the smaller flange.
You may find it useful to look at our articles on how to repair and install a pump, drum, pump, drain and pressure switch, heating element.
Replacing a bearing yourself does not seem difficult if you study the progress of the work in advance and thoroughly prepare for the process. Knowing the brand of the washing machine and having prepared the necessary tools for dismantling, you can easily carry out repairs.
We disassemble the tank, change the bearings
The process of disassembling the tank will be less labor-intensive than the procedure for removing it. We'll tell you what actions need to be taken to get to the damaged bearings:
- unfasten the drum pulley;
- Using an adjustable wrench or a gas wrench, unscrew the mounting bolt;
- unscrew all the retaining screws located around the perimeter of the tank;
- Carefully separate the tank into two parts and pull out the drum. This procedure is not so easy to perform; you will have to lightly tap the shaft with a hammer to remove the drum;
- carefully examine the exposed surface. If a washing machine with such a malfunction has been in use for quite a long time, part of the damaged bearing may stick to the shaft, forming a hole;
- if a wear is found, take a grinder and carefully cut off the edges of the bearing, then take a gas wrench and pull out the hard-to-remove part of the element.
If during the work you encounter difficulties with dismantling metal parts, use special lubricant WD-40.
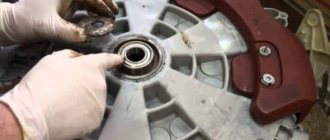
After the old parts are removed, thoroughly clean the surface of the tank, drum, and shaft seats. When working, be sure to use lubricant to treat the bearings. The shaft and oil seal are treated with lubricant.
Install the new parts in their intended place. To securely fix new bearings, it is recommended to use Supermoment glue or sealant.
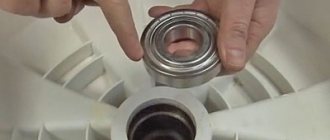
Tank and bearings
There is no need to remove the cuff. Remove the drum pulley. Unscrew the fastening screw.
Expert opinion
I work in the household appliance repair industry. Extensive experience in restoring washing machines and dishwashers.
Ask a Question
Important! This is another nuance of the HANSA washing machine. Bolt size - 18! Use an adjustable wrench.
A thread locker is applied at the factory, so it is not easy to unscrew. It is advisable to use an extension lever to increase the pressure. At the first stage this is mandatory.
You can use a pipe for this. And fix the pulley using pliers, inserting the handles between the stiffening ribs of the tank.
Pulley with unscrewed bolt
Unscrew all the mounting screws in a circle. The photo shows parts of the shock absorbers that remain.
Tank with screws
We divide the tank and take out the drum. It just won't come out like that. It is necessary to hit the shaft with a hammer through a wooden plank. Then we inspect the surface for the presence of development. In this case, an extreme situation occurred - the internal bearing collapsed, because part of it was welded to the shaft. This happens, especially if a machine with a malfunction has been in use for a long time.
Drum shaft with bearing part
This problem can be solved. You will need a grinder, a metal disc and a little skill. You need to cut off one edge (or two). After this, you can use a gas wrench and remove the stuck part of the bearing.
This is what he looks like after working as a grinder.
Cut off part of the bearing
Removed part of the bearing
This is what a running shaft looks like
Important! Use WD-40 penetrating lubricant if you have difficulty dismantling metal parts.
The parameters of spare parts for other Hansa SMA models can be viewed in the correspondence table.
Be sure to clear debris from the tank, drum, and shaft seats. Photos of knocking out the bearings, pulling out the oil seal, and installing new ones did not work out. Therefore, I suggest watching a short video on these works.
Be sure to use lubricant! Apply it also to the shaft.
Lubricant on the oil seal seat
It is better to use a special lubricant for washing machine seals. You can buy from suppliers of spare parts for household appliances. It is appropriate to use analogues. This is discussed in the video.
Lubricate the oil seal well.
New oil seal with lubricant in the tank
It is recommended to use “super moment” glue for a reliable connection.
Fastening the oil seal in difficult cases
The following bearings are used on this model of the Hansa machine:
- 6203;
- 6204.
The oil seal has the following dimensions: 25*47*10.
On other models the following may be used:
- 6204;
- 6205.
We return the machine to functionality
Reassembly is carried out either from memory or based on photographic material taken during the work. Assembling the unit from photographs is much easier; the likelihood of confusing the location of parts, terminals, chips and wires in this case will be negligible.
I would like to highlight one important point related to the reverse installation of the engine in SMA Hans models that do not have access to the part from the rear. In this case, installing the tank first and then the motor, it will be difficult to put the drive belt in the right place. To tighten it well, you need to put the washer on its side and carefully put it on, inserting your hand into the hole between the body and the tank. Another, easier method is to install the engine and tension the drive before starting final assembly.
October 23, 2012
Author: valbara (www.elremont.ru)
The rumblings in SM began two months ago. . .
I realized that it was a bearing, but I didn’t understand where. . .
to delay further means to run into the family budget, and there is already a hole after the vacation))). . .
Having removed the belt from the electric motor, it became clear that the bearing was covered on the drum, since the motor itself was working exclusively. . .
I'll try to make a photo report. . .
The standard size of the bearings for my machine was unknown to me... the bearings turned out to be 204, 205, but I got 203, 204 (good thing you can exchange them), and accordingly, the oil seal (cuff) is also not the same... I'll change it tomorrow... the oil seal generally costs a penny... I'll start... The top cover has already been removed Fig. 1Now the crossbar, Fig. 2 and moving the control panel to the side... I didn’t secure it with anything, I just put it on the body...
Rice. 3The next thing was to disconnect the powder container... by the way, it was easy to disconnect, but the reverse sequence was different, almost all the rubber bands had to be disconnected...
Rice. 4I also had to unscrew the threaded tube from the body where the water supply hose is screwed on in order to completely remove the container...
Rice. 5Then photographing or memorizing all the wires and connectors, although in my opinion they cannot be confused... they are all the same length only in their place...
Rice. 6And here is a completely incomprehensible substance...)) Fig. 7And this is the work of the heating element... the water should be softened...)) Fig. 8This is the same... later it was all washed, scrubbed and cleaned...
Rice. 9The engine can be easily removed, two front screws secure it, and the rear “ears” are inserted into the guides... you need to apply a little force to pull it out...
Rice. 10Inspection showed that both the lamellas and brushes will still serve...
Rice. 11then he unscrewed the top and front stones...
LYING! I unscrewed the front panel first after the powder container, then the stones. .
Rice. 12 Fig. 13Well, when all the wires and hoses are disconnected, you can carefully pull out the drum.
. . ))) The lower stone turns away when the drum is removed.
Rice. 14Already with the drum removed, the heating element was unscrewed... we unscrew the nut flush with the stud and press it in a little with a hammer blow (I had a copper hammer) and slowly pull it out... sooooo scale. in bulk... so you'll have to work hard to get it out of there...))) Fig. 15Now look how I put it back...))) Fig. 16 Fig. 17The back of the drum from the pulley side looks like new... the bearing, nut have no traces of rust or dirt... suspicion fell on the inner bearing...
Rice. 18 Fig. 19 Fig. 20I unscrewed the nut by sharply hitting the wrench with a hammer (experience in removing an engine cooling fan on a foreign car... there was also nothing and nothing to fasten the moving part to)... it came off, by the way, the nut is relatively easy, the main thing is not to be afraid to hit...
Rice. 21 Fig. 22Having removed the pulley, I screwed the nut onto the thread (not all the way) and again, as in the case of the heating element, I moved the shaft from its place with blows of a copper hammer... the drum itself was in a vertical position... the blows should be clear, strong, if your hands are shaking))), then it’s better to wait out this moment, otherwise you can miss and hit the body...
Rice. 23The rear bearing is Polish, looks new...
Rice. 24After the shaft was moved (I expected that I would spend more time... it gave way in 3-4 blows) I began to halve Fig. 25But the inside part was less pleasing...
Rice. 26First I knocked out the inner bearing with it, naturally, the oil seal was also knocked out... a 40 cm pin and the same hammer... I had to work hard... I put half of the drum on a flat surface and hit it from the outer side... there were concerns, but when I started hitting it more sharply, the result immediately appeared... the bearing went...))) Fig. 27As you can see, the bearing and cuff are covered! Later, I saw a defect on the cuff, I think only because of this a leak formed, which killed the bearing.
Assembling the Hansa washing machine
Assembly is carried out in the reverse order, and usually does not cause difficulties. But there is an important point related to the electric motor. The thing is that this model does not have rear access.
If you install the tank and then install the electric motor, then problems with the belt will arise. To pull it onto the pulley, you will have to put the machine on its side, and stretch your hands between the tank and the body to put it on.
Another solution to this problem is to install the engine and tension the drive belt before final assembly.
Tank with motor
Engine on tank
The disadvantage of this option is that with a motor the tank will be much heavier, and you will need help for installation. You decide. Good luck with your work!
Do you wash your shoes in the machine?
Oh yes! No
How to call a service technician?
Let's take a closer look at the process of calling the wizard:
- We recommend writing down the model and manufacturer of your washing machine. This information will be useful so that the technician can replace the necessary part on the spot, which he must take with him.
- Call our service center at phone number: or write to us. The company manager will answer all your questions and give answers to everything that interests you.
- Next, the technician will contact you, you can find out the probable cause of the equipment failure and find out the price for repairs.
- You can agree with the company manager or technician on a time when he will come to you and be able to repair the faulty unit.
- At the specified time, a service center employee will arrive at the address and carry out repair work.
Candy
To do the job, you need to get into the back wall of the drum.
- Use a flat screwdriver to pry up and remove the oil seal. It also needs to be replaced with a new one, since it becomes unusable at the same time as other fasteners.
- Then the right and left bearings are knocked out alternately. Do this carefully, as excessive tapping can lead to defects on the body.
- The part in front is knocked out with a hammer and a metal rod, only after this work continues with the second part, which is located a little further. It is not so easy to approach it, so you will need to make an effort and use available means.
- When the bearings are removed from the washing machine, proceed to preparing the seals.
- They are removed and replaced with new ones.
- The tank elements and connecting parts are well cleaned from dust and dirt.
- Lubricate the seals with special lubricant and install.
Candy washing machines don't really like having their insides rummaged around, but sometimes you can't do without it. And replacing a bearing is just one of these cases. To avoid breaking anything, we strongly recommend that you watch this video before starting work:
Prices for services
| Services | Price from) | Application |
| Departure + Diagnosis of the problem (in case of repair work)* | ||
| Departure + Diagnostics | ||
| Replacing shock absorbers | ||
| Replacement of drum, tank | ||
| Replacing the motor (motor, drum drive, electric motor) | ||
| Replacing the wiring harness | ||
| Replacing the fill/inlet valve (KEN, water supply valve) | ||
| Replacing buttons and switches | ||
| Replacing the cross (shaft) | ||
| Replacing the hatch (door, cover) | ||
| Replacing the hatch cuff (elastic band, rubber seal) | ||
| Replacing the tank support | ||
| Replacing the pipe | ||
| Bearing replacement | ||
| Replacing the pressure switch (water level sensor, relay) | ||
| Replacing the drive belt | ||
| Replacing the programmer (program selector, command device, timer) | ||
| Replacing the counterweight | ||
| Replacing springs | ||
| Replacing the hatch handle | ||
| Replacing the oil seal | ||
| Replacing the mains filter (FPS, starting capacitor) | ||
| Replacing the drain/fill hose | ||
| Replacing the drain pump (pump) | ||
| Replacing the drain filter | ||
| Sunroof glass replacement | ||
| Replacing the thermostat (water temperature sensor) | ||
| Replacing the heating element (heating element) | ||
| Replacement of UBL (hatch lock, lock) | ||
| Replacing the drum pulley | ||
| Replacing the drum curtain of a vertical machine | ||
| Replacing motor brushes | ||
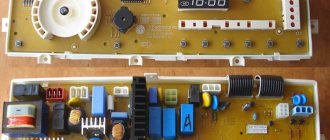
| Repair of control module, board, block, triac | ||
| Cleaning the fill/drain system | ||
| Clearing the blockage | ||
| Removing a Foreign Object | ||
| Installation / Connection of the machine | ||
| Telephone consultation | ||
| Malfunctions | Price from) | Application |
| Gives an electric shock | ||
| Vibration / Vibrates heavily / Jumps / Shakes / Jumps | ||
| Stinks / Rotten smell | ||
| Knocks out the machine (RCD, traffic jams) | ||
| Gives off a fur coat | ||
| Takes a long time to wash | ||
| Freezes / Stopped during washing / Freezes during the spin cycle / Stopped with water | ||
| Programs are frozen | ||
| Smell of burning / Smoke | ||
| Key flashing | ||
| Indicators (buttons, lights) are flashing | ||
| Won't turn on/Won't start/Won't start working/Stopped working | ||
| Indicators do not light up | ||
| Doesn't heat water / Doesn't heat water | ||
| The door does not close / The hatch does not block | ||
| The drum does not spin / The drum is jammed / The drum does not rotate | ||
| Doesn’t take up water / Doesn’t get water / Doesn’t fill up with water | ||
| Doesn't pick up speed / Drum doesn't spin well | ||
| Doesn't stop/Won't turn off/Won't finish washing | ||
| Doesn’t spin clothes / Stopped spinning / Spin doesn’t work | ||
| The hatch (door, cover) does not open / Blocked / Jammed | ||
| Doesn't rinse clothes | ||
| Timer doesn't work | ||
| Buttons don't work | ||
| Doesn't respond / Doesn't switch modes | ||
| Does not drain water / Drain does not work / Does not drain water / Drains poorly | ||
| Doesn't wash / Takes up water but doesn't wash / Doesn't start washing | ||
| Water remains in the drum | ||
| Remains powder, conditioner | ||
| Turns off during washing | ||
| Stains laundry / Doesn’t wash things | ||
| Water overflow/Collects a lot of water | ||
| Squeaks | ||
| Doesn't wring clothes well | ||
| Constantly fills with water / Constantly fills with water | ||
| Tears things | ||
| Programs crash | ||
| The hatch handle is broken | ||
| Broken hatch (door, cover) | ||
| Immediately drains water / Fills and drains water / Continuous drainage | ||
| Leaking / Leaking / Leaking | ||
| Noisy / Humming / Knocking / Rattles / Creaks / Crackles / Whistles | ||
| Other fault | Call |
None « HAIER Bearing Replacement | Replacing the HISENSE bearing »
Washing machine service areas in Moscow
ZAOVnukovo | Kuntsevo | Novo-Peredelkino | Vernadsky Avenue | Solntsevo | Filevsky Park | Krylatskoe | Dorogomilovo | Mozhaisky | Ochakovo-Matveevskoe | Ramenki | Troparevo-Nikulino | Fili-DavydkovoVAOBogorodskoe | Eastern | Golyanovo | Izmailovo | Metrotown | Novokosino | Preobrazhenskoye | Sokolinaya Gora| Veshnyaki | Eastern Izmailovo | Ivanovskoe | Kosino-Ukhtomsky | Novogireevo | Troparevo-Nikulino | Perovo | Northern Izmailovo | Sokolniki SAAO Airport | Beskudnikovsky | Eastern Degunino | Dmitrovsky | Koptevo | Molzhaninovsky | Falcon | Khovrino | Running | Voikovsky | Golovinsky | Western Degunino | Levoberezhny | Savelovsky | Timiryazevsky | Khoroshevsky SVAO Alekseevsky | Babushkinsky | Butyrsky | Losinoostrovsky | Maryina Roshcha | Otradnoe | Rostokino | Northern Medvedkovo | South Medvedkovo | Altufevsky | Bibirevo | Lianozovo | Marfino | Ostankino | Sviblovo | Northern | Yaroslavsky SZAOKurkino | Pokrovskoye-Streshnevo | Strogino | Shchukino | Mitino | Northern Tushino | Khoroshevo-Mnevniki | South TushinoCAOArbat | Zamoskvorechye | Meshchansky | Tagansky | Khamovniki | Basmanny | Krasnoselsky | Presnensky | Tverskoy | Yakimanka UAOBiryulyovo East | Brateevo | Donskoy | Moskvorechye-Saburovo | Nagatinsky Zaton | Orekhovo-Borisovo Northern | Tsaritsyno | Chertanovo Central | Biryulyovo Western | Danilovsky | Zyablikovo | Nagatino-Sadovniki | Nagorny | Orekhovo-Borisovo South | Chertanovo North | Chertanovo YuzhnoyeYUVAOVykhino-Zhulebino | Kuzminki | Lyublino | Nekrasovka | Printers | Textile workers | Kapotnya | Lefortovo | Maryino| Nizhny Novgorod | Ryazan | YuzhnoportovyuzAOacademic | Zyuzino | Kotlovka | Obruchevsky | Teply Stan | South Butovo | Gagarinsky | Konkovo | Lomonosovsky | Northern Butovo | Cheryomushki | Yasenevo
Source