The Indesit washing machine module breaks down infrequently, but it is impossible to exclude the possibility of its failure.
If a part for some reason ceases to perform its functions, it is impossible to continue using the equipment.
Read the article about what to do if the control board is broken and how to repair the Indesit washing machine module.
How to understand that an electronic board needs to be repaired?
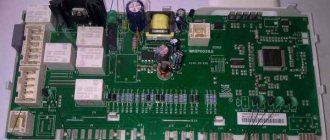
The control board is the main part of the device. It is she who manages all processes, giving commands to various nodes . If the board fails completely, the machine stops responding to any external influence. When certain parts of it burn out, only certain functions are lost.
You can understand that there has been a malfunction in the control board processor using code F18. It appears on the display of the washing machine.
If there is no display, the programmer knob will rotate and the “Power/Start” indicator will blink. The light signal is repeated 18 times, followed by a pause.
Features of repair of Indesit wisl models
For free
Call and diagnosis
Spare parts
Own warehouse
10% discount
For beneficiaries
Every breakdown is accompanied by symptoms.
Some have a clear sign (visual) - mechanical, burning smell, destruction of components and devices.
And some hidden defects. These are the most insidious, since you have to check the entire chain of devices and time drags on. Especially from an inexperienced master.
Almost all Indesit models wisl 103, wisl 105, wisl 83, wisl 82, wisl 102 are built on an EVO II control module with a commutator motor.
Therefore, their design and repair will be largely similar.
- Deciphering the error code by flashing indicators:
By adding the numbers corresponding to the blinking LEDs, you will receive an error code.
As an example of error F10, we add the sum 8+2=10 (F10).
- Faults by error code:
F01 - the signal between the control board and the engine is lost.
Using a tester, we measure the control voltages on the motor control block:
The motor control thyristor may have become unusable. In addition, ring the motor terminals.
F02 - lack of signal from the engine tachogenerator and electronic module.
We also check the engine block and connector.
We make sure that the tachogenerator is working properly:
The tachometer monitors the speed of rotation of the engine rotor.
When it rotates, an alternating voltage is generated at the terminals of the tachogenerator coil.
The frequency is compared by an electronic board and the rotation of the drum is controlled. It may be enough to tighten the sensor mounting screws or glue it to restore proper engine operation.
The resistance of the contact group in a quiet state should be about 70 Ohms. Without removing the probes from the coil terminals, rotate the motor shaft. The resistance must change. If this happens, then the tachogenerator is working.
F03 - break in the temperature sensor (thermistor), breakdown of the processor on the module.
The sensor itself rarely fails. Usually there is no signal from the board (connector contacts)
First, ring the temperature sensor, reflash the ROM, ring the kilo-ohm resistors. If that doesn’t help, the board needs to be replaced.
F05 - the drain pump or pressure switch (level sensor) does not work.
About 80 percent of the time, a clog (filter, drain hose) or pump is to blame.
We clean the filter by removing the front panel with a flat screwdriver and twisting it:
The pump impeller must be clean and free of debris:
Place the washing machine on its side and separate the pipe from the tank and pump:
If error F05 pops up again, the reason is electrical, namely, why doesn’t the sump pump work?
We take a multimeter in our hands and start the draining program and measure the voltage at the pump terminals. It should be equal to 220 volts.
Its presence tells us that the pump needs to be replaced.
F07, F08 - the heating element is not in the water, does not work (burnt out or broken).
Make sure there is water in the tank by looking into the drum. Next, remove the back wall and check the heating element with a tester:
F04, F08 - pressure switch (water level switch).
Presence of signal from the connector.
Check the condition of the level sensor:
- contacts 2-4 are closed - level "EMPTY TANK" - contacts 2-3 are closed - level "FULL TANK" - contacts 2-1 are closed - level "OVERFLOW" (not less than half the level of the glass of the loading hatch.
Remove the top cover by unscrewing the two screws at the back. This sensor is located on top:
Why is it needed?
To adjust the water level in the tank: low, medium and high. Protection against overflow of the tank is also provided.
How to check? We just blow into it. You should hear clicks. There can be three of them. It depends on the water levels provided by the program: economical, delicate, half load.
F09 The memory card of the electronic board is faulty.
F10 - water intake time exceeded.
The filler pipe from the detergent cuvette to the tank may be clogged, or the water fill valve may not be working properly.
Also check the level sensor (see above).
F11 problem with the drain pump.
The pump winding resistance should be about 170 Ohms - measure with a tester. Follow the instructions for error F05
F12 - there is no signal between the control board and the program selector.
Carry out an external inspection of the board for damage to the elements.
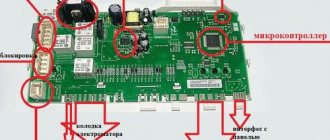
If no burnt nodes are identified, 1. processor diagnostics is required:
Just check the reset pins (133DDB), quartz resonator, 50Hz signal, DATA and CLK.
2. Microcontroller failure: Usually the reason is that the lock (Q9) and valve control triacs (Q10-Q13) explode due to actuators or other reasons. In this case, SMD resistors always burn out between the U6 terminals and the control electrodes of the triac (560 Ohm), sometimes also between them and the common wire (1 kOhm).
Designations on the resistors: 561 and 102, respectively. 561 triacs must be replaced, even if they look intact!
In these cases, the corresponding pins of the U6 chip are always damaged.
It is best to remove a non-working microcircuit using a soldering station (heat gun).
If it is not available, you can use a very sharp knife and carefully cut off all the leads, while being careful not to damage the printed conductors, and then simply remove their remains from the board with a soldering iron and braid with flux. Another way: when heating the leads with a soldering iron, slip a safety razor blade under them, or, passing a loop of thin nichrome wire under them from the inside, carefully pull it out, also heating the leads one by one with a soldering iron.
After replacing U6, you can partially check the operation of the module: immediately after connecting to the network, a constant voltage of 5 volts should appear between pins 4 and 8 of the U3 memory chip, and after about 20 seconds relay K6 will click. This will happen even if there are no external devices connected and there is no memory chip.
After one of the triacs fails, before installing the restored board into the machine, you should check the device (lock or valve) connected to the corresponding output of the board to avoid repeated damage. For example, connect an incandescent lamp with a power of 75...100 W to the open circuit of a triac - device and install a program to launch this device. Or simply connect it to the network in series with the lamp. It shouldn't glow brightly.
Triacs are designed for a maximum current of 0.8...1 A, but in reality the lock's thermal relay and valves consume no more than 0.2 A through the triac circuit. In all cases, after repair, you should make sure that the data in the U3 memory chip (24C64) is intact. If necessary, replace (reprogram) it according to the model.
F17 - problem with the hatch lock.
There is no power to the door lock - ring the contacts.
F18 - board processor.
The module needs to be replaced.
- When turned on, all the lights on the panel begin to blink, like a garland.
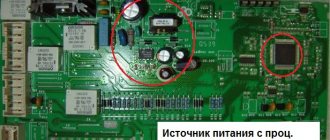
Pay attention to the power supply of the control board - these are swollen capacitors C17, C16, C20.
We select new capacitors, maybe 1000 uF. We take a soldering iron and change them.
- A common defect is that the machine does not work, the lock lock works, the washing program starts and then there is silence.
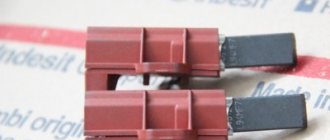
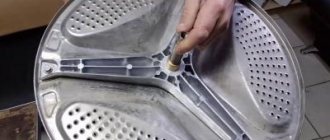
Check the hatch lock, its contacts and wiring. Next we look at the motor brushes.
If the working reach of the embers is less than 7 mm, they must be replaced (both should be replaced). To do this, disconnect the wire and pull out the contact to remove it.
We remember in which direction the graphite contacts are ground. We clean the collector lamellas with sandpaper. We remove dust with a vacuum cleaner. We install new ones, making sure that they fit tightly to the collector.
If necessary, grind off the graphite with sandpaper. Attach the motor to the tank, connect the power wires, but do not put on the drive belt. We start the spin cycle and rub it in to reduce friction. Next, we assemble the remaining parts.
What can break in your washing machine:
What to do if the Indesit washing machine is under warranty?
If the Indesit washing machine gives an error indicating that the control board is broken, you can try to reboot the equipment. Perhaps there was simply a malfunction due to a voltage drop.
To do this proceed as follows:
- turn the programmer knob to the neutral position;
- press and hold the “Start/Pause” button for 5 seconds;
- leave the machine turned off for 15 minutes;
- are trying to get it working again.
If no changes have occurred, you must contact a service center that provides warranty service for the purchased household appliances. You must take with you a warranty card confirming your right to free service. The service must perform an examination, determine the cause of the breakdown and eliminate it.
If no more than 15 days have passed since the date of purchase, the buyer has the right to demand a refund or replace the machine with a similar one. However, if the equipment was purchased via the Internet, this period is reduced to one week.
The warranty period for the Indesit washing machine is 1 year. To be able to receive service, before purchasing you need to make sure that all stamps are affixed to the coupon.
Sometimes it happens that there is no official service center in the city. In this case, you need to go to the store with a broken machine. The seller is obliged to take the equipment for examination. In return, the buyer is issued an acceptance certificate with stamps, date and signature of the responsible person.
If the store refuses to accept the goods, then you must go to court.
The machine does not wash according to the program
If the machine loses its program, starts washing for longer than the allotted time, without switching to rinse or spin mode, there may be problems with the dial, with draining, heating the water, or overloading the drum.
- If there is underfilling, clean all existing filters and hoses, check the water pressure in the system and whether the fill valve is working.
- If water comes in but doesn't go out, clear the blockage in the drain hose and check the pump.
- If heating is insufficient, pay attention to the heating element and temperature sensor.
If this is definitely not the case, then the software module is buggy and you need to find out why (more on this below).
How to repair?
If the warranty period of the Indesit washing machine has expired, you will have to repair the control board at your own expense. This is a delicate job , which can only be done independently if the person has knowledge in the field of electronics.
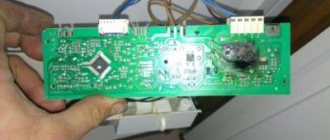
How to disassemble the device?
In modern Indesit machines with vertical loading, the control module is located in the upper part, under the panel. To get to it, you will need to remove the cover. This is not difficult to do. It is enough to unscrew the bolts located on the back wall of the device.
For horizontal loading machines, the board is located in the lower left corner when viewed from the rear. To get to it, you will have to unscrew not only the back and top walls, but also remove the hatch, which is attached to 6 screws.
It is most convenient to get to the board if you carefully lay the device on its side (on the side on which the powder tray is located). Only after this will it be possible to disconnect all the wires and remove the board.
Before starting work, you need to turn off the power to the machine and turn off the water supply valve. Only after this can you begin dismantling. This article will tell you how to remove the cover.
How to remove and diagnose the block?
Before you remove the board, you need to photograph the way it is connected to the various wires. This is done in order to prevent errors during the reassembly process.
It is difficult to determine exactly where the defect is located, unless the elements have been burned out. Sometimes the soldering of diodes and other small elements is broken.
For diagnostics and repairs, you will need the following tools and accessories:
- multimeter;
- soldering iron;
- tin;
- rosin;
- solder.
It’s good if you have at hand a diagram of the control unit for a specific model of the Indesit washing machine.
Repair work
You can repair the following items yourself:
Capacitors. They are responsible for voltage stabilization.
The fact that one of them is out of order will be indicated by its swelling. If all capacitors are of normal size, you need to test them with a multimeter (1 – a break has occurred, 0 – a short circuit). If a failed element is detected, it is replaced.- Resistors. There are resistors with a resistance of 8 Ohms and up to 2A (first order) and with a resistance of 10 Ohms and 5 A (second order). If during diagnostics it is discovered that these data do not correspond to the required values, the resistors are changed.
- Thyristor switch . Most often it breaks due to a sudden voltage drop. Diagnosis begins only after checking all capacitors. First, first-order diodes ring (normally, the voltage should not exceed 20 W). The voltage on the filter should not exceed 12 volts.
- Trigger. Its voltage should be about 12 W and its resistance should be about 20 Ohms.
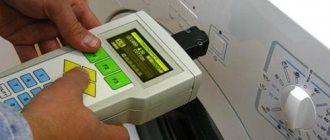
- Board firmware . To complete the work, you will need a programmer adapter, with which you can gain access to the module software. A professional programmer costs about 3,000 rubles, a simpler version will cost 500 rubles. You will also need proprietary Indesit software and drivers. They can be found on the official website).
The video will tell you about repairing the electronic control unit:
Replacement
If the part cannot be repaired, you will have to replace it. The price starts from 7,500 rubles. Sometimes technicians offer to purchase a used control module at a reduced price. However, when making such a purchase, you need to understand the risks.
A part that has worked for several years in another device may fail at any time. It cannot be returned under warranty.
New boards are sold in regular and online stores . You need to purchase a part that matches the model of the washing machine. When a new board is purchased, it needs to be installed. This is done according to the scheme for dismantling the old part, but in the reverse order. At this stage of the repair, photographs taken while disassembling the washing machine may be useful.
Functionality check
After the board is installed in place and the machine is assembled, its functionality is checked. To do this, the device is plugged in and a 15-minute dry wash cycle is started. If the equipment follows all commands, the repair can be considered successfully completed.
When is self-repair possible?
Do-it-yourself electronic board repair without the involvement of specialists is possible in case of the following breakdowns:
- Malfunction of control sensors. As a rule, this breakdown occurs due to clogged or greasy contacts in the adjustment knob. Signs of damage:
- Malfunction of the programmer sensors. Mostly occurs due to clogging and clogging of the contacts in the adjustment knob. Main symptoms: the regulator rotates quite tightly, there is no distinct click when it rotates. To eliminate the breakdown, clean the regulator knob.
- Presence of soot. As a rule, this applies to old units. Carbon deposits usually accumulate on the filter power coils. You can fix the problem with a brush or a regular rag,
- Malfunction of the sunroof lock sensor. Mostly occurs due to its being washed out or salted. To solve the problem, cleaning it is also enough,
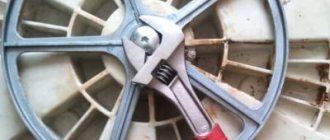
- The machine does not start or the drum speed is unstable. To eliminate this damage, it is necessary to tighten the pulley,
- The metal part of the washing machine is electrocuted , as a result of which the control module can block the operation of the unit. To solve this problem, you should ground the washing machine.
If the above breakdowns occur, you can repair the control module of your washing machine yourself. This will give you the opportunity to save your family budget with little time investment.
DIY washing machine repair
Dismantling, as well as repairing the module, is not particularly difficult. All you need to do is remove the front panel and get to the board installation location. After which it can be easily removed.
Modern modifications of washing machines are designed in such a way that the terminals of the control device cannot be installed in the wrong position, which greatly simplifies the task. However, when performing dismantling work, you must remember what is connected where, so that you can later put everything back together without any problems.
For greater reliability, you can photograph the process of dismantling the board. As a rule, the electronic board can be easily removed after removing the fastening elements (screws, bolts and fixing strips).
However, there are times when it is better to entrust the repair of the control board to a professional.
The main signs that it is better to contact a specialist are:
- on the electronic board there are places of discoloration in the form of scorch marks and darkened tracks,
- capacitor caps are broken (usually in the place of a cross-shaped notch) or clearly convex,
- darkening of the main processor mounting area,
- areas of burnt-out coating are visualized on the damping coils,
- The legs of the microcircuit have a non-uniform color.
If you have the above symptoms of a breakdown and have no experience in eliminating them, it is better to entrust the solution to this problem to a professional.
How much do specialist services cost?
Lack of experience in repairing household appliances is a reason to contact a specialist.
Only a professional can restore or replace the board . You can find a master by looking at an ad on the Internet or in a newspaper. Perhaps one of your relatives or friends has already used similar services.
The price for replacing the control board is 2,500 rubles. The part itself will have to be purchased separately. If it is possible to restore the board, the technician will take it to the service center, since it is impossible to perform such repairs at home.
To reduce the risk of encountering scammers, you need to read the reviews left by other clients. An honest master will definitely give a guarantee for the work performed and document everything.
Causes and prevention of breakdown
The control board in an Indesit washing machine most often fails due to the following reasons:
- A machine was purchased with a manufacturing defect.
- Voltage fluctuations occur frequently.
- Water got on the electronics.
- One or more sensors have failed.
- The machine is infested with insects.
To prevent damage, you need to install a voltage stabilizer and connect the device to the network via an adapter. Insects must be removed from the house, and water must not be allowed to get on the board.
A lot of important and useful information about repairing Indesit washing machines is presented in this section.
Repair or replacement of the electronic module of the Indesit washing machine
In most cases, a damaged electronic module board of an Indesit washing machine cannot be repaired at home. The only way out is to replace it. Restoration is possible in case of obvious violations, which are represented by poor-quality soldering or poor contact.
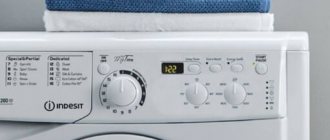
When going to a call, the technician from the Myguru service has a spare unit with him and, after diagnostics, determines further actions. When contacting us regarding a breakdown of your washing machine, please provide its model and code, which is displayed on the display located on the front panel of the device. This will allow the technician to pre-determine the repair kit and speed up the restoration process.