The more options a household appliance has, the more complex the “filling”. If the washing machine becomes uncontrollable or stops working altogether, the reason for this may be a breakdown of the “brains” of the unit - the control board. In this article we will tell you what malfunctions exist, how they are expressed and how to repair the control board of a washing machine.
Relevant for the following models of washing machines: AEG / AEG, Ardo / Ardo, Beko / Beko / Veko, Bosch Logixx, Maxx, WFF / Bosch Logix, Max / Maxx; Brandt / Brandt, Candy / Kandy, Daewoo / Daewoo, FAGOR / Fagor, Hotpoint Ariston AQXXD, AWSL, Aristocrat, Margherita / Hotpoint Ariston AVSL, Aristocrat, Margherita; JLA, Electrolux EWS / Electrolux; Gorenje / Gorenje, Haier / Haer, Hansa / Hansa, Hover / Hover, Indesit WISL, WISN, WIUL, IWSB, INNEX / Indesit Inex; Kaiser / Kaiser, LG Direct Drive / LV/LG Direct Drive; Regal W.M.; Samsung Diamond / Samsung Diamond; Siemens / Siemens; Vestel BWM / Vestel; Whirlpool / Whirlpool; Zanussi FCS / Zanussi; Atlant and others, including top-loading models.
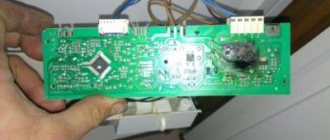
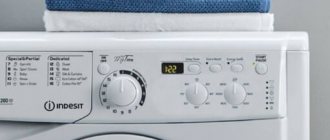
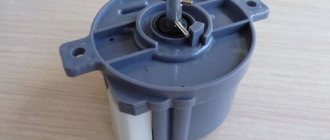
Purpose and design of the control board
The control module controls the operation of all components of the washing machine. It ensures timely switching on and off of each of them, thereby managing the washing process. All data collected from the sensors flows into the control module. Guided by the selected program, it regulates the drum speed and ensures that the water is heated to the required temperature. The slightest malfunction of the module entails a deterioration in the quality of the device as a whole; a serious breakdown can lead to the machine simply not turning on.
The control unit performs the following main functions:
- controls the amount and temperature of water,
- sets the operating mode of the electric motor,
- controls all machine components depending on the specified program,
- controls inlet water pressure and controls the inlet valve,
- performs the locking function.
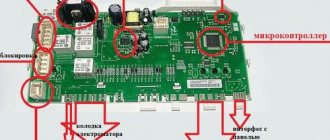
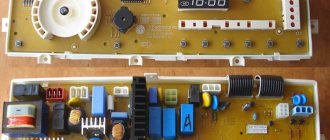
Structurally, the control module consists of two parts. This is the washing machine control board and display board. Sensors and actuators are connected using chips or contact pads.
Signs of a broken electronic board
The washing machine is complex, but one small part is responsible for performing all the functions - the control module. Therefore, if it fails, it cannot go unnoticed.
Indirect signs that indicate a breakdown of the control board of the LG washing machine:
The spin does not work, the error code does not appear on the screen;- the indicators on the control panel flash at the same time, sometimes they simply stop lighting;
- the machine does not start washing, does not draw water and does not respond to other commands;
- washing lasts a long time - for several hours;
- The washing machine periodically freezes and requires a reboot to continue normal operation;
- the drum rotates in different directions, the engine speeds up and slows down;
- The heating element does not heat the water.
Since the control module is responsible for the functioning of all systems, any malfunction may indicate its failure. If the reason is not in the part responsible for performing the action, then you should disassemble the “brain” of the washing machine.
In addition, there is a code that indicates a malfunction of the control board - this is a PF error. It indicates that a module power failure occurred while executing a particular program.
Reasons for module failure
There are many factors that affect the longevity of the washing machine control module. Some of them lead to breakdowns that are easy to fix; others cannot be fixed without calling a specialist.
Manufacturing defects
Quite a rare problem, especially among famous manufacturers. The defect can be expressed in anything, in poor soldering of parts, a broken track on the board, low-quality radio components. In the vast majority of cases, the defect “pops up” in the very first weeks of operation. The solution to the problem is to return the device under warranty.
Supply voltage parameters mismatch
Power surges in the network are quite common. A strong surge can lead to the failure of any electronic device, including the control module board. Most often, service workshops do not consider this case to be covered by warranty, so it is easier to protect yourself from such trouble in advance by connecting the machine through a voltage stabilizer.
Failure of one or more sensors
Actually, this malfunction does not relate to the control board of the washing machine. To fix this problem, it is enough to identify the faulty sensor and replace it.
Short circuit caused by water entering the module
A washing machine cannot operate without water, and water is not the best companion for electricity. Even a small amount of moisture getting on the board can cause it to fail. Most manufacturers try to protect the buyer from such a nuisance by sealing the units hermetically and installing protection against accidental short circuits. But no one is immune from this. Water may enter the module after repairs or during transport of the machine.
In addition to the above, the cause of poor operation of the module may be carbon deposits formed on the connecting contacts or their contamination. Rodents that are smart enough to get inside the device can also cause a lot of trouble. In any case, it’s worth starting the check by inspecting the control module board, cleaning it of dirt, washing the contacts, and making sure the wiring is intact.
Checking the control module
Even the most expensive and high-quality washing machine can break down. Any unit can fail, including the control unit. If the machine stops working normally, the first thing you need to do is determine the reason, understand which unit has failed.
Failure of the control module board can be accompanied by a variety of symptoms.
- The machine indicators freeze while the program is running. The control panel does not respond to user actions. The display does not show any error messages.
- The control panel lights flash randomly. It is not possible to enable any program.
- It is possible to select and start a washing program, but the device does not draw water or draws it in and drains it at the same time. At the same time, there is also no reaction to the user’s actions; only a “reboot” helps.
- Having started the washing program, the machine does not switch operating modes and, if there is no user response, it can wash for hours without trying to drain the water.
- Immediately after turning on, the device turns off spontaneously.
- The indication reports that the washing process is normal, it appears that modes are switching, but nothing happens, the machine does not fill with water, and the engine does not work.
- Spontaneous change in the speed and direction of rotation of the engine. The nature of its operation changes regardless of the program; in a special case, the engine rotates without stopping and in one direction.
Another evidence in favor of a malfunction of the washing machine control board is the discrepancy between the water temperature and the parameters of the selected program. The heating element either overheats it too much or simply does not turn on.
How to repair a board yourself
To determine the breakdown, inspect the board for traces of damage and burnout of elements.
Important! It is better not to repair the controller at home - this is a very difficult and risky process. Soldering skills, straight hands and a minimum set of tools do not guarantee a positive result. The consequences of home repairs can exceed the cost of a new unit several times!
When to change the entire module
A complete replacement of the control board is required if it cannot be repaired. Controllers for popular models are sold in hardware stores. You can purchase and replace it yourself. In all other cases, it is better to contact persons competent in this matter.
The most common types of controllers: Arcadia / Arcadia, AKO, Computime / Computertime, Invensys / Invensis, Samsung MFS.
Where is the controller located
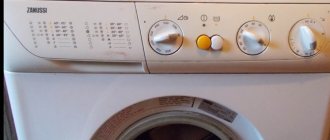
The control unit is located behind the front panel of the washing machine. You can see it when you remove the top cover. The location may vary depending on the type of laundry load, but in general it should not be difficult to find.
Dismantling
To remove the processor from the machine body, you need to perform several steps:
- be sure to unplug the power cord from the outlet;
- turn off the water supply;
- remove the top cover;
- remove the powder compartment;
- disconnect the chips with wires;
- unscrew the fastenings of the board to the case;
- get the part.
To facilitate the subsequent installation process, we recommend taking photographs and notes on the parts.
Functionality check
It is impossible to check the board's functionality when removed, without special instruments. You can only visually assess the presence of burnouts, oxides, and mechanical damage. Any part can fail. Most often these are diodes, resistors, thyristors, relays and other small components.
An example of checking a board with a multimeter:
We fix soldering ourselves
Due to the enormous vibration load on the machine during operation, the soldering of electronic elements may fail. To eliminate defects you will need a soldering iron, solder, flux and the ability to solder.
Capacitors
The capacitor performs voltage stabilization. You can determine the breakdown by swelling of the element or with a multimeter. If the device displays:
- "0" - short circuit
- "1" - break
When replacing, be sure to note that the capacitor has polarity.
Resistors
Checking resistors is divided into two stages according to the order of the elements:
- 8 Ohm, up to 2 A - first order resistors,
- 10 Ohm, up to 5 A - second order resistors.
If the specified parameters do not comply, mandatory replacement of the elements is necessary.
Thyristor block
The unit fails due to frequent changes in the network or impulse noise. Carry out the test only after you are sure that the capacitors are working properly. For the operation, you will need to install a negative resistance. The voltage of first order diodes should not exceed 20 volts. The burnout of the output contacts is checked with a multimeter in continuity mode. The voltage on the filter should be within 12 volts. Observe the polarity of all elements and handle the thyristor ports with care, otherwise repairs will result in large financial expenses.
Checking trigger status
Often its failure is also due to problems with capacitors. The trigger itself breaks quite rarely. Poor or vibration-damaged soldering leads to problems with the assembly. To eliminate them, solder the output contacts. The output voltage should not deviate too much from 12 volts. If the module has been replaced, before commissioning, measure the threshold voltage and output resistance, which should fluctuate within 12 volts 20 ohms, respectively.
How to re-flash the controller of an automatic machine
If the control board is intact, but problems remain, you can try to reflash the machine program. To do this, the module must have connectors for connecting equipment (if they do not exist, new firmware will be installed only in a service center, but directly into the processor).
You will need a programmer - a device that connects the controller to the laptop. Professional options are sold in spare parts stores at prices ranging from 2 to 4 thousand rubles. Online stores sell simplified versions priced up to 500 rubles. For each brand of car you need a separate programmer: for example, for Indesit, Ariston, Whirlpool and Electolux, USBDM Memory Dump, also known as Arcadia, is suitable.
You will also need a program or driver for flashing. They can be downloaded from the official websites of manufacturers or special resources - for example, bineep.ru and eeprus.ru.
To flash via USBDM:
- Connect the programmer to the appropriate connector and then to the computer.
- Install the driver that comes with the programmer on your computer.
- Open Windows Device Manager. Find the ESBDM item.
- Select the Target tab. Click Detect Chip to have the system detect the board model. If the model is not recognized, check the controller, semiconductors, triacs and other elements again with a multimeter - perhaps it is damaged after all.
- If everything is fine, click Load Hex Files... and select the program for the machine.
- Click Program Flash and wait for the process to complete.
https://www.youtube.com/watch?v=qaIXqShtdZQ
Automatic machine testing
Most automatic washing machines produced by well-known manufacturers have a functionality check function - autotest. This procedure allows you to obtain accurate data about the system and, based on the results obtained, make a decision about the need for repairs.
The procedure for starting the automatic test program depends on the specific model. You should carefully study the instructions; the sequence of actions will be indicated there. For example, the autotest of the Ardo washing machine is launched as follows:
- The programmer arrow rotates and is positioned vertically downwards,
- zero temperature is set,
- All control panel buttons are pressed.
It is important not to forget that during testing the drum must be empty; before the test begins, you must remove the laundry, if necessary, scoop out and soak the water with a rag.
The result of the automatic testing program will be an error code that will clearly indicate the cause of the failure. True, in the event of a malfunction of the control module board, the autotest will not always be able to work correctly, which can also be considered an indirect confirmation of the failure of the board.
Symptoms of a problem
Most malfunctions individually mean that it is not the control unit that is broken, but another element of the machine (the sensor is faulty, the belt is broken, the engine is burned out, the UBL is broken, etc.). But if two or more symptoms are observed at the same time, most likely the reason is in the controller.
The car is behaving strangely
An indirect sign of a board failure is strange behavior of the machine: the drum rotates madly; it either collects or drains water; the order of programs changes and the like. If the engine, sensors and pump are working properly, repair or replacement of the part with a new one is necessary.
The device does not turn on
For detailed diagnostics, you need an electrical circuit of the unit and a multimeter to check for possibly burnt-out radio components.
But first, rule out other faults: check the outlet, cord and the presence of electricity in the network. If everything is in order with them, it is not a fact that it is the board that is broken: the power button may also break.
The machine freezes
If the washer periodically stops and then continues to work, pay attention to the electronic module or programmer (depending on the specific model). Professional diagnostics, flashing or replacement of the control element are required.
The device does not work: it writes an error, the indicators blink
If the display shows an error code or a corresponding symbol, this does not mean that the problem is in the board. The reason could be a malfunction of the heating element, lack of water, an open door and much more. Specific error codes are written in the instructions for the machine or on the official website without a display; errors are indicated by blinking indicators on the front panel. If all the lights are on, the capacitors in the control unit may be broken. A specific set of flashing lights indicates a specific problem. These codes can also be found in the instruction manual for your specific model.
The machine does not wash according to the program
If the machine loses its program, starts washing for longer than the allotted time, without switching to rinse or spin mode, there may be problems with the dial, with draining, heating the water, or overloading the drum.
- If there is underfilling, clean all existing filters and hoses, check the water pressure in the system and whether the fill valve is working.
- If water comes in but doesn't go out, clear the blockage in the drain hose and check the pump.
- If heating is insufficient, pay attention to the heating element and temperature sensor.
If this is definitely not the case, then the software module is buggy and you need to find out why (more on this below).
The washing temperature is not maintained
One of the symptoms is that the control board may not be sending a signal to the heating element.
Or, the water does not reach the desired temperature because the heating element is faulty. Less commonly, a temperature sensor or controller fails. In this case, the water may boil, which will significantly shorten the life of the washing machine.
Call the master
Failure of the control board is a serious malfunction; correcting it will require knowledge and ability to handle electrical circuit components. Before undertaking independent repairs, you should think about whether you have enough qualifications for such work. In case of the slightest doubt, it would be right to turn to specialists.
You can often hear advice - remove the board and take it to a workshop, where they will test and repair it. This is not the best solution. If you decide to contact a mechanic, he should inspect the car completely; the right thing to do would be to take the car to a service center or call a technician to your home.
The car should be taken to the workshop even if it is under warranty. It is worth understanding that any intervention in its circuit will cost the warranty, which means you will have to pay for repairs.
What motors are in washing machines?
Most washing machines on the market are equipped with commutator-type motors. Their operation does not require capacitors, so they can be connected to the electrical network immediately, directly, which is quite convenient.
A standard commutator electric motor for a washing machine includes:
- rotor on bearings;
- permanent magnet stator;
- collector unit;
- two or four washing machine motor brushes;
- tachogenerator or Hall effect sensor.
Sensors and tachogenerators are used to regulate and control the speed of the engine, so if you plan to start the electric motor for the washing machine directly from the mains, they will not be needed. But to connect a high-quality speed controller that maintains power at rated load, these devices are necessary.
Replacing the entire board yourself
If it is definitely established that the cause of the malfunction lies in the control module of the washing machine and there is a replacement at hand, even a novice repairman can handle the job. Selecting a suitable unit is quite simple; each board has markings that allow it to be clearly identified. It is worth noting that most manufacturers use the same type of blocks on different machines. They differ in designation, but are fully functionally interchangeable. For example, the Indesit W105TX, WISL82 modules are completely identical.
Since the control board of a washing machine is one of the main parts of the machine, its selection and purchase should be taken very seriously. You need to buy only from trusted sellers and ask for a guarantee.
The procedure for replacing the module depends on the model and brand of the washing machine. Before starting work, you should familiarize yourself with the recommendations for disassembling a specific model; it is better to watch the video.
The repair procedure in this case is to remove the old module, disconnect all cables and conductors, and connect a new one. After that, all that remains is to assemble the car.
Features of connecting an electric motor
Before you start adjusting the speed, the electric motor for the washing machine must be connected correctly. Standard motors from a commutator-type automatic washing machine are equipped with several outputs, which a novice craftsman can easily confuse. Therefore, we will consider the features of connecting the electric motor from the washing machine in more detail and at the same time check its performance. After all, the unit may not start due to the fact that it is simply faulty.
Recommendations for correctly connecting the washing machine motor are as follows:
- take the motor, inspect it and find several wires coming from the shoes or disturbance coils;
- using an ohmmeter set to the minimum value, ring all these outputs to find the coil with the highest resistance (if there are only two wires, then this can not be done);
- find the commutator and brushes of the electric motor of the washing machine, from which a pair of wires also come off;
- find a group of wires coming from the tachometer (often they are placed outside on the housing, but sometimes the electric motor for a washing machine has to be disassembled). If the tachometer has only two outputs, then it can also be measured with an ohmmeter, but for devices with three wires this method is not suitable;
- connect one output from the coil to one wire from the collector, and bring out the second pair of these wires for power supply;
- Having first figured out how to connect an electric motor from standard washing machines, it is advisable to mark all the found wires (collector, tachometer, coils) with colored markers or appropriate stickers.
There is also another good way to check the purpose of the wires, but it is only possible when the electric motor for the washing machine has a terminal block with which it was originally connected to the power supply on the washing machine. The following wires are usually routed to it:
- two for the commutator and brushes of the electric motor of the washing machine;
- two or three from the stator winding of the coil;
- two from the tachometer.
When three wires came from the coil, an increase in speed was carried out through the middle terminal when the washing machine was started in spin mode. When tested with an ohmmeter, the pair of wires with the highest resistance will provide increased torque at lower speeds. And on the leads with the least resistance, the torque will be lower at higher speeds. There may also be wires of some kind of protective system on the block, but you do not need them.
In order for the electric motor from the washing machine (its armature) to rotate in the opposite direction, the wires should be connected in reverse - connect the first pair from the collector and coil to an alternating network, and connect the other pair to each other. This may be necessary if you need to fix the electric motor for the washing machine on a certain plane, which cannot be rotated or changed, and the rotation does not coincide with the desired direction. If reverse is necessary for constant operation, then this possibility of changing direction can be realized using a six-pin DPDT switch, where the middle contact pair, in one of the two positions of the toggle switch, is connected to independent contacts on the poles.
If everything is done correctly, then the electric motor for the washing machine is ready for a test run. It can be considered successful when the unit picks up speed smoothly, without jerking or jamming, and the washing machine motor brushes should not spark. Now you should work on the speed controller. For this purpose, there is more than one standard diagram for connecting the electric motor of a washing machine - there are many of them now offered. Let's look at the two most common and accessible options.
Independent replacement of radio components
If you have the knowledge and ability to work with a soldering iron, you can try to repair the faulty module. To achieve the desired result, a diagram will be useful. Some manufacturers do not consider it necessary to make it easier for users to repair their products, but this is not a problem; any diagram of any module can easily be found on the Internet.
Before starting work, you should remove the board, clean it from dust and examine it carefully, preferably under a magnifying glass. Some faults, such as a burnt resistor, are much easier to detect visually than with a device.
Tacho sensor for washing machine
The motor of direct drive washing machines operates in difficult conditions, which are characterized by sharply uneven torque values over time. Since many manufacturers minimize the dimensions of the electric motor, their declared overload factor rarely exceeds 10%. In such conditions, the durability and reliability of the tachometer located in the washing machine is crucial (the control panel of the LG washing machine is shown in the figure). How to make a tachometer or diagnose it?
Operating principle
Failure of the electric motor is associated with a current overload in the circuit. This unfavorable phenomenon can be warned by the Hall sensor in the washing machine. Hall sensors are compact and accurate. Sometimes such devices are called rotor rotation control sensors. The sequence of their operation is as follows.
If current flows through a conductor and a magnetic field, the induced magnetic flux can move through the conductor perpendicular to the flow of current, causing charged particles to drift toward the edges of the rectangular strip. These charged particles aggregate at the edges of the surface. The magnetic flux imparts a force to the conductor, causing the voltage (plus sign) to drift toward one edge while the electrons (minus sign) move to the opposite edge. The force acting on the flow of current is called the Lorentz force.
While a magnetic force is applied to a conductor, the carriers are located on opposite sides, creating a voltage drop across the conductor. This voltage drop is the Hall voltage. It is proportional to the current flowing through it, the strength of the magnetic field and the type of conductor material.
If any of these three variables changes, the voltage drop across the conductor will also change. Therefore, the device must have a controlled voltage applied to the current path. If the current is controlled and the conductor material is given, the only thing left to change is the magnetic intensity. The greatest effect will be achieved when it changes at an angle of 90° to the direction of the current.
Signal Boost
The device is configured in two different ways - analog and digital. Such devices are classified as proximity devices; they do not make direct contact, but use a magnetic field to activate an electronic circuit.
The signal strength varies depending on the material in the conductor. The material directly affects the electrons or positive ions that pass through it. Semiconductors from:
- gallium arsenide (GaAs);
- indium antimonide (InSb);
- indium arsenide (InAs).
It is important that the conductor is rectangular and very thin. This allows space for the charges passing through to separate and combine at the edges of the plate. The more intense the magnetic flux, the greater the voltage drop across the conductor.
The problem is that the Hall signal is very small and does not exceed 30 μV in a magnetic field of 1 Gauss. Due to the low voltage generated, the signal must be amplified for practical use in a washing machine motor.
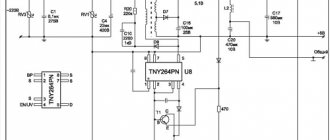
The type of amplifier that is best suited for use with a Hall element is a differential amplifier (the circuit used for an LG direct drive washing machine is shown in the figure), which only amplifies the potential difference between the positive and negative inputs.
If there is no voltage difference between the positive and negative inputs of the amplifier, there will be no output voltage to the amplifier. However, if there is a voltage difference, this difference will have a certain linear gain. The degree of gain is determined by the type of circuit, in this case it depends on the capabilities of the LTC2262-14 ADC integrated board.
The Hall sensor on the washing machine is connected directly to the differential amplifier. When there is no magnetic field in the element, the corresponding voltage is not created, and the output voltage on the amplifier is absent, and otherwise it increases. A differential amplifier detects this voltage drop and amplifies it.
Features of the use of the Hall sensor determines all changes in the control circuit of the washing machine drive that are necessary to ensure proper operation of the control panel. The layout of control elements for LG direct drive washing machines is shown in the figure.
Checking the functionality of the sensor
Sometimes the problem is solved by simply resetting the control circuit. If this does not help, you will have to perform a series of actions described below.
Signs that your device is not working satisfactorily
How to check the tachometer? As the drum in a washing machine is rotated by the motor rotor, the Hall sensor - also mounted on the stator next to the rotor inside the motor - remains in a static position.
An electrical circuit inside the control unit detects the position and speed of the rotor and sends this information to the electronic control panel. The board uses this information to make decisions about the washing process and check that certain components are working correctly.
It happens that the Hall sensor in LG machines does not transmit a signal to the control board that the motor is rotating when it is supposed to do so, for example, during a scheduled shutdown of the washing machine.
Some of the reasons why the unit does not work:
- engine breakdown;
- malfunction of the device itself;
- break in the electrical control circuit.
Some external symptoms of a tachometer malfunction are: the washing machine refuses to start, the water does not reach the required level, the unit vibrates intensely, and the laundry is poorly wrung out. In this case, you can check using a regular multimeter.
Check procedure
To find a faulty sensor in an LG washing machine, you need to apply +5V (using a power source or battery) between the red wire, which is the positive terminal, and the black wire, which is the negative terminal. After this, the voltage is checked between each of the signal wires (white) and the red wire. When rotating the engine with your own hands, the voltage should vary from + 5 V to 0 V. When using tachometers such as SS411 or S41F, the testing voltage range can be increased to 30 V.
Replacing resistors
Burnt out resistors (resistances) discovered during a visual inspection are soldered off. It is unlikely that you will be able to find out their denominations by the markings on the case; a diagram will help here. But even if all the parts look perfect, this does not mean that they are not damaged. Resistors are checked with a multimeter, checking the data obtained with the values indicated in the diagram.
After making sure that the main components of the circuit are in good condition, it is worth checking the operation of the thyristor unit. These are devices that control the operation of electric motors. They often fail in the event of sudden power surges in the network. If the cause of the breakdown lies in the controller, a soldering iron is unlikely to help; it is much easier to buy a new unit and replace it.
The performance of the washing machine largely depends on the control board; this is its most important part. To avoid premature repairs, you should adhere to a few simple rules: under no circumstances disconnect the machine from the network while the program is running, do not transport it without completely removing the water, and do everything possible to provide the device with a stable voltage.
Connecting the motor from the SMA to a 220 V network
When connecting the commutator motor to the network, connect one end of the brush and the winding wires together (or place a jumper on the terminal block), connect the other end of the wires to a 220 V network.
The direction of rotation of the motor will depend on the commutation of the winding wires connected to 220 V. If you need to change the direction of movement of the motor, install a jumper on another pair of wires, or use a two-section switch, as shown in the diagram.