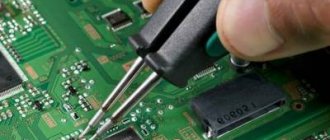
It is not difficult to detect a breakdown due to a bearing problem in a Whirlpool washing machine. In this case, the machine knocks, “jumps,” constantly vibrates, and sometimes freezes. It is impossible to operate it in this condition.
If repairs are not carried out in time, more serious damage will occur - the drum, shaft, and cross are deformed. Replacing the bearings will help restore the machine and prevent further development of faults. It is important to take your time and follow the instructions.
We will tell you further how to repair and replace the bearing of a Whirlpool washing machine.
How to determine that a Whirlpool washing machine part needs to be replaced?
The bearing regularly experiences heavy loads, which is why it has a certain service life, usually 6-10 years. First, the oil seal is deformed: the rubber does not provide a seal. Water from the tank, falling on the bearing, washes out the lubricant, and therefore full rotation of the shaft does not occur.
Visible signs of damage include:
- Knocking, strumming, vibration of the machine.
- Puddles under the car.
- The device does not cope well or does not cope with the spin cycle.
- Oil stains remain on the laundry after washing.
- The drum rotates unevenly, with a hum and squeak.
Preparing to disassemble the Whirpool washing machine
Preparing to disassemble a Whirlpool washing machine is a mandatory step. You should not ignore it, so as not to be distracted by searching for the necessary tools while doing the work.
For dismantling you will need:
- pliers;
- screwdrivers of different shapes or a screwdriver;
- wrench;
- hammer (needed when replacing bearings);
- empty bucket and rag;
- VD-40 lubricant or its equivalent.
When the tools are collected, it is necessary to decide on the location of the work.
Before proceeding with transportation, the equipment must be disconnected from all communications . In order not to spoil the floor covering, it must be covered with cardboard or thick material. You should also keep a bucket and a rag at hand in order to collect the remaining water from the pipes in time.
How to repair?
Replacing bearings in a Whirlpool washing machine is much easier than in machines of other brands. It is enough to disassemble part of the housing, get close to the drum and dismantle the part. The most important thing is to detect the breakdown in time, avoiding further complications that require more problematic and expensive repairs.
To work you will need the following tools:
- selected parts, gaskets;
- wire cutters and pliers;
- slotted and Phillips screwdrivers;
- wrenches for nuts and bolts;
- lubricant;
- rubber and regular hammers;
- hacksaw;
- sealing agent.
Dismantling begins with preparatory actions:
- First of all, you need to unplug Whirlpool.
- Disconnect the machine from the water supply.
- Free the machine from anything that may interfere with operation.
- Place in free space.
- Drain the remaining water using a filter and hose.
- Remove the cuvette (powder tray).
After preparation, the actions will be as follows:
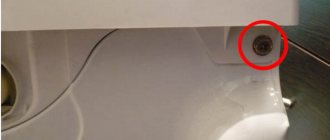
- Using a screwdriver, unscrew the holders and remove the top cover.
- In the place where the cuvette was located, use a key to unscrew the lock under it.
- Clear panel.
- Release the tank by removing the seal and tucking the cuff deep into it.
- Unfasten the locking device and leave it inside.
- Remove the bottom panel using the drain filter hole.
- Dismantle the front panel with the door, remove the clamp, lower counterweight and upper metal part.
- Using pliers, disconnect the pipe and move the fill hose.
- Dismantle the upper counterweight.
- Disconnect the fixing elements of the electric heating device and temperature sensor.
- Unscrew the drain corrugation holder and remove it from the tank.
- Remove the shock absorber struts and move the pump.
- Remove the tank from the housing by lifting it up.
- Remove the belt, motor, and drum pulley.
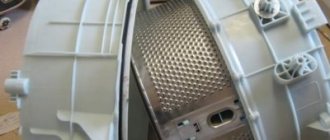
- If the tank is disassembled, unscrew it. If the part is solid, cut strictly along the seams with a hacksaw.
- Knock out the drum.
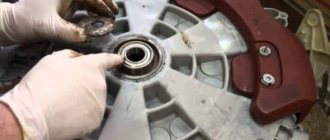
- Using a screwdriver, remove the bearings with seals.
- Thoroughly clean the nests. Place new parts in them, and carefully lubricate the seals. Drive in the parts until they are completely immersed.
- Clean the shaft.
- During assembly, the tank must be secured with sealant. If it is sawn, secure it with bolts for reliability.
- When assembling the machine, return all parts to their places, observing strict sequence.
When carrying out repairs, it is worth checking the condition of all internal elements. If other damage is discovered, it is better to fix the problem immediately so that you do not have to disassemble the washing machine again in the future.
Testing of the repaired device is carried out in washing mode. To check, you need to connect Whirlpool to communications and start it. If the technical device does not vibrate, there is no hum, then the repair was carried out efficiently.
The video will show you how to change bearings in a Whirlpool washing machine:
Step-by-step replacement of worn bearings
The matter is gradually moving towards completion, and soon it will be possible to get rid of the faulty bearings, but there are still a few preliminary steps ahead.
Stage #1 - preparatory work
Now you need to carefully disconnect the drum from the back of the tank - a responsible operation that requires special attention.
First you need to free yourself from the fasteners holding the pulley. The tank is turned over with the pulley up, and the bolt securing it to the shaft is disconnected. When the pulley is removed from the axle, the unscrewed bolt is returned to its place to avoid damage to the shaft when the drum is knocked out.
The shaft is removed gradually, by carefully tapping with a hammer. Some experts advise inexperienced craftsmen to use a rubber mallet in this case, so as not to inadvertently flare the bearing seat.
If the shaft moves little by little, the work continues patiently. If the result is negative, before increasing the effort, the standard bolt should be replaced with one that you don’t mind throwing away if it becomes deformed.
When the position of the shaft is equal to the head of the bolt, the latter is unscrewed and the drum is removed out.
It is necessary to carefully inspect the shaft and bushing for their integrity. To check, you can put a new bearing on the shaft to make sure there is no or no play. If flaws are found, the shaft with the cross will have to be replaced.
Such a drum shaft must be cleaned until it shines and only then returned to its original place. You can additionally treat the surface with anti-corrosion paint
The bushing located on the shaft should also be free of wear and tear defects and mechanical damage.
Pronounced transverse grooves eloquently indicate that the oil seal on such a bushing will not be able to protect the bearing from moisture, and, therefore, repeated repairs are inevitable.
Before removing the bearings, the seal must be removed. The operation is simple: pick it up with a flat screwdriver and remove it. If it doesn’t work right away, you’ll have to soak it with a penetrating lubricant.
It won't be a problem if the seal breaks, it still needs to be replaced.
Stage #2 - removing the damaged part
The tank is placed on wooden blocks, and it’s time to work with a metal rod or a blunt chisel. Place the pin on the worn bearing and hit the part with a hammer.
Subsequent blows are applied in a circle until the part is knocked out. During operation, care must be taken to ensure that the bearing does not become distorted. The outer bearing is removed first.
The tank is a rather fragile part, so many craftsmen, in order to avoid breakage, knock out the bearing by placing the container on their knees or a soft base
The second bearing is also removed using the same method. The blows should be careful and not strong. And yet, this procedure is quite noisy, so the neighbors will be grateful to the home craftsman if he finds the opportunity to do it outside the walls of the house.
The landing sites must be thoroughly cleaned of dirt using an anti-scale agent and a soft cloth, until they shine, to prevent clogging of new parts.
Stage #3 - installation of new bearings
Now nothing prevents you from installing serviceable bearings. Initially, this is done with the smaller one.
A metal rod will help here too: it is alternately applied to the bearing from opposite sides and, with careful blows of a hammer, is directed to the right place.
The sound will indicate that the part is placed correctly: it will become much louder. The larger bearing is changed in the same way.
When installing new bearings, craftsmen use the same tools: a hammer and a metal rod. You can use other convenient installation devices
All that remains is to install a new oil seal. First of all, it must be treated with a lubricant created specifically for washing machines. Only after this can it be placed in its proper place.
When this is not available, some recommend Litol-24, which can be purchased at any auto store. But responsible craftsmen categorically do not advise doing this. It does not have great water resistance, and everyone understands what moisture brings to the bearings.
Stage #4 - reassembling the structure in reverse order
The lubricated tank shaft is installed at the same location - in the back cover. Before connecting the tank halves, it is recommended to replace the sealing rubber with a new one. As a last resort, fill the groove along with the gasket in a circle with a layer of sealant.
It’s a good idea to first make sure the tank is tight by pouring water into it above the gasket. If it does not leak, then everything has been done correctly, the work of replacing faulty bearings has been successfully completed
All that remains is to assemble the car. This is done in the reverse order of disassembly. And here the photographs he took while disassembling the unit will provide an invaluable service to the home handyman.
The more there are, the less likely it is that “extra” parts will remain near the assembled washing machine.
How to replace in a top loading machine?
The difference between models with vertical loading is the fixation of the drum on two axle shafts. Whereas with horizontal, one mount is used. Bearings on both axle shafts must be replaced. It doesn't matter which one is unstable.
Repair includes the following basic actions:
- Disconnect electrical wires and hoses.
- Remove the outer and rear walls of the device.
- Remove the linings located on the sides of the drum - under them there are calipers with bearings.
- First of all, the bearing that does not have a pulley near it must be replaced. Then you need to change the part on the opposite side.
- The installation sites of the elements must be cleaned and lubricated.
- Reassemble in reverse order.
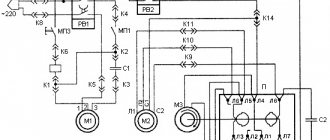
SMA device diagram
Basic elements of all Whirlpool machines:
Motor. If it is a commutator, then it includes a drive belt. The inverter motor is directly connected to the drum.- Buck . It consists of two halves with a drum inside. Its package includes a crosspiece, a bushing, a shaft, and bearings. There are bumpers (stiffening ribs) inside.
- Water drain pump . Its design consists of a motor, impeller and pipes. Before entering the pump, the water passes through a mesh filter.
- Shock absorbers. These are two springs that hold the tank.
- Control board . This is the main element that is responsible for all the actions performed by the washing machine.
- heating element . This element heats the water. It is located under the tank.
- Tacho sensor . It controls the rotation speed of the drum.
- Pressostat . A small sensor is located under the top cover. It performs the function of determining the water level in the tank.
- Counterweights . They hold the device in place during vibration.
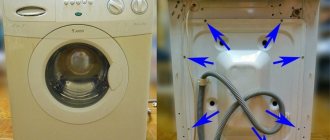
In addition to the listed elements, the design of the washing machine includes:
- drain hose,
- inlet hose,
- input filter,
- power cable.
A diagram of the washing machine is needed in order to understand exactly where each element is located. In general, the differences between different models of Whirlpool SMAs are minimal. The only difference is the orientation of the drum.
Where and at what price can I buy a new one?
Before repairing, you must purchase spare parts. It is not possible to buy a universal part, since the size range of bearings is quite wide. One manufacturer may have more than a dozen species. When choosing, it is recommended to follow the designations of original or similar parts.
The most common bearings for whirlpool with numbers:
202;- 203;
- 204;
- 205;
- 206;
- 207;
- 305;
- 306.
You can use the following selection methods:
- Find the information in the instructions for the washing machine.
- Using the serial number of the machine, obtain information from the Internet.
- Dismantle the old part and use its markings to accurately decide on the purchase. This is the most reliable way.
You can purchase bearings at many home appliance parts stores. Parts are often offered by workshops that repair cars. A large selection is available in online stores. The price is within 500 rubles, the elements are sold both in a repair kit and separately. Replacement usually requires two bearings: a large one and a small one.
It can be difficult to find the best quality and most reliable parts. You need to choose ones where the clips and balls are as wear-resistant as possible, the steel is durable, and the casting is precise.
Additional components are also important . Even the most expensive bearing will not last even a year if a low-quality oil seal is installed and the wrong lubricant is used.
Difficulties and ways to overcome them
Difficulties that you may encounter when disassembling the Whirlpool washing machine:
- in order not to confuse the bolts that secure different elements, they need to be laid out on sheets of paper and the corresponding signatures made; matchboxes are also suitable for this purpose;
- when connecting the control board, there is a risk of mixing up the terminals, which can cause damage to household appliances - to prevent this from happening, the wire layout must be recorded on your phone;
- some bolts may come out of the thread with difficulty; if they are rusty, they need to be treated with lubricant;
- if after assembly any of the elements do not work, it is necessary to check the tightness of the contacts;
- To avoid stripping the threads, do not apply excessive force; the bolts must be secured securely, but without force.
Call a specialist
If it is difficult to replace the Whirlpool bearings yourself or you don’t have the time, it would be advisable to seek help from professionals. The master has in his arsenal all the necessary tools and control devices. When called, he is able to quickly identify the problem and determine whether repairs are needed.
A specialist will fix the breakdown much faster than anyone else. Another advantage is that many organizations themselves purchase spare parts and subsequently provide a guarantee for them, as well as for services.
Finding a master will not be difficult; there are many offers. You can contact:
- to the service center;
- to the workshop;
- to a private specialist, through word of mouth;
- by announcement or advertisement;
- leave a request on the official website.
When choosing, you should read reviews and pay attention to work experience. If an organization has been operating for a long time and its specialization is only the repair of washing machines, then these are great advantages.
The cost of the service for replacing bearings in a Whirlpool machine varies. On average it ranges from 2500-3000 rubles.
Instructions
The disassembly diagram for the Whirlpool washing machine will differ depending on the type of load. First of all, this concerns the sequence of actions.
Front loading appliance
Adhering to the following algorithm, you will be able to disassemble any model of Whirlpool washing machine with horizontal loading:
Unscrew the top cover. It is secured with two bolts, which are easy to reach. After removing them, the lid is lifted up slightly and pushed forward.- Unscrew the screws holding the control panel and remove it. Behind it is an electronic module, which is fixed with small bolts and latches that need to be opened.
- Immediately under the top cover you can see the water level sensor. It is held on by one bolt, which is unscrewed.
- The next step is to remove the detergent tray. To get it out, you need to pull the plastic tab. There are no other fixing devices.
- To remove the front wall, you need to tighten the top mounting screw. If necessary, remove the hatch cover. Release the clamp and remove the cuff. You can then remove the front wall completely and move it to the side.
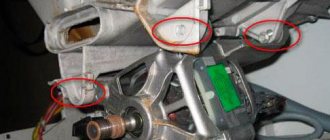
- Behind the front wall there are traverses that need to be twisted.
- Disconnect the contacts leading to the surge protector and remove it.
- Remove the water supply valve. It can be seen on the back panel at the top.
- Twist the counterweights.
- Remove the belt and motor.
- Remove the heating element, which is fixed with one bolt. You need to take it out carefully, swinging it from side to side.
- Disconnect the thermostat.
- Remove the tank. If necessary, untwist it into two halves.
- There is a drum inside the tank. If access to its internal components is required, first remove the spider, then the pulley, oil seal and bearings.
- Dismantle the pump. It is disconnected from the filter, drain hose and pipes.
The washing machine is completely disassembled. You can begin repairing or replacing spare parts.
The video will show you how to disassemble the Whirlpool washing machine:
From vertical
To disassemble a Whirlpool top-loading washing machine, perform the following steps:
- Unscrew the fasteners that are located on the right and left walls of the case. They act as external latches for the top cover.
- Carefully pry up the control panel and disconnect the contacts from it.
- Under the panel you can find several more bolts that are also twisted. Another screw is located behind the seal; once this is removed, the top cover can be removed.
- Loosen the clamps and remove the pipes.
- Screw in the bolts holding the side walls and front panel.
- Remove the belt from the motor.
- Dismantle the engine.
- Remove the pump.
- Twist the heating element.
How to avoid encountering scammers?
As a rule, employees of unscrupulous organizations promise to carry out free diagnostics and eliminate the cause of the damage. In this case, the contract is not drawn up, the necessary documents are not drawn up. A few days later, the consumer is notified that the repair has been completed and the washing equipment can be picked up.
At the same time, the cost of repairs is announced, reaching up to 80% of the price of a new device. If the customer does not agree with such an expensive restoration, the scammers resort to tricks, threatening non-return of the technical device and even its sale to offset the debt.
When choosing a service provider, in order to avoid negative situations, it is recommended to pay attention to the following points:
- Fraudsters have a hard time hiding their reputation. Negative reviews about organizations that have violated the rights of service recipients are often published on the Internet.
- An important element is the company sign. A workshop that does not want to attract undue attention to itself will not post legally significant information about itself.
- A reliable service organization will not require large upfront payments. Full payment must be made after repairs are completed and upon acceptance of the equipment. An advance payment is charged with the client's consent.
- The service provider must have a cash register. Advance and full payment must be accompanied by checks.
- You should not agree to repair if the company’s employees do not offer to conclude an agreement and draw up an acceptance certificate for the faulty device.
- You should carefully study the contract. It should not contain phrases indicating that the contractor unilaterally has the right to change the type of service and its cost.
- The warranty period or formalities associated with it must be indicated.
- Upon receipt of the repaired automatic machine by the customer, the responsible person demonstrates the work done.
- After the service is provided, it is necessary to sign a bilateral acceptance certificate with a mark in the contract.
Tools
- Screwdrivers: flat and Phillips
- Pliers, wire cutters
- Spanners
- Necessary parts and gaskets for them
- Special lubricant or dishwashing detergent
- Hammers: simple and rubber
- Bit
- Sealant
If everything is available and you are determined to implement your plans, we begin preparations.
1.Unplug from the socket. This is the main condition for all intrusions into the device.
2. Disconnect from the water supply
3. Free Whirlpool from everything unnecessary.
4.Put it in an open place
5. We drain the remaining water, which is always present in the drainage paths. We use a drain filter for this or simply lower the hose to the floor.
When the preparatory steps are completed, we begin dismantling.
How to glue a plastic water tank?
Below are adhesives and sealants that are suitable for bonding the drum. These compositions easily withstand the difficulties characteristic of SMA - temperature extremes, vibration attacks, high pressure, contact with water.
Permatex 81730
This is a flowable adhesive-sealant designed for hermetically sealing headlights and glass in a car. The composition is characterized by transparency. Frozen seams do not allow water to pass through and are not afraid of extreme temperatures. The operating range of the composition is from minus 62 to plus 232 °C. Great for the task. Costs on average - 175 rubles.
Kraftool
The composition is highly elastic. Withstands strong vibrations and heating up to plus 250 °C. Its main purpose is to seal connections in electric motors. Reliably fastens the halves of the product even without bolted connections. One tube can glue 4 tanks together. The cost is about 200 rubles.
Glue F
This is polyurethane glue. If you use it, then you won't need bolts. But it is so strong that if you need to disassemble the machine again, you will have to saw it again. The second disadvantage is the price, it costs much more than sealants, a 310 ml can costs almost 700 rubles.
ABRO 11AB-R
An ultra-resistant sealant that can withstand the harshest conditions. He is not afraid of very high temperatures, and is not afraid of chemically aggressive substances, including acids. The cost is approximately 350 rubles.
Symptoms of a problem
No matter how good and expensive a particular Candy washing machine model is, this does not mean that it will work forever. Any mechanism has its own service life. Bearings have an average service life under average statistical conditions of 5-6 years. But it can also be less if a particular washing machine was operated in an unfavorable environment. When the bearings reach the end of their life, they need to be replaced to extend the life of your home appliance.
Summarize
Despite the fact that the work of repairing automatic machines is not easy and quite labor-intensive, if you have free time, it is better to do it yourself. This will save money, and it’s not for nothing that they said from time immemorial: “If you want to do it well, do it yourself.” But before you disassemble the bearing, you should soberly assess your strength. Remember that a normal technician will not assemble the unit you disassembled.
We hope that today's article was useful to the reader. If you have any questions while reading it, you can ask them in the comments below. The editors of electric-220.ru will be happy to answer them. If you have experience in producing such work, please share it with novice home craftsmen. Write, communicate, ask. And finally, according to the already established good tradition, we bring to your attention a short but quite informative video on today’s topic.
Sequencing
- Use a screwdriver or screwdriver to unscrew the holders
- The top cover retracts to the side
- We take out the powder tray, use a wrench to unscrew the lock under it
- Freeing the socket
- Open the tank, remove the seal, tuck the cuff inside
- We unfasten the locking device and immerse it inside
- Remove the bottom panel through the hole in the drain filter
- We dismantle the front panel with the door, the clamp, the counterweight at the bottom, the metal upper part
- Use pliers to disconnect the pipe and move the inlet hose
- We dismantle the upper counterweight
- Disconnect the clamps of the electric heater and temperature sensor
- Unscrew the drain corrugation holder and remove it from the tank
- Remove the shock absorber struts, then move the pump
- Lifting the tank, release it from the housing
- Remove the belt, engine and pulley
- We unscrew the collapsible tank, cut the solid one strictly along the seam using a hacksaw
- Knocking out the drum
- We remove the bearings together with the seals using a screwdriver
- We thoroughly clean the sockets, put new spare parts in them, thoroughly lubricating the seals, and hammer them in with a hammer until they are completely immersed.
- Cleaning the shaft
- When assembling, we glue the tank with sealant, and put the sawn one on bolts for greater strength.
- We return everything disassembled to its place in strict sequence.
When carrying out such an operation, do not forget to check the condition of all internal components. If something is not in order, it is better to replace it immediately so as not to have to dismantle the device once again.
Useful tips on how to repair Whirlpool washing machine bearings
It is not difficult to detect a breakdown due to a bearing problem in a Whirlpool washing machine.
In this case, the machine knocks, “jumps,” constantly vibrates, and sometimes freezes. It is impossible to operate it in this condition. If repairs are not carried out in time, more serious damage will occur - the drum, shaft, and cross are deformed. Replacing the bearings will help restore the machine and prevent further development of faults. It is important to take your time and follow the instructions.
We will tell you further how to repair and replace the bearing of a Whirlpool washing machine.