A situation may arise that at the very beginning or in the middle of the wash, the machine reaches high speeds and begins to spin. Such a malfunction can occur either constantly or periodically - not every time the washing machine is used.
In a working washing machine, the washing process occurs as follows: after loading the laundry, water is drawn into the tank, which, depending on the washing mode, can be heated. The laundry is cleaned of dirt due to the measured rotation of the drum during washing. To remove excess water at the end of the washing program, the drum turns to high speed - the laundry is pressed tightly against its walls, and the water leaves through the holes in the drum. If you need washing machine repair in Saratov, contact our company. There may be several reasons for such a malfunction.
What is a triac in a washing machine?
When it comes to diagnosing the control module of a washing machine, the term “triac” is often heard. For users who are far from electrical engineering, this word is akin to a curse and means nothing. At the same time, this semiconductor is among the first to suffer in the event of failures and breakdowns: it burns out and requires replacement. A triac in a washing machine is a key connecting radio element that allows the control board to transmit signals to sensors and system components. Let's take a closer look at what it looks like and on what principle it functions.
Methods for determining failure
First of all, you need to determine what kind of breakdown occurred. An initial diagnosis will help you decide whether it is possible to fix the problem yourself or whether you will still have to spend money on professional repairs.
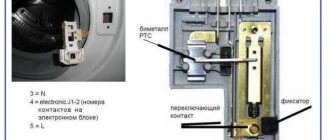
The right step would be to first familiarize yourself with the circuit diagram of the washing machine in order to have an idea of where everything is located.
Sometimes, to determine the reason for the failure of household appliances, it is enough to read the instructions for use, which, among other things, contain recommendations for eliminating breakdowns.
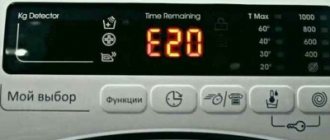
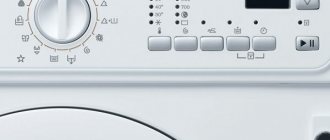
The first thing you need to do is look at the display. If it is impossible to complete the specified process, the washing machine displays special codes on the display.
Error codes in the operation of the washing machine are given in the instructions that the manufacturer necessarily attaches to its product:
- F01 – in the control of the drive motor the triac semiconductor device is closed;
- F02 – due to an open circuit or short circuit, the tachometer generator has lost the ability to signal the rotation of the drive motor, another reason for such an error is motor blocking;
- F03 – the temperature sensor circuit has been short-circuited or broken;
- F04 – failure of the water level sensor;
- F05 – due to an interruption in the operation of the drain pump, a clogged drain tract, or a malfunction of the water sensor, the “empty tank” signal is not given;
- F06 – due to errors in the front panel buttons, the program code is not defined;
- F07 – the heating element does not heat up;
- F08 – faulty wiring, relay or tubular electric heater itself;
- F09 – EEPROM memory has failed;
- F10 – the water level sensor suddenly lost signals of both a full and an empty tank;
- F11 – the supply voltage has disappeared in the drain pump;
- F12 – communication between the controller and the display module is broken;
- F13 – open or short circuit in the sensor circuit responsible for the drying temperature;
- F14 – malfunction in the drying heating element;
- F15 – damage to the heating element relay responsible for drying;
- F16 – drum lock;
- F17 – power is not supplied to the hatch door lock or they forgot to close it;
- F18 – a communication error has occurred on the main electronic module between the controller chips and the processor that controls the asynchronous drive motor.
Triac and its application
A triac, also called a triac, is a special type of triode symmetrical thyristor. This is a small black plastic “box” with three power electrodes on one side and a shutter on the other. The advantage of this radio element is its ability to conduct electric current at working “electron-hole” junctions in both directions.
Due to their excellent current conductivity, triacs are actively used in systems with alternating voltage. Triacs are also used in washing machine circuit boards as current pulse transmitters. With their help, the system exchanges information, transmitting commands from the “brains” of the machine to specific nodes and sensors, and then back.
Triacs are triode symmetrical thyristors capable of conducting current in both directions.
The operating principle and design of a triac is identical to any other thyristor. When a control current enters the pn mechanism, the junction opens and closes only when the voltage drops to a given operating level. The radio component has a drawback - its power electrodes are not interchangeable.
Useful sources
- Horowitz P., Hill W. The Art of Circuit Design. Volume 1. - M.: Mir, 1993.
- Managing a Powerful AC Load
- Control of high-power DC loads. Part 1
- Control of high-power DC loads. Part 2
- Control of high-power DC loads. Part 3
- Clicking the relay correctly: switching powerful loads
- Managing a Powerful AC Load
- Controlling MOSFETs #1
- Modern high-voltage drivers of MOSFET and IGBT transistors
- Key on your shoulder! – features of the use of high-voltage drivers produced by IR
How does the part function?
The triac is responsible for receiving and transmitting voltage through the washing machine. Unlike a thyristor, it conducts electric current in two directions, working like two back-to-back thyristors with common control. Due to its symmetry, the device received the prefix “simi”.
- power terminals designated “T1” and “T2”;
- control electrode, marked "G".
As a result, we get five transitions, organized into two circuits, which are parallel thyristors. When negative polarity is formed on T1, the trinistor effect p2-n2-p1-n1 appears, and when it changes - p1-n2-p2-n3.
Soldering iron power control circuit
In conclusion, we present a simple circuit that allows you to control the power of the soldering iron.
Simple power regulator for soldering iron
Designations:
- Resistors: R1 – 100 Ohm, R2 – 3.3 kOhm, R3 – 20 kOhm, R4 – 1 Mohm.
- Capacitances: C1 - 0.1 µF x 400V, C2 and C3 - 0.05 µF.
- Symmetrical thyristor BTA41-600.
The above diagram is so simple that it does not require configuration.
Now let's look at a more elegant option for controlling the power of a soldering iron.
Power control circuit based on a phase regulator
Designations:
- Resistors: R1 – 680 Ohm, R2 – 1.4 kOhm, R3 – 1.2 kOhm, R4 and R5 – 20 kOhm (dual variable resistance).
- Capacitances: C1 and C2 – 1 µF x 16 V.
- Symmetrical thyristor: VS1 – VT136.
- DA1 phase regulator microcircuit – KP1182 PM1.
Setting up the circuit comes down to selecting the following resistances:
- R2 – with its help we set the minimum temperature of the soldering iron required for operation.
- R3 – resistor value allows you to set the temperature of the soldering iron when it is on the stand (switch SA1 is activated),
A situation may arise that at the very beginning or in the middle of the wash, the machine reaches high speeds and begins to spin . Such a malfunction can occur either constantly or periodically - not every time the washing machine is used.
In a working washing machine, the washing process occurs as follows: after loading the laundry, water is drawn into the tank, which, depending on the washing mode, can be heated. The laundry is cleaned of dirt due to the measured rotation of the drum during washing. To remove excess water at the end of the washing program, the drum turns to high speed - the laundry is pressed tightly against its walls, and the water leaves through the holes in the drum. If you need washing machine repair in Saratov, contact our company. There may be several reasons for such a malfunction.
Checking the part for functionality
You can check the triac for serviceability either with or without a multimeter. In the second case, you will need a flashlight bulb and an AA battery. It is enough to organize a circuit with a sequential connection of a power source corresponding to the lamp voltage and the working leads of the part. Then we apply electric current and evaluate the result - the light should come on. Next, without de-energizing the system, disconnect the battery and check the pn junctions for passability:
- if the triac is working, then the current will be held at a certain level, and the light bulb will continue to glow;
- If the triac burns out, the circuit will lose power and the lamp will go out.
You can test the triac without a battery with a lamp. You will need a multimeter turned on in the “Buzzer” mode. The instructions are as follows:
- apply probes to the contacts;
- look at the device display (if “1” – the triac is working).
Checking with a buzzer will confirm that the pn junction is not broken. In this case, the operating current will not start the system - the resistance at the contacts will be too high, and the pulse will not arrive at the electrodes.
The second step is to check the opening of the transition. It is necessary to connect the control terminal to the anode. In this case, the multimeter will increase the operating current, the resistance at the contacts will drop - the triac will work. In response, a number different from one will appear on the tester’s display.
At the “finish” you will need to open the control output. After disconnecting, the resistance should increase, and “1” will appear on the multimeter screen again. This means the triac is working.
Source
Field Effect Transistor Driver
If you still need to connect the load to an n-channel transistor between drain and ground, then there is a solution. You can use a ready-made chip - a high-side driver. Top - because the transistor is on top.
Drivers of both upper and lower arms are also available (for example, IR2151) to build a push-pull circuit, but this is not required for simply turning on the load. This is necessary if the load cannot be left “hanging in the air”, but must be pulled to the ground.
Let's look at the high-side driver circuit using the IR2117 as an example.
The circuit is not very complicated, and the use of a driver allows you to use the transistor most efficiently.
Let's make sure the element is faulty
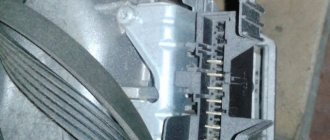
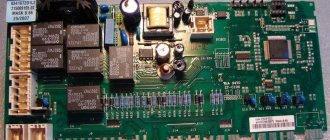
First of all, you will need to gain access to the control board of the washing machine. To diagnose semiconductor elements you will need a special device - a multimeter. To partially disassemble the machine, one screwdriver is enough. The algorithm of actions will be as follows:
- turn off the power to the automatic machine;
- turn off the tap responsible for the water supply;
- remove the top cover of the case by unscrewing 2 bolts;
- pull out the powder receptacle;
- unscrew the bolts holding the control panel;
- take a photo of the connection diagram of the “device” to the board so as not to make a mistake during subsequent assembly;
- reset the contacts and remove the dashboard.
To obtain more accurate results, it is recommended to unsolder the triac before diagnosing it.
However, the method of soldering semiconductors is more complicated; you will have to perform additional manipulations with radio components on the control board. Therefore, beginners prefer to check triacs directly on the spot, without disconnecting them from the module.
To check the semiconductor for penetration, you need to lean the multimeter probes against the power contacts of the triac (these are the left and middle “legs”). The tester screen may display either 0 (indicating that the element is faulty) or one (which means the part is fully functional). On some devices, the letters OL are displayed instead of 1; they also indicate sufficient resistance.
At the second diagnostic stage, you need to move one of the multimeter probes to the control terminal. In this case, the voltage drop should be from 100 to 200, minor differences are acceptable.
Next, it is checked whether the junction of the semiconductor opens. To do this, hold the multimeter probes on the power terminals and quickly touch the control contact. The readings on the tester screen should change immediately. This adjustment will indicate the serviceability of the triac.
When the semiconductor being tested produces correct results at all diagnostic stages, it means that the problem is not in this circuit element. We'll have to test other triacs. If a breakdown is confirmed, be sure to replace the part.
Relay
From the point of view of the microcontroller, the relay itself is a powerful load, and an inductive one at that. Therefore, to turn the relay on or off, you need to use, for example, a transistor switch. The connection diagram and also the improvement of this scheme were discussed earlier.
Relays impress with their simplicity and efficiency. For example, the HLS8-22F-5VDC relay is controlled by a voltage of 5 V and is capable of switching a load that consumes a current of up to 15 A.
The main advantage of the relay - ease of use - is overshadowed by several disadvantages:
- this is a mechanical device and the contacts can become dirty or even welded to each other,
- lower switching speed,
- relatively large currents for switching,
- contacts click.
Some of these shortcomings are eliminated in so-called solid-state relays. These are, in fact, semiconductor devices with galvanic isolation, containing inside a full-fledged powerful switch circuit.
How to choose a replacement part?
When deciding to replace a semiconductor, it is important to responsibly select components. When buying a new triac, you should pay attention to the isolation of the element, its peak rating and opening current. But how can you find out the characteristics of a part removed from the control board of a washing machine?
Look at the markings of the faulty triac - by deciphering the inscription, you can find out all the necessary information about the semiconductor element.
Therefore, the first thing to do after desoldering and diagnosing the triac is to copy its markings onto paper. For example, if the original semiconductor bears the inscription BTB 15-700BAK, then it carries the following information:
- BT – semiconductor element series;
- B - indicates that the triac case is not insulated (at the same time, the index “A” will indicate the isolation of the semiconductor);
- 15 – peak current of the triac (in this example, respectively, 15 Amperes);
- 700 – peak voltage (in our case it is 700 Volts);
- VAK is a combination indicating the opening current of the triac, in this example it is 50 mA. The designation CB will indicate an opening current of 10 mA.
The last letters of the marking are of great importance. If there was a triac on the control board with an opening current of 50 mA, and the purchased element is characterized by only ten mA, then the machine will not operate at full power, but only at 10-20% of the possible potential.
You cannot buy replacement triacs with a lower peak current and voltage - these parameters must correspond to the original ones or exceed them.
It is also worth paying attention to the index indicating whether the triac is insulated or not. For example, it is quite possible to replace the semiconductor with characteristic “B” considered in the example with an analogue with the index “A”.
Soldering iron power control circuit
In conclusion, we present a simple circuit that allows you to control the power of the soldering iron.
Simple power regulator for soldering iron
Designations:
- Resistors: R1 – 100 Ohm, R2 – 3.3 kOhm, R3 – 20 kOhm, R4 – 1 Mohm.
- Capacitances: C1 - 0.1 µF x 400V, C2 and C3 - 0.05 µF.
- Symmetrical thyristor BTA41-600.
The above diagram is so simple that it does not require configuration.
Now let's look at a more elegant option for controlling the power of a soldering iron.
Power control circuit based on a phase regulator
Designations:
- Resistors: R1 – 680 Ohm, R2 – 1.4 kOhm, R3 – 1.2 kOhm, R4 and R5 – 20 kOhm (dual variable resistance).
- Capacitances: C1 and C2 – 1 µF x 16 V.
- Symmetrical thyristor: VS1 – VT136.
- DA1 phase regulator microcircuit – KP1182 PM1.
Setting up the circuit comes down to selecting the following resistances:
- R2 – with its help we set the minimum temperature of the soldering iron required for operation.
- R3 – resistor value allows you to set the temperature of the soldering iron when it is on the stand (switch SA1 is activated),
A significant disadvantage of thyristors is that they are half-wave elements; accordingly, in alternating current circuits they operate at half power. You can get rid of this drawback by using a back-to-back circuit for connecting two devices of the same type or by installing a triac. Let's figure out what this semiconductor element is, the principle of its operation, features, as well as the scope of application and testing methods.
SMA Electrolux ewf106410a, Drive motor triac fails
Good day everyone. I ask for help, otherwise this machine has already blown my mind. SMA Electrolux ewf106410a, I attach a photo of the module, periodically, once every 2 months, once every 6 months, the triac of the drive engine fails (short circuit), with this event disables the machines (installed specifically for it) on the machine. The engine does not raise any suspicions, I connected it to the network, at maximum speed there was almost 0 sparking, we checked with a megameter that there were no leaks on the body, the wiring to the engine was also fine. module, I installed an RC chain in the Sim's circuit (it wasn't there from the factory), the varistor waved, I thought it might break through from time to time, I replaced 2 relays of the engine and ULN, I soldered the percent just in case, there were suspicions that soldering failure might occur, but all these actions did not help , and the Sim’s radiator does not short-circuit or touch anything.
Help in writing tests, term papers and dissertations here.
SMA ARDO SED 1010 s 20044004795 Minisel 1000 module, when starting the engine, the motor triac and protective diodes burn out during the first inspection: the track in the module on the motor inductor-thermal fuse circuit is burnt out.
SMA ZANUSSI ZWQ5100 it is not visible which motor triac was used? SMA ZANUSSI ZWQ5100 on module AKO 729352-03 Elux 192911000, the original motor triac was torn to pieces.
SMA Candy cs125TXT RU No. 31001225 0746 0199, ROM is failing Hello! The washing machine came in for repair Candy cs125TXT RU No. 31001225 0746 0199. Initially it was with.
sma ELECTROLUX EW 914S pnc 914760021-00, no engine rotation. sma ELECTROLUX EW 914S pnc 914760021-00 no engine rotation. When opened, a burnt out one was found.
Source
The triac burned out in the washing machine
It is not difficult to suspect that the triac in the washing machine has burned out - the machine freezes, does not turn on, or works with obvious malfunctions.
But you cannot be 100% sure that the radio element is broken, since similar “symptoms” manifest themselves in other electronic problems. To confirm the “diagnosis”, it is necessary to conduct a comprehensive diagnosis of the washer’s control board. The electronic module should be dismantled, inspected and, having found triacs, begin testing them. Let's figure out what to do and in what order.
Typical malfunctions of SMA Electrolux
To determine a malfunction, it is not always necessary to disassemble the Electrolux washing machine; it is enough to pay attention to the behavior of the CM during operation.
Let's look at the reasons for breakdowns that are inherent in Electrolux Intuition, Electrolux Inspire and other models.
SMA does not turn on
Have you decided to start the wash, but the machine won’t turn on? Don't panic. Let's understand the reasons:
Problems with water supply and drainage in an Electrolux car
It happens that the Electrolux washing machine does not fill or drain water. For what reasons does this happen:
No powder collection
After pouring the powder into the dispenser tray, the machine releases a stream of water through a special valve. Along with the water, the detergent also goes away. Over time, the CM may stop picking up powder.
What caused the Electrolux washing machine to malfunction?
The most common cause of the problem is a clogged dispenser. To eliminate it, just remove the tray and rinse it under the tap.
If everything is fine with the tray, the inlet valve may be worn. Then it needs replacing.
Washing in the Electrolux machine does not start, the drum does not spin
If you have a problem like this, you can try to fix the problem yourself.
To do this, you need to open the hatch of the Electrolux washing machine and take out half of the laundry. Having thus reduced the load, try to start the SM again. If there is no result, then:
No water heating in Electrolux machine
How can you tell if your SMA is not heating the water? After starting the wash, wait 15-20 minutes. Then place your palm on the sunroof glass. Warm surface - there is heating. And if washing is done in cold water, the reason for this is a malfunction of the heating element.
The thermostat or voltage stabilizer could also be faulty.
Rinse mode does not turn on
A top-loading Electrolusk washing machine did the wash as usual, but does not go into rinse mode? Most likely, the heating element (heating element) has broken. Since the water does not reach the required temperature, the rinse does not start.
The cause of such a breakdown could be the control module. If a system failure occurs, it is enough to reboot the SM within 15-20 minutes. If this happens constantly, you will have to replace the module.
Turning on SM Electrolux leads to knocking out plugs
When you turned on the washing machine, did the automatic transmission break out? This means that there are problems in the electrical network. Never turn on your Electrolux machine again. It's better to call an electrician to find out what the problem is.
What can cause a short circuit:
Spin doesn't work
For what reason does the Electrolux washing machine not spin out clothes?
Electrolux hatch door does not close
Subsequently, the Electrolux washing machine does not start.
Methods for testing triacs
Before repairing and replacing the triac on the control board, you must ensure that the semiconductor is faulty. You can test the radio element in different ways. The following verification options are most often used:
- “continuity” with a multimeter;
- installation on a test bench;
- connection to a circuit with a power source and a lamp;
- examination with a transistor tester.
To test the triac on the control board, it is enough to have a multimeter on hand.
The most popular way to diagnose a triac is by testing it with a multimeter. This tester, unlike the transistor tester, is accessible to almost everyone and is quite easy to use. Assembling a test stand for a one-time check or organizing an electrical control circuit is more difficult and takes longer. It’s better not to complicate the task and give preference to the “tseshka”.
Call the master
Sometimes you can’t do everything yourself, or it’s just scary to get into the washing machine without experience in performing such work. In such cases, it is better to call a specialist.
There are several options:
The cost of services depends on the pricing policy of a particular company or master and even on the city of residence. The table shows approximate prices for replacement parts:
| Call a specialist, diagnostics | 500-1000 rub. |
| Drum | From 2000 rub. |
| Motor replacement/repair | From 1500 rub./from 750 rub. |
| Button | From 1000 rub. |
| Water level/temperature sensors | From 1200 rub. |
| Bearings | From 2500 rub. |
| Email module | From 2500 rub. |