The probability of failure for Whirlpool brand washing machines, although lower than for many others, still exists.
But not every malfunction is so serious that you have to call a technician.
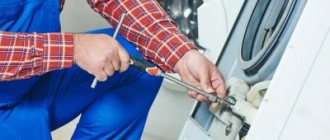
In many cases, the owner of the unit is quite capable of repairing it himself, sometimes saving a very significant amount of money. Just first you need to read this article, the topic of which is the Whirlpool washing machine: do-it-yourself repair.
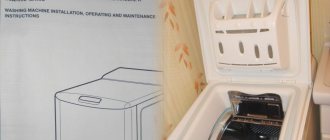
How to replace in a top loading machine?
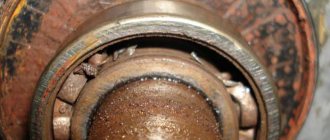
The difference between models with vertical loading is the fixation of the drum on two axle shafts. Whereas with horizontal, one mount is used. Bearings on both axle shafts must be replaced. It doesn't matter which one is unstable.
Repair includes the following basic actions:
- Disconnect electrical wires and hoses.
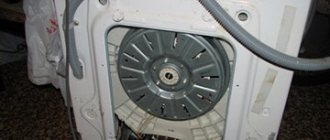
- Remove the outer and rear walls of the device.
- Remove the linings located on the sides of the drum - under them there are calipers with bearings.
- First of all, the bearing that does not have a pulley near it must be replaced. Then you need to change the part on the opposite side.
- The installation sites of the elements must be cleaned and lubricated.
- Reassemble in reverse order.
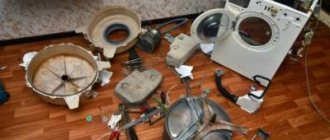
DIY repair
The reason that the machine cannot pump out water is most often dirt accumulated in the drain filter. Perform the following operations:
- Place a sufficiently large container under the machine and unscrew the plug of the emergency drain hose (located in the same place as the drain filter) to remove water from the machine.
- Unscrew the drain filter (you also need to place a container under it), remove all dirt from it.
- Using a screwdriver, clear any dirt from the pipe to which the filter is attached.
- After starting the machine in drain mode, check whether the drain pump impeller rotates (it can be seen through the hole from the filter plug). If the pump does not work, it must be replaced. To get to this unit, you need to lay the car on its side and remove the tray from it.
- If cleaning the filter does not produce results, and the pump turns out to be working, you need to check the level sensor tube for blockages. If it turns out to be clean, you can blow into it to check the functionality of the sensor - it should respond to the pressure difference with a click. A non-functioning sensor must be replaced.
It wouldn’t hurt to wash the filler filter at the same time. It also gradually becomes clogged with rust and sand, which prevent the flow of water (error code - “F13”: water is drawn into the tank slowly).
Inappropriate behavior of the control panel, accompanied by blinking indicators and display or incorrect execution of a given program, is usually associated with malfunctions of the electronics. All the owner can do in such a situation is to turn off the device for one minute and then restart the startup attempt. If the picture has not changed, you need to contact a service center: the microcircuit may need to be re-flashed.
Whirlpool AWT2295 washing machine - crack in the tank
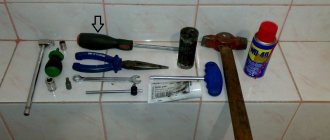
In case of insufficient heating of water, as well as its complete absence, the first thing that comes under suspicion is a tubular electric heater - a heating element. Perhaps its resource has been exhausted, or perhaps it burned out prematurely - due to a thick layer of scale deposited on it. You will also have to check the temperature sensor (thermistor). Armed with a wrench, screwdriver and multimeter, do the following:
- With the back of the car facing you, remove the back panel.
- Find the shank of the heating element protruding from the tank at the bottom of the machine (4 wires are connected to it). In Whirlpool machines, access to the heating element is limited due to an inconveniently located bracket - it needs to be unscrewed.
- Disconnect the two outer wires and, connecting a multimeter to the free contacts, measure the resistance. These are the heating element contacts. At room temperature, the device should show a resistance in the range of 20 - 30 Ohms (depending on the power of the heating element).
- If the heating element is working, disconnect the two middle wires. The pins they were connected to are the thermistor. Measure its resistance. In Whirlpool machines, the resistance of the temperature sensor at room temperature is 35.9 kOhms. To be sure, you can check the resistance of the sensor after heating with hot water - it should change significantly (when heated to 80 degrees, it usually decreases by 9 times).
- The faulty part must be replaced. If this is a heating element, then after removing it, the edges of the hole inside need to be thoroughly cleaned of dirt and salt deposits. To dismantle the heating element, simply remove the plastic shield and unscrew the bolt located between its contacts. The gasket should also be replaced, even if it still appears to be quite suitable.
Often the heating element cannot be pulled out immediately due to the fact that, as they say, it has become stuck.
In this case, you can attach a wooden block to the shank and lightly hit it with a hammer. If water begins to seep through the car door, it means it’s time to change the sealing gasket (cuff).
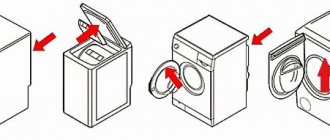
We follow the instructions:
- Open the door completely.
- Next, you need to take a fairly thin screwdriver and carefully drive it under the wire clamp that secures the cuff along its outer side.
- Having pryed the clamp, you need to gradually remove it by moving the screwdriver to the left or right. These actions must be continued until the connection point with the small bolt is found.
- Unscrew the bolt a little, after which the clamp can be removed.
- Remove the worn cuff and very carefully, without using sharp tools, install a new one in its place. This must be an original part designed specifically for this modification of the washing machine. If you install a gasket from another washing machine, the door will not close hermetically.
To make the seal last longer, wipe off any remaining dirty water from it after washing, especially in the lower part. The substances present in it lead to the loss of rubber elasticity and the appearance of cracks on it.
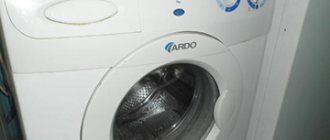
Repairing a washing machine often costs a considerable amount, so if possible, it is better to fix the breakdown yourself. Ardo washing machine - DIY repair. Read the recommendations for the home handyman.
We will tell you about the features of repairing Bosch washing machines in this material.
The most vulnerable parts of Whirlpool machines
Based on the problems described above, we can identify the most vulnerable areas of Whirlpool washing machines. Many modern models have a self-diagnosis system that, using a fault code, will tell you which part has failed.
But what to do if the machine does not turn on at all, and there is nothing that could help you find out the cause of the breakdown? Listen to the advice of experienced repairmen, they are sure that the most vulnerable parts in a Whirlpool machine are:
- Thermoelectric heater – heating element.
- The engine and its moving elements.
- Hatch cuff, pipes.
- Controller (control module).
Attention! Whirlpool machines, like any other machines, suffer from blockages. Both filters and hoses become clogged. If you carry out cleaning in a timely manner (3-4 times a year), you can avoid breakdowns of the water drain and fill system.
How to avoid encountering scammers?
As a rule, employees of unscrupulous organizations promise to carry out free diagnostics and eliminate the cause of the damage. In this case, the contract is not drawn up, the necessary documents are not drawn up. A few days later, the consumer is notified that the repair has been completed and the washing equipment can be picked up.
When choosing a service provider, in order to avoid negative situations, it is recommended to pay attention to the following points:
- Fraudsters have a hard time hiding their reputation. Negative reviews about organizations that have violated the rights of service recipients are often published on the Internet.
- An important element is the company sign. A workshop that does not want to attract undue attention to itself will not post legally significant information about itself.
- A reliable service organization will not require large upfront payments. Full payment must be made after repairs are completed and upon acceptance of the equipment. An advance payment is charged with the client's consent.
- The service provider must have a cash register. Advance and full payment must be accompanied by checks.
- You should not agree to repair if the company’s employees do not offer to conclude an agreement and draw up an acceptance certificate for the faulty device.
- You should carefully study the contract. It should not contain phrases indicating that the contractor unilaterally has the right to change the type of service and its cost.
- The warranty period or formalities associated with it must be indicated.
- Upon receipt of the repaired automatic machine by the customer, the responsible person demonstrates the work done.
- After the service is provided, it is necessary to sign a bilateral acceptance certificate with a mark in the contract.
Pump and motor
When the end point is a pump, starting capacitor or motor, dismantling begins from the bottom of the housing. For convenience and better visibility, the machine is placed on its “back”. It is important here not to destroy the electronic board or cause a short circuit, which can be caused by residual water getting inside the machine. Therefore, we first drain the residues through a garbage filter, and also dry the dispenser sections in the powder receptacle. Next we proceed according to the following instructions:
- press the latch at the junction and disconnect the drain hose;
- We fix the cover with electrical tape, securing it to the body of the machine;
- slowly lower the machine onto the back panel;
- take the 5/16 socket and unscrew the screws holding the drive belt;
- remove the protective casing;
- disconnect the connector connected to the electric motor;
- remove the drive belt;
- select the head by 1/2 and loosen the engine mounts;
- take out the engine.
To provide access to the pump, remove the left wall of the housing and inspect the drain chamber. Then we disconnect the hoses, pipes and loosen the clamps on the pump. All that remains is to pull the part towards you and pull out the pump.
Call a specialist
If it is difficult to replace the Whirlpool bearings yourself or you don’t have the time, it would be advisable to seek help from professionals. The master has in his arsenal all the necessary tools and control devices. When called, he is able to quickly identify the problem and determine whether repairs are needed.
A specialist will fix the breakdown much faster than anyone else. Another advantage is that many organizations themselves purchase spare parts and subsequently provide a guarantee for them, as well as for services.
Leak in the hatch area of the Whirlpool machine
When water leaks from under the door of the Whirlpool washing machine during the washing or rinsing mode, it begins imperceptibly - first a couple of drops, then a thin trickle, and sooner or later a flood begins.
You don't need a diagram of the Whirlpool washing machine to find the cuff that is causing the breakdown. It can be seen with the naked eye - this is a large rubber gasket in your SM. It is located along the entire inner perimeter of the hatch, and its main task is to keep water out.
The most vulnerable place of the seal is at the bottom, because dirty water often remains there. If you don't clean it up periodically, the cuff may burst. It is enough to slightly touch the worn out seal for it to break - then a leak cannot be avoided.
Important! You cannot use the machine with a torn cuff - it will not be able to hold water. If a breakthrough is detected, the cuff must be changed URGENTLY.
If you are used to carrying out repairs at home, then dismantle the old one and install a new cuff.
MALFUNCTION PROBABLE CAUSE REMEDY IN THE CAR...
Page 15
- Image
- Text
FAULT
PROBABLE CAUSE
WAYS
SOLUTIONS
There is not enough laundry loaded into the machine.
This does not interfere with the operation of the machine.
There is too much laundry in the machine or the laundry is not stacked evenly.
Do not exceed the maximum load capacity and place laundry evenly in the machine.
Your car is vibrating.
Your car hits some hard object.
Do not allow the machine to rest against any hard object.
Too much detergent has been used.
Press the Start/Pause button. To stop foaming, dissolve a tablespoon of softener in 0.5 liters of water and pour the resulting mixture into the detergent dispenser. Press the Start/Pause button again after 5-10 minutes. Next time you wash, use the correct amount of detergent.
Excessive foaming in the detergent dispenser.
The wrong type of detergent was used.
Use only special detergents for automatic washing machines.
The degree of soiling of the laundry is too high for the program you have selected.
Select the appropriate program (see Table 1).
Unsatisfactory washing results.
The amount of detergent used is insufficient.
Use more detergent.
13