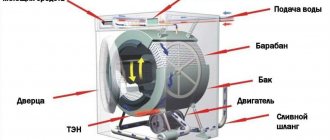
Everyday life has long been unthinkable without technological progress, which significantly simplifies life. One of such devices is a modern washing machine. The unit has a complex design and even the smallest parts play an important role.
For example, if a washing machine belt malfunctions, it can simply stop the entire washing procedure. It won’t be difficult to replace it, just select the right model.
- Regular tank overload
Specifics of belt drive
All components in a washing machine are interconnected and if any element fails, the washing process will be disrupted or completely stopped.
Belt drive is the connecting link between the engine and the pulley. It is the coordinated work of this unit that reproduces the movements of the drum when performing a given washing mode. If the component mechanism falls off or breaks, the device ceases to fulfill its purpose.
Belt drive is not provided in all models of washing machines. For example, LG produces direct drive products. The manufacturer claims that this technological technique helps reduce vibration during operation (+)
After loading the cylindrical drum and setting the required washing program, the process is as follows:
- The rear part of the drum, equipped with a friction pulley (visually a metal wheel), with a recess along the entire circumference, is activated by the friction forces arising from the tension of the elastic belt.
- A pulley is also attached to the electric motor, but of a smaller diameter. A system of two rings is connected by a drive belt, the main purpose of which is to transmit torque from the motor to the drum.
- In the process of reproducing engine torque, a speed of 5000-10,000 rpm is achieved. This indicator is quite large and therefore subject to reduction.
- To reduce the speed, a light, large-diameter ring is used, which is rigidly attached to the drum shaft.
- Due to this rotational transition from a smaller to a larger wheel, a weakening occurs to 1000-1200 rpm.
The belt tension coefficient has a significant influence on the effective transmission of forces. Excessive tension force promotes maximum transmission of torque.
The increased friction force generated by high tension on the belt drive in the washing machine leads to significant overheating of moving components
However, this significantly accelerates wear not only on the belts themselves, but also on the pulleys, bearings, seals and axles with which they come into contact.
If the situation is the opposite and the tension is weak, the belt will slip on the pulleys. The frictional interaction of surfaces entails polishing of the moving parts involved. The consequence of this process is a significant deterioration in adhesion.
Only thanks to the high elasticity of the flexible drive are both processes compensated and the electric motor operates under the correct conditions. However, for this you need to correctly select the required model of the rubber part.
Despite the compelling advantages of direct drive, belt drive has a number of significant advantages. The engine of the unit is removed from areas of possible wetness, and you can also use a small motor
Peculiarities
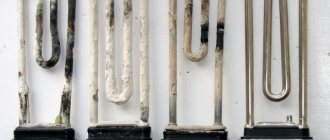
The heating element for the Samsung washing machine is made in the form of a curved tube and is installed inside the tank. The tube is a body in which there is a spiral that conducts current. The base of the housing contains a thermistor that measures temperature. The wiring is connected to special terminals on the heating element.
In fact, a heating element is an electric heater that allows you to turn cold water from the tap into hot water for washing. The tube can be made in the shape of the letter W or V. The conductor located inside has a high resistance, which allows water to be heated to elevated temperatures.
The heating element is covered with a special dielectric insulator, which correctly conducts heat to the steel outer casing. The ends of the working spiral are soldered to the contacts to which voltage is applied. The thermal unit, located next to the spiral, measures the temperature of the water in the tank of the washing unit. Activation of the modes occurs thanks to the control unit, while a command is sent to the heating element.
The element is intensely heated, and the resulting heat warms the water in the drum of the washing machine to the set temperature. When the required indicators are achieved, they are recorded by the sensor and transmitted to the control unit. After which the device turns off automatically and the water stops heating. Heating elements can be straight or curved. The latter differ in that there is a 30-degree bend next to the outer bracket.
It should be clarified that heating elements differ in operating power. In some models it can be 2.2 kW. This indicator directly affects the rate of heating of water in the tank of the washing device to the set temperature.
As for the normal resistance of the part, it is 20-40 Ohms. Short voltage drops in the network have almost no effect on the heater. This is due to high resistance and the presence of inertia.
Correct selection of belt
The main task when choosing a belt drive is to find the part marking, for example, 1046 H7, 1100 J4, etc. Essentially, these are four digital characters and a Latin letter with a number. Accordingly, similar designations should be on the new part.
Differences between drive units
Externally, these structural elements differ not only in color, but also in the characteristics of the tread, length, number of wedges, as well as the materials used in the production process.
There are only two main types of belt drives, but there are differences between the cross-section profiles:
- monocline for foreign-made washing machines have a cross-section of 3 L, domestic - Z and A;
- poly-wedge (toothed) for large equipment - J, for small equipment - H.
Visually, they can be distinguished by the depth of the streams. As a rule, this kind of part allows the greatest power to be transmitted, because it has the best coefficient of adhesion. The maximum transmitted power reaches 100 kW.
The number of streams in the toothed edge of the drive can vary from 3 to 8, tracks - from 3 to 9 pieces. The distance between the strips in the J-shaped profile is 2.34 mm, in the H-shaped one – 1.6 mm.
If we look at a V-belt drive in cross-section, it has a trapezoidal shape, with a profile angle of 400, and a rivulet drive looks like several trapezoids, sequentially arranged on the wider side (+)
Outboard engine belts are also classified depending on the type of rigidity - elastic and rigid. The former are an ideal option for new models of washing units, as they have stretching properties.
These characteristics make it possible to achieve a rigid coupling between the engine and the tank. However, they do not have the ability to adjust the degree of tension.
If the washing machine uses a single mono-V belt, then there will be no special thread on the motor shaft for the part. However, this option is rare
Rigid belts, on the contrary, have practically no stretch. Before installing them, you will need to adjust the position of the motor relative to the tank. This variation is rare and can only be found on old models of equipment.
Explanation of the 1270 J3 belt drive marking for a washing machine: belt length 1270 mm, section profile J, number of wedges 3
The length parameter is also of significant importance when choosing a part. In the marking, this indicator is indicated by numbers in front of the section profile and the number of wedges.
In addition to the distinctive characteristics described above, drive belts are made of rubber or polyurethane. The first variation has a greater degree of strength, however, this affects the low stretch coefficient in comparison with the polyurethane sample.
The second option is easy to install, but its wear rate is faster than that of a durable rubber product. The type of belt drive required is usually indicated by the brand of the automatic washing machine, since the motor pin is tailored specifically to its profile.
Rubber belts differ from their polyurethane counterparts primarily in color. Rubber black, polyurethane light. Rubber ones last longer
Required guidelines for choosing
It is not always possible to read the belt markings; for example, with prolonged use, the coding can simply be erased. In such a situation, to select the necessary accessories, pay attention to the main parameters, which are discussed below.
First of all, the length of the connecting element is taken into account. If the choice is made incorrectly and the purchased belt is shorter or, conversely, longer than the previous one, it will either break or constantly fly off during operation. In this case, it is unlikely that you will be able to fully operate the equipment.
A V-belt consists of the following parts: cord - a load-bearing layer located approximately at the center of gravity of the section, base - rubber layers running under the cord, wrapper - several layers of rubberized fabric
The cross-section profile must also be taken into account - an H-shaped one will not fit on a motor tailored for a J-shaped one. But the number of wedges does not need to be taken into account.
For example, belts with similar markings 1130 H6 and 1130 H7 , 1276 J4 and 1276 J5 are almost the same. A product with more wedges will be wider. This reduces the likelihood of slipping.
All models of Samsung washing machines use belts with the same profile and length - 1270 J. For narrow equipment, three-wedge parts with code 1270 J3 , for medium and wide ones - 1270 J5 .
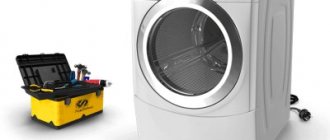
Tools, materials, accessories - which ones to choose and how?
You will definitely need:
- leather;
- knife;
- awl;
- punches;
- hammer;
- centimeter;
- metal ruler (preferably a square).
It is advisable to also have:
- press for working with rivets;
- tools for making grooves and sanding leather edges;
- a piece of thick rubber as a backing;
- special device for cutting leather;
- igloo;
- waxed threads;
- sewing machine;
- beeswax;
- impregnation (polishing);
- napkin, foam sponge, wool sock.
Be careful when purchasing material. The leather of different animals has both pros and cons and is suitable for certain types of belts:
- pork is the cheapest. The new one looks good, but as soon as it gets wet, it starts to warp. Often goes to the inner surface of two or three-layer belts;
- ox (bull, buffalo) – rough, heavy, super strong. It's hard to work with, but the price is good. Used for brutal options with patterns, embossing, carvings;
- calf - the best option: strong and durable, soft and smooth, does not crack or form creases;
- goat, sheep - durable, flexible, but thin. Useful for elegant ladies' belts;
- crocodile, snake - soft, elastic, with an interesting structure, but very expensive.
You can purchase a suitable leather blank of the required color and size or a solid piece of leather, but you will have to tinker with it.
To secure the belt you need a buckle:
- a classic or massive frame in the shape of a rectangle, the letter O or D;
- badge;
- automatic buckle or lock.
We identify signs of breakdown
If the drive belt has become unusable, the owner of the equipment will soon be able to notice this. However, it is quite difficult to determine that the problem is in the transmission unit, since the drive accessories are located in the equipment body. However, you can find out the true cause by characteristic signs.
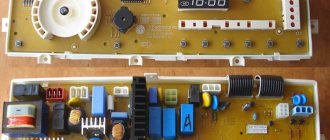
Thanks to technological developments, most washing machines are equipped with a digital display. Using the self-diagnosis system, the user can see the failure code and decipher it using the included instructions
In most cases, the equipment independently determines the nature of the breakdown and notifies the user through the display or by highlighting the corresponding buttons. Depending on the manufacturer and modification of the device, the instructions will indicate a decoding of the error code.
If for some reason the unit does not break down, a flying off, torn or stretched part affects the operation of the washing unit in the following way:
- After selecting the washing mode, the program starts, the time is counting down, the motor is running, but the loading tank does not make any rotational movements.
- Equal time intervals between the audible hum of the engine and its complete stop.
- The selected washing mode is launched, the engine runs continuously, then the system is completely inactive without the possibility of ending the process early by pressing the program cancel keys.
- Manual rotation of the drum is carried out without hindrance.
All of the above signs indicate the need to replace the belt drive. To avoid a recurrence of this kind of trouble, it is worth considering in detail the reasons contributing to the malfunction, especially if it occurs regularly.
If the transmission belt is stretched, deformed or broken, you need to remove the back cover and replace the worn element
Operating principle of dampers
Such devices also work in conjunction with suspension springs. The damper body is a cylinder, but instead of a rod, there is one piston with perforations to remove air. The design is supplemented with rubber gaskets made of polymers with specific impregnation. The latter prevents overheating of the device and provides better contact with the centrifuge of the washing machine.
Shock absorber set for Indesit washing machine
The mechanism is attached to the body and drum using rubberized bushings. They minimize gross vibration to some extent, while the rest of the damping falls on the shoulders of the damper itself. Depending on the model and type of washing machine, the form factor of the device also changes.
- Collapsible. Almost all elements of the device can be disassembled manually and replaced. Most often, rubber gaskets wear out.
- Solid. The devices are tightly sealed and cannot be repaired - only replaced. Found mainly in budget models.
Dampers also vary in their maximum load capacity. For household devices, the figure varies between 50-150 Newtons. As the damper wears out, the load on the components increases even more, so it is better not to delay replacing the part. Otherwise, it may damage other important equipment elements.
Main causes of malfunction
When the connecting link between the motor and the drum comes off for the first time, it does not always cause serious damage. This can happen if there is too much laundry. At the same time, installing the belt back is not difficult.
However, if this is not the first time the transmission has slipped, the damage may be more significant. Let's look at all the faults and methods for eliminating them in more detail.
Regular tank overload
Often the main reason for the rapid wear of the transfer unit is frequent overload with laundry. A washing machine with a tub designed to hold a 7kg load is not designed to handle the maximum possible load on a regular basis. During this washing mode, the load on the belt increases.
If the manufacturer's recommendations for operating the washing machine are not followed, various breakdowns may occur, including imbalance of the belt drive.
If the owner of the equipment loads the drum 25-30% less than the nominal weight specified in the instructions, then the service life of not only individual parts, but also the entire unit will be significantly longer.
Unreliable fastening/breakage of the drum pulley
In simple terms, a washing machine pulley is a round cast-iron wheel with spokes located behind the drum. This is where the belt is put on. The entire mechanism is quite primitive, but reliable and effectively performs its functions until it breaks down.
Inexpensive models of domestic and Chinese-made washing units often have poor quality parts. A bent pulley can be installed during assembly, and metal burrs can be visually noted on the new part. On a defective wheel, the belt drive is erased literally after 6 washes
Since the washing process is carried out by means of a motor that transmits revolutions through a belt to a pulley, it is the transmission unit that is the weak link of the mechanism.
However, frequent slipping of the belt may be due to a malfunction of the rotating wheel. During the washing/spin process, you may notice a slow rotation of the drum.
You can check the condition of the wheel without dismantling it. To do this you need to perform the following steps:
- It is necessary to remove the back wall of the case.
- Now remove the belt: you need to grab it with your left hand, directing the effort towards yourself, and spin the wheel with your right, the drive will slide off on its own.
- With both hands, grasp the sides of the pulley and lightly rock the part. This way you can check the quality of fixation.
- To eliminate the possibility of defects, run your hand over the surface and visually inspect for deformation.
If any defects are found during the inspection, the part will need to be replaced with a new one. If you leave everything as is, you may have to change the belt more often than once every couple of months.
To replace the drive, you will first need to remove the old one. However, this process is not the easiest - the mounting bolt on which the pulley is mounted is additionally treated with sealant, but more on that a little later.
At the beginning of the repair, you need to disconnect the device from the power supply, drainage system and water supply. Using a Phillips screwdriver, unscrew the screws securing the back wall.
Next, using the method described above, remove the belt drive. Taking a small wooden wedge, you need to clamp it in the wheel cross. This is necessary to immobilize the mechanism when unscrewing the bolts.
Aerosol lubricant is required to eliminate the properties of the sealant, therefore, after spraying the bolt with the composition, you must wait a little for the sealing mass to completely dissolve
To unscrew the central bolt, you will need to heat it until red with a blowtorch. Then treat this fastener with a lubricant, for example, WD-40 or a similar technical aerosol.
After a short period of time, put a wrench on the bolt and unscrew it, tapping it a little with a hammer.
This is what the completed process of unscrewing the drum pulley looks like. However, the repair is not always considered complete. In some cases, the cause of problems with the belt drive may be the engine wheel.
After completing the dismantling, if there are obvious defects in the wheel, it is replaced with a new part. To do this, the pulley is placed on the drum shaft, the screw is treated with sealant and screwed back in using a wrench.
Now we move on to the stage of replacing the belt. First, we put the belt on the engine, and then we pull it onto the large circle of the drum pulley, while turning it counterclockwise and gradually placing it in the provided grooves.
When finished, check the tightness of the fit by several turns of the wheel - its movement should be tight. After this, you need to return the back cover to its original place and secure it with bolts.
Bearing deformation and damage
There are cases when the cause of a flying belt is the misalignment of the drum due to failure or deformation of the bearings.
As a result of bearing wear, the user may hear unpleasant sounds during the washing process: creaking, knocking, incomprehensible noise. The sound effects get stronger over time.
There are only two reasons for the failure of this part:
- The seals wear out, resulting in leaks and water entering the bearing. Thus, the part is covered with a corrosive coating.
- Long service life of the washing machine. Classic factor of temporary wear and tear.
The entire repair process is quite complicated, but financially justified - the cost of a specialist’s services will cost 30-50% of the cost of a new unit.
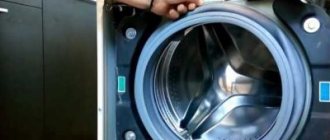
First, remove the housing cover, attached with two screws to the back of the washing machine, and then the back wall. You also need to remove the detergent dispenser and control panel.
Afterwards, using a suitable tool, the front clamp of the hatch cuff is removed, and the restrictive part itself is removed from the body.
Each washing machine model may have different cuff modifications. To remove the clamp, use pliers or a slotted screwdriver.
Now unscrew the door lock and remove all the parts along with the front panel. Then we disconnect the dosing hopper from the pipe coming from the drum.
In the process, you will need to remove all obstructing parts, loosen the hose clamp and remove it.
The locking system is secured with two screws. When unscrewing them with one hand, it is necessary to hold the closing device between the cuff and the hatch wall. After unscrewing, smoothly remove the part from the inner wall of the machine
To remove the tank counterweight, simply unscrew the mounting bolts with a screwdriver. In different models of washing machines, its location can be either on the front or the back.
To remove the counterweight, it is enough to initially loosen the fasteners and then unscrew them. In most models, the load is secured with four bolts
Having reached the heating system - heating element, it is necessary to photograph the wiring for correct connection during reassembly.
Having unscrewed the fastener, we remove it from the cell by prying it with a screwdriver. The pipe connected to the tank and any possible wires are also disconnected.
Depending on the modification of the washing unit, the heating element will be placed either at the front or at the rear. In most cases, it is secured using a single nut.
The next step is to remove the drive belt. All wiring to the motor must be disconnected. Next, twist the screws that secure the electric motor and remove it.
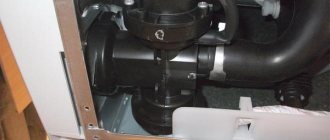
We deal with the shock absorber mounting screws in the same way. On the right and left of the tank there are springs that need to be removed. By disconnecting the hose tube from the tank, you can remove it.
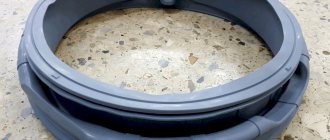
The removed tank must be placed on the table and then continue to disassemble it. Since the cuff is rubber, it will most likely deteriorate and need to be replaced
First of all, remove the cuff - this part must be replaced. However, you must first make notes at its location with a marker.
We remove the pulley - this process is described in detail in the previous section. After this, you need to try to sink the shaft inside the tank with your hands. If the attempt is unsuccessful, repeat using a rubber mallet. Now the tank is disassembled into two parts.
Most often, latches or a screw connection are used to secure the two halves of the tank. After separation, you can remove the drum
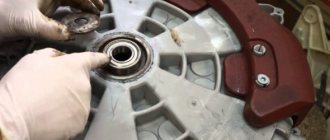
Having divided the tank and taken out the drum, the condition of the cross, bushing and shaft is carefully inspected. If the washing machine was used regularly after the bearings failed, these parts may also fail.
Using a hammer and chisel, knock out the bearings. However, the entire process must be carried out with extreme care so as not to deform the tank. There should be two parts that fall out - the oil seal and the bearing.
A lot of dirt usually collects in the places where the bearings are fixed, so they must be thoroughly cleaned and treated with a lubricant.
The places where the bearings were installed are treated with a special compound, for example, Litol 24 universal lithium grease. We insert new bearings into the same areas and drive them in the same way.
At the final stage, we assemble the tank and the washing machine itself. In this case, the connecting seam on the tank and the gasket also need to be lubricated, only with a sealant with waterproof properties.
Conclusions and useful video on the topic
This video describes in detail the main parameters necessary for the correct selection of a belt drive for a washing machine, as well as possible reasons for the failure of this unit:
You can even replace the belt in the washing machine yourself. The video instructions will show you how to do this correctly:
The most difficult problem that contributes to the transmission belt falling off or breaking may be hidden in faulty bearings. Find out how to replace them from the story:
If the malfunction of the washing machine lies precisely in the link connecting the drum and the engine, it is necessary to take a responsible approach to choosing the appropriate marking of the part. The process of replacing a belt drive is quite simple, but accompanying serious breakdowns can significantly complicate the process. Therefore, if the tank is disassembled, it is better to photograph all the parts for subsequent correct assembly of the torque mechanism.