Factory drilling machines are commonly used in industrial and assembly shops. Well, it’s understandable - high productivity and quality of work are required there.
But it makes no sense to purchase such serious units for a home workshop.
Firstly, it is expensive - not everyone can afford it. Secondly, factory machines, as a rule, are large in size and take up a lot of free space.
On the other hand, using a conventional electric drill or a screwdriver cannot achieve high drilling accuracy.
Therefore, we offer an alternative option - to assemble a tabletop drilling machine with your own hands, using affordable and simple components.
To assemble a home-made structure, they usually use corrugated pipe, thick sheet metal, cutting corners and channels, as well as various car parts - steering rack, rack, etc.
As a drive, you can use a drill, a screwdriver or a motor from a washing machine.
We have selected the simplest and most interesting ideas that can be found on the Internet, and we want to share them with you.
Operating principle and main components of the drilling machine
A drilling machine is a well-structured product.
Firstly, the bed. As a rule, this is a steel plate (but for small devices it can be made of light alloy) on which the entire product is mounted. A stand is installed vertically on the edge of the bed farthest from the master. The working part, consisting of a motor, a working head with a cartridge and, if there is one, a transmission, moves up and down along it and turns left and right. The head on the stand is fixed in the required position by a locking mechanism.
And precise positioning of the height of the spindle with the chuck and drill is performed with a special handle.
Professional drilling machine
The motor and work spindle can be located on both sides of the stand. In this case, a belt drive is organized on several pairs of pulleys between the motor shaft and the working spindle. By throwing the belt from one pair to another, they set different speeds of rotation of the working body - the drill.
Drilling machine with pulleys and belt drive
Another option is to mount the cartridge on the motor shaft. The design is simpler, but the speed of rotation of the drill must be adjusted by changing the speed of rotation of the motor, and this requires an electrical or electronic circuit.
Drilling machine with chuck on motor shaft
The working tool is a drill. Drills are classified by size and purpose. In the practice of home-made workers, diameters from 0.5 mm to 12 - 18 mm are used. Drills are selected for work on wood, plastic, hard and soft metal, and concrete. They will differ in the sharpening geometry of the working end and the presence or absence of hard surfacing at the end.
Drill
The machine works this way. The motor turns the working spindle, at the lower end of which the chuck sits. There is a drill clamped in it. With rapid rotation and pressure on the surface from top to bottom, the drill cuts into the material with its cutting edges.
Machine capabilities
A homemade machine with a drive and electric motor from a washing machine is a powerful and easy-to-use device. Due to the belt drive, the engine speed is reduced and the speed is increased. As a result, the tool quickly and easily drills even thick steel with drills of any diameter.
Having assembled and painted your homemade product, you can begin testing it. The equipment starts up as follows:
- we remember safety precautions (that the drilling machine is extremely dangerous, so we securely fix it on the work surface and use personal protective equipment);
- connect the machine to the electrical network;
- install a drill of the required section;
- place a sheet of metal under the drill that needs to be drilled;
- drill the required number of holes.
The result will please the master: the torque will be enough to drill even thick steel. Moreover, there are no restrictions on the drills used - even large-diameter “heads” can be installed in the chuck. If the speed gained by the electric motor is small, it is easy to improve the design: fix another smaller pulley on the driven axle. The machine will speed up and “take” metal of any thickness.
Interesting:
- How to make a machine from a washing machine engine
- Wood lathe from a washing machine engine
- Where can I use the motor from an automatic washing machine?
- Grinding machine from a washing machine motor
- What can be done from an old washing machine
- How to make an apple press from a washing machine?
Reader comments
- Share your opinion - leave a comment
Scope of application of homemade drilling machines
The thought of creating a drilling machine with their own hands arises among people who love to tinker, but at the same time are not involved in the manufacture of any objects on a professional basis, either using metal or other materials (wood, plastic, etc.).
This is due to the fact that home-made equipment will not be able to fully replace industrially produced analogues in full, both in functionality and performance, but will only facilitate the performance of simple repairs and other work.
In addition, radio amateurs and people involved in the independent production of printed circuit boards can also set themselves a similar task, because Having a drilling machine greatly simplifies their work, and purchasing factory-made equipment is unprofitable.
Options and techniques for creating a good drill press
In industrial plants and workshops with large volumes of repetitive procedures associated with the processing of materials, simple designs are not enough.
This is ensured by the fact that during drilling operations, materials with different densities and hardness are machined.
To assemble a high-quality and productive machine for drilling holes, you can choose different options, the most common of which include the following:
- a drilling machine made from a professional drill with a reliable and stable stand;
- equipment with an asynchronous motor and the ability to install drills of different diameters.
Vertical and horizontal drilling machines that differ in design, made by hand, allow you to work with different materials.
These can include plastic, metal and wooden parts, the processing of which requires compliance with the parameters of accuracy and quality of drilling activities.
Using both options, you can significantly save money without spending it on purchasing an expensive factory-made machine that will not be used very often.
Types of do-it-yourself drilling machines
There are different types of drill presses made at home. They differ in: material of manufacture, structure, size.
And home craftsmen never stop coming up with new designs and selecting sizes for drilling machines. After all, not everyone makes machines according to ready-made drawings.
Here are some of the most popular drill press designs:
Wireless machine made of wood. This design is well suited for portable drilling of large items. Since the operation of the drill in such a machine is provided by the battery, it is necessary to make a special wooden box. The machine drawing is adjusted independently to the dimensions of the built-in drill.
Mini drilling machine. Making such a tool will not take much effort and time. This design is considered the most economical and does not require a large amount of materials. The model is designed depending on the size and shape of the drill; the drill itself can be secured with ordinary rubber bands or cable ties.
Machine made of plastic pipes. This option is good for those who have pipe scraps left after plumbing repairs. In another case, this option is very economical, since PVC pipes are cheaper than metal or wood. It’s not that difficult to make, the main thing is to maintain the proportions and dimensions.
These machines are easy to assemble, inexpensive and very convenient. But still, most often craftsmen prefer a more classic version.
Why is it needed?
In short and formally, to expand functionality. Holes can be made using a regular drill, that's a fact. But drilling, countersinking and reaming are only possible with drilling machines. Let's understand the concepts.
Reaming – increasing the diameter of a hole. Countersinking is a special processing of holes to the highest accuracy and ideal cylindrical shape of the 4th or 5th class. If you set a goal to get an even more accurate hole, for example, class 2 or 3, you will need reaming - “finishing” the holes to obtain ideal sizes and shapes.
High-quality processing of holes is not all the capabilities of a drilling mechanism; with its help you can grind, mill and do much more.
Homemade desktop machine.
Of course, drilling machines of this kind are available for sale - of any size and purpose. But, firstly, they are all expensive. And secondly, making a homemade drilling machine is much more interesting and fits perfectly into the general concept of a “jack of all trades.”
Materials and tools for making the machine
Before starting work, you need to think through the sequence of all technological operations in the manufacture of a homemade machine, plan the manufacturing technology, decide on future materials and tools that will be needed during the work process.
To make a machine with your own hands, you will need the following materials and components:
- Plywood 15 mm.
- Pine board, solid;
- Furniture drawer guides;
- Sleeve;
- Furniture footwear;
- Wing nut;
- Fastening: M6 bolt, self-tapping screws of various lengths.
To make a machine from a drill or screwdriver, you will need the following tool:
- Circular saw or sawing machine.
- Jigsaw.
- Angle grinder (angle grinder or simply “grinder”).
- Drill or screwdriver.
- Grinding machine.
- Various hand tools: hammer, screwdriver, clamps, wood core drill (or simply “crown”), square, marking pencil, etc.
We collect everything you need
A drilling machine is not a cheap pleasure. To make it from scratch, one electric motor is not enough: you will have to additionally find or purchase a lot of materials and tools. So, in addition to the engine and drive belt from the washing machine, the consumables you will need are:
- bearings;
- power cord of sufficient cross-section with a socket;
- round pipe;
- threaded rods;
- drill chuck;
- springs;
- metal profiles for the base;
- nuts and washers;
- thick rectangular pipe (for the rack).
From a working motor from an old washing machine you can make a full-fledged drilling machine.
As for tools, to make a machine with your own hands, you should prepare a grinder, welding, screwdriver, vice and drill. Thread-cutting devices are often required: a tap, a die and a die. A tape measure and a marker will also come in handy. At the “finish” you also need paint for metal surfaces.
Drilling machine from a conventional drill
To make a small but functional drilling machine for your home workshop, you do not need to purchase special materials and components. The design of such a convenient and useful desktop device contains the following components:
- The base, which is also called the bed;
- a mechanism that ensures rotation of the working tool (a conventional drill can be used as such a mechanism);
- device for providing supply;
- a vertical stand on which the rotation mechanism is fixed.
Diagram of a homemade machine from a drill
The stand on which the drill will be mounted can be made from a sheet of chipboard. This material is quite capable of supporting the weight of such a device. The bed of such a mini-machine should be more massive, since it protects the entire structure from vibrations, which can negatively affect both the quality and accuracy of the resulting hole, and the comfort of work.
As the material for the frame of such a drilling and adding machine, you can use a regular furniture board, the thickness of which is more than 2 cm. It is most convenient to use the base of an old photographic enlarger for this, slightly modifying its design. Sometimes an old microscope is used, but this is a rather rare option, since such a unit will not be large enough and its use will be limited.
The quality and accuracy that a homemade drilling machine will provide depends primarily on how correctly and reliably the connection of its base and vertical stand is made. The important elements of such a micro machine are two guides along which the block with the drill attached to it will move. Such guides are best made from two strips of steel, which must be securely screwed to the rack using screws.
When making the block, it is advisable to use steel clamps that will securely fix the drill on it. In addition, in order to avoid unwanted vibration processes when drilling, a thick rubber gasket must be installed at the junction of the block and the drill.
After this, you need to make a feed mechanism for such a mini machine, which should ensure the movement of the electric drill in the vertical direction. The manufacturing schemes for such a mechanism can be different, but it traditionally contains in its design a lever and a spring, which is attached at one end to the stand, and at the other to the block with the drill. This spring gives the feed mechanism greater rigidity.
A drilling machine made from a drill, which is not planned to be removed from it, can be made more convenient to use if you disassemble the original switch of the drill and mount a separate button on the frame of the mini equipment. This button will always be at your fingertips and will allow you to quickly turn the device on and off. As you can see, it’s not at all difficult to make a drilling machine from a drill; all you need to do is read these instructions carefully or watch the training videos in this article.
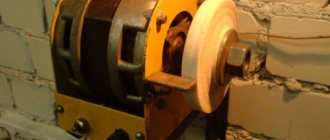
How to make a machine from a washing machine engine
Anyone may need a machine. In a professional workshop or in an ordinary utility room, such a device must be located. Let's try to make the necessary device with our own hands.
Washing machine machine
Parts for assembly
Work on the manufacture of a drilling machine using a washing machine engine will not require special design skills or talents - perseverance and ingenuity will be enough. However, you need to understand that its operation in the future will already imply knowledge of certain safety precautions, since a certain risk of injury will be present.
For manufacturing, you will need the engine itself, which will generate energy to operate the entire system, and a mechanism that includes all functional elements: drive, drill, frame, all kinds of additional electrical equipment, etc.
To correctly install the washing machine motor, in addition to the motor itself, you will need:
- V-belt;
- engine pulley;
- pulley on the door shaft;
To assemble the rest of the mechanism you need to stock up on the following parts:
- drill chuck;
- drill shaft;
- fasteners;
- bearings of several varieties: 8103 and 6003 2RS;
- staples, an angle of 50 mm and a square beam with dimensions of 30*60*30 cm made of steel;
- metal square sheet 40*40 cm.
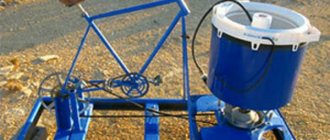
In addition, you will need to build the turntable yourself - you will have to weld it yourself from three hairpins, soldering them to each other. You will also need a steering rack. Such a spare part, taken from a VAZ-2108, would be a good fit - fortunately, it’s easy to find them at a disassembly site, and they cost mere pennies. As a rule, a ready-made version is used as an electrical circuit - for example, TDA 1085.
Machine device
When assembling a structure, the main thing is to understand that its simplicity is the key to its reliability and the absence of unforeseen difficulties in the process. An example is the V8 steering rack, which is used as one of the main components. After all, what could be simpler than using the moving mechanism of a car for its main purpose, but in a different unit.
At the initial stage, actions are carried out in the following order:
- Creating a frame by soldering a metal sheet and a steel beam.
- The steering rack is screwed to the beam using bolts with brackets (example - in the photo below).
- The steel stud is cut into 5 pieces of equal size and welded into the shape of blades. As an analogue, you can purchase ready-made ones, the main thing is that the size is suitable.
The next stage is the manufacture of the basis of the mechanism, with the help of which it will move in place and be used for its intended purpose. How to do this:
- The corner must be cut so that the resulting parts can be used to assemble a rectangular frame to which all elements will be attached in the future.
- Bearings are put on the bolts used for fastening to give free movement to the future drilling mechanism.
- Now you need to screw the resulting frame to the movable steering rack - for this, the latter is equipped with another end of the corner with drilled holes for bolts.
- From the remaining two corner pieces, you will need to weld a square-shaped profile - a drill shaft with bearings will be placed in it, with a chuck and a pulley located on both sides, respectively. Next, you just need to screw the last part to the steering rack (example in the photo below) - and the base for the drilling machine is ready.
- A pulley is mounted on the motor shaft, and it is installed on a frame welded from corners, and then screwed from the side to the moving mechanism of the machine.
- A drive belt is stretched between the pulleys, and the motor is connected to the microcircuit board.
After this, having powered the machine with electricity, you can already test it in action. In this case, it is better to protect the microcircuit using a plastic case - to eliminate the risk of damage to the contacts and loss of power supply.
Of course, it’s easiest to start assembling if you already have at least some idea about something like this. The best memory, as we know, is visual, so the video below will help you delve into the process in more detail.
Conclusion
As is clear from the description above, you don’t need to be a genius to build such a structure.
Purchasing the parts necessary for it is unlikely to hit the wallet too hard, while the usefulness of the resulting mechanism in economic activity of any kind is very difficult to overestimate.
Of course, it is better to carry out the assembly in a specialized workshop, but in the absence of one, which most likely will be the case, you can equip an ordinary garage for these purposes - there will be plenty of space there.
The service life of a machine, i.e., its shelf life, is determined, first of all, by the frequency of operation, the materials that have to be drilled, and problems or lack thereof with power supply. As a rule, none of the above problems arise, so the mechanism lasts for many years.
Source: https://1stiralnaya.ru/sovety/stanok-iz-dvigatelya
Homemade plywood machine
A drilling machine made of metal is durable and reliable. However, not every craftsman has a welding machine.
Therefore, we offer an alternative option - to make the frame and main parts of the drilling machine from plywood.
Please note: to assemble a homemade drilling machine, the author uses MDF, but it is better to use plywood.
Necessary materials:
- plywood;
- furniture guides;
- edged board;
- plastic legs;
- fastening clamp;
- metal plate.
First of all, we take two furniture guides, and after removing the internal movable slats, we screw them to the plywood blocks. The bars themselves will need to be secured to a wide piece, as shown in the photo.
Next, we take another pair of furniture rails - we screw them to the plywood platform between the side rails (we also remove the internal movable strips).
We make a mount for a drill. You must first cut off a metal plate and weld a clamp to it. Additionally, we make reinforcement using round or square rods (this is the only operation where welding is used).
Now you will need to make a movable platform. We saw off a piece of plywood of the required size and screw the internal strips of the furniture rails to it. We connect both parts of the structure together.
Another plywood board must be screwed to the movable platform, to which a metal plate with a clamp is attached.
After this, we cut out the base of the drilling machine and screw plastic legs to its lower part.
Next, we install a stand made of edged boards. The previously assembled structure must be attached to the rack.
Install the return spring. We fix the electric drill or screwdriver in the clamp.
Machine base and stand
A homemade drilling machine consists of a washing machine consisting of a base with a stand, a moving carriage, an axis with a chuck and a feed mechanism. First, a basis is assembled on which the remaining elements will be fixed. Instructions on how to do it are as follows:
- draw a circle or rectangle, depending on the chosen base shape;
- cut pieces of pipes for the base;
- we bend the profile pipe, combining the base (to give the shape, the profile is sawed through with a grinder in several places);
- We weld all the elements.
When using welding, remember safety precautions!
The next step is making the stand. Its role is played by a rectangular profile welded to the base strictly vertically. The “leg” is strengthened with a metal triangle or other suitable “corner”. Do not forget that before use, the metal must be thoroughly cleaned of corrosion and dirt, and also checked for defects and irregularities.
Drilling machine made of profile pipe and bearings
Square metal profile is one of the most popular materials for making a benchtop drill press.
There are a lot of options for homemade structures made from corrugated steel pipes. Let's consider the most optimal, in our opinion, tabletop drill stand for a home workshop.
Necessary materials:
- profile pipe;
- threaded rod;
- bolts with nuts;
- metal corner;
- bearings;
- spring;
- channel;
- pieces of metal strip.
First of all, we make a stand. You will need a piece of thick metal (plate) and two pieces of corrugated pipe (20x20 mm and 25x25 mm). The length of each piece is 40 cm.
We drill mounting holes in the metal plate, and then weld two profiles to it.
We make a carriage from four pieces of square corrugated pipe 15x15 mm, as well as bolts with nuts and bearings.
A homemade carriage is placed on a stand made from a larger profile. We place a slider on the second rack measuring 20x20 mm.
We drill a hole in it. Then you need to weld the extended coupling. We strengthen the joint with metal gussets.
To fix the homemade slide at the desired height, use a wing nut.
Next, a lever made from a steel angle is attached to the slider and carriage. A handle made of a profile pipe must be welded to the lever.
A piece of channel is used as the base of the machine. We drill holes in it and fasten the metal plate with the stand using bolts.
In the end, all that remains is to make a mount for the drill. We attach it to the carriage. We install an electric drill. A spring is used to automatically return the carriage to its original position.
Steering rack drilling machine
You can make a homemade drilling machine from a drill and a steering rack
Necessary materials:
- sheet metal;
- round pipe (steel);
- car steering rack;
- steel round timber;
- metal strip;
- electric drill.
We start by making the base. From sheet metal 2-3 mm thick, cut a rectangular blank of the required size. We round off sharp corners using an angle grinder.
Next, cut a piece of metal strip 30-40 mm wide.
We weld it to the bottom of the base, and immediately bend it along the contour of the workpiece. The bend area must first be heated with a gas burner, or you can first bend the strip to size on a bending machine.
Using a grinder with a petal wheel, we process the outer part of the base so that the edges are flush with the welded strip of metal.
After this we need a steel disk. We attach it to the base and fix it with welding. Then the author drills three holes to install the bolts - tighten them with nuts.
Now we need to make a vertical stand. A round pipe is used as the starting material. Use a grinder to cut the workpiece to the appropriate length. Using welding, we attach it to a metal disk.
Additionally, you need to strengthen the rack in the lower part with the help of three or four jibs cut from thick sheet metal.
Next, from a pipe and a pair of steel plates, you need to make a tightening clamp that fits onto the rack. It is needed to rigidly secure the working support table.
Two metal plates with holes are welded to the top of the rack, which are needed to secure the steering rack of the car.
A section of professional pipe is welded to the end of the rail, to which the master welds a homemade metal clamp, with which the electric drill will be rigidly fixed.
Now we need to make a support work table (we cut it out of a sheet of metal) and a flywheel to lower and raise the drill.
We clean the weld seams with a grinder with a flap wheel, after which the surface of the metal must be painted - it will last longer and be more beautiful.
The design turned out to be quite inexpensive and easy to use. It is very convenient that a drill is used as a drive - if necessary, it can be removed and used for other purposes.
What should it consist of?
A basic unit can be made from an ordinary drill. You can add additional devices to it - for example, a milling unit. But each machine must consist of several required elements: a drill, a countersink, a reamer and a tap.
There are many types of drilling units in industry - semi-automatic, spindle, vertical and others. In everyday life, the so-called mini-additive unit with a modest set of tasks is most often used. Before you make a homemade drilling machine at home, you need to understand the functions, basic elements and general operating principles of this type of mechanism.
Vertical version of the machine. Vertical drilling machine. Tabletop mini drilling machine. Drilling machine from a drill. What does a drilling machine consist of? General structure of a drilling machine.
By function, the most popular devices are spindle machines, the main function of which is to transmit rotational motion to the workpieces. In second place in popularity are devices for horizontal and radial drilling. An apparatus for boring parts is also common. With such functional diversity, drilling equipment is generally classified as a device for universal use.
Considering this fact, it would be logical to build a universal mini-additive device at home. It can be made automated, equipped with additional devices - in a word, the craftsmen here have complete freedom in technical solutions.
But with this freedom there are a number of mandatory components, without which there are no drilling machines in principle:
- bed;
- steering rack;
- engine.
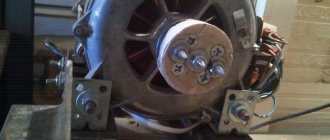
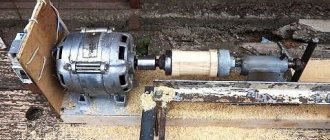
5. Drilling machine driven by washing machine motor
We bring to your attention another budget option for a homemade drill. Only in this case, instead of an electric drill, the motor from the washing machine is used as a drive.
Necessary materials:
- round metal pipe;
- steel corner;
- strip of metal;
- Electrical engine;
- gas lift (shock absorber);
- plywood pulleys;
- belt for belt drive.
First we make a reinforced stand. Usually a profile pipe is used, but in this case it will not work. Instead, we will use a round pipe and a corner.
We take a grinder with a cutting disc to cut the workpieces to the required length. We weld the parts together and clean them with a grinder. Next, we weld the reinforced stand we made to the frame.
We would like to immediately draw your attention to the fact that the base must be heavy and stable enough to support the weight of the electric motor and metal parts.
From sections of corner and strip it is necessary to make a movable structural element that will lower and rise along the rack. Essentially, this part is a carriage with a mechanical feed mechanism.
Next, you need to make a mounting platform on which the motor will be placed. It is welded to the carriage made earlier.
Now you need to make a spindle with a chuck for fixing the drill.
To do this, we need a threaded pin at the end, which will act as the spindle shaft. We put the bearing on it and secure it with nuts.
We cut off a piece of the tube and place it on the pin. We install the second bearing on top of the tube.
We prepare another piece of pipe. We cut it along the entire length. Place it on the installed bearings. The longitudinal cut must be welded tightly. We screw the cartridge onto the shaft.
We weld the spindle body to a metal plate, and the plate itself to the moving part.
To be able to lower the spindle, a lever must be installed.
Instead of a return spring, the author decided to install a shock absorber (gas lift).
Now we are making a work table on which the workpieces will be placed. To do this, you will first need to make a small slider that will move along the rack.
We weld a round table to it (the author uses an old circular saw blade). Additionally, you need to make a retainer.
We machine two pulleys from wood or plywood. We install one pulley on the electric motor shaft, the second on the spindle shaft. We tighten the belt.
All the parts of the drilling machine need to be painted, and then we assemble everything into a heap. Install the on/off button.
Unlike the first option, this design turned out to be quite cumbersome. But such a machine will definitely be more powerful than a drill stand made from a drill.
Drilling machine with washing machine motor
To make a homemade drilling machine that is ideal for a home workshop, you will need profile pipes and other available materials. First of all, it is necessary to make a base for the vertical stand of the machine - for this we weld a frame from a 60x60 mm rectangular profile.
Basic welding work
We weld a steel sheet 4–6 mm thick on top of the metal frame, which must first be cut to size so that it does not protrude beyond the edges of the profile. We clean the seams using a grinder. Next, we make a vertical stand - for this we cut a profile pipe with wall dimensions of 60x60 mm and a length of 65 cm.
Then we weld the vertical post to the base. From a steel corner 25x25 mm you need to cut four pieces 8 cm long. Stepping back from the edges of the corners 2 cm, we drill holes - you need to cut threads in them. We put bearings on the bolts, tighten them with nuts and screw these parts into the holes in the corners.
We prepare four plates to the size of the structure, and then compress them with clamps and weld them together with the corners with bearings. Next, we weld a piece of profile pipe to the plate.
Drilling machine assembly steps
We fasten the profile pipe with the plate to the guide using bolts with hexagon heads. Before welding the spindle, you need to make a seat for it so that the joints have a small gap.
The mounting for the electric motor is very simple - anchor bolts with a ring are screwed to a 25x25 mm corner, and two bushings are welded to where the motor is directly attached. The pulley and shaft can be removed from the old grinder.
At the last stage, the lifting mechanism and handles are manufactured, which are attached to the washer by welding. All elements are painted and then assembled. The result is a very cool and inexpensive DIY drilling machine.
Rate this post
Source: https://sdelairukami.ru/sverlilnyj-stanok-s-dvigatelem-ot-stiralki/
DIY drilling machine based on an electric drill
To make such a device you will need:
- a pair of used car shock absorbers;
- electric drill with power handle;
- two housing bearings;
- chain and sprocket;
- profile rectangular pipe;
- spindle feed handle;
- steel sheet, plates and angle;
- stud, bolts, washers and nuts;
- spring.
Let's make a vertical stand. According to the markings, we weld a piece of chain to the wide side of the profile pipe.
Let's make a mobile carriage. Using bearing housings, we mark and drill holes in the steel plate for fastening them with hardware.
We screw a nut onto the stud inserted through the bearing, put on the sprocket and secure it with a second nut.
We mark another plate for installation and welding in the center of the profile pipe.
We clean the old shock absorbers, and after drilling the bottoms, drain the oil and knock off the covers. After wrapping the mirrors of the rods and threads with aluminum foil, we place them in the shot blasting chamber for complete cleaning. Finally, remove the levers.
We place the shock absorbers with their upper parts in the corners at the level of the sloping shelves and weld them.
We fix the shock absorbers parallel to the steel plate at the corners using welding.
We apply a piece of profile pipe to the ends of the painted rods and drill two holes along the marks.
We lay it flat and place a U-shaped bracket in the center with its legs facing outwards and weld it.
For a piece of profile pipe with a length equal to the width of the larger side, remove the opposite edge. Drill a hole in the center of the square base.
We cut a piece of round pipe along the generatrix and weld ears with two holes along the edges of the cut. It turned out to be a kind of clamp.
Insert a bolt into a part made from a profile pipe from the inside and weld it behind the head. We fix the hardware in a vice, place the clamp along the legs with the ears up and connect them by welding.
We place the U-shaped bracket on the profile pipe between the shock absorbers, then the rods will fit into its holes. Screw the nuts onto the threads of the rods and tighten them.
In the photo: clamp for attaching a drill
We turn the shock absorbers over and place an assembly of bearing housings, pins and sprockets on the bracket leg. We weld the assembly plate to the bracket.
We place it on the assembly, then the sprocket will engage with the chain, and weld the shock absorbers to the plates.
Let's make a base for the machine.
We attach a vertical stand to the base of the machine with bolts.
We put the spindle feed handle on the pin and secure it with a nut. For convenience, we screw plastic balls onto the handles.
We secure the drill with a clamp.
The drilling machine is ready for use, so that it is convenient to use workpieces when drilling, we will install a vice on the base of the machine.
Tabletop drilling machine made from drill
The most common design can be considered a machine made from a hand or electric drill, which can be made removable, so that it can be used outside the machine, or stationary. In the latter case, the switching device can be moved to the frame for greater convenience.
The main elements of the machine are:
- drill;
- base;
- rack;
- drill mount;
- feed mechanism.
The base or frame can be made from a solid cut of hard wood, furniture board or chipboard. Some people prefer a metal plate, channel or tee as a base. The bed must be massive to ensure structural stability and compensate for vibrations during drilling to produce neat and accurate holes. The size of the frame made of wood is at least 600x600x30 mm, of sheet steel - 500x500x15 mm. For greater stability, the base can be made with eyes or holes for bolts and attached to the workbench.
The stand can be made of timber, round or square steel pipe. Some craftsmen use the frame of an old photographic enlarger, a substandard school microscope, and other parts that have a suitable configuration, strength and weight as a base and stand.
The drill is secured using clamps or brackets with a hole in the center. The bracket is more reliable and provides greater accuracy when drilling.
Machine based on the steering rack of a passenger car
A steering rack for a car and a drill are quite massive products, so the frame should also be massive and, preferably, with the ability to attach the machine to a workbench. All elements are welded, since connections with bolts and screws may not be sufficient.
The frame and support post are welded from channels or other suitable rolled products, about 5 mm thick. The steering rack is secured to a stand, which should be 70–80 mm longer than the rack, through the eyes of the steering column.
To make the machine more convenient to use, the drill control is placed in a separate unit.
Assembly procedure for tabletop drilling machines:
- preparation of all elements;
- attaching the stand to the frame (check verticality!);
- assembly of the movement mechanism;
- fastening the mechanism to the rack;
- fastening the drill (check verticality!).
All fastenings must be made as securely as possible. It is advisable to join one-piece steel structures by welding. When using any kind of guides, you need to make sure that there is no lateral play during movement.
Advice! To fix the part in which the hole is drilled, the machine can be equipped with a vice.
You can also find ready-made stands for drills on sale. When purchasing, you need to pay attention to the weight of the structure and the size of the working surface. Lightweight (up to 3 kg) and inexpensive (up to 1.5 thousand rubles) racks are suitable for making holes in a thin plywood sheet.
Homemade drilling machine from a drill with an engine from household appliances - step-by-step manufacturing diagram
A home drill can be used as the main element of a self-assembled drilling machine, for installation of which you will need:
- bed or stable and reliable base;
- device providing power supply;
- securing base for the drilling element.
As a result of the assembly, the master will have a high-quality and productive drilling and additive machine, which has its own benefits.
Design advantages
Machines for drilling deep holes assembled using an electric drill are distinguished by a range of operational advantages:
- optimal compactness and low weight of the structure;
- Possibility to carry and use batteries;
- obtaining high-quality and accurate hole parameters;
- quick assembly and dismantling of equipment without wasting time;
- performing various works and processing all materials.
For repairs and home maintenance, a machine will be enough, but for a garage and larger-scale procedures it is better to choose a different type of device.
Asynchronous motor
By choosing alternative options from which to assemble a drilling machine, you can abandon the idea of using an electric drill needed on the farm.
For the rotation mechanism, you can use a motor of any power with an electric drive; it can be easily removed from old equipment and household appliances.
Manufacturing Features
The procedure for making a drilling machine with your own hands is not complicated, but you must take into account the advice of the experts:
- for a small drilling machine it is better to choose an asynchronous motor from an old washing machine;
- to install a sufficiently powerful engine, you will need a more durable and as stable base as possible;
- During the design and assembly of the installation, it is important to place the engine closer to the rack, which will reduce the vibration level;
- the connection using hexagons should be as strong and reliable as possible to increase the wear resistance of the unit.
This machine is more difficult to assemble even with an accessible circuit, but its main advantage remains increased power, which is suitable for processing different surfaces.
How to make a drilling machine from a washing machine motor
Home » Machine » How to make a drilling machine from a washing machine motor
Making a drilling machine with your own hands is not difficult. In everyday life, it is very beneficial to have tools and devices for performing plumbing and carpentry work.
In addition, after some household appliances become obsolete, a lot of useful spare parts, electric motors and other things remain. From these, if desired, you can make useful equipment at home.
In this article, read how to make a drilling machine with your own hands from a drill or asynchronous electric motor.
Tabletop drilling machine made from drill
The easiest option is to assemble a drilling machine using a drill. It doesn’t weigh much, so we mount the rack from boards, chipboard or sheet metal. It is important to obtain a 90 degree angle between the base plane and the holder.
To ensure free movement of the drill strictly in the vertical direction, we prepare guides. These can be metal profiles. The main condition is the absence of backlash and distortions. The platform with the drill must move freely.
Having assembled a stable, durable structure, we fasten the profile guides strictly parallel to each other and perpendicular to the plane of the base. The figure clearly shows the place where the drill is attached to the moving platform and the method of installing the guide profiles.
In the video at the bottom of the page you can see a version of the lever method of raising the platform of a home drilling machine. To automatically lift the drill up after reducing the pressure force, set the springs to tension or compression.
Drilling machine from a washing machine motor
The photo shows a homemade drilling machine, which differs from the one discussed above in the type of electric drive and more complex mechanics. Why are such complications needed? The fact is that the asynchronous motor from an old washing machine is heavier and has more vibration. The further away the engine is from the rack, the stronger the shaking will be. Intense vibration will lead to inaccurate drilling and drill breakage. There are two options - to make a powerful bed, when when the drill is lowered, the drive also lowers, or to place the motor closer to the holder stand motionless, then only the working part of the machine will move. The second method requires more complex execution. Here you will need pulleys and a belt to adjust the rotation speed. There are many options without a belt drive with a drive located against the wall. They are much easier to assemble, but the assembly discussed below has a non-standard approach, and some of the techniques used may be useful. According to the author of this design, there are still vibrations, but they are so minimal that when drilling iron with a 0.7 mm drill, the drill remained intact. Since neither the author nor other Internet users provide a description of how to assemble such a machine, we will try to briefly consider the installation of moving and adjusting parts of a homemade benchtop drilling machine.
How to make your own PCB drilling machine
A printed circuit board is a plate made of dielectric material, on the surface of which is applied a layer of metal that conducts electric current. The thickness of such products is 1.5–4.5 mm.
In this regard, a drilling machine designed for drilling printed circuit boards is a mini-machine, so when manufacturing it, the following features must be taken into account:
- such a machine does not need large electrical power;
- there is no need for a significant stroke of the machine head with a drill installed in it;
- the machine must be small in size, allowing it to be used on the desktop of a radio amateur or a person engaged in the manufacture of electronic systems;
- the absence of the need for significant power makes it possible to perform a similar installation at a lower voltage class and without the use of bulky chucks designed for installing large-diameter drills;
- On machines for this purpose, special adapters and collets are used to install drills, due to their small diameters.
Working with printed circuit boards is a “delicate” and scrupulous task that requires careful work and precision of the holes made.
You can make a homemade drilling machine for printed circuit boards using the technology considered in the case of using an electric drill or screwdriver, with the only difference being that electric motors of lower voltage and size can be used as a drive.
Compact drilling machine
Drawing of a miniature drilling machine.
It is not at all necessary to try to make the device powerful and large in size. It all depends on its purpose. If you are, for example, a radio amateur, you may need a very small machine that can be built on a compact tabletop.
- The unit can be made entirely from available material - metal blanks . The only ready-made parts in this case are the electric motor and mounting brackets. You can work with metal workpieces on a milling or lathe. If this is not possible, all elements can be purchased in stores that sell furniture fittings.
- The frame does not have to be made of metal; it can be made of plexiglass with a base of two layers.
- The spindle plate is mounted on a bushing; it is better to do it on a milling machine. If you don't have one, you can use a regular drill and file. During operation, this plate will move vertically with the engine.
- to the spindle ; the spindle itself consists of a shaft and bearings; it is placed in a sleeve for vertical movement while the machine is operating.
- For good tension of the drive belt and its rearrangement when changing the rotation speed, a bracket for the engine , in which special grooves are made for moving along. The bracket is made in the same way as the spindle plate.
- The rotation speed and torque are controlled and adjusted using a pulley with different diameters.
The unit is of complex design, this is a fact, of course. Its original purpose was to drill printed circuit boards. But then it was improved to universal status. A special coordinate vise can be used with this option to allow drilling at any desired angles.
Home drilling machines can be made from any available materials - the space for engineering is limitless. The main thing is to maintain the reliability and stability of the working surface of the table and a competent mechanism for the vertical movement of the spindle. Well, the precision of manufacturing of all parts, including the smallest ones. Make a machine to suit your needs, don’t be afraid to make your own decisions, you will succeed.
https://www.youtube.com/watch?v=kT0I8r2nvuY
Making a drill from a car steering rack
For many, this solution will not be obvious, but experts will immediately appreciate its simplicity and functionality. We make a drill based on the steering rack of a car. To do this, you only need the rack itself from an old decommissioned, disassembled car, or just a rack from a car that no longer exists.
You will also need fasteners and the drill itself. A steering rack drilling machine is an excellent solution for permanent work!
Homemade drilling machines - photo gallery
Sources
- https://nzmetallspb.ru/osnastika/sverlilnye-stanki-svoimi-rukami.html
- https://protechniky.ru/remont/kak-sdelat-samodelnyj-sverlilnyj-stanok-svoimi-rukami-chertezhi
- https://stroitelcentr.ru/idei-kak-sdelat-stanok-dlya-sverleniya/
- https://armatool.ru/sverlilnye-stanki-iz-dreli-svoimi-rukami/
- https://met-all.org/oborudovanie/stanki-sverlilnye/sverlilnyj-stanok-iz-dreli-svoimi-rukami.html
- https://sdelairukami.ru/sverlilnyj-stanok-svoimi-rukami-na-baze-elektrodreli/
- https://sam-stroitel.com/prostoj-sverlilnyj-stanok-svoimi-rukami-39-foto-izgotovleniya.html
- https://www.rmnt.ru/story/instrument/nastolnyy-sverlilnyy-stanok-svoimi-rukami-sxemy-ichertezhi.1229327/
- https://camodelkin.ru/instrument/samodelnyj-sverlilnyj-stanok-iz-dreli.html
- https://podelki.expert/sverlilnyj-stanok-svoimi-rukami/
- https://svoimirykamiinfo.ru/sverlilnyj-stanok-svoimi-rukami/