Activator type machines
Oka washing machines of the activator type are distinguished by the fact that a disk with blades is built inside the flat bottom.
It's called an activator. It is driven by a motor. An activator washing machine washes clothes approximately 70%. The Oka-16 model is an activator type machine. This is a free-standing vertical loading machine. The maximum amount of laundry that can be loaded into it at a time is 2 kg.
The activator washing machine is controlled mechanically. The knob installed on the panel is turned and the washing time is set. The timer is set to 4 minutes. When the washing time is finished, the machine turns off. If you need to turn off the machine earlier, this can be done. The tank is made of stainless steel.
The blades, under the influence of the engine, begin to rotate, the water, and with it the laundry, too. As a result, the dirt is washed off mechanically. Then the water with the powder flows back into the tank through the hose.
When you need to drain the water, remove the hose from the holder and install it in the drain.
The machine does not have modern functions, there is no drying and no leakage protection. The car is white. Weight - 16 kg.
The Oka-18 model can wash 3 kg of laundry at a time. Machine weight 16 kg. The tank is made of stainless steel.
The Oka-10 model is similar in principle to the previous one. It turns on mechanically using a timer. A hose holder is installed near the lid. Tank volume 32 liters. Weight - 13 kg. The machine can wash 2 kg of laundry.
The Oka-9M washing machine has a blue body. The height of the device is 98 cm, width - 80 cm. Weight - 22 kg.
The Oka-19 model is installed separately. Laundry is loaded from the top. It is placed in a 3 kg stainless steel tank. There is no drying, but there is a manual squeezing device. The body of the machine is made of steel and covered with durable enamel.
Peculiarities
In 1956, the Nizhny Novgorod plant named after. Sverdlov began production of the legendary model. At the same time, the first copies appeared on the shelves. There was a line behind them. And soon the Oka brand proved to everyone that it has every right to exist. Soviet housewives really liked the unpretentious design and ease of operation. Previously, the plant named after. Sverdlov produced ammunition during the war, and then switched to producing civilian products. Since then, the company has been engaged in this area and has had good success.
Early Oka washing machines in the USSR were distinguished by their reliable design and impeccable performance. Even after they stopped producing the old models, they continued to work for a long time, since many housewives did not want to get rid of them.
The very first washing machines were not quiet. They were bulky and did not have a very attractive design. However, many were happy with this execution, especially those women who had previously washed by hand. Such a miracle of technology came to their aid. However, since the release of the first car, the design has remained virtually unchanged. Oka models continue to be produced in the form of a cylinder - this appearance is not fashionable and does not save living space.
The tank and the unit body itself form one whole. They are made of stainless steel or aluminum. The manufacturer continues to produce and offer for sale reliable models in blue and white-blue colors.
Today, Oka washing machines have the following varieties:
- centrifuges;
- semi-automatic;
- small cars
- activator type machines.
The latter do not have the usual drum. Instead, the manufacturer installs an activator in the lower part of the housing. It is connected to an electric motor. When the start occurs, the shaft begins to rotate and thereby twists the laundry. It is the activator type models that are considered excellent in terms of design due to the absence of a drum. Such devices break down less, especially since domestic units are still distinguished by their low price and excellent data. They can withstand temperature changes. Therefore, this type of machine is purchased for use in dachas.
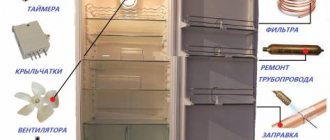
Do-it-yourself washing machine repair: the most common breakdowns
Although the designs of the machines are very similar, there are differences in them. However, there is a certain set of faults that are common to all washing machines.
Wash does not turn on
Repairing a washing machine with your own hands begins with the fact that you need to determine at what stage the program stopped. Sometimes the washing machine fails to start. There are several possible reasons:
- The door is not closed. Until the relay operates, the wash will not start. Push the door firmly against the body. If this does not help, there may be a foreign object in the lock or the latch may be faulty.
- No power or voltage too low.
- Check the integrity of the plug, socket, and cord.
The cord may fray
- The contacts on the terminal block where the power cord is connected may be oxidized. In this case, remove the cover of the washing machine, find the block and inspect the contacts, clean them if necessary.
- The time relay is faulty. Diagnosing its failure is not easy. You just need to switch programs several times. If at some point the washing starts, then the time relay is really faulty.
- Check the water supply hose. It may be pinched.
- The water supply filter is clogged. Then we act like this: shut off the water supply to the machine;
- remove the supply hose from the pipe;
- Using pliers, remove the filter from the machine and rinse it under running water;
- install it in place, put on the hose.
If all these points are checked, there are no faults, but the washing machine still does not turn on, the problem may be in the control board. This can only be determined by installing the working board.
Water does not fill
If the machine does not fill with water, first check if there is water in the water supply. It is also worth checking its pressure (open the tap and evaluate the pressure). If it is sufficient, we move on:
Popular models
Note that there are models that are bought and sold very well. Let us list the main ones.
- For knitwear and cotton, wool, and synthetic fabrics, the Oka-8 . It has an aluminum tank, which allows the machine to operate for many years without corrosion.
- "Oka-7" is distinguished by the presence of rollers that allow it to be moved from place to place. Available in a metal case. A special bracket helps with spinning clothes. There is such a mechanism as different rotation of the blade circle. This ensures high-quality washing. In addition, the blade circle can rotate in one direction or the other. There is also a “Gentle Mode” which rotates the paddle disc clockwise. The machine washes very thick fabrics very well. Mainly suitable for washing things that do not require special treatment.
- The electric model "Oka-9" washes approximately 2 kg of laundry at one time. It has a white body, mechanical control, vertical loading of laundry, and a timer. Leak protection and drying are not provided in this model. The dimensions are as follows: 48x48x65 cm. Tank volume is 30 liters.
- Oka-18 washing machine is made of stainless steel . The color of this model is white and the weight is 16 kg. Energy consumption class is A, and washing class is C. Loading type is vertical. The drum volume is 34 liters. The noise level during washing is 55 dB. This model weighs 16 kg.
- The Oka-10 model is very comfortable to use. It can be “shoved” even into the narrowest space. It is economical. Its characteristics: there is a program for removing difficult stains (you just need to specify the option in the menu, and the program will do everything itself), overfill protection, load control. If a failure occurs, the unit will stop and no breakdown will occur. Drying available. The weight of the machine is 13 kg, the tank volume is 32 liters.
- The Oka-50 and Oka-60 units do not have high power since they are not designed for heavy loads. These models can wash from 2 to 3 kg of laundry. Such models do not have large dimensions and are mainly used for washing children's clothes.
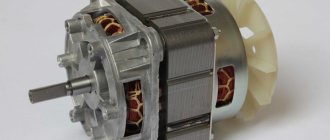
Engine
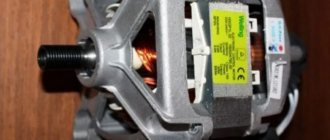
Another reason when a washing machine is electrocuted may be the motor. It is a device consisting of steel, aluminum and copper. The windings are insulated with varnish and placed in special insulating trays made of special cardboard or fiberglass.
The motor heats up during operation. In this case, the temperature can reach critical values and lead to melting of the varnish. As the insulation between turns deteriorates, the resistance changes downward, which leads to more current consumption and the release of additional heat. As a result, a breakdown often occurs on the motor housing, and then on the washing machine housing.
Checking the washing machine motor
Repair is carried out as follows:
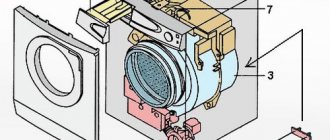
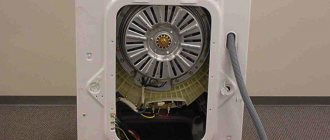
- It is necessary to get to the inside of the washing machine, for which the back wall of the case is removed.
- The motor is located under the drum casing, at the bottom. The connector with contacts is on the side, on the left. It is necessary to remove it and at the same time clean it from possible contamination.
- Next, you need to check the motor using a multimeter. The technology consists of measuring the resistance of both windings and the housing. Accordingly, the readings of the device when testing the housing and between different windings should tend to infinity at the highest limit.
- If there is resistance, then it is necessary to remove the motor and wash and clean it, if necessary. If the resistance is not infinite, then the motor requires repair.
Electrical diagram of the OKA car
Colored wiring diagram for the domestic OKA car. The diagram is in high resolution, so to enlarge the picture, click on it. To eliminate errors when working with the circuit, the second version of the OKA electrical equipment circuit is shown below.OKA car wiring diagram
1 – side turn signal 2 – front turn signal 3 – headlight 4 – cooling system fan motor 5 – sound signal 6 – fan motor activation sensor 7 – windshield washer motor 8 – spark torque sensor 9 – battery 10 – Oka starter 11 – switch 12 - spark plugs 13 - ignition coil 14 - Oka generator 15 - coolant temperature gauge sensor 16 - low oil pressure warning lamp sensor 17 - socket for portable lamp 18 - windshield wiper relay 19 - brake fluid level sensor 20 - brake signal switch 21 – windshield wiper electric motor 22 – carburetor solenoid valve 23 – reverse light switch 24 – starter relay 25 – relay for low beam headlights 26 – relay for high beam headlights 27 – hazard warning and turn signal breaker relay 28 – cigarette lighter 29 – heater fan switch 30 – additional heater motor resistor 31 – exterior lighting switch 32 – fuse box 33 – fog lamp circuit fuse 34 – rear window heating relay 35 – cooling system fan motor relay 36 – parking brake warning lamp relay 37 – rear window wiper and washer switch 38 – rear window heating switch 39 – rear fog lamp switch 40 – carburetor choke control lamp 41 – hazard warning switch 42 – ignition switch 43 – ignition relay 44 – heater fan motor 45 – level indicator sensor fuel 46 – courtesy light switch in the door pillar 47 – instrument cluster 48 – windshield wiper switch 49 – windshield washer switch 50 – horn switch 51 – headlight switch 52 – turn signal switch 53 – parking brake indicator switch 54 – courtesy lamp interior lighting 55 – switch for the warning lamp for closing the carburetor air damper 56 – rear door glass washer motor 57 – tail light 58 – rear fog lamp 59 – license plate light 60 – rear door glass heating element 61 – rear door glass wiper motor.
OKA car electrical circuit diagram - another option
1 — headlights; 2 — front direction indicators; 3 — sensor for turning on the electric fan; 4 — sound signal of the Eye; 5 — electric fan of the engine cooling system; 6 — side direction indicators; 7—sparking torque sensor; 8 — spark plugs; 9 — ignition coil; 10 — electric motor of the windshield washer pump; 11 - battery; 12 — Oka car generator; 13 — oil pressure warning lamp sensor; 14 — carburetor solenoid valve; 15 — coolant temperature sensor; 16 — reverse light switch; 17 - switch; 18 — plug socket for a portable lamp; 19 - brake fluid level sensor; 20 - starter; 21 — windshield wiper gearmotor; 22 — relay-interrupter for direction indicators and hazard warning lights; 23 — relay for turning on the high beam headlights; 24 — relay for turning on low beam headlights; 25 — starter activation relay; 26 — relay for turning on the electric fan; 27 — fuse block; 28 — relay-interrupter for the parking brake warning lamp; 29 — windshield wiper relay; 30 — rear window wiper and washer switch; 31 — rear window heating switch; 32 — rear fog lamp switch; 33 — switch for the carburetor air damper warning lamp; 34 — fog light circuit fuse; 35 — control lamp for the carburetor air damper; 36 — alarm switch; 37 — external lighting switch; 38 — relay for turning on the heated rear window; 39 — heater fan motor switch; 40 — brake light switch; 41 — cigarette lighter 42 — additional resistor for the heater fan electric motor; 43 — ignition switch relay; 44 — ignition switch; 45 - three-lever switch; 46 — interior lamp; 47 — lamp switches located in the door pillars; 48 — instrument cluster 49 — parking brake warning lamp switch; 50 — sensor for level indicator and fuel reserve; 51 — electric motor of the heater fan; 52 — rear lights; 53 — rear window wiper gearmotor; 54 — rear window heating element; 55 — license plate lights; 56 — rear fog lamp; 57 — electric motor of the rear window washer pump; A - the order of conditional numbering of the plugs in the spark-torque sensor housing; B - the order of conditional numbering of the plugs in the gear motor blocks of the windshield and rear window wipers and the windshield wiper relay breaker; B - the order of conditional numbering of plugs in the blocks of the ignition switch and three-lever switch; G - the order of conditional numbering of plugs in the blocks of the instrument cluster.
CAR ELECTRONICS REPAIR
conclusions
If your washing machine is electrocuted and you don’t know what to do? The repair instructions will help you fix the problem. However, in more complex situations, it is still better not to try to eliminate the defect with your own hands. It is better to immediately contact specialists.
If you know how to hold a screwdriver in your hands and have a resistance tester on your household, then you are capable of more. In fact, most breakdowns can be repaired, but without knowledge of the technique and the availability of appropriate devices, this is difficult to do. Therefore, if complications arise, it is recommended to contact us for at least a consultation. The master will explain what needs to be done and how.
In difficult cases, you can immediately bring your equipment to us so that we can carry out professional repairs. We will provide a guarantee for our services. We undertake to advise on any issues.
Source
User manual
And here lies the most important advantage. In order to start washing, you will not need to carefully study the instructions. Everything is quite simple. Therefore, both older people and young people can wash clothes in Oka brand machines. For the convenience of consumers, rotary switches are installed on the housing. They simplify the tasks associated with washing.
Almost all Oka models require careful handling. To ensure your machine lasts a long time, give your equipment a rest.
Know that time intervals are needed between washes. Otherwise, the plastic activator circle may become damaged.
Fuse box diagnostics (video)
VAZ-1111 especially small class passenger cars are equipped with 12-volt electrics with a negative terminal connected to the car body. The cars were equipped with carburetor and injection power units, which had little effect on the location and purpose of the circuits. The VAZ-1111 electrical circuit, which is basic for all versions of the Oka, can be used when repairing a car of any year of assembly.
What is included in the Oka electrical circuit?
Electrical diagram of VAZ-1111 with symbols
Electrical diagram of VAZ-11113 with symbols
Contactless ignition diagram indicating the main elements and connecting wires
Fuse diagram for VAZ-1111 and 11113
Common electrical faults
Wiring diagram SeAZ VAZ-11116
in high resolution (1 MB).
1/1 – High beam headlight lamp; 1/2 – Low beam headlights; 1/4 – Side light lamp; 2 – Front direction indicator lamp; 3 – Side direction indicator lamp; 5 – Generator with built-in voltage regulator; 9 – Hall sensor; 10 – Ignition coil; 12 – Starter Lada Oka; 13 – Spark plugs; 14 – Sound signaling device; 17 – Water temperature indicator sensor; 18 – Oil pressure warning lamp sensor; 23 – Battery; 25 – Reversing light switch; 26 – Brake light switch; 30 – Relay-breaker for direction indicators; 31 – Handbrake warning lamp relay; 32 – Windshield wiper relay; 33 – Additional resistance of the heater electric motor; 35 – Windshield wiper motor; 37 – Heater electric motor; 38 – Radiator cooling fan electric motor; 39 – Electric fan relay; 42/1 – Turn indicator switch; 42/2 – Headlight switch; 42/3 – Windshield wiper and washer switch; 42/4 – Horn switch; 44 – Ignition switch; 46 – External lighting switch; 48 – Hazard switch; 49 – Heater motor switch; 52 – Instrument cluster; 63 – Speed sensor Lada Oka; 74/1 – Thermal cigarette lighter element; 74/2 – Cigarette lighter lamp; 75 – Brake fluid level sensor; 76 – Handbrake warning lamp switch; 77 – Diagnostic block; 81 – Cartridge for connecting a portable lamp; 83 – Windshield washer pump; 87 – Interior lighting switch in the front door; 89 – Interior lamp; 93 – Sensor for level indicator and fuel reserve; 98/1 – Side light lamp; 98/2 – Direction indicator lamp; 98/3 – Brake light lamp; 98/4 – Reversing lamp; 99 – License plate light lamp; 104 – Electric fan thermal switch; 108 – Rear fog lamp; 112 – Rear window wiper motor; 113 – Rear window washer motor; 115 – Rear window heating element; 121 – Relay for turning on the heated rear window; 125 – Additional relay; 126 – Headlight high beam relay; 127 – Relay for low beam headlights; 129 – Starter relay; 133 – Rear window heating switch; 136 – Rear fog lamp switch; 137 – Rear window wiper switch; 138 – Rear window washer switch; 158 – Fuel injectors; 159 – OKA watch; 168 – Relay for rear fog lights; 169 – Additional brake signal; 170 – Fuel pump relay; 171 – Electric fuel pump; 172 – Idle speed regulator; 173 – Throttle position sensor; 174 – Knock sensor; 175 – Canister purge valve; 176 – Oxygen sensor; 177 – Absolute pressure sensor; 178 – Main relay; 221 – Controller.
Useful: Pinout and diagram of a fuel pump with a VAZ relay