Scrap metal collectors will be happy to take your old washing machine. But don't rush to please them. You won't get much money for scrap, but if you approach this issue wisely, you can get a lot of useful things for your household. Homemade products made from a washing machine engine will help you quickly de-feather poultry, cut pet food, mow the lawn, and smoke fish and meat. And this is not a complete list of what can be made from a washing machine. Today in the review by the editors of HomeMyHome.ru there are detailed instructions on how to give the “iron heart” of a washing machine a new life.
Parts from a washing machine - material for many useful homemade products
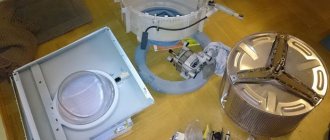
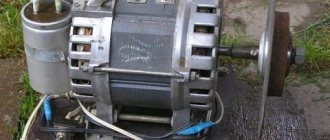
What can an engine from an old washing machine look like?
If you are planning to make homemade products from a used engine, you need to figure out what it is and what it is capable of. In washing machines you can find three types of motors: asynchronous, brushless and commutated. Let's take a closer look at them:
- Asynchronous - can be two-phase or three-phase. Two-phase engines are found in older Soviet-made models. More modern machines are equipped with three-phase. The design of such an engine is extremely simple; it can reach speeds of up to 2800 rpm. The working engine removed from the machine just needs to be lubricated - and it is ready for new exploits.
Such motors are characterized by quiet operation. Their only drawback is their impressive dimensions.
- Commutator – you will find this type of motor in the design of most household appliances. Such devices can operate from direct and alternating current, have compact dimensions and a controlled speed. The only drawback of such an engine is the brushes that wear out, but these parts can be replaced if necessary.
It must be admitted that, in comparison with an asynchronous motor, such a motor is noisier. In addition, it often overheats and even sparks
- Brushless direct drive is the most modern motor from the Korean manufacturer. You will find it in modern washing machines from LG and Samsung.
Such models are the most compact.
They are characterized by wear resistance, simplicity of design and high efficiency. Now that you can determine the type of motor, all that remains is to decide where you can use the motor from the washing machine.
Motor connection
To lay out the winding wires, you will need a multimeter. It would also be a good idea to prepare side cutters or pliers for stripping the wires. The list of other tools depends on what kind of equipment will be assembled for the engine.
Connecting the unit to alternating current.
- We determine the pairs. We apply one probe to any core, and use the other to check the rest. If the multimeter gives a signal, it means a pair has been found.
- We find the resistance indicator of the two windings. The highest value indicates the trigger pair.
- Different tandems are connected in pairs and then connected to a common 220 V network.
- The shutdown button can be installed on the starting winding cable.
Sometimes it is necessary to reverse the direction of rotation of the motor. It is enough to simply change the outputs of the starting winding.
We properly disassemble and decide what can be made from parts of an old washing machine
Disassembling a washing machine is a leisurely task. After working with water, a salt build-up may remain on the parts; it must be carefully removed so as not to damage the parts during removal. What can be made from an old washing machine? A motor will be useful for homemade projects - it will become the basis for many devices. The drum will also come into play. It is usually made of stainless steel. All pipes must be disconnected from the drum. A loading hatch may also be useful. In addition to these parts, do not rush to throw away springs, counterweights and body parts.
For those who are versed in electronics, you may need a circuit board - it can easily be used to find spare parts for repair work if necessary.
Making a vibration table with your own hands
This is another idea on how to use a motor from an old non-working washing machine. You will be able to make a vibrating table for paving slabs.
Vibrating table
The homemade structure looks like a slab. On top it is a device attached by a movable joint.
When the slab vibrates, air bubbles appear from the concrete poured into the molds on it. At this time, possible voids disappear. The finished product is durable and high quality.
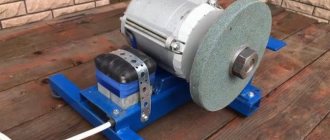
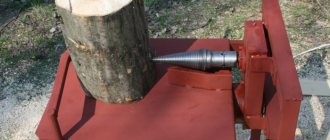
How to make a sharpener or grinding device from a washing machine engine
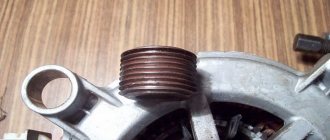
A sharpener is one of the most popular tools for the home. It can be used to sharpen garden tools, household knives and scissors. If you don’t already have one, buy it at any tool store or make a sharpening machine from a washing machine. The most difficult part is how to attach the sanding wheel to the motor. The easiest way is to buy a ready-made flange. It looks something like this.
Flange for motor
You can machine a flange from a metal pipe of a suitable diameter; most often, a tube with a cross-section of 32 mm is suitable. You need to cut a piece 15 centimeters long from it, this is quite enough to fix the emery. The flange is secured to the motor shaft by welding or a through bolt. The video describes in detail how a homemade washing machine sharpener works:
Parameters affecting power
To understand how much electricity a washing machine consumes per hour, add up the energy consumption of all its components.
- An electric motor rotates the drum. During simple washing, consumption decreases, and during drying mode it increases. On average, the engine consumes 0.4–0.8 kW. Motors are commutator, direct drive and asynchronous.
- The heating element heats the water and makes the spin automatic. It is turned off in cold rinse mode, but works at maximum during heating and spinning. The more powerful the heating element, the less time it will take to heat the water. Heating element indicators: from 1.7 to 2.9 kW.
- The pump pumps out water according to the specified program. It requires 25 to 40 watts depending on the model.
- Electronic control consumes up to 10 watts, mechanical control takes no more than 5 watts. The control system includes starting capacitors, an electronic module, light bulbs, a programmer and other small radio elements.
Read also: Cutting speed when grinding formula
By adding the indicators of all components, you can find out the number of kilowatts consumed.
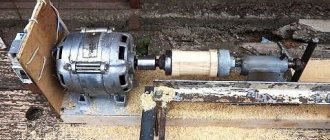
Making a wood lathe from a washing machine
What else can you do with the washing machine motor? One popular idea is a wood lathe. Let's look at the step-by-step process.
| Illustration | Description of action |
| To firmly fix the engine on the workbench, make fasteners from a metal angle. To do this, drill holes for fixing to the motor legs and table. | |
| To fasten a wooden part, you will need a flange fixed to the motor shaft, and these are the studs made from ordinary bolts with cut off heads. Screw these pins into the base. You will need 3 studs. | |
| The motor is fixed to the table with self-tapping screws and to the metal part with bolts. | |
| The opposite end of the wooden part is attached with such a device. It consists of a screw with a loop, two wooden stands perpendicularly fixed to the corners. | |
| This wooden part must be movable so that different workpieces can be used. For mobility, it is mounted on a threaded stud with bolts. | |
| To control the motor you will need a power supply. You can use one of the computer units. You will need to install switches to adjust the rotation speed. | |
| How to connect a motor to a power supply in animation. | |
| To guide your tools, make a tool rest. It consists of two wooden parts and a metal corner. All parts are movable due to fastening with one bolt. | |
| The lower part of the tool rest is rigidly fixed on the workbench using self-tapping screws and corners. | |
| The workpiece is fixed on the machine on both sides: on the left - on studs, on the right - on a bolt with a handle. To fix it in the workpiece, you need to drill the corresponding holes. | |
| To work, you will need sharpened tools - cutters. | |
| Final sanding of the workpiece is done using a strip of sandpaper. |
Step-by-step manufacturing instructions
The following will provide detailed instructions on how to make a step-by-step circular saw driven by a washing machine engine.
Manufacturing of the bed
The table for a circular saw is a wooden box made of plywood, or in some cases a workbench knocked together from boards. The main requirement for the frame is stability and the ability to attach circular saw mechanisms.
If the circular saw will be used for long longitudinal cuts, then it is necessary to make a rectangular table, and mount the saw blade almost at the very end of the table at a distance of 20-30 centimeters from the edge.
Perforations are made in the table cover for a saw blade, which will be located under the tabletop of the station.
The frame must have a mass that will not allow the structure to move when cutting. This is very important because the kinetic energy from the rotation of the blade can resonate with the force of movement of the cutting board. As a result, the bed may move, creating a traumatic situation.
The circular saw table can be fixed to the floor, but for this you will have to install special mounting points and this will deprive the structure of mobility.
By the way, it is not necessary to make the table in the form of a box; a benchtop version is also possible.
Which drive should I use, direct or belt?
A circular saw with a washing machine motor can have two drive types: direct or belt. Both designs are valid, but direct drive circular saws are more reliable.
The absence of belts prevents them from breaking. Also, to mount the disk, you will need an additional driven shaft, to which torque will be transmitted from the engine through a belt drive. In this case, the rule applies: the fewer spare parts, the more reliable the mechanism. In addition, the presence of belts leads to increased vibration during operation.
Direct drive is reliable and easy to install, but it requires reliable fastening, since loosening the fasteners will lead to movement of the motor, and therefore to distortion of the disk, which is absolutely unacceptable.
We recommend using a motor with the ability to mount the saw blade directly onto the shaft.
Selecting a disk and mounting it on the engine or separately in the table
As already mentioned, it is better to use a direct drive in a circular saw. This will significantly simplify the design, while the functionality and performance of the saw will not deteriorate.
Disk selection
It is best to choose a universal-type carbide saw blade that has a medium tooth size.
These discs are different:
- Long service life with proper use.
- You can sharpen them yourself using a round file and a special template.
- Aluminum profiles can be sawed in small quantities.
Motor mount
It is best to place the engine under the bed because:
- It is safe for the operator of the circular saw.
- Electrical wiring is located at the bottom, which means it cannot enter the work area.
- You can make a reliable mount on one of the walls of the frame, and also fix the engine to the tabletop from below.
If for some reason the disk breaks or bends, then in 80% of cases it will remain under the table, and if the disk is located at the top, it will fly out along the rotation path.
How to attach?
The engine must be placed in brackets that will securely tighten it. The brackets themselves are attached to the wall and cover of the frame.
You can also make a small remote platform on brackets on which the engine will be mounted.
The figure shows the mounting of a motor with a belt drive on the metal frame of the future table.
And this way a direct drive engine can be mounted.
The main thing is that the mount is reliable and does not allow the engine to vibrate or move.
Motor connection
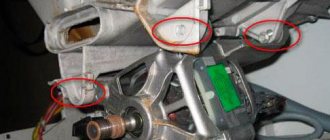
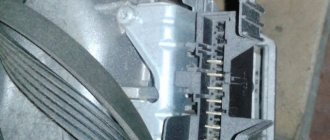
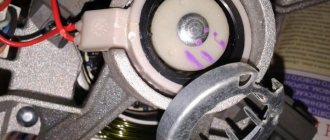
Old washing machines such as “Malyutka” or “Vyatka” have commutator-type motors in their design. Inverter, that is, brushless motors, are equipped with modern automatic washing machines. They are much more reliable than motors with a commutator (analogous to an electric drill motor), in that they do not contain current-collecting brushes and a graphite commutator.
The image shows a commutator motor with a remote power button.
It is necessary to remove wires from the cable entry point; there will be four of them: two supplying from the 220V network and two closed to the control (disconnecting) relay. It is through him that control is carried out.
A typical electrical circuit looks like this.
If you do not have knowledge in the field of electrical engineering, then you can connect the motor as follows - the “selection method”.
- Two power cables are output. They usually have the same color.
- The remaining two cables are routed to the side.
- The power cables are “connected” to the outlet with their bare ends. If the motor starts rotating, then the power cables are being used.
- A power button is mounted on the remaining two wires.
It is necessary to look at the actual connection of the motor cables while it is mounted on the washing machine. This will help you understand which ones supply power and which ones are mounted to the control relay.
Electrical part
The electrical part, in addition to connecting to the network, can be divided into two components.
Electronics:
- Start-stop button.
- Actuator.
The starter is a small box with an input, a stabilizer and a collector for current. Essentially, it delivers a charge of the required capacity to the engine. The starter is connected to a start-stop button, which makes or opens a contact.
Automation:
- Automatic shutdown relay.
- Rheostat regulator.
The relay is connected to the input of the electric motor and immediately turns it off in the event of a short circuit and voltage surges.
A rheostat is needed to regulate the speed. For small low-power circular machines, there is no need to connect it. In a homemade circular saw, it is necessary to reduce the number of revolutions when diagnosing engine operation.
To assemble the starter circuit and connection, special education at the level of an electrician is required. If you don’t have the necessary knowledge, it’s better to contact a specialist.
We recommend watching the video for more details on how to connect the motor from a washing machine. The author explains everything in great detail.
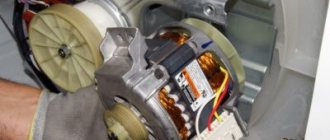
How to make a simple feather removal machine for home use from a washing machine with your own hands
The time of slaughtering a bird is a troublesome stage. This is usually done in the fall, when the ducks and broilers have reached the desired weight, and it is no longer profitable to keep them in the winter. You need to pluck several dozen or even hundreds of carcasses very quickly. You can get rid of hard labor with the help of a feather removal machine, and it’s easy to do everything from the same parts of the washing machine.
The only thing that can cause difficulties is the search for rubber fingers with threads - beaters. You will have to order them, so keep in mind that you need to think about making the machine long before slaughter
The device does not require disassembling the washing machine. It is especially convenient to use machines with vertical loading. You just need to fix the beats in the drum so that they point inward. Before plucking, the chicken carcass must be scalded with boiling water and then simply thrown into a rotating drum. Here's what happens:
Important! To prevent water from getting on the engine of the feather removal machine, you need to protect it with a plastic casing.
And the last point - the feather removal device must be firmly fixed, since the vibration when loading the carcass will be very strong.
How to save energy
Despite the characteristics of the washing machine and its power consumption in kW stated in the passport, you can reduce costs:
- Unplug the machine after finishing washing. When plugged into an outlet, it continues to use energy.
- Choose the right program depending on the main factors: amount of laundry, type of fabric and degree of soiling. This reasonable approach will save up to 30% of electricity consumption.
- Do not divide one load into several small washes. If the weight of the laundry allows, then it is better to load the laundry to the maximum value. According to the characteristics of washing devices, an incompletely loaded drum consumes 10-15% more energy.
- If you have the opportunity to dry your clothes outside, then there is no point in setting the spin/dry mode to full speed. This way you can save money and get fresh, sun-dried laundry.
- Clean the heating element from scale every six months. To do this, put an anti-scale agent in the powder compartment and turn on the “Cotton Wash” mode, selecting heating to a temperature of 60 ° C.
- For a small amount of clothing, you can use the “quick wash” program: its cycle is several times shorter than usual, consumes less water, and accordingly saves energy. This program is also called the partial occupancy or “few things” mode.
For a family of three, it is wiser to choose a small model to optimize energy costs. For large, high-volume washes, choose a Class A or B machine.
When choosing a washing machine, focus not only on appearance, variety of functions and enormous power. You can purchase a home assistant who will wash things efficiently and save money.
Lawnmower from a used motor
We continue to look for the answer to the question of where we can use the motor from an automatic washing machine. Another original idea is making a lawn mower. For a small area, an electric model connected to a power source with a cord is quite sufficient. The design of such a unit is very simple. You will need to make a platform on four wheels with a small diameter.
The platform can be made of metal or OSB board, plywood and even the body of the same washing machine
The engine is fixed on top of the platform, the shaft is threaded into the hole below, and the knife is attached to it. All that remains is to attach handles and a lever to the cart to turn the power on and off. If you have an asynchronous motor lying around, you will be surprised at how quiet the unit will be, even compared to factory models.
Advice! To prevent grass from wrapping around the knives, you need to slightly bend their cutting edges down.
Video: how to make a lawn mower
Lawnmower
It will come in handy in gardens or summer cottages.
Lawnmower
The manufacturing process is as follows:
- First you need to find the wheels from the cart.
- After this, a metal platform is installed. It is made from a corner of a square profile. A special frame can be made from it, after which the racks should be welded to it.
- For the handle, take a small diameter pipe. The handle is welded to the frame using gas welding.
- Next, a hole is prepared in the platform.
Do you turn off the water tap after washing?Oh yes! No.
- There is a grille in the front part. It is bolted on.
- The engine is attached to the platform so that the shaft fits into the hole. Knives are attached to the end of the shaft by welding.
- To protect the engine from grass, it is covered with a casing. Several small holes should be made in it.
- At the end of the process, the power supply cable is connected.
How to build a generator from an old washing machine
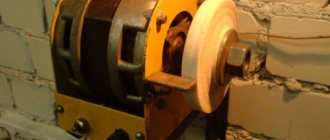
We continue to look at homemade products from a washing machine motor, and the turn has come to the generator. You won't be able to assemble a powerful device, but in the event of an emergency shutdown, you can be well prepared. To turn the engine into a generator, you will have to disassemble it and partially cut off the core. In the remaining part of the core you need to make grooves for neodymium magnets.
The magnets must be placed in two rows with the same spacing
The gaps between the magnets are filled by cold welding. To operate the device, the kit must include a motorcycle battery, a rectifier and a charge controller. Details of the work in the video:
How to determine the power of the device
Energy consumption depends on the rated power of the device. To find out the washing machine's power in watts, look at the sticker on the back of the washing machine. There are models of several classes based on the level of power consumption. The first letter before the power numbers will indicate which class the device belongs to based on the principle of economical consumption of electricity.
Taking into account the class of the washing machine, you can determine its approximate power. Class A is considered the most economical. The more advantages it has, the less energy it consumes. Class G consumes the most electricity. Classes are assigned to devices based on research results in kilowatt consumption per kilogram at a temperature of 60° Consumption according to classes
- Class A consumes 0.15 to 0.19 kW per hour to wash 1 kg of dry laundry.
- Class B consumes from 0.19 to 0.23 kW per 1 kg.
- Type C consumes from 0.23 to 0.27 kW.
- Type G consumes from 0.27 to 0.31 kW per 1 kg.
A separate class includes devices with clothes dryers.
Homemade concrete mixer
If you have started a small renovation that requires, for example, plastering the walls, a concrete mixer will come in handy. Once again, washing machine parts will come in handy.
As a result, you will receive a compact device with low power, which you won’t mind throwing away after the repair work is completed.
As a container for concrete, you can use the same drum with pre-sealed holes for draining water. It is best to use parts from a front-loading machine; there will be almost nothing to redo. To strengthen the body, use a metal corner, and for convenient movement of the concrete mixer, equip it with wheels. The main difficulty in the design is the manufacture of a “swing” for the correct tilt and subsequent pouring of concrete. How to do it correctly in the video:
Making a concrete mixer
If a private house is undergoing renovation, a concrete solution is often needed. Renting a concrete mixer will cost a pretty penny, so it’s better to make one yourself from a washing machine. It’s worth knowing that automatic will not work.
Concrete mixer
Instructions:
- the drain hole is initially sealed in the housing;
- then take two steel strips;
- blades need to be made from them;
- a shaft is inserted through the hole intended for the activator, and the blades are pre-welded to it;
- the motor is installed and connected to the shaft.
Homemade products from a washing machine engine: circular saw
You will be surprised, but a circular machine can also be built based on the motor from a washing machine. An important point in this matter is the additional equipment of the motor with a device that regulates speed. Without this additional module, the circular machine will work unevenly and simply will not cope with the task. Device assembly diagram:
Circular saw diagram
The principle of operation of the device is simple: the engine drives a shaft on which a small pulley is mounted. From the small pulley there is a drive belt to a large pulley with a circular saw.
Important! When working with a homemade circular saw, take care of your hands. All structural parts must be firmly fixed.
The resulting unit will not be very powerful, so it can only be used for cutting boards up to 5 cm thick. How this homemade circular saw works:
What will be needed for production?
To make a circular saw from a washing machine engine, you will need the following materials and tools:
- Washing machine motor.
- Wooden beam.
- Plywood sheets.
- Fastening elements: screws, bolts, nails.
It is necessary that the motor shaft has no play or noise during operation, and that the electrical wiring is insulated and in good working order.
Tools you will need:
- Jigsaw.
- Screwdriver.
- Drill.
Since you don’t have to spend money on tools and an engine separately, all other costs will amount to up to 5 thousand rubles. A high-quality and productive circular machine itself costs no less than 10 thousand rubles.
What else can be made from a washing machine drum: original decor ideas
The drum with its correct perforation is a material for the manufacture of decorative objects. Here are some interesting ideas.
Ottoman with drum base. It’s easy to do – you just need to attach the wheeled legs and make a soft seat
Such a drum can also be turned into an original lamp. If you place a lamp inside, the perforated surface of the drum will cast glare on the walls. Such lamps will look good on the ceiling of the veranda or even on the floor
Bedside tables and tables. Drums with doors from top-loading machines can be used to hide small items.
This is how the drum turns into a cabinet or nightstand
How many kW per hour do different models consume?
Electricity prices are constantly rising, so consumers are increasingly purchasing machines with high energy efficiency. Let's consider several models of washing machines of different power with the most economical consumption.
- The LG F12B9LD model is made using direct drive electric motor technology. Class type A+, consumption is 1.02 kW per hour.
- Premium device Bosch WAY28790EU. It belongs to the optimal economy type A+++, consumes 1.31 kW per hour.
- Washing machine HOTPOINT ARISTON AQ114D697DEU/B. There is a function for automatic consumption optimization, classified as type A+++. Consumes 1.138 kWh
- Narrow device with front loading type INDESIT XWSA610517WUA. 16 washing programs, tank designed for 6 kg of laundry, class A+. Consumes 1.006 kW/h.
- Washing machine model LG F80C3LD. Front loading, spin quality class G, and only 0.75 kW per hour per 1 kg. Consumption type A++.
- Washing machine Bosch WVH228360OE. Front loading type, has a drying function, the tank holds 7 kg of clothes, electricity consumption class, consumption 5.67 kWh/kg, spin type B.
Making a barbecue from a drum from a washing machine, photo examples
A metal grill is a temporary product. Sooner or later it burns out and requires replacement. You can buy a new one each time or use improvised material, for example, a drum from a washing machine. Making this craft from a washing machine drum takes a couple of minutes. The beauty is that oxygen easily enters the perforated container, which causes active combustion.
Kebab coals burn quickly, and the process of cooking meat is significantly accelerated
The metal of the drum can withstand a couple of seasons. Make a comfortable stand for it so you don’t have to bend over, and you’re done. Standard length skewers will fit comfortably on a small roasting pan. If necessary, you can lightly weld a couple of guides.
How to determine the power of a washing machine?
First you need to understand which parts of a given household appliance consume electricity the most:
- The electric motor is the “heart” of the washing machine . The task of this element is to give rotation to the drum. The main types of motors used in modern devices are commutator, asynchronous and direct drive. Average power consumption ranges between 400 and 800 Watts (0.4 to 0.8 kW). During normal washing, energy consumption is less, during spinning - more.
- Heating element - serves to heat water in the tank . It fully automates the washing and drying process. The quality of washing certain items depends on choosing the right temperature. Therefore, the heating element may not turn on at all during washing (rinsing in cool water) or consume power for the entire “coil” - washing at a temperature of 90–95 degrees. Each heating element installed in a washing machine has an installed power. It ranges from 1.7 to 2.9 kW. The higher the power, the faster the water in the tank will heat up.
- Pump (pump) - designed to pump out water at various stages of washing. The power consumption of such pumps varies from 25 to 40 watts.
- The control panel , electronic module, programmer, various sensors, starting capacitors, light bulbs and other radio components are elements that together consume no more than 5 - 10 Watts.
In turn, they will consume the amount of energy corresponding to the choice of washing program.
The programmed modes differ from each other in temperature, washing duration, intensity, number of drum revolutions during washing and spinning, additional options (number of rinses, etc.).
Affects power consumption and weight of loaded items and fabric types.
Power determination
- You can determine how many kilowatts of electricity your machine will consume based on its technical specifications. They are located on the case sticker or in the manual manual.
- A household appliances consultant can explain your questions in detail.
- You can also find out the power by the letter marking of the washing machine of a particular model. It is indicated on the EU energy efficiency label - DIRECTIVE 2009/125/EC, indicating the basic consumer properties of the product.
In this video, you will be told a lot of useful information about energy consumption, including for washing machines. Enjoy your viewing!
How to make a good smokehouse from a washing machine drum
The icing on the cake in our matter is the smokehouse. Fragrant smoked meat, lard and fish - what could be better for the table? If you have a tank from a top-loading machine lying around in your shed or garage, consider it a done deal.
It is necessary to cut a hole in the bottom of the tank for the firebox, and weld fasteners inside for hanging food. All that remains is to install the tank on the fireplace, hang the fish or lard, cover the top of the tank with a lid and light the sawdust.
Products need to be smoked for several hours until cooked
It is important that the fuel under the smokehouse smolders and does not burn. It is better to place such a device away from home.
Important! You'll have to keep an eye on this smokehouse. It should not be left for a long time, the fire may flare up, and instead of a smoked product you will get a burnt product.
We hope we have convinced you that you should not scrap your old washing machine.
You can make so many useful things for your home from its parts! If you have experience in making such homemade products or can suggest something tonal - write in the comments!
Washing machine in the Soviet Union - emergence and evolution
Washing machines today are an everyday item, and now women, and men too, cannot imagine how they managed without this device before, when these home appliances did not exist.
The evolution of washing machines
Now it is almost impossible to imagine hand washing, and only very elderly people can remember how and where they washed sixty years ago. In the USSR, washing machines began to be produced almost half a century later than in America.
A short excursion into the past
A patent for the unit, called the “electric washerwoman,” was issued in 1910 to engineer A. Fisher from the USA. From that moment on, the replacement of hand washing with machine washing began. When did the first washing machines appear in the USSR?
Drawing of the first washing machine by A. Fisher
The country had not yet produced its own cars, nor did they arrive from abroad. And only a few nomenklatura ranks, while on official business trips abroad, brought from there this miracle of imperialist technology.
The first washing machines were imported into the USSR in 1925. Soviet and party bosses meticulously chose washing machines. The cost did not bother them; the technical characteristics were of secondary interest.
They were mainly interested in appearance. It was extremely important that the car looked like a piece of furniture, and not like some kind of unit, and that it fit organically into the existing interior, if not a living room, then at least a kitchen.
The leadership of the relevant ministries did not get around to starting domestic production in the country. That’s why ordinary Soviet women suffered with washboards and rubles while the nomenklatura washed their things in expensive imported machines. And only in the post-war period, in the fifties, domestic washing machines appeared in the country.
The first domestic washing machines
In 1950, the Riga Electromechanical Plant was the first to start producing washing units. The plant’s specialists developed and launched into production washing machines “EAYA-2” and “EAYA-3”. To attract buyers, these devices were sold for only 600 rubles, although each copy cost the plant one and a half thousand.
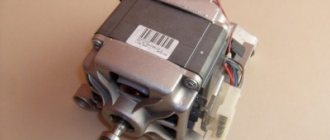
The device of the commutator electric motor of an automatic washing machine
The appearance of motors of different models may differ, but the design and operating principle are almost identical. The device consists of:
- housings;
- starter;
- starter coils (shoes) with two or three terminals;
- anchors;
- pulley;
- two brushes;
- collector;
- tachometer (with two or three wires);
- terminal block.
To connect the motor, you need to know the outputs of the armature, starter and tachometer windings. A tester will help you avoid getting tangled in wires.
Easy motor connection
Set the tester to the mode of least resistance and call the windings of the tachometer, coils and armature. Make connections through terminals that communicate with each other. A correctly connected device picks up speed smoothly, does not crackle or spark. You can check how many revolutions the motor makes using a speed sensor.
A visual step-by-step implementation can be seen in this video:
Connection and launch
When dismantling the electric motor from the washing unit, it is recommended to make special marks on all its wires. These steps will help you connect the motor directly to the electrical network in the future (this is especially true for asynchronous electric motors from old washing units, which require connecting starting capacitors). Other types of motors also have their own characteristics.
Therefore, to correctly connect each type of electric motor, it is best to search for information on the Internet or use special reference books for this. And if during dismantling all contacts were marked, then starting the motor from the washing device will not be difficult. To do this, you just need to follow the instructions for connecting a certain type of engine to the network and adhere to safety rules.
How to adjust rotation
There are many ways to control speed:
- laboratory autotransformer;
- adjustment board for household appliances;
- screwdriver buttons, grinders;
- lighting regulators (switches, toggle switches).
The adjustment scheme is simple, you can do it yourself.
This is a satisfactory option for a pump or fan. For more powerful mechanisms (for example, machine tools), a different regulator circuit will be needed.
The essence of the question is how to reduce speed without losing performance? The connection is made through a tachogenerator, which transmits the number of turns to the speed controller microcircuit, which coordinates the cycle using a thyristor.
Such a board allows you to either increase or decrease the speed, but requires constant, intensive cooling due to overheating. A detailed video about how the speed and power of the stroke are regulated by connecting to the microcircuit can be viewed here:
Now you know what speed different types of engines make and how to set up this process in your home workshop. Good luck!
Source
Washing machine motor type
To understand how to connect the motor, first find out what type of motor was used in the old washer. If this is Soviet-era technology, asynchronous motors were installed there. Their design consists of a minimum of elements:
- aluminum body;
- stationary stator;
- rotating rotor.
The stator in the structure serves as a support and also as a magnetic circuit. The moving rotor is responsible for rotating the drum. When turned on, the magnetic fields of these elements interact, which leads to rotation of the shaft and transmission of torque to the drive belt.
Asynchronous motors are divided into two types: two-phase and three-phase. The production of two-phase ones has long ceased, so most often you can find a device that operates on three phases. Its advantages include:
- simple design and easy maintenance;
- quiet operation;
- low cost.
Disadvantages include low efficiency (efficiency), large dimensions and low power.
A modern automatic washing machine (AWA) uses commutator and inverter motors, but in this publication we will talk about the asynchronous type.
How to connect the motor from the washing machine?
To successfully carry out the work yourself, consider the connection features:
- The motor is connected to a 220 V network.
- This does not require a starting winding or a capacitor. The latter may burn the device upon startup.
The asynchronous motor is connected directly to the network via a socket.
How to correctly determine the purpose of the wires? A multimeter in resistance measurement mode will help with this. Four wires come from the node: two of them from the starting winding, two from the working winding.
How is diagnosis carried out:
- Apply multimeter probes to the wires one at a time.
- Look for a pair with the same values.
- Starting wires have high performance (up to 30 ohms). And for the working value they barely reach 12 ohms.
Having identified the working conductors, connect them to the cable and socket. Additionally, prepare a start button for easy starting of the structure. A button from a doorbell, the contact of which is not fixed, is suitable. The diagram shows the connection steps:
- PO - starting winding. Used before the engine starts rotating.
- OV - working winding. Serves to create torque.
- SB - voltage supply button.
Pressing the button activates the unit. Without a starting part, the motor will start when plugged into an outlet, which is not very convenient. After finishing work, be sure to secure the engine on a stable surface. You can even attach it to a new car if its motor is broken. For DIY fastening, use bolts or dowels.
Pay attention to the direction of rotation of the shaft. If it turns clockwise but you need it to work counterclockwise, reconnect. It is not difficult. Just swap the starting winding leads.
Don't rush to get rid of old equipment. So, you can connect the motor yourself and use it for practical purposes. The video shows in detail the connection steps: