Why do we need to know the structure of a Bosch washing machine? The answer to this question is obvious - to be able to repair it. After all, by studying the structure of a particular model of washing machine, we learn to disassemble it, learn about its strengths and weaknesses and, in the end, having gained experience, we will be able not only to repair any failed unit, but also to give recommendations to the user regarding its features operation of a Bosch brand home assistant. Let's study the design of washing machines of this brand together.
Main nodes
This device has many parts that belong to the following groups:
- Those parts that relate to the control panel.
- Various parts of the body.
- Electrical devices, tank and drum.
- Hydraulics.
In the future, each of them will be considered separately.
Control
A group of parts for controlling the operation of a Bosch washing machine consists of the following parts:
- The housing panel, which has a recess for the powder receiver and space for indicators, keys and control panel knobs.
- In order to make it convenient to use the controls, they are provided with an overhead panel with holes for them, on which there are explanatory inscriptions.
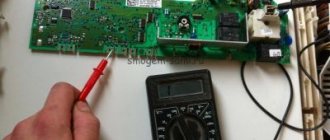
- The heart of the control board of a washing machine is a microcircuit that is installed using special fasteners.
- In order to provide power supply, a network capacitor is used. A special protective casing is provided for it.
- Power cord for washing machine.
- There is also an external panel for receiving powder.
- Since laundry may require different washing algorithms, a mode switch is needed. It is located on the control panel, and its internal mechanism is located under its surface.
In different models of Bosch machines, the composition and arrangement of elements may vary.
SAFETY
1.1. Safety signs
The following pictograms are used in the repair instructions:
| DANGER! Repairs must only be carried out by a qualified electrician! The user may be injured as a result of incorrect repairs! |
| WARNING! |
| Sharp edges: Wear protective gloves. |
| The component is sensitive to static electricity! Please follow the instructions for working with such components. |
1.2. Electrical safety rules
To avoid electrical shock, always follow these instructions:
- If the device is faulty, the housing or frame may be live!
- There may be a risk of electric shock if live components touch metal parts inside the machine! Before starting repair work, disconnect the machine from the electrical network!
- If tests must be carried out while the machine is running while live, always use a differential circuit breaker in such cases!
- The resistance of the protective grounding conductor must not exceed the values specified in the standard! The protective conductor is critical for personal safety and machine function.
- After completing the repair, carry out an inspection in accordance with VDE 0701 or relevant national regulations!
- After completion of the repair, perform a functional check and a leak test.
Please follow these instructions:
- When testing in accordance with VDE 0701 via connector, the heater must be tested for insulation damage to the housing after disconnecting all connectors (relay, pressure switch) and the differential leakage current must be measured on the device!
- When replacing the distributor and drain pump, beware of sharp edges in stainless steel areas.
- Before starting repair work, you should always disconnect the machine from the power source! If tests must be carried out while the machine is running while live, always use a differential circuit breaker in such cases!
Frame
All Bosch models have 28 parts in it. Their arrangement is the same in all cases, making it easy to disassemble these devices without the use of special tools.
This group of parts includes:
- Top cover of the washing machine.
- Intake valve cover.
- Cover for the service hatch.
- Special mount for inlet hose.
- Right transport bolt.
- Left transport bolt.
- The right, left and rear walls of the machine connected together are considered as a single element.
- A key that is used to adjust the height of the machine legs. They can be installed at a certain height, ensuring the correct position of the Bosch washing machine even if it is installed on an insufficiently level floor.
- A tray that is designed to protect against water leaks. The Bosch automatic washing machine uses the Aquastop protection system. There is a sensor on the pan that is triggered if water gets there.
- Legs designed in such a way that their height can be adjusted. To do this, they have a thread that makes it possible to tighten or unscrew them.
- Lower short front panel.
- Lower front extended panel.
- Fastening element for the front panel.
- A loop for the hatch through which laundry is loaded for washing.
- A clamp that is a fastening element of the cuff.
- Base for manhole cover.
- Glass part of the hatch window.
- This is a decorative outer hatch panel.
- Mounting pins that fix the position of the hatch.
- A handle that can be used to close the hatch through which laundry is loaded.
- The mechanism that ensures the operation of the device that locks the hatch. If it malfunctions, it will be impossible to lock the hatch in the closed position.
- Bushings that hold the hatch.
- Front wall of the washing machine.
- Fastening elements for holding the front panel.
- A device designed to lock a hatch.
- Upper spacer bar.
- Bottom spacer bar.
- Latches that are designed to fix the top panel of the Bosch washing machine.
The design of the washing machine is such that disassembly does not require special tools or special skills. In Bosch max 4 machines the body depth is 40 cm, while in other models it is larger - 60 cm.
Bosch washing machine under warranty: what to do?
If a machine whose control board has broken is under warranty, then with a high degree of probability the cause of the malfunction is a manufacturing defect. The manufacturer Bosch provides a 1-year warranty on its household appliances.
To receive service, you must have a standard nameplate on the device. The manufacturer considers its removal as depersonalization of the equipment and a violation of the rules of use.
If a breakdown is detected, you must contact a retail outlet or a Bosch service center. You must have proof of purchase with you in the form of a check or receipt. They are needed to confirm the date of purchase of household appliances.
The service center is required to repair or replace the faulty control board free of charge during the entire warranty period. In this case, the consumer must be provided with a certificate stating that the machine was sent for diagnostics and repair. It states the date and time of the request, and also indicates the client’s complaints.
The manufacturer may refuse service in the following cases:
the machine was opened and an attempt was made to repair it outside the service center;- it will be proven that the cause of the breakdown is a violation of the rules for transporting equipment;
- the manufacturer finds out that the malfunction occurred due to the user’s fault, due to improper handling of the device or for some other reason;
- the board has burned out or been damaged by rodents and insects;
- The malfunction occurred due to instability of the power grid parameters.
If the consumer does not agree with the refusal of warranty repairs, he needs to order an independent examination and go to court with its results.
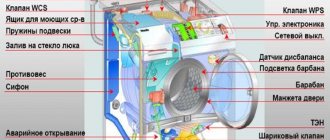
Tank, drum and electrics
The main working parts of any such machine are the tank and the drum, as well as the electrics, which will ensure the operation of the washing machine in various modes. Bosch devices use the following parts:
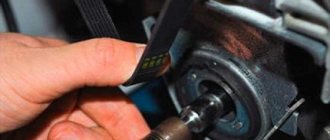
- A bolt that is designed to secure the drum pulley.
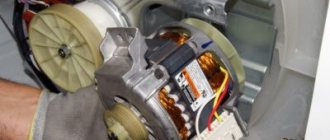
- The large drum pulley is designed to transmit the rotation from the electric motor to the drum.
- The back wall of the tank where laundry was loaded.
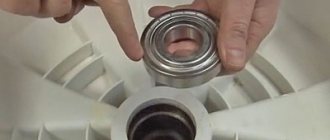
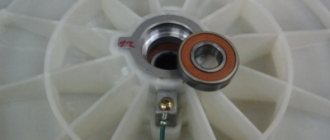
- Bearings that allow the drum to rotate.
- The drive belt connects the axle, which is rotated by the motor, and a pulley attached to the drum.
- A stopper that stops the drum.
- A metal drum together with a special cross with a bushing.
- Large rubber seal for the tank.
- Counterweight.
- The mechanism by which a counterweight is attached.
- Bolts that provide reliable fastening of the washing machine motor.
- Front engine mounts.
- An electric motor that rotates the tank.
- Electric motor brushes.
- Rear engine mounts.
- Stands for mounting the tank. They are designed for shock absorption, which dampens the rocking of the machine, which can occur due to the rapid rotation of the drum.
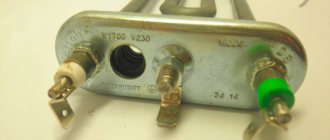
- A mechanism designed to fix the heating element.
- An element that heats water to the desired temperature.
- Thermistor is a temperature sensor, based on the data of which water heating is controlled.
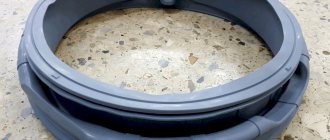
- A clamp that is designed to secure the cuff.
- Rubber cuff of the hatch.
- Thin rubber gasket.
- Front counterweight-stabilizer.
- Front of the tank.
- Springs that are designed to hang the tank.
The listed details related to this group are not complete. Here it is necessary to add various connecting wires and terminals that ensure the operation of the electrical system of the Bosch machine.
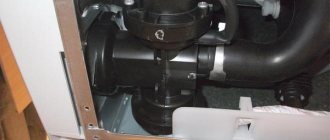
Hydraulic system
This system is used to ensure that water enters the washing machine and waste water is drained. In addition, one of the tasks of hydraulics is to ensure the flow of washing powder and stir it. It also provides direct washing and rinsing of laundry.
The hydraulic system includes the following parts:
- Twin water inlet valve.
- Tube for powder distributor.
- Cover for powder receptacle.
- A special mesh filter for the water entering the machine. It prevents dirt and small stones from getting into the tank.
- A hose through which water from the plumbing system flows into the washing machine.
- Flow-through mesh filter, which is located between the water supply and the inlet hose.
- A mount that is designed to hold the hose through which water is supplied to the machine.
- A straight pipe through which water enters the cuvette, where mixing with the powder occurs.
- A niche for the container, where the powder and water enter, are mixed and transferred to the tank.
- A cuvette where the powder is mixed with water.
- Drain pipe clamp.
- Large mixer pipe.
- Clamp for the drain pipe.
- A ball that acts as a float to prevent water from flowing out during washing.
- A hose through which waste water is drained after washing.
- Large drain pipe.
- Air adapter. Used to operate the pressure sensor.
- A large tube that is part of a pressure switch.
- A pressure switch is a sensor designed to measure pressure.
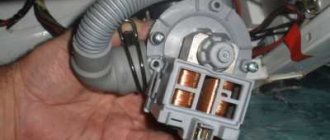
- Drain pump. It consists of several parts. Ensures that water is drained from this device.
- A filter that traps debris that should have come out along with waste water. It can trap loose buttons, contents left in the pockets of washed clothing, and other similar small items.
- Plastic pump housing.
- Rubber gasket.
- A long pipe through which water drains.
- Fasteners designed to fix the pipe.
- Fastening for fixing the outlet of the pipe.
Design Features
One of the important features of Bosch machines is that its design is carefully thought out. During the design, the accumulated experience was taken into account and everything was done to ensure that the machines operated reliably and did not present difficulties during repair. One example of such models is Bosch max 5.
There are no overly complex parts in the design. With only a Phillips screwdriver and wrenches of the required sizes, you can almost completely disassemble the washing machine.
Another feature of devices of this brand is a durable hatch through which laundry is loaded. This chrome sunroof has double glass. It is almost impossible to accidentally damage it.
Bosch machines have friction shock absorbers that dampen machine vibration.
Service test of Bosch Maxx4 washing machines
For diagnostics, you can run a service check of nodes:
1. program control knob to the “OFF” position (0)
2.simultaneously press two additional function buttons
3. program selection selector to clap position 30 degrees, the work and program end LEDs light up
4.select the element to be tested using the selector clockwise:
- cotton washing 60 degrees (checking the electric motor) - cotton washing 60 degrees economical (drain pump) - cotton 90 degrees (water intake, maximum heating with heating element) - rinsing (valve check, preliminary and main wash) - spinning (main wash valve) - drain (pre-valve)
5.to start, press the “start” button
If a malfunction is detected, an error code is indicated.
In this article we will tell you how to repair Bosch washing machines yourself. Find out how to fix minor and moderate damage without calling in a professional.
Bosch washing machines attract attention and deserve the respect of customers due to their high quality and abundance of innovative technologies. The German assembly fully justifies the price of such washing machines - high-quality materials are used in production, and the developers give preference to ergonomic shapes. But even with the highest quality equipment, breakdowns are not excluded.