A bearing is one of the elements of the internal structure of a washing machine that can withstand enormous loads during the process of washing, rinsing and spinning clothes.
Over time, the bearing wears out, which is indicated by grinding, knocking and strong vibration of the washing machine body.
Further operation of the household appliance in this condition is impossible. Otherwise, there is a high risk of even more serious breakdowns requiring lengthy, expensive repairs.
We will talk about replacing the bearing in an Electrolux washing machine below.
When does it need to be replaced?
Creaking, grinding, knocking and strong vibration of the washing machine during washing, rinsing and especially spinning are clear signs that the bearing requires replacement.
Another symptom for which repair work can already be planned is drum play. If, during manual rotation, the drum swings sharply from side to side, the bearing must be changed.
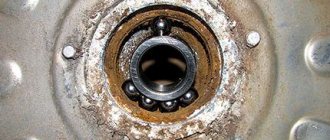
The assumptions about bearing wear will be finally confirmed by oily smudges and stains that can be detected when disassembling the washing machine on the inner surface of the rear panel.
How to change it yourself?
Replacing bearings in an Electrolux washing machine is a rather lengthy process that requires attention and accuracy . In order for the work to proceed as quickly as possible, and the result to please you with its quality, it is important to assemble the necessary tools in advance and prepare the washing machine for repair.
Preparation
Before starting the disassembly process with the subsequent replacement of bearings, the household appliance must be disconnected from the electricity network, sewerage and water supply, and moved away from the wall (nothing should interfere with free access to the washing machine).
High-quality repairs are impossible without:
- screwdrivers (all types),
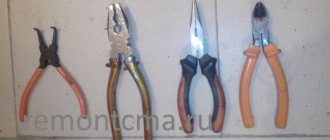
- pliers,
- hammer (preferably rubber),
- socket heads,
- sealant and WD-40 (makes the process of dismantling soured parts and fasteners as easy as possible).
Disassembling the case
For those who disassemble the Electrolux washing machine with their own hands for the first time, some design features of the case may come as a surprise. The thing is that the body of the washing machine consists of two parts, connected to each other in the center of the side part.
In order to get to the bearings and carry out the necessary repair work, it is enough to remove only one, the back half of the washing machine body.
Algorithm of actions:
- Unscrew the bolts securing the top panel from the back side and remove the cover from the body;
- unscrew the bolts securing the rear panel (located at the bottom of the case);
- bend the plastic latches and unscrew the bolts securing the side panels (located in the lower and upper parts of the case);
- using a slotted screwdriver, remove the plugs and unscrew the fixing bolts located along the line of connection between the two parts of the washing machine body;
- Unscrew the bolts holding the wide cross beam connecting the two halves of the body.
Once the cross support beam is removed, the rear section easily slides away to expose the drum.
How to remove and disassemble the drum?
In order to get to the bearings, the drum must be removed and disassembled.
Algorithm of actions:
- Rotate the shaft by hand and remove the drive belt.
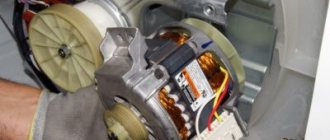
- Unscrew the bolts securing the motor, disconnect the wiring, carefully move the motor away from you, and remove it from the body of the washing machine.
- Disconnect the contacts of the heating element, unscrew the nut and push through the central bolt. Using gentle rocking movements, remove the heating element from its seat.
Unclench the drain hose clamp and disconnect the pipe.
Remove the wiring from the drain pump, unscrew the fastening element, carefully turning it clockwise, and remove the part from the washing machine body.- After unscrewing the central lock, remove the counterweight from the housing.
- Using pliers, carefully pull out the pin holding the shock absorbers.
- Separating the tube from the pressure switch, remove the water pressure sensor.
- In the upper part of the body, loosen the clamp and disconnect the water supply pipe.
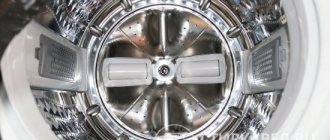
- The hatch door is opened from the front side of the body. Pull back the cuff and remove the clamp. The rubber cuff is inserted into the drum of the washing machine.
- Carefully lift the tank, remove it from the springs, and then remove it from the washing machine body.
To get to the bearings, place the tank on a flat surface and, armed with screwdrivers, pliers, keys, begin disassembling:
- dismantle the pulley - to do this, block the wheel with a wooden block and, using a star screwdriver, unscrew the central bolt;
- Unscrew the bolts securing the two halves of the collapsible tank of the Electrolux washing machine.
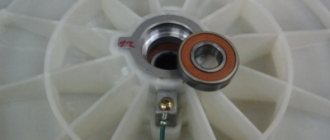
That's all, the disassembly process is over, the tank is divided into two parts, one of which provides access to the bearings.
Dismantling and replacing bearings
Strict adherence to a certain sequence of actions for replacing bearings will help carry out repair work as quickly and efficiently as possible:
- Work begins from the inside of the tank. First of all, using a flat screwdriver, remove the worn rubber ring (seal).
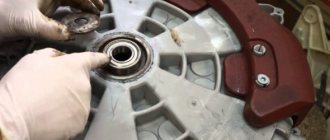
- The opened bearing seat is filled with WD-40 liquid (facilitates the process of dismantling the old soured part).
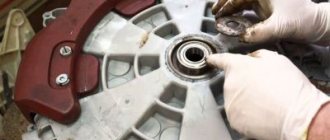
- Turning the tank over to the outside, place a chisel on the edge of the metal ring, which is lightly tapped with a rubber mallet (thus knocking the bearing out of its seat). To maintain the integrity of the bearing seat, you need to knock exactly along the contour of the metal ring.
- Clean the seat from the layer of scale and dirt (sandpaper will come to the rescue), and then lubricate the surfaces with lubricant (Lithol).
- The new bearing is carefully inserted into the prepared seat (it is important to ensure that the part fits evenly, without distortions).
- Lightly tap the outer edge with a rubber hammer to drive the new bearing into the seat.
- The bearing is covered with a new oil seal on the inner surface of the tank.
Once the new bearing is installed, you can proceed to the reassembly process and check the quality of the work done.
Reassembly and inspection
The reverse assembly process follows the following algorithm:
the two halves of the collapsible tank are connected and fixed with bolts (the seams are first coated with sealant);- return the pulley to its original place, fix it in the center with a bolt;
- the tank is suspended on springs in the upper part of the body, after which shock absorbers are attached;
- connect the drain hose and pipes, fix the counterweight;
- the cuff is returned to its original place and secured with a clamp;
- install the motor, drain pump and heating element, connect the corresponding contacts;
- connect the pulley wheel to the engine with a drive belt (you must ensure that the belt fits exactly in the center of the pulley);
- connect the two parts of the washing machine body, return the lid of the household appliance to its original place (all connections are fixed with fasteners).
After the reassembly process is completed, the washing machine is connected to the water supply, sewerage and electricity systems. The test wash starts.
If no extraneous, very loud sounds are heard during the process, and there are no leaks, we can assume that the repair work has been successfully completed.
Electrolux will tell you about replacing bearings in a washing machine in this video:
Preparing for work
Before you begin replacing the drum bearings, it is worth carrying out a number of preparatory steps. Good preparation contributes to faster, and most importantly high-quality, completion of work.
First, you need to take care of the necessary equipment. What you will need:
- hammer, the striking part of which is covered with bronze,
- lubricating fluid, such as WD-40,
- pliers,
- two screwdrivers (phillips, flat),
- medium size adjustable wrench,
- set of sockets and open-end wrenches,
- automotive sealant,
- metal rod 30-40 cm long.
Secondly, you should take care of purchasing new parts: the damaged component and the oil seal. This can be done via the Internet in an online store or specialized center. To buy the necessary components, you need to know the series of the existing lg direct drive machine. As a rule, such data can be found in the technical data sheet of the device. When purchasing in a specialized store, you can use the help of a consultant. He will not only help you select the necessary components, but will also offer assistance with repairs. But you can also choose it yourself.
It is not recommended to take risks by purchasing components that are not intended for this category of equipment. In the best case, after a short period of time the entire algorithm will have to be repeated again. And this is not 10-15 minutes of time. If you have no experience with such an event, there is a risk of carrying around all day.
Original parts cost about 250-350 rubles, an oil seal costs about 300 rubles.
It should not be forgotten that different machine models may have different components installed. Therefore, you need to know what model of machine is available and what components are there.
Thirdly, you need to prepare your workspace. Of course, it is better to move the repair work to an equipped workshop or garage. If this is not possible, replacing the drum bearings can be done in an ordinary apartment. One condition is to free up more space in order to comfortably perform all the necessary manipulations.
Differences for Electrolux top-loading washing machines
The design of the top-loading washer tank consists of two side walls (to which the drum is attached) and an open hatch in the upper part (through which access to the flaps and drum locking is available).
Since the drum is mounted on two supports, two sets of bearings must be replaced. Algorithm of actions:
- Using a flat-head screwdriver, pry up the control panel on both sides and remove it from the washing machine body. Having previously recorded the connection diagram in the photo, remove the terminals from the connectors.
- Dismantle the rubber hoses and remove the fill valve.
- Unscrew the fasteners and remove the side panels.
After unscrewing the fixing elements, remove the front panel.- The bearing on the side where there is no pulley is replaced first.
To do this, remove the caliper (bearings and oil seal enclosed in the housing), clean the seat from dirt, and screw in a new bearing assembly. The supports on top-loading washing machines have different thread directions. On the side where the pulley is missing, the thread is right-handed (unscrews counterclockwise). On the reverse side there is a caliper with a left-hand thread (unscrews clockwise). - The second thing to replace is the caliper on the engine side. To do this, remove the drive belt, unscrew the central bolt holding the pulley, and then dismantle the grounding pads and caliper. The new bearing assembly is installed on the cleaned seat.
After the bearings have been replaced, the washing machine is reassembled in the reverse order, connected to the electricity, water supply and sewerage networks, and a test wash is started.
What is it and why change it?
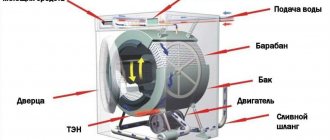
An inexperienced person may not pay due attention to such an important detail as a bearing, because it is practically invisible in the design of the equipment. During a visual inspection, we see a drum, valves, tubes and a pump
As a rule, it is with these parts that the “audit” of breakdowns begins. It is the bearings that determine the quality of the hidden structures.
It is not difficult to determine the degree of wear on your own. Such a breakdown can be determined by ear. There are some malfunctions in the operation of the unit: in the “spin” mode, the machine begins to knock heavily, rattle and vibrate.
The check can also be carried out visually by alternately pressing the top and bottom of the drum. If play is detected, we can safely say that it is time to change the bearing.
Ignoring the breakdown and postponing repairs, the matter will end with the worn part damaging the bushing on the axis of the drum cross. And this risks replacing the entire crosspiece. Such repairs cost much more than replacing a bearing.
There may also be such a development of events: water may leak from under a worn bearing. And it, in turn, will fall on the heating element - and as a result, the module will short-circuit. Then this machine can only be taken for recycling.
READ ALSO: Washing machine with sink included: advantages and disadvantages
Experts recommend changing this part after a certain time interval, regardless of the condition they are in at the moment. Water causes considerable harm to this element. When it is in good condition, it does not come into contact with the liquid environment.
Corrosion is inevitable only as a result of leakage. A hole appears in the oil seal. By the way, it also needs to be changed without waiting for a breakdown (experts advise doing this after 4–5 years of using the machine).
If your immediate plans include replacing bearings, you should not forget about updating the oil seal. The service life of the bearing and oil seal must be the same. Otherwise, the failure of one part will lead to the failure of another.
Where and at what price can I buy a new part?
When buying a new set of bearings for an Electrolux washing machine, it is important to pay attention to the main technical characteristics of the selected part . The new bearing must match all the parameters of the dismantled element.
In order not to make a mistake with your choice, it is enough to inform the seller (or online store manager) of the markings of the old part (laser-applied on the metal surface of the bearing).
The price of a bearing for an Electrolux washing machine starts from 500 rubles. It is better to buy original parts, the quality of which is confirmed by relevant certificates and a manufacturer’s warranty.
If it is not possible to see the markings on the dismantled bearing, the required part is selected using the serial number of the washing machine (indicated in the warranty card).
Possible difficulties
During the process of dismantling the pulley, an unpleasant situation may arise when the central bolt, covered with scale and rust, cannot be unscrewed.
Treating the soured part with WD-40 makes the tedious process of disassembling the washer easier.
Electrolux washing machines most often have double-row bearings of the BA2B type. Such bearings are secured with a retaining ring, which must be removed before the seat is knocked out.
In a single row bearing design there is no retaining ring. Another single row bearing takes its place. Difficulties may arise at the stage of dismantling the structure of two single-row bearings. The following rule will help you avoid problems: the outer bearing is removed first, the inner bearing second.
Washing machine malfunctions
The most common malfunctions of Electrolux washing machines are:
- Water heating does not work.
- The Electrolux machine does not fill with water.
- The drain does not function.
- The rinse program does not run.
- Spin does not work.
- No powder is collected.
- The equipment does not turn on.
- Knocks out the machine gun.
These are the most common faults; in fact, there are many more of them. To solve some of them, for example, to replace a pressure switch, only partial disassembly of the device is necessary. Others will require more serious work to eliminate. So, to replace the bearings, in addition to the housing, it is necessary to disassemble the tank.
Cost of repairman services
Replacing bearings is a labor-intensive process that requires not only time, but also certain knowledge and skills. Professional craftsmen will quickly and efficiently replace bearings in an Electrolux washing machine at the client’s home.
Calling a specialist is not difficult. There are enough contacts on the Internet, both service providers and individuals involved in the repair of washing machines. When submitting an application, you must specify the model and brand of the washing machine and describe the problem.
The technician will provide more accurate information about the cost of repair work only after diagnosing the malfunction during a visual inspection of household appliances.
The cost of services for replacing a bearing on an Electrolux washing machine starts from 1,200 rubles. Depending on the urgency of the order and the complexity of disassembling the washing machine, the final amount payable may increase.
An agreement will help protect yourself from fraudulent actions on the part of the master , which must include: information about the master and the service department providing the service, a full list of works with a detailed breakdown of the amounts to be paid, deadlines for repairs, guarantees for the work performed.
Washing machine malfunctions
The most common malfunctions of Electrolux washing machines are:
- Water heating does not work.
- The Electrolux machine does not fill with water.
- The drain does not function.
- The rinse program does not run.
- Spin does not work.
- No powder is collected.
- The equipment does not turn on.
- Knocks out the machine gun.
These are the most common faults; in fact, there are many more of them. To solve some of them, for example, to replace a pressure switch, only partial disassembly of the device is necessary. Others will require more serious work to eliminate. So, to replace the bearings, in addition to the housing, it is necessary to disassemble the tank.