Professional repair of Samsung washing machines at home is required when identifying breakdowns of household appliances. Korean-made products are not immune to malfunctions, despite the high quality and reliability of equipment from this brand. Our service center engineers will repair washing machines of any model, offer low prices for their services and provide a guarantee on work and parts.
Over the course of many years of repairing Samsung washing machines, TekhRemByt specialists have gained extensive experience and are fluent in the methods of diagnosing and eliminating any, including hidden, breakdowns. The company's specialists will equally successfully replace the rubber seal of the drum, restore the performance of the power unit, replace a burnt-out heating element, and clear a blockage in the hoses or filter element. The cost of work performed and installed spare parts will pleasantly surprise equipment owners.
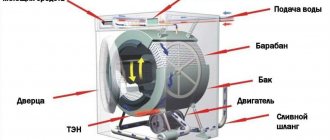
Samsung washing machine device
Let's get acquainted with the structure of a washing machine using the example of the well-known Sensor Quick model. Main front elements of the model:
- removable front panel;
- distribution hopper for powder and special products;
- control Panel;
- electric valves;
- level relay;
- laundry tank;
- adjustable stand legs;
- drain pump with filter;
- drain hose;
- drain hose plug.
Rear elements:
- power cable;
- counterweights;
- tank suspension springs;
- shock absorber;
- engine;
- pulley with drive belt.
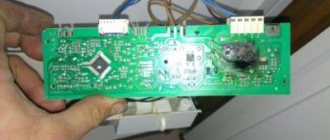
The control panel is a board with buttons and indications that turn on the washing mode, change the temperature, spin speed, washing time, and delay start. It is also possible to manually set all these parameters with the “Manual program setting” button. The display shows the current washing status and error codes.
How to disassemble a Samsung machine yourself?
Instructions for disassembling a Samsung washing machine:
Remove the cover.- Remove and distribute for detergents.
- Remove the control module.
- Remove the service panel.
- Remove counterweights.
- Dismantle the heating element.
- Remove the belt.
- Detach the center and rear panels.
- Remove the tank with the drum, disconnecting it from the springs.
- Remove the bottom cover and unscrew the motor with counterweight.
The wires must be disconnected carefully, being careful not to damage them. It is better to record the entire disassembly process on camera so as not to get confused during subsequent installation. Detailed instructions for disassembly are here.
Problems
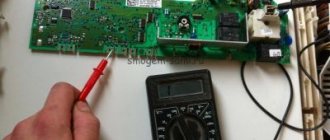
If the Samsung washing machine does not work, the buzzer sounds when there is a malfunction. Then the light flashes at intervals of 0.5 seconds and an error code is displayed. The engine and associated components are temporarily disabled. The fault code can be read in the instructions. You can also enter the washing machine into testing mode by turning on the “ON” button while simultaneously holding down the “1” and “2” keys. After pressing “3” testing and diagnostics begin.
Doesn't turn on
Several elements are checked step by step:
- availability of power supply in the network;
- cable integrity;
- contacts of the noise filter control board;
- fuse;
- output voltage of the power transformer.
If everything works, the problem is in the control board.
Doesn't pump out water
A drain fault is highlighted by indication E2. Turns on if, when an imbalance is detected, the carrier frequency is less than or equal to 25.3 kHz. To reset the error, turn off the washing machine and turn it on again.
To eliminate this, check for kinks in the drain hose, clogged filter, and integrity of the drain pump motor. If everything is normal, change the control board.
No heating
Error E5, E6. The message appears when the water heats up too quickly or too slowly. Check the heating element for serviceability - 20.5-21.5 Ohms. If everything is in order, then change the control board.
Doesn't take up water
A water supply malfunction is indicated by code E1. It turns on if, during flooding, the change in the carrier frequency of the level sensor is less than 50 Hz, or the specified level is not reached within 20 minutes.
They check whether the water is open, whether the machine is paused, the contacts on the EC, the operability of the coil, and clean the contacts of the level relay. If everything is normal, the problem is in the control board.
The drive belt is worn out
When there is a malfunction, increased noise is heard. Check the integrity and tension of the drive belt and remove the shipping fasteners. It is also necessary to make sure that the washing unit is stable.
It's buzzing a lot
A humming sound during the spin cycle may indicate the “end” of the bearings or drum cross. To identify the error, shake the drum from side to side with your hands and twist it. A humming or crunching noise means the bearings are faulty. Strong imbalance of the tank - cross.
Stops during a cycle
The most common problem is turning off the water or electricity supply. When resumed, the machine will continue washing. The following reasons are engine malfunction, heating element failure.
Stuck on rinsing can be due to various blockages.
Other typical errors that cause a stop:
- heavy weight of laundry, improper styling;
- problems with electronics;
- activation of leakage protection;
- the loading hatch door is open.
Read the instructions carefully and ensure that the wiring is in good condition.
The drum does not spin
Check the correct installation and integrity of the belt, the presence of power supply, the integrity of the rotor windings, the generator, and the stator. Inspect the fuse. If everything is working, the problem is in the control board.
The door does not open
Perhaps the machine did not finish washing and there is water left in it. Or the hatch door lock does not work. Several solutions to the problem:
- wait 3-5 minutes after finishing washing;
- run “Spin” or “Drain” to remove water, then try again;
- Unplug from the socket and drain the water in an emergency.
If the door still does not open, contact service.
Broken circuit
The control module fails for several main reasons:
- wiring burns out;
- tracks and semistores burn out during a power surge;
- the board oxidizes when exposed to moisture;
- the cable breaks.
In general, if it is clear that the problem is in the circuit, then the control board is replaced or repaired.
Service
Our employees have sufficient experience and knowledge to professionally repair Samsung equipment. All maintenance and restoration operations of equipment are performed inexpensively. Engineers will repair equipment using original spare parts or high-quality analogues.
The service center also accepts requests to eliminate breakdowns of dishwashers, refrigerators, and other large household appliances. You can call a specialist at a convenient time by phone, on the company’s website, or during a personal visit to the office. Most repairs are successfully completed on the first visit of our engineer.
DIY repair
Repairing high-tech equipment is expensive. You can pay more than a thousand rubles just for a visit and troubleshooting. However, fatal malfunctions are rare. If you identify them correctly, you can do the repairs yourself. Modern block diagrams of equipment allow this - the main thing is to correctly diagnose the malfunction.
Replacing bearings
To replace the bearings, remove the front panel with the hatch and cuff. We pull off the cover from the plastic capsule of the drum, unscrewing the screws. The following works with the tank and drum:
- After releasing the tank, unscrew the pulley with a spanner. Let's take it off.
- We knock lightly on the shaft, tightening the bolt until it stops, releasing the bearing.
- We remove the drum.
We pay attention to the shaft wear and bearing stroke. If there is wear and tear, then even installing new bearings and oil seals will not help. If there is no output or it is small, we proceed further.
We pry off the oil seal with pliers. Then we take out the outer bearing and knock it out with a metal rod. To knock out the inner bearing, turn the cover over.
The following bearings are suitable for replacement: 204 for the main bearing, 203 for the internal bearing. Oil seal - 25*50.55*10/12.
The original oil seal is coated in white grease, which extends service life. It is heat resistant and moisture resistant.
The bearing is pressed using the hammering method or a special mandrel. You only need to hit the clip that we are hammering in, and not the lid. Avoid distortion when inserting.
The oil seal can also be knocked out with a hammer, the main thing is not to damage it. It's better to use a mandrel.
Lubricate the bushing on the drum shaft and insert it into the bearings. It should fit in without any effort, without any play. Reassemble in reverse order.
Shock absorber repair
Shock absorbers soften drum vibrations and stabilize it. They seem to be inexpensive, but if you have time, you can restore them yourself. They are installed on opposite sides - for stretching and contracting mechanisms. Effort absorption force – 16-20 kg. For repair:
- open the plug insert that holds the inner rod;
- take an unnecessary piece of leather belt 3 mm thick;
- try it on manually along the hole and increase it by 2-3 mm;
- Using a caliper we measure the seating depth of the liner;
- we reduce the seating depth by the size of the plug, and cut out the remainder of the belt with an overlap of 1 mm to increase the density;
- push the belt inside the tube, block it with a plug, inserting it all the way;
- After lubricating the new bushing, the rod will work tightly, like on a new mechanism.
During operation, it is recommended to drip grease into the existing holes once a year. Regular synthetic motors will do.
Replacing the pump
If after starting the machine the door is blocked and the remaining water does not pour out, the pump has failed. The same malfunction occurs if there is no drainage when setting to “spin”.
To replace the pump, remove the front panel, release the pump hose from the plug, and drain the remaining water into a low container. There is not much of it there - up to a glass. After this, unscrew the lid with the filter. We put the machine on its side - it’s more convenient. To remove the pump:
- loosen the clamps, remove the pipes;
- Unscrew the fastening screws from the front panel;
- remove the chip with wires from the power supply;
- remove the entire assembly with the electric motor, unscrew the motor;
- we adjust, screw on the protection, and assemble in reverse order.
If the electrical connector does not have foolproof protection, be careful. The main thing is to maintain the polarity correctly. After installing the pipes, we twist everything and put on the front panel. Check: fill up with water and turn on the drain. The water will drain.
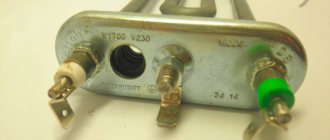
Replacing the heating element
If the water does not heat up as usual, this means that the heating element is not working. It happens that removing the heater is necessary when passing water through the gasket of the heating element. To replace it, disconnect the machine from electricity. We remove the back cover, pull off the plastic connectors from the power wires, and the temperature sensor chip. Using a screwdriver, unscrew the fastening screws of the heating element. Remove the plastic junction box and disconnect the cable.
Now the heating element is right before your eyes: 2 electrical outlets and a mounting bolt with a nut in the middle. We unscrew the nut, press on the bolt, wiggle it slightly by the connectors and the heating element comes out of the socket.
To prevent water from leaking, apply sealant to the gasket and reassemble in reverse order. After assembly, the water should warm up and not leak through the gasket.
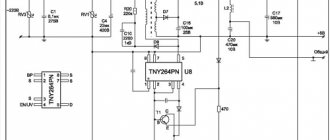
Electronic module repair
You can repair the electrical circuit of a Samsung washing machine yourself. To check the electronic components, we first call the power part. The voltage must come from an external power supply. Now you can get to checking the components:
- We check the power capacitor for capacity. It is more convenient to shake the board out of the case.
- We call diodes, transformer;
- We check the input keys - the cables connecting the board. Because of them, the display may not work.
Cables are a sore point of the equipment. Solder the contacts using a hair dryer or carefully with a soldering iron. All breakdowns are mostly trivial, but take a lot of time. When soldering, it is important to be careful so that the contacts do not intersect.
When connecting the electronic module, do not reverse the polarity of the chips.
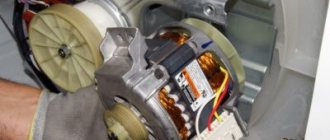
Belt replacement
The belt on all Samsungs changes the same way.
- Unplug the machine.
- First, unscrew the screws from the back cover of the washing machine. They hold the top cover, which cannot be easily removed.
- It is necessary to lightly hit the top of the machine several times towards the back cover with the palm of your hand to displace the upper module.
- Remove the top cover and tilt the washing machine forward.
- To remove the old belt, we help by twisting the drum with the other hand. When a break occurs, remnants of the belt cord remain on the motor shaft and pulley. They need to be removed.
- We insert the new belt into the hole and put it on the engine first. You can help from the bottom side.
- We pull the belt onto one side of the pulley and place it in its groove with rotation.
When purchasing, choose belts in dark colors—they last a long time. After putting on the belt, the drum should rotate together with the motor shaft in 1 plane. If it "writes out eights" - straighten it below on the pulley.
Replacing the drum cross
If the drum is actively playing, and the crunch of a collapsed bearing is not heard, there is no howling, then most likely the drum cross has “flyed”. You can verify this by looking into the hatch from behind. There is no trickle of water, the bearing looks good. Together with the absence of unnecessary sounds, the immobility of the shaft indicates its serviceability.
Further actions:
- Remove the pipe from the drum cover.
- Unscrew the screws that connect the capsule to the drum and the lid to the cuff. Remove the cover.
- Pull out the tank, helping if necessary with a rubber hammer.
- Unfold the back and inspect it.
Before repairing the crosspiece, we will repair the tank capsule with a homogeneous material, melting it with a construction hairdryer.
The crosspiece is secured with special bolts, so we unscrew them without damaging them. We remove the old cross using powerful wrenches. Do not use an open-end bolt - the bolt may break. The shaft sleeve must be polished. We tap with a rubber hammer, put the cross in place, and tighten it.
Coat the bolts with oil paint before screwing them in - they will hold tightly. When seating the tank, lubricate the shaft mounting hole and the bushing on the drum with oil. The installed bank is locked at the back - a pulley and bolt are installed. We also coat the pulley bolt.
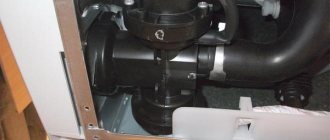
Replacing the drain pump
The drain is located at the bottom, closed with a hatch or panel. Snap off the panel with a screwdriver. To drain the water from the drain filter, place the bottle and drain the remaining water from the hose with the plug. Or unscrew the filter cap slightly and drain onto a rag. The filter protects the impeller from large objects entering.
Next, we place the machine on its side.
De-energize and remove the terminals from the pump. Unscrew the fastening bolts. We slightly break the base of the motor and remove it. The impeller should rotate easily.
The seal on the new pump must be present - pay attention. We install the pump exactly as it was. After installation, check the tightness of the filter, put the hose and plug in place. If the pump does not drain, measure the voltage at the terminals during the spin or drain program. It should receive 220 V. If the voltage does not arrive, the problem is in the module.
Water inlet valve repair
The solenoid valve changes when water constantly begins to flow into the machine without cutting off its flow. To start work, turn off the water supply with the tap. Then:
- We remove the top cover by unscrewing a couple of screws on the back and sliding it back with light taps.
- Unscrew the water supply hose of the inlet valve and the valve mounting screws.
- Disconnect the electrical connector.
- Remove the clamps and the valve itself.
- We disassemble the valve, clean the inside from rust and dirt.
- After cleaning, dry it and put it back together.
When disassembling, carefully remember the order of disassembly. You can even take a photo. Install the unit and hoses in the reverse order.
When does the drain hose need to be replaced?
Replacing the drain hose is required in three cases:
- the hose is too short, connection difficulties arise;
- there is mechanical damage on the hose;
- the hose is so clogged with debris and scale that the blockage cannot be removed.
If the blockage is minor, you can get by by cleaning the hose. Read about replacing the drain hose here.
Starting the testing process
Testing the Samsung automatic machine from the popular Eco Bubble line will help you understand how to carry out self-diagnosis of the unit. The principle of the described actions will be similar for most other models of the brand. Before starting the procedure, you need to check that the washing machine is connected to utilities. Then you should turn on the device to the mains. Entering the test mode is carried out by simultaneously pressing a simple combination of keys: “Spin”, “Options” plus the network key.
By holding down the buttons, you will hear a characteristic sound and watch the indicators on the operating panel light up. After you release the buttons, the washing machine will go into standby mode for testing. Close the hatch cover tightly; now we can assume that the device is finally prepared for self-diagnosis.
Where and how much to buy a new one?
You can buy a new drum from an official Samsung dealer. The average price of a part varies from 5,000 to 10,000 rubles. If you change it yourself, the expenses will be over. If you contact a master, you will have to pay about 3,000 - 5,000 rubles, depending on the complexity of the work.
Considering that a new budget machine costs an average of 23,000 rubles, buying and replacing a drum with the help of a specialist is not rational.
If you still decide to buy a new part, then you need to be extremely careful when placing your order. The drum must match the washing machine model. This is indicated in the accompanying documentation. You need to buy the drum complete with a cross .
Reasons for failure of the control module
In general, the command apparatus in the SMA is more reliable than the electronic control unit. That is why electromechanics successfully “survives” to this day. But the reasons for breakdowns of both types of boards are almost the same.
- Water getting on board. Leads to a short circuit and burnout of radio components in the case of an electronic board or failure of the synchromotor or burnout of contacts for KSMA.
- Voltage fluctuations in the network. The electronic components of the control module are damaged. Programmers are more resistant to surges; in rare cases, the synchromotor may burn out. The problem mainly affects washing machines located in facilities with poor-quality power supply: in private houses, dachas, and utility rooms.
- High humidity in the room where the washing machine is used. Promotes oxidation of contacts of components of modules of both types. The contacts subsequently stick, burn and/or short-circuit.
- Mechanical damage to the disc cams in the programmer due to mechanical wear or inaccurate switching of washing modes (for example, the program selection knob was turned counterclockwise with force). The plastic physically wears off or chips.
Basic malfunctions of the programmer
Command devices fail less often than electronics. Here are the main breakdowns that RemBytTech specialists encounter during repairs.
- (usually the heating element or motor) burn out or stick The most common malfunction, detected in 70-80% of cases when there is a problem with the programmer. It can be solved by washing the contacts or replacing burnt out contact groups.
- The synchromotor burns out. It is replaced with a new one.
- The gearbox fails. Replaced with a new one.
- Mechanical damage to disc cams . Program disks are made of plastic and over time their “cams” wear out. In addition, inaccurate rotation of the program selection knob can lead to pieces of the disc's plastic breaking off. Damaged program disks are replaced with new ones.
They don’t sell spare parts for programmers, so we use components from old washing machines that were sent for disassembly.
Call the master
Replacing a drum costs at least 3,500 rubles, excluding expenses for the part itself. Work completion time is from 1 to 3 hours. The average warranty period is 1 year.
When calling a specialist, you need to contact trusted specialists . It is recommended to give preference to repairmen from a large company that has its own website and office in the city.
To minimize the risk of encountering scammers, you first need to study reviews about the company on the Internet. Contacts of masters can be found on the Internet or in newspaper advertisements.
Calibration
The Samsung washing machine independently determines the weight of the items loaded into it. To make this value more accurate, you need to run the calibration mode.
This is done in several steps:
- Switch off the device and empty it.
- Press the “Temperature” and “Delay End” buttons simultaneously, and then “Power”. The device should turn on.
- Click on the “Start” button, this will activate the calibration mode.
- The drum will begin to rotate clockwise and counterclockwise. The whole process takes about 3 minutes.
- When it stops, “End” will appear and the device will turn off.
After calibration, the equipment is completely ready for washing.
Depending on the model, the process may differ slightly, so before starting the machine you need to study the instructions.