This manual is designed to help you find faults and solve problems associated with the breakdown of Gorenje dishwashers.
It often happens that an error on the PMM display appears due to the breakdown of some part, and its solution requires repair, and not just entering a service test, which is carried out by technicians during the initial diagnosis.
Next, we will look at the main errors of Gorenje dishwashers and give brief comments that will help in troubleshooting problems indicated by one or another code.
What do these or those codes mean?
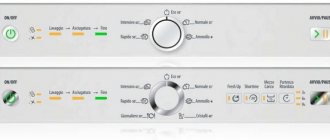
To begin with, it is necessary to say that Gorenje dishwashers are still available in two versions: with and without a display. All machines have a self-diagnosis system, but it interacts with the user differently. So, let's start listing the fault codes.
- E1 On a machine without a screen, this code is represented by two glowing indicators: the first and the last. This means the activation of a special sensor located in the pan of the machine and protecting its body from leaks.
- E2, E9. The second and last indicator lights up, counting from left to right. This makes itself felt by the pressure switch, which has detected an excessive amount of water being poured into the machine.
- E3 The following indicators are lit: first, second and last, counting from left to right. This error records the fact that the system cannot bring the water to the set temperature.
The water heating temperature is set by a program embedded in the control module and can be adjusted by the user. The module monitors the actual heating temperature and compares it with the value specified by the program.
- E4 The third and last indicator lights up, counting from left to right. This code appears when communication with the temperature sensor is lost.
- E5 The first, third and last indicator lights up, counting from left to right. What does this code indicate? And he indicates that the flow of water into the machine is too slow, or the water does not flow there at all.
- E6 Indicators are lit: second, third and last. This indicates problems with removing waste water from the dishwasher system.
What to do if a leak occurs?
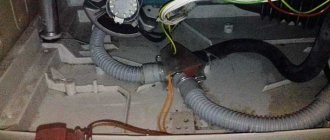
When code E1 appears, the user must immediately turn off the power to the dishwasher, turn off the water supply to it and check the tray. Perhaps there really is a lot of water in the sump, or maybe the leakage sensor just worked idly. Both can happen with equal probability. True, you can look under the body of the Gorenje dishwasher. If it is wet there, it means there is still a leak. What to do in this case?
- First of all, restart the machine and see if the error appears again.
- If the error appears again, you need to turn off the machine, pull it out and remove the side cover of the case.
- Reach your hand into the pan and feel the bottom. If there is no water there, then press the sensor float with your finger and check whether the machine will work after that.
- If there is a lot of water in the pan, you need to drain it. Take some strong stand and a basin. Lift the machine and place it on the stand, place a basin next to it. Tilt the machine body towards the basin and drain the water.
- Look where the water was coming from and fix the leak. Most likely, you will have to change the pipe or body of the circulation unit, but it is possible that the rubber gasket has simply become leaky or the clamp has become loose.
- Reassemble the machine and check if the error appears again.
If there is no water in the pan and the sensor does not want to work, it can be replaced. But first, you need to “ring” the wiring that communicates with this sensor with a multimeter and, probably, test the control module. If the tire responsible for interacting with the leakage sensor has burned out, you will have to contact a technician so that he can professionally eliminate this unpleasant defect.
Overflow of water
Having witnessed the appearance of code E2, E9, the user should not turn off the power to the machine and turn off the water supply. Instead, you need to reboot the machine and see how it behaves. It is necessary to repeat the reboot several times in order to completely eliminate a short-term system failure.
Next, you need to turn off the Gorenje dishwasher, unhook the right or left wall of the case, and then check the tray. If the pan is dry, disconnect the blue wire from the pressure switch. Next, we connect the machine and turn on the very first program. If the machine begins to drain water, it means that the control module can be excluded from the list of possible problems. If the machine starts pumping water, it means the control board is broken.
The second situation does not necessarily require replacing the control board. You need to call a technician who will reset the firmware or reflash the board. In more than half of the cases, this is enough to restore control.
If we have excluded the control module, we need to remove the thin rubber hose from the pressure switch tube and carefully inspect it. Pressure must be maintained inside the hose, and if there is even the slightest damage to it, it must be replaced. Also inspect the level sensor tube. Small debris may accumulate in it, which needs to be cleaned out. Check the resistance of the pressure switch, and also check its wiring.
If everything is in order, then the last thing you need to inspect is the inlet hose. In slightly more rare cases, the pressure switch begins to work incorrectly or refuses to work due to a blockage in the inlet hose. Due to the blockage, water begins to flow unevenly. Air bubbles form inside, which ultimately enter the hose and tube of the part, interfering with its operation. By removing the blockage, you will restore normal operation of the system.
The water doesn't heat up
Code E3 lights up on the display; you should pay attention to how cold the machine washes the dishes with water. In winter, this is especially noticeable, since simply icy water accumulates at the bottom of the washing chamber. If the water inside is hot, this indirectly indicates a breakdown of the control module, which incorrectly reads the readings from the temperature sensor. Well, let’s not talk about sad things ahead of time. To begin, let's do the following:
- unscrew the front protective panel, which is located under the dishwasher door, and also unscrew the left side wall;
- Having gained access to the heating element and the temperature sensor, we won’t go to them in the first few steps; first we will find the thermal fuse, which is found on many models of Gorenye dishwashers;
- Having found this part, take a multimeter and check whether this fuse has worked or not. Readings close to zero indicate that the fuse has not tripped;
- If the fuse is intact, check the resistance of the heating element. If the multimeter shows 25-30 Ohms, then the heating element is in order; if the value approaches zero, the part must be changed.
- Let's check the thermistor and its wiring; most likely, the breakdown is hidden there.
In such a situation, failure of the control module also cannot be ruled out. If, after doing all of the above, you do not find any defects, you can invite a specialist to test the electronics. You shouldn't do this on your own.
Thermal sensor does not function
Error code E4 specifically indicates that the temperature sensor requires repair. However, there are nuances here too. The temperature sensor may actually be broken, or perhaps the wiring leading to it may be broken. The contacts may also burn slightly, or the control module may fail, which will no longer recognize this part.
We will try not to think about possible problems with electronics for now; we will check the temperature sensor and wiring one by one with a multimeter. Depending on the identified problem, we replace the sensor or the broken wiring.
No or not enough water
Error E5 appears if the machine does not draw water at the proper speed or does not draw it at all. First of all, you need to see if the inlet hose is pinched. It may be that the water utility has turned off the water supply, so water is not flowing into the machine. Having eliminated elementary errors, we move on to identifying more complex defects.
At the same time, it is worth checking the inlet valve for blockages. Quite often the valve mesh becomes clogged and due to this defect the valve cannot operate normally.
Through the side wall we get to the intake valve and check its resistance with an ohmmeter. If the valve is functioning normally, you should also check its supply wiring. Failures in the electronics of the dishwasher cannot be ruled out.
Waste water does not drain away
When you start the waste water discharge program, the control module detects the time during which the machine will remove all dirty water from the system. If the water is discharged more slowly than 3 minutes, the control module will display error E6. We need to look for the reason.
- First of all, you need to make sure that the garbage filter is completely clean.
- Next you need to check the drain hose and siphon for blockages and squeezing.
- We turn off the machine, remove the side cover of the housing and check in turn the pressure switch, drain pump and wiring leading to these parts. To check we need a multimeter.
- If you can identify a fault in one of the parts, you should not try to repair it. Only replacement will help here.
So, we looked at what the various Gorenje dishwasher error codes mean and, most importantly, we looked at how to fix these errors. Try to look for defects yourself, but be reasonable. If you cannot identify the problem yourself, feel free to contact a specialist. A qualified specialist will definitely help you. You may also find the information from the publication Dishwasher Repair Gorenje useful. It describes some of the nuances that we omitted in this article. We want to end here, thank you for reading the text to the end. Good luck!
Gorenje dishwasher error codes
This manual is designed to help you find faults and solve problems associated with the breakdown of Gorenje dishwashers.
It often happens that an error on the PMM display appears due to the breakdown of some part, and its solution requires repair, and not just entering a service test, which is carried out by technicians during the initial diagnosis.
Next, we will look at the main errors of Gorenje dishwashers and give brief comments that will help in troubleshooting problems indicated by one or another code.
Rare designations
Sometimes older models have different codes. You can also get to know them.
- L 1 / F1 Heating error.
- L 2 / F2 The machine is overfilled with water.
- L 3 / F3 Temperature sensor error.
- L 4 / F4 Water pressure fault.
- L 11 / F5 Valve leaking.
- L 12 / F6 Pressure sensor fault.
- L 1+L 2 / F7 Drain does not work after 2 minutes of pumping.
- L 1 + L 3 / F8 Filters clogged.
- L 1 + L4 / F9 Circulation error.
- L 1 + L 11 / FA Turbidity sensor operation error.
- L 1 + L 12 / FB Sprinkler operation error.
In most cases, the manufacturer recommends diagnosing hoses, filters, control units, sensors, etc. Sometimes you can do this yourself. The sequence of actions is indicated in the instructions. But if you cannot deal with the dishwasher yourself, it is better to call a specialist. It is better to entrust the equipment to professionals who know how to work with mechanisms and electronics.
Error E4 in a dishwasher may appear on the display over time, regardless of the service life of the household appliance. It signals a minor breakdown of one of the nodes of the drainage system. If you have basic experience in surface repair of equipment, the malfunction can be easily resolved without contacting a service center.
How to decipher fault codes for Gorenye dishwashers
First, let's look at how errors are displayed on models with an LED panel and with LCD displays. Depending on the dishwasher model, you will have to decipher what the alphanumeric code or a certain combination of light bulbs means.
| Fault codes | What kind of light bulbs are shining? | Meaning |
| E1 | Triggering of the leakage sensor. Water flows into a special tray (if the dishwasher is equipped with such a part). | |
| E2 | Triggering of the overflow sensor. | |
| E3 | No water heating. | |
| E4 | Break in the thermistor operation. | |
| E5 | No flooding into the dishwasher system. | |
| E6 | No drain. | |
| E9 | This code means the same thing as error E2. |
Meanings of error codes and recommendations for troubleshooting Gorenje breakdowns
Below we list the designations of fault codes that the user may encounter when operating the Gorenye dishwasher. In the tables below, the causes are presented in rating form, starting from the problem with the greatest probability and ending with the least.
E1 – activation of the leakage sensor and detection of water in the tray
Appears if the float sensor of the “Leakage Protection” system is closed for more than 3 minutes, if water leaks into the pan. In this case, the pump will operate until the element contact opens.
Water entered the pan due to a leak in the tank from the Aquastop system hose.
Drain the tray so that the contact of the tank full sensor opens. This is followed by restarting the dishwasher to check and find the location of the leak.
A malfunction of the electronic board is obvious if none of the four failures listed above are confirmed.
How to reboot the machine to determine the module failure:
· select the washing mode;
· close the loading hatch;
E2 - the level sensor of the Gorenye dishwasher has tripped
The system signals error E2 if the water level has crossed a certain mark and an overflow is detected. The Gorenye dishwasher stops the user-specified program, starts the pump to drain the water, and displays an error on the display (or the indicators flash).
Important! To immediately rule out a failure of the control board, you need to carry out the following check:
- Remove the side wall and check that the pan is not full (the float may have tripped).
- Drain the dishwasher by emptying the tank.
- Disconnect the PMM, disconnect the blue wire from the pressure switch connector.
- Turn on the machine.
- Enable program No. 1.
- After starting the program, the following situations may occur: 1. Draining will start. This will mean that the electronics correctly detected the signal and worked, which means the control unit is working. 6.2. The PMM will begin to pour water into the system. This means that the electronic system misinterpreted the signal, the control unit has failed and needs to be replaced.
After emptying the dishwasher tank, check the operation of the pressure switch using an ohmmeter.
Select a mode and turn it on. Make sure the pump delivers water evenly without creating bubbles.
If the water supply is intermittent, you need to inspect the pump hose that passes through the pan - it may be clogged.
The repair involves closing the water valve to regulate the pressure of the water flow. After this, reboot the device several times to make sure the problem is resolved.
E3 – no heating
Warning lights or an error code appear on the user panel when the water heats up too slowly - less than one and a half degrees in 20 minutes.
Using a tester, measure the resistance of the fuse. If “0” lights up on the device screen, it means “closed”, there is no operation. If the measurements report: “open,” then the fuse has tripped to protect the heating element from overheating and burnout.
In the latter case, the thermal fuse trips due to one of two possible reasons:
1. The thermistor position is broken.
The heater should be checked using an ohmmeter. Measure the resistance by applying the probes of the device to the contacts.
Perform wiring maintenance by checking the integrity of the connections on the dishwasher parts and its control module.
If the washer pump stops working, water stops circulating in the system and therefore does not heat up (at this moment the heater thermal fuse could have tripped).
If the above breakdowns are not confirmed, this may mean that the relay that controls the operation of the heating element was broken.
Using an ohmmeter, measure the voltage at the heater connector as it heats up. At this moment, the terminals should produce 220 Volts.
E40 – the temperature sensor circuit is broken
You will see this code when the PMM is turned on and the sensor is not working. Malfunction is rare if the dishwasher is used correctly. A failure often occurs as a consequence of previous repair work - wiring maintenance or replacement of a module or detergent dispenser.
To solve the problem yourself, try using our recommendations.
Armed with a multimeter, measure the resistance of the thermostat - it should be at the level of 12 kOhm at a room temperature of 20 degrees.
E5 – the dishwasher does not fill with water
This code usually lights up when water is filled into the dishwasher if the required level is not reached within a 7-minute period.
Check whether the fill hose in the PMM is not pinched. Also inspect the filter mesh on the machine body, at the hose inlet.
Check the integrity of the connections between the intake valve and the electronic board. Run the tester in ohmmeter mode to measure the resistance and check if the connections are OK.
It is necessary to check the coil with a tester.
If the wiring is fine, take a tester to check the voltage at the solenoid valve.
E6 – no draining
Alarm code “E6” lights up when draining if the tank is not emptied within three minutes.
Check the operation of the drain pump. You will need a tester to check the resistance at the connector where there should be no breaks.
Check with a tester whether the pump receives voltage from the block when draining - it should be 200V.
If the operation of the part is not impaired, but its signals that the tank is already empty do not reach the module, the electronic board may fail.
E9 – overflow
This code requires a complete check of the hydraulic system of the Gorenje dishwasher. Pay special attention to the situations listed in the table.
Run the wash cycle to check how evenly the water flows. It is possible that the pump hose is clogged.
Important! In Gorenje electronic boards with 3 and 5 buttons (first generation of screens), the E9 code does not light up.
Now you know everything and even more about the errors of Gorenje brand dishwashers. You will be able to provide all possible first aid to the damaged equipment and save on diagnostics when calling a technician.
Some of the most popular dishwashers are Gorenje brand models, because they combine sophistication and restraint, versatility and affordability, which is what users like. These kitchen monsters are assembled according to a modern type, so if any breakdowns or other operational inaccuracies occur, error codes can be seen on the dishwasher display. Due to the fact that error codes for Gorenje dishwashers are displayed on the screen, a person can quickly figure out what exactly the fault is and what solution may be appropriate.
The list of encryption errors for dishwashers is small; it can be easily found on the Internet, which will help you call a technician in time and save the device from permanent breakdown.
How to reboot:
If the code disappears, you can continue using the equipment. Most likely this is a system glitch. But if the fault appears again, it’s time to find its meaning and restore the operation of the equipment.
| Error codes | Flashing indicators on the panel | What means? | Reasons for appearance | DIY repair |
| E1 | There is a leak in the system. Aquastop protection has activated | There was a leak. Water has accumulated in the dishwasher tray. |
Check the Aquastop system and its cable to the module. If there is a malfunction, install new parts
The water overflow sensor has tripped
Temperature sensor break
Error codes on models with LED panel:
For 45/60 cm models on which control modules from desks are installed. numbers
(220003513/220004987/220003355)
Descriptions of error codes and troubleshooting instructions
Below we provide explanations of individual error codes, followed by a table of possible reasons for their occurrence. The reasons are listed in order from most likely to least likely, based on our experience.
E1 The sensor for leaks and the presence of water in the pan has triggered (if installed)
This error occurs when the anti-leak float and its contact are in the closed position for more than 3 minutes (water in the pan)
. In this state, the drain pump operates until the sensor contact returns to the open position.
1.
Water in the sump due to a leak in the tank, from the Aquastop hose, from components in the machine body (recirculation pump, drain pump, rinse aid container, etc.) or leakage in the connecting hoses.
1.
Drain the pan until the overflow sensor contact opens, run the machine to determine the origin of the leak and repair it.
2.
The overflow sensor is stuck when turned on.
2.
Move the sensor to its normal operating position (open).
3.
Overfill sensor is faulty.
3.
Replace the overflow sensor and carry out steps according to step 1.
4.
Electrical connections are faulty.
4.
Make sure the electrical connections are correct (see diagram) and in good condition (check connectors) in both the leakage sensor and the control module.
The multimeter is set to measure “Ohms” to check the flow of current through the connections indicated in the diagram.
Repair defective connections.
5.
The control module is faulty.
5.
A malfunction of the control module becomes obvious if none of the causes of the malfunction described above are identified.
Turn on the machine, set the operating program and close the door. If the drain starts after 3 minutes or less and the machine generates an error signal, the control module is faulty. Replace the control module.
Checking the leak sensor.
Disconnect the wire from the sensor. Set the multimeter to the "ohms" position and make sure that pins 1 and 2 are closed (0 ohms) and pins 2 and 3 are open. Pressing the float switches the contact.
Rice.
2 Schematic diagram of the leakage sensor.
E2 Emergency level sensor triggered
This signal appears when the water level in the tank has increased from level (PRS1) to level (PL1). This can only happen when the dishwasher tank is overfilled. In this situation, the machine interrupts the selected program, turns on the drain and displays a fault indication.
Pay special attention!
To immediately check whether the problem is due to a faulty control module, proceed as follows:
I.
The machine will drain. This means that the electronics have detected the signal level correctly and, therefore, the problem is not in the control module.
II.
The machine begins to fill with water. This means that the electronics determined the signal level incorrectly and the board is faulty. Replace the control module.
1.
The level switch pressure hose is not installed correctly (LS97).
1.
Check the rubber hose for holes, kinks and damage. Holes in the hose lead to a loss of pressure, which prevents the level sensor from operating.
2.
Water in the pressure supply hose to the level switch.
2.
Disconnect the hose from the pressure sensor and see if there is water in it. If water gets into the level sensor, replace it.
3.
The level relay is faulty.
3.
With an empty tank, check the operation of the pressure switch (see diagram) with a multimeter. Replace the pressure switch if necessary.
4.
The washer pump is faulty or clogged.
4.
Select the program and launch. Check that the pump starts supplying water correctly without bubbles (uniform supply):
If the water supply is interrupted, check the pump hose passing through the pan for blockages. If this does not solve the problem, replace the pump.
5.
Increased water intake at the inlet valve (rare).
5.
Partially close the water tap to simulate a decrease in water flow and check the error several times. If the error does not recur, replace the inlet valve.
A special case:
If the water level (PRS1) is reached when the signal level (PL1) is already present, the program does not stop, but the tank continues to drain. During the subsequent cycle, water filling will occur 10 seconds less than the nominal filling time; this time is stored in memory and retained for subsequent filling cycles (this applies to all machines with an electronic control module).
In this case, all hydraulics in the dishwasher must be checked, paying particular attention to:
6.
Water in the pressure supply hose to the level switch.
7.
Water in the pressure sampling chamber of the level sensor (LS97).
7.
If necessary, replace the pressure tapping system with the latest model (with yellow stamp) and connect to the level sensor.
8.
The washer pump is faulty or clogged.
8.
Select the program and launch. Check that the pump starts supplying water correctly without bubbles (uniform supply):
If the water supply is interrupted, check the pump hose passing through the pan for blockages. If this does not solve the problem, replace the pump.
Pay special attention!
E3 The machine does not heat the water
This alarm appears when the water does not heat up quickly enough (less than 1.5°C in 20 min.)
1.
The thermal fuse of the heating element has tripped (if applicable)
1.
Use a multimeter to measure the resistance of the thermal fuse: if the measurement indicates "shorted" (0 ohms) the thermal fuse has not tripped.
If, on the other hand, the measurements show “open”, this means that the thermal fuse has tripped to prevent the heating element from burning out.
In this case, the reasons why the thermal fuse tripped are investigated, including:
— Incorrectly located temperature sensor
— Defective washing pump
2.
The heating element (heating element) is faulty
If the measurements show an "open" the element is faulty and must be replaced.
3.
Temperature sensor installed incorrectly
3.
Make sure the temperature sensor is installed correctly in the socket and reinstall it if necessary.
4.
Faulty electrical connections.
4.
Make sure the electrical connections on the components and control module are in good condition.
Use a multimeter in Ohm mode. Check the resistance across the control module connectors. Repair defective connections.
5.
The sprinkler does not rotate.
5.
Make sure the spray arm rotates freely. If it gets stuck inside the tank, the heat distribution is not correct.
6.
The wash pump is faulty.
6.
If the washing pump does not work, the water does not circulate and, therefore, the water inside the tank does not heat up (in this case, the thermal fuse of the heating element most likely tripped).
Replace the washing pump and thermal fuse of the heating element.
7.
The control module is faulty.
7.
If the previous causes have been eliminated, then it is likely that the control module heating element activation relay is faulty. In this case, use a multimeter to measure the voltage at the heating element connector during the heating phase. At this point, the terminal voltage should be 220 VAC. It is necessary to monitor the voltage for several minutes, since the heating element does not turn on immediately after startup and the malfunction becomes obvious after several minutes of operation.
In this case, replace the control module.
E4 Temperature sensor circuit break
This signal occurs when the machine is turned on, but the temperature sensor is not connected. This only occurs on rare occasions during normal use: it is more likely the result of previous work, such as maintenance of wiring-related components, such as replacing a control module or detergent container.
Perform the following checks to resolve this issue:
1.
Electrical connections are in poor condition.
1.
Make sure the electrical connections are correct on both the sensor and the control module. Also check that the connections are in good condition. Repair connections if necessary.
2.
The temperature sensor is faulty.
2.
Using a multimeter, measure the resistance of the temperature sensor, which should be around 12 kOhm at 20°C. If an "open" circuit is measured, the sensor is faulty and must be replaced.
3.
The electronic control module does not read the temperature sensor.
3.
If the previous causes have been eliminated, and the control module does not read the temperature sensor, it is therefore faulty and must be replaced.
E5 No water fill
This error occurs during the water fill cycle if the level (PL1) is not reached within 7 minutes.
1.
The water tap is closed.
2.
The water intake hose is kinked/pinched.
2.
Make sure the hose is not kinked and that the strainer is clean. Move the water intake hose to avoid pinching it and clean the filter.
3.
The water inlet valve circuit contacts are faulty.
3.
Make sure that the connections between the water intake solenoid valve and the control module are normal.
Use a multimeter in Ohms mode to measure the resistance and check the condition of the connections shown in the diagram.
Repair defective connections.
4.
Broken water inlet valve coil.
4.
Check the intake valve coils.
Using a multimeter, check that the coil is not broken. If the coil is broken, then the solenoid valve is faulty and must be replaced.
5.
The control module does not supply voltage to the water inlet valve.
5.
If the electrical connections are OK (step 3), use a multimeter to check for AC voltage at the water inlet solenoid valve.
During the water fill cycle, the valve must have 220 V AC power. If not, replace the control module.
E6 The machine does not drain water
This alarm occurs during the drain cycle if the tank is not empty (PL0 level is not reached) within 3 minutes.
1.
The drain hose is kinked/pinched/clogged.
1.
Make sure the drain hose is not kinked or clogged.
Move the water drain hose so that it is not pinched and clean it.
2.
The level sensor (pressure switch) is faulty.
2.
Drain the water from the tank and use a multimeter to check the switching of the pressure sensor at the lower level, as shown in the diagram. In case of malfunction, replace the pressure switch.
3.
The drain pump is faulty.
3.
Check the operation of the drain pump.
Use a multimeter to measure the resistance at the drain pump connector: it should not be open. If the drain pump winding is broken, the pump is faulty and must be replaced.
In some cases, the pump does not drain, although the multimeter readings are correct (the windings are not broken).
Replace the pump if this is the case.
4.
The drain pump connections are faulty.
4.
Check that the connections between the pump and the control module are intact. Use a multimeter in Ohm mode to check the connection as shown in the diagram.
Repair of defective connections.
5.
The control module does not start the drain pump or there is an error in reading the signal level.
5.
If the previous causes have been corrected, using the multimeter in AC mode, verify that the pump is receiving voltage from the control module during the drain cycle. At this stage, 220 VAC should be supplied to the pump.
In both cases, replace the control module.
All the best, write to Elremont © 2008
Source
Gorenje dishwashers - a little about the advantages
The modern Gorenje dishwasher is a high-tech and stylish kitchen assistant that has the following number of advantages:
- has enough space for washing kitchen utensils of any size,
- the ability to place baskets on one of several levels,
- presence of very good capacity parameters,
- you can load up to 14 sets of dirty kitchen utensils into the dishwasher at a time,
- Ideal for washing long and short kitchen utensils,
- effectively washes kitchen utensils over the entire area, even in hard-to-reach corners,
- after finishing work, it issues perfectly clean and dry dishes,
- the door of models of the specified brand opens automatically, which makes it clear to the person that the washing is complete and the need to pick up cutlery,
- these models have the highest quality protection against leaks compared to options from other brands,
- the machines have a convenient external device that greatly facilitates the installation process,
- models of this brand are economical and operate in virtually silent mode,
- Gorenje machine filters are self-cleaning, which greatly simplifies the life of their owners,
- after washing, the dishes are completely hygienic, there is no visible dirt or harmful bacteria left on them,
- The devices can determine for themselves which mode is best for washing in a given case.
As it has already turned out, Gorenye dishwashers are spacious, high-tech and convenient, which is why they are popular. Many homes have such machines, and it’s worth getting more detailed information about their error codes, as well as troubleshooting options.
What error codes are there and what do they mean?
The standard option for indicating dishwasher malfunctions are codes consisting of one English letter and one or more numbers. For machines manufactured by Gorenje, fault codes begin with the English letter E, followed by only one digit. This dishwasher has the following codes indicating problems:
- E1.
- E2.
- E3.
- E4.
- E5.
- E6.
- E9.
Each option has its own meaning, informs about a specific problem, and also suggests in what specific way it can be solved.
The appearance of the E1 code on the display of a modern dishwasher is accompanied by the blinking of the first and last light on the control panel. This combination notifies the owner of the dishwasher that the built-in leakage sensor has tripped and the water supply has been stopped. Since the machines are high-tech, they block the flow of liquid to avoid flooding the kitchen.
When the second and last light sensor flashes on the screen, and the E2 code pops up, the user should know that the overflow mechanism has worked. The sensor warns that the incoming water level is excessively high.
An error that is encrypted with the E3 code value is additionally manifested by the blinking of the first, second and last light sensors. Such a notification will notify the consumer that water heating is not being performed, which means that there are specific problems in the system responsible for this process that require diagnosis and elimination.
The blinking of the third and last light sensor indicates the presence of error E4. This encryption indicates the fact that the thermistor is not functioning correctly or is completely broken. To be more precise, the problem most often lies in a broken thermistor.
If three sensors on the dishwasher light up, namely the first, third and last, then the display shows error E5. This code indicates that water has stopped flowing into the dishwasher, which means you should think about clogged pipes or some other problems in this area.
The flashing of the second, third and last light, as well as the display of fault code E6, hints to the consumer that the drainage is not being performed and that the dishwasher system responsible for this process needs to be diagnosed. If the first and last light comes on, and error code E9 appears on the Burning machine screen, it means the overflow sensor has worked and there is too much liquid in the device.
Reasons for error E4 in the dishwasher
Any type of dishwasher is equipped with an aquastop. This is an emergency system that is triggered when the pan is overfilled with water. As a result, error E4 appears on the display. The situation arises for several reasons. To find out, first the pan of the car is cleared of dirty water.
Troubleshooting is done in the following nodes:
To find out why the dishwasher gives error E4, open its case, check all elements of the drainage system and the functionality of the pump.
It is impossible to find out the cause of error E4, much less carry out repair work, without disassembling the machine:
- The dishwasher is disconnected from the power supply by removing the plug from the socket.
- The tap is blocking the water supply to the machine. Disconnect the supply hose from the shut-off valve.
- Error E4 displayed on the display indicates that the pan is overfilled. Therefore, the dishwasher must first be emptied of water. To do this, use a bucket, scoops, rags, and other devices.
- When all the liquid has been eliminated, containers for storing dishes are pulled out of the dishwasher hopper.
- The car is pulled out to a spacious place and laid on its side.
- Using keys and a screwdriver, unscrew the nuts, screws, and self-tapping screws that secure the back and top covers, as well as the tray. After dismantling these parts, all components of the machine will be freely visible.
- To find the cause and eliminate the E4 error in the dishwasher, the first step is to remove the aquastop.
Important! In older dishwashers, the sensor ignores minor leaks. A machine breakdown is first manifested by the formation of small puddles, and then by flooding of the room.
After dismantling the Aquastop sensor, they begin to search for the cause of the E4 error code and identify the damaged unit.
The first step is to inspect the dishwasher pump and the hose connection to it. The pump is installed conveniently in a visible place. If disassembly is necessary, you will not have to take photographs or write down on paper the order of the parts.
If the cause of the leak is a hose that has flown off, do not rush to put it on the pump nozzle. On the reverse side of the drainage element, loosen the clamp. The hose is removed from the machine and inspected.
A clogged hose is cleaned with acidic agents and mechanical devices. If this cannot be done, buy a new part.
Advice! To reduce the likelihood of clogging the hose with solid accumulations, water hardness reducing agents are added to the machine before starting work.
If the hose is not torn off, and the dishwasher displays error E4, there may be a crack somewhere or a loose clamp. The second problem is easily fixed. The clamps just need to be tightened. It is impossible to fight cracks. The hose is just being changed.
After eliminating the cause, everything is put back into place, except for the covers of the machine body. It is connected to the water supply, electrical network, and checked for functionality. If the leak does not recur, the dishwasher is working, the repair was successful. The lids are put in place.
What to do if each of their codes is detected
When detecting an error code on the display of a dishwasher, not every consumer can quickly and correctly navigate what to do in such a situation. So that the user does not face a feeling of confusion and is able to save his kitchen appliances, it is worth reading the action guide, which is written for each code separately. So, if the machine signals problems using the E1 code, then you need to act according to this principle:
- completely disconnect the dishwasher from the electrical power supply,
- stop the flow of liquid into the dishwasher,
- perform a detailed check of the condition of the pallet,
- look under the dishwasher body to find out if there is actually a leak,
- restart the mechanism again and see if the same code appears again,
- if the error does not disappear, you should remove the side panel from the device, pull out the pan and drain the water from it, track the source of the leak and fix it, if you need to change the gasket or pipe, complete the process, assemble the machine and start it up.
Only those who understand repairs can carry out such actions, and if a person does not have the necessary knowledge, then they should seek help from a qualified technician.
Knowing how to fix a breakdown with code E2, you can also begin to fix error E9, because they are essentially the same. So, when the presented dishwasher malfunction indicators appear on the screen, the consumer needs to act according to the following scheme:
- The dishwasher should be completely isolated from the power supply,
- The water supply to the dishwasher must be completely shut off,
- reboot the device several times in a row, seeing what happens during this time,
- unhook one of the walls of the housing to check the condition of the pallet,
- if you find a dry sump, find the blue wire and properly disconnect it,
- connect the machine and check whether it drains water (if it drains, then problems with the control module can be completely ruled out; if there are problems, most likely the control board has failed),
- Call a technician to repair or replace the part.
Most often, to eliminate this malfunction you need to call a specialist, since the repair is quite complex and requires special knowledge and appropriate tools.
The following instructions will tell the consumer what to do in the event of a breakdown with code E3:
- check the temperature of the water at which kitchen utensils are washed,
- unscrew one of the walls and the protective panel located under the door,
- check the operation of the temperature sensor and heating element,
- use a device called a multimeter to carry out detailed diagnostics,
- check the condition of the fuse, as well as the resistance level that the heating element currently has,
- check the thermistor and wires, if any of the parts require replacement, replace it,
- additionally test the condition of the control module.
Again, all diagnostic and repair processes must be performed by a qualified technician.
You can solve the error that is encrypted with E4 code by following the steps below:
- remove the panel and check the condition of the temperature sensor,
- inspect the wires that lead to the temperature sensor and evaluate their integrity coefficient,
- if necessary, replace the wires or install a new temperature sensor.
If everything is in order with the specified part and wires, then we can assume that there are specific problems with the electronics and they should be addressed by a professional technician.
The display of error E5 on the dishwasher screen indicates a lack or complete absence of water, so this problem will have to be solved in this way:
- check the inlet hose to find out if anything is pushing through the fluid supply system,
- check whether there is water in the house at all, whether its supply has been turned off,
- check the inlet duct to see if there are any blockages,
- check the resistance of the intake valve using a special device for this purpose,
- diagnose the wiring that supplies the valve.
If all options have been checked and no failures are observed in this area, then there are electronic failures that should only be addressed by a professional.
When a user approaches his Gorenje dishwasher and sees error E6 on its display, most likely the following actions need to be performed:
- check the level of contamination of the device's garbage filter,
- carefully inspect the siphon and drain hose of the dishwasher to identify the presence of squeezing or blockages,
- disconnect the dishwasher from the power supply and carefully remove one of the side panels,
- check the wiring, drain pump and pressure switch to identify damage and other problems,
- To properly diagnose the condition of the device, use a working multimeter,
- If malfunctions of one or another part are identified, it should be properly replaced.
The occurrence of one of the listed errors may indicate the presence of a minor malfunction or a serious problem, so it is better to ask a professional to carry out an accurate diagnosis to determine the exact cause of such an electronic reaction.
Is it worth taking on the repairs yourself?
If the user is not very good with electronics, then an accurate diagnosis of a dishwasher breakdown, as well as proper repair of it, is beyond the power of a person. In order for the Gorenje dishwasher to be saved and the error code no longer pops up on the screen, the owner of this modern household appliance should follow these steps:
- If you find an error code on the display, completely disconnect the device from the electrical power supply,
- contact a qualified technician and ask him to come to carry out diagnostics,
- listen to the opinion of a specialist, if necessary, pay for repairs or replacement of parts.
Trying to save a little, a person who does not understand anything about electronics can only make the device worse and completely disable it. Of course, another solution to the problem is also possible. The user can tell the technician the error code and, under his strict guidance, over the phone, view the status of the device, after which the technician will decide whether the situation requires his presence or give advice on what to do next.
To prevent error codes from popping up on Gorenye dishwashers, you need to carefully care for them and use them correctly, without overloading them with detergents. It is necessary to use the device according to the instructions, then it will break down extremely rarely and will be able to perform all its options correctly. If a breakdown does occur, then users who are unsure of their abilities and knowledge should immediately call a specialist. Often such errors are caused by simple inattention or some minor problems, but there are also more serious problems that require professional intervention and expensive repairs. It is possible that the system simply malfunctioned, and it will function normally after a restart, which should also be checked. There are not so many errors, but each of them can indicate a number of possible breakdowns.