Everyone knows that using an automatic washing machine is easy and comfortable. But if a home assistant suddenly breaks down, repairing it seems to many to be something incredibly difficult and can only be done by highly qualified craftsmen. Especially when the problem involves almost complete disassembly of the washing machine.
For example, when replacing bearings or removing foreign objects from the space between the tank and the metal drum. In these cases, it is necessary to remove the drum together with the tank from the machine outside.
Services want a fairly decent amount for such repairs. Is it worth the extra expense to do something that you can actually do yourself? It is absolutely possible to disassemble the drum of any washing machine with your own hands. Let's look at how this happens step by step.
Is it possible to solve the problem
If something gets into the drum assembly, it can cause the washing machine to stop and break down.
To remove debris, you must disassemble the unit. However, it is worth considering that there are some nuances. The drum should be removed very carefully so as not to touch other parts of the device. As a rule, such repairs are carried out by professional craftsmen. If it is not possible to turn to specialists for help, then you can try to solve the problem yourself. The main thing is to adhere to the recommendations described below. See also -
Problems with water temperature in the washing machine: checking the sensor
How to halve a drum
Previously, almost all washing machines had a tank consisting of two halves. To disassemble it, you just had to unscrew the bolts connecting the halves. However, production approaches have changed significantly and now manufacturers install non-separable drums in their models, the parts of which are soldered together. But even such a component can be disassembled if some specific manipulations are performed.
How to halve a solid tank:
- The pulley is removed from the tank. If the retaining bolt cannot be unscrewed immediately, it is likely that the manufacturer additionally used reinforcing glue.
- Use a hacksaw to cut the tank into two parts along the weld seam.
- As an additional step, you can drill small holes around the perimeter of the seam. Then, with their help, the halves of the structure will be connected to each other.
- It is easy to remove the drum from the sawn tank. Moreover, convenient access to the oil seal and bearings will open.
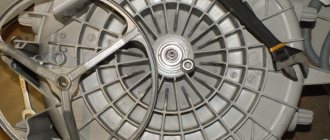
- The units consist of metal elements, as well as an oil seal. It is best to disassemble the drum from the unit that is located closer to the front.
- The drum is placed with the hole down, and the outer metal ring is knocked out with a hammer. The procedure must be carried out as carefully as possible, since hitting the inner ring can lead to its falling out and subsequent problems with removing residues.
- The second bearing is pulled out in the same way.
Repair involves replacing failed elements and subsequent assembly of the structure in accordance with the instructions. It is during the assembly of the machine that the photographs that were taken during disassembly may be needed.
Not every washing machine repair can be done on your own. But disassembling and replacing parts of the drum can definitely be done even by an inexperienced user. It is enough just to follow the instructions and not neglect the rules of working with tools.
What do you need for work?
To fix the problem, you need to disassemble the washing machine. To do this you will need the following tools:
- Screwdriver.
- Wire cutters.
- Set of stars.
- Ticks.
- Set of screwdrivers and hexagons.
- Ratchet and heads.
- Hammer.
If you plan to replace certain parts, they should be purchased in advance.
Please note that disassembling a washing machine without tools is not so easy. Therefore, they also need to be prepared in advance. See also -
The washing machine is leaking from below - causes and repair of leaks
Required Tools
Before you begin, make sure you have all the necessary tools and materials on hand.
You may need:
- a set of screwdrivers, including Phillips and standard slotted;
- set of stars and hexagons;
- screwdriver;
- hammer;
- wire cutters and pliers;
- set of socket heads with ratchet;
- hacksaw for metal.
You don’t necessarily have to use all of the above equipment - the complexity of the work depends on the model of the washing machine. Some units are very easy to disassemble, but in order to remove the drum from others, you will have to work hard.
For washing machines with different types of loading, the procedure for disconnecting the drum may differ significantly. Let's consider the sequence of actions for devices with front and vertical loading. Remember that for any model of washing machine, work on removing the drum must begin by disconnecting the unit from the electrical network and disconnecting the water intake and drainage hoses.
Disassembling a front loading machine
This is the most common modification of washing machines. First of all, the device must be disconnected from the power supply and the drain hose must be removed from the sewer. Only after this can you begin to disassemble the unit. First you need to remove the back cover by unscrewing all the screws. The same must be done with the front of the device.
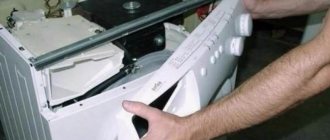
You should carefully remove the container intended for washing powder by unscrewing all the hardware. The control panel can then be removed. You don't have to take it off at all. It is enough to secure it a little to the side so that it does not interfere with your work. If you still decide to remove the panel, then it is worth taking a photo in which all the wires and their connections will be visible. Otherwise, you will not be able to connect them correctly.
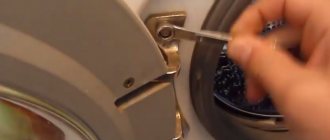
Now you should remove the hatch cuff. To do this, just pull the spring. You also need to remove the bottom panel. All hardware should be unscrewed. The front wall of the unit must be removed along with the hatch. That's all. The unit has been disassembled. Now you need to remove the tank.
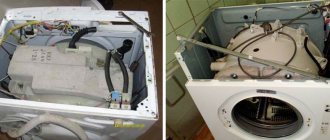
How to remove the tank
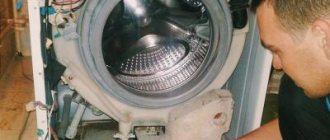
First of all, you should disconnect everything from the tank: shock absorbers, wiring, pipes, counterweight. You should unscrew the central bolt, which is located on the motor cover. In this case, you need to hold the drum itself with your hand. After this, you can remove the washing machine motor.
It should be noted that removing the drum is a complex procedure that cannot be rushed. In this case, it is necessary to unscrew all the hardware and carefully remove the drum so that the parts of the device located next to it are not damaged.
After removal, the tank can be disassembled into several parts.
It is worth noting that often its parts are glued very securely and firmly. Even specialized services refuse to repair certain models of washing machines because of this feature. See also -
Repairing a washing machine tank: eliminating leaks
Reasons for dismantling
Automatic washing machines fail over time for various reasons, so do not neglect the presence of noise and vibrations that this unit can emit. If the problem is not fixed in time, you will have to buy a new washing machine.
As a result of a long period of operation or due to a manufacturing defect, the tank of the SMA may jam or fail. If the drum is jammed, this may indicate that foreign elements have entered the unit. In this case, you can remove the drum from the washing machine at home and remove foreign objects without resorting to the services of a service center.
If the seals, bearings, or heating awning fail, you can disassemble the tank and remove the drum from the washing machine in order to replace worn or broken parts. If the tank walls are damaged or the bushing seats are destroyed, the entire tank assembly must be replaced. The process of dismantling the drum depends on the type of unit and the complexity of the work being carried out.
If the machine is top loading
Top-loading units offer several advantages. First of all, they are easy to use and easy to download. In addition, the drum of such models is fixed in two places. This significantly increases the service life of the device. This technique is analyzed as follows:
- It is necessary to unscrew all hardware located on the front and rear walls.
- The right side panel should be moved back a little and then carefully removed.
- After this, you need to disconnect all the wires and remove the hardware located around the plastic cover.
- The same must be done with the second side.
- After this, you need to unscrew the hardware that holds the shaft.
- That's all. All that remains is to close the tank doors and then remove the tank itself.
It’s worth taking pictures during the process so you don’t get confused when assembling the unit. If the plastic cover is soldered, you need to pull it towards you and then trim it with a drill.
See also:
- 6 best Bosch washing machines according to customer reviews
- 7 best Indesit washing machines according to customer reviews
- 7 best LG washing machines
- 7 best Gorenje washing machines according to customer reviews
- 7 best washing machines under 20,000 rubles according to customer reviews
Main types of breakdowns
A thorough inspection may reveal typical damage:
- cracks on the drum head;
- oil seal leakage as a result of its damage;
- bearing failure.
If a bearing fails, it is carefully knocked out of the drum assembly and replaced with a new one. (You can read more about removing the washing machine drum bearing in this article).
It is quite difficult to knock out the bearing, so this process must be done from inside the drum using a hammer and a metal pin. If the oil seal is worn or damaged, the procedure is identical.
Expert advice: abrasions and cracks on the plastic drum are treated with a silicone-based sealant.
It is necessary to pay attention to the fact that spare parts from cars, Kaiser, Ariston and Indesit are directly suitable for each other, and specialized online stores are filled with them. Thus, there are no problems with choosing and purchasing parts.
After the repair work has been completed, it is necessary to reassemble the washing machine.
Next, you should connect and check its functionality.
If the machine operates for some time in normal mode and there are no leaks, extraneous noise, strong vibrations or squeaks, then the repair to eliminate these faults can be considered successful and of high quality.
An undoubted advantage of repairing the unit yourself is saving money from the family budget. For those users who are willing to fork out the cash, there is an acceptable option in the form of contacting specialists at branded service centers.
You may also be interested in the article on how to get rid of mold in a washing machine.
Owners of cars from Kaiser and Fagor should pay attention to the fact that the representative centers of manufacturers' data guarantee high-quality and timely repair and maintenance services for products and units, as well as ensuring the delivery of parts to replace damaged parts in the shortest possible time.
If the breakdown is significant and requires significant costs, then delivery of parts to the consumer is free.
Owners of equipment from Samsung and LG manufacturers have the right to a warranty period of three years, which is also one of the advantages when contacting the technical maintenance services of these brands.
Watch the video in which a specialist shows in detail how to remove the drum on an Indesit washing machine:
Care Tips
The best repair is the one that never happened, so it’s easier to save the thing than to try to restore it later. To avoid having to do this, you must follow all the instructions in the operating instructions.
- Do not overload the machine with laundry . Due to overload, not only will things not be washed properly, but the bearings and support shaft will also wear out greatly.
- You should not start the machine with a half empty drum. This will cause everything to bunch up on one side during the spin cycle and create an imbalance in the drum, causing the machine to vibrate a lot. This runout on the shaft severely damages the bearings and seal, after which repairs become necessary.
- Hard water leaves scale on the heating elements, which leads to a decrease in their service life. This problem can be solved by installing special filters in the water supply that reduce the carbonate hardness of the water. Thanks to this, there will be significantly less scale, which means the service life of the heating element will be longer. It happens that scale accumulates on the drum - from here it must be removed with special means.
- Clean the machine's dirt filter regularly . It is located in its lower part, most often on the right side. Its clogging will lead to the fact that water will stop draining from the machine, and it will be impossible to do without completely disassembling the drain system and cleaning it.
- Do not put too much powder in the tray . The remaining wet powder, when dried, turns into a very hard substance that can clog the water supply pipes to the tank. Use exactly the amount of powder needed for a given wash cycle.
- Never send items for washing that may contain small items in their pockets, such as paper clips, buttons, and other similar items. During the cycle, they will fly out of the pockets and can cause serious damage to the drum. Keep an eye on this when preparing your items for the scheduled wash.
For information on how to cut and glue a non-separable washing machine tank, see below.
“6 senses” technology for Whirlpool washing machines
The Whirlpool washing machine drum is equipped with 6-sense technology. This means that, depending on the set washing program, it performs special rotations. In addition, based on special sensors, the loaded laundry is weighed and the type of fabric is determined, after which the laundry device independently selects the required amount of water and its heating.
6Sense technology from Whirlpool
There is also a special system for automatically balancing the laundry in the drum. This means that the smart device checks that the clothes are evenly distributed before spinning. If clumping is detected, the centrifuge reverses. If there is no improvement, then the spin speed is automatically reduced or this cycle is eliminated altogether. Thus, such manipulations will reduce the possibility of injury to washed items during drying at high speeds.
You can choose 3 types of washing:
- Intense (high temperature and large amounts of water).
- Casual (Standard).
- Fast (in just 15 minutes)
Design features of the device
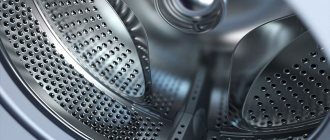
If the motor is considered the heart of laundromats, then the drum of a Whirlpool washing machine is its soul. Due to the fact that there are perforations on its walls, even the most stubborn stains are washed off. The design of the device is thought out in such a way that if you set a delicate wash program, the centrifuge rotates slowly and things do not rub against the tank doors.
Everyone knows that the level of residual moisture depends on the spin speed. The American brand Whirlpool knows about this, which is why all modern versions of washing machines are produced with high spin, which starts at 1200 revolutions.