When buying a washing machine, you can save money if you choose domestic models. For more than 20 years, this company has been successfully producing refrigerators and freezers, and since 2004 it began producing washing units.
Modern models of Atlant washing machines are equipped with a special display on which information codes appear in the event of a malfunction
The latest technologies are used in the production of domestic equipment, so Atlant washing machines are practically in no way inferior to their foreign counterparts. All models are equipped with a modern self-diagnosis system, which allows you to quickly determine the cause of the malfunction.
Washing installations can have a full-fledged display with LED indication (models 50с81, 45у102, 50с102, 50с82, 45у82, 50у102), a small segment display (model 50у87), and also be without a display (models 35м101, 50у88). Cars that have a display on the dashboard, when a breakdown occurs, display an information code on it in the form of an alphabetic or alphanumeric combination. Models without a display transmit an error code using four indicator lights.
Manufacturers of washing machines do not recommend fixing any malfunctions yourself without first reading the operating instructions.
In our article we will list the main error codes for Atlant washing machines, tell you what they mean and how you can eliminate some of them yourself.
What does this code mean?
After studying the relevant instructions, you can quickly come to the conclusion that error F14 means a breakdown of the control module of the Atlant washing machine, but in reality this is not always the case. The reasons for the error can be hidden much deeper, in particular, its occurrence can be affected by:
- clogged garbage filter;
- incorrect connection of the machine to the sewer;
- power surge.
Before reflashing or even changing the control module, you need to check the above reasons. Let's hope that we are talking about a banal short-term malfunction in the electronics of the Atlant washing machine.
Error codes SMA Atlant
The modern Atlant automatic washing machine is equipped with a self-diagnosis system, with the help of which the operation of the components is analyzed. If a problem occurs in a certain area, it displays a fault code on the display. Let's look at the most common errors and understand the reasons for their occurrence and find out how to fix it.
If the number indicator is on Applies to models without a display. This situation indicates that the tank is overfilled. The reason for this may be the following factor: the pressure switch is broken. The pressure switch is an element that controls the level of incoming water in the SMA (automatic washing machine).
In the error tables provided in the instructions, you will not find information about fixing this part, but we will try to figure out how to solve this problem. To check, you will have to disconnect it from the hose; of course, before doing this, turn off the electrical appliance from the network. Remove the upper element of the machine body; to do this, unscrew two screws, they are located on the back side.
For models such as Atlant 50u102, Atlant 50u88, Atlant 70s1010, the sensor is located on the top of the front wall. It is attached to the hose using a clamp; you can either cut it off or loosen it with pliers, and also carefully disconnect the electronic elements.
To check the serviceability, blow into the hole where the hose was inserted; if everything works properly, clicks will be heard. But in a faulty version, nothing will happen, then you will need to replace the faulty thermostat with a new one.
We strongly recommend purchasing all replacement elements from official representatives. The next thing that could happen is that the intake valve is jammed or clogged; for testing, disconnect the fluid supply hose.
Remove the filter mesh, wash it, unscrew the valve from the CM and connect the water supply pipe to it. Then turn on the liquid supply; in good condition it will not leak water. If all of the above steps did not lead to the desired result, check whether the wiring is working properly. It would also be useful to pay attention to the tightness of the cylinder.
f2: temperature sensor fault
If this error is displayed during startup, indicating a malfunction of the temperature sensor, it is worth checking the sensor itself first. To do this, you will need to remove it from the washing machine, unscrew the machine and find the thermistor. To remove it, disconnect the wires that go to it, then loosen the screw that secures the heating element.
Remove the thermistor from the heating element, the next step is to measure the resistance using a multimeter. By lowering the sensor into water with a temperature of 20 degrees, the multimeter will show a resistance of around 6000 Ohms. Then place the sensor in a liquid with a temperature of about 55 degrees, the reading should be 1400 ohms. If it shows different values, then you should purchase a new, working sensor.
Another reason may lie in faulty wiring. How can this be eliminated? To do this, check the electrical circuit for a break; it is also possible that the contacts have oxidized. If everything is in order with the wiring, the control module may be the cause; in this case, there is only one way out - replace it.
f3 (f3): problems in the operation of the heating element
This error is interpreted as problems with the operation of the heating element. Again, the integrity of the electrical circuit may be compromised, please call. Or there is a problem with the control module - needs to be replaced. The heating element may fail, then it needs to be replaced.
f4 (f4): water does not drain
If the device without a display, the 3 indicator lights up. This means that no water is drained. The drain hose may be installed incorrectly, or it may be pinched. Check that the connection is correct. Maybe the pump filter is clogged; to clean it, drain the water, open the pump cover, be sure to first install a container where the water will flow.
Wash it and put it back in its original place. You also cannot exclude the possibility of a clogged drain; clean it. In addition to the above reasons, this error may appear in a situation where spinning does not occur. In this case, you need to check the following points: whether the spin is turned on, perhaps you used a product not intended for automatic machines.
That is, it foams excessively; to eliminate this error, turn on an additional rinse. It is also possible that the laundry is not distributed evenly and the device cannot center the spin cycle.
f5 (5f) (f5): malfunction of water injection (draining)
If there is no display, the 2nd and 4th indicators are lit. And this indicates improper pumping and draining of liquid. Check that the hose is connected correctly; it may be kinked.
Check to see if there is insufficient pressure in the system, or the cold water supply valve is simply closed. The possibility of a malfunction of the filling valve cannot be ruled out; clean the filter in it. The module-valve wiring is damaged, the system does not respond to incoming signals.
Washing machine inlet valve
How to fix it? Everything is quite simple; you will need to test the circuit using a multimeter and clean, degrease and restore the connection in the damaged area. In addition to the situations described above, the control module may be damaged; it must be repaired or replaced at a service center.
Indicators 2,3,4 are lit: network fault
Interpretation of this error: faults in the electrical network. Check that the surge protector is working correctly. To check the correct operation, you will need a multimeter, ring all contacts in pairs, the operating resistance is in the range of 680 kOhm -+ 5%. Then measure the incoming resistance in the plug, it should also be in the range of 680 kOhm. If the power supply fails, the resistance will be equal to infinity.
The next reason may be a control module that is not working correctly; you will need the help of a specialist, or replacing it with a new one. It is possible that the parameters of the power supply network do not meet the standards; take measurements, but you should remember that working with electricity is extremely dangerous and it is better to entrust this to a professional electrician. Indicators do not work. The selectors responsible for the notification have failed; the interface needs to be replaced.
f8 (f8): tank is full
Let's look at how to reset this error. First, you need to check the condition of the pressure switch and the operability of its electrical circuits; use a multimeter for diagnostics. If the pressure switch is working properly, check the control module. If this does not give the desired result, you should make sure that the inlet valve is functioning properly; perhaps it is jammed.
Tank assembly
f9 (f9): tachogenerator is broken
The breakdown is typical for the Atlant 45u102, Atlant 45u84, Atlant 45u81 models. It signals the failure of the tachogenerator; this can also be determined by the indicators when 1 and 4 light up on them. The reason is probably hidden in a malfunction of the engine or tachogenerator. This may also indicate a wiring problem in the electric motor or a malfunction of the control module.
The first thing that needs to be ruled out is a malfunction of the engine, everything is quite simple here, if the washing machine (WM) starts and the drum begins to spin, then it is working. Otherwise, you will have to test on a 5-Volt and 24-Volt board, check the Lita for the capacity of the ESR, test the triac.
Check the tachometer sensors for circuit breaks, start testing at the connector and end near the processor. It would also be useful to check the SDM elements and engine power supply elements. Check to see if the wiring and connectors above and below the engine are corroded.
If all this checking does not reveal any problems, the problem may lie in the firmware or processor. What to do in such a case? There are several ways out, either contact a specialist at the service center for help, or replace the software board.
f10 (f10): the door is not locked
In this case, the machine does not turn on. The lock or locking hatch may be damaged; if a fault is found, replace it. The control module may also have malfunctioned; run diagnostics.
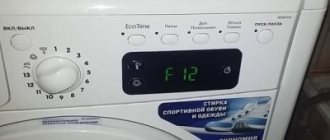
f12 (ф12): engine
Indicates an engine malfunction. Inspect and test the motor to see if the problem lies with the motor or its windings.
f13 (f13): other faults
The instructions describe this as other breakdowns. In order for the error to be reset, you will have to diagnose the wiring and contacts of all circuits of the system, and if found, eliminate the defect, or replace it with a new part.
f14 (f14): software
Incorrect operation of the software. If the software module needs to be repaired or completely replaced, contact a service center to diagnose the program.
f15 (f15): leak detected
First, look at the integrity of the drum and its sealing; if everything is in order with it, check the sealing gum. If it is worn out or damaged, replace it; to select one suitable for your model, call the service center. If you purchase a non-original part, the problem may recur.
Check the condition of the inlet hose, couplings, and pipe. If defects are found, replace them.
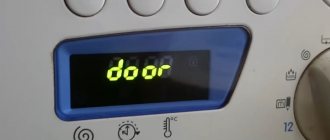
door (door): door
The door is open. Close the door tightly and check the condition of the lock; if it is broken, replace it.
None: lots of foam
Indicates that there is excessive foam in the drum. You may have used the wrong washing mode; select the appropriate one for your fabric type. Wrong laundry detergent, not suitable for SMA.
If you have used too much detergent, use the correct detergent for your machine and stick to the amount recommended by the manufacturer.
Preliminary actions
To try to fix error F14, you first need to check if there was a momentary system failure. Close the hatch door tightly, turn off the washing machine and disconnect the power cord from the power supply. Then you can go have a coffee, since you will have to wait from 7 to 15 minutes. It's better to wait 15 minutes. We come back, turn on the machine and try to run the program; if error F14 appears again, it’s worth starting the Atlant equipment in test mode. What do we have to do?
- First we need to connect the machine to the power supply and close the hatch door tightly.
- Make sure the program selector is at the 12 o'clock position.
- Press the “Start/Stop” button and hold it.
- Turn the program switch knob to the 6 o'clock position (pointer down).
- Release the “Start/Stop” button.
- Turn the program switch knob to 12 o'clock (pointer up).
If four eights appear on the display, it means that the test mode has been successfully launched. The machine itself will test the system, and if at the end it gives three beeps, you are lucky, there are no serious malfunctions. If the machine produces an error code at the end of the test, then things are bad, there is a fault that needs to be found urgently.
To take the machine out of test mode, turn the program switch one step to the left, then turn it back to 12 o'clock and turn off the machine.
Prevention of the Atlant washing machine
In order for the Atlant machine to last as long as possible and not require any additional investments, it is necessary to operate it correctly and care for the device in accordance with the instructions.
Measures to prevent the appearance of error codes on the machine display are:
- Use high-quality washing powders (it is advisable to give preference to liquid detergents, since they are better washed out of machine parts).
- Every time after using the appliance, wipe the silicone door seal dry to prevent mold from appearing there.
- Use anti-scale protection products for your machine.
- Do not overload the drum with laundry.
Checking the drain hose
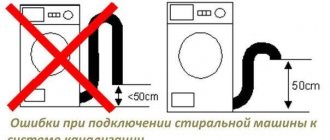
No matter how paradoxical it may seem, in some cases a simple check of the connection of the machine to the sewer helps to eliminate the F14 fault. If the Atlant machine was recently installed, you should check it all the more, since this may well be the main cause of the problem.
Note the top bend of the drain hose. It should be at a height of 1 m from the floor. The distance between the connection point of the drain hose and the bend of the drain pipe must be at least 80 cm. If the connection is incorrect, this may cause a “siphon effect”.
Dirty water from the sewer may flow back into the machine, and the self-diagnosis system may inadequately respond to this malfunction with error F14. To be honest, SM Atlant does not have the most advanced electronics with far from optimal software.
Error F14 in Atlant cars without a display
If your SMA Atlant does not have a screen, then the washing machine will report error F 14 by flashing the lights. Here are the LEDs that will blink:
- In SoftControl models. Indicators for the “Water Hold”, “Rinse” and “Wash” program stages.
- In the OptimaControl series . LEDs for “Rinse”, “Wash” and “Pre-wash”.
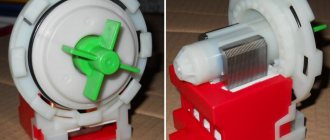
Cleaning the filter
Experts note that in some cases, SM Atlant may display error F14 due to a clogged drain filter. It sounds unexpected, but the fact remains a fact. Cleaning the filter is easy.
- Disconnect the machine from the power supply.
- Tilt it back a little.
- Place a flat container under the body to drain dirty water into.
- Open the hatch, which is located in the lower right corner of the washing machine body.
- Unscrew the filter and drain all the water.
- Clean everything inside, rinse the filter itself and screw it back into place. Return the machine to its original position.
After cleaning the filter, try restarting the machine several times. Then run the service test as described above. If error F14 persists, then the matter is serious.
Control module test
Apparently, you can’t do it without the help of an experienced craftsman. If the above measures do not help, you will need to test the control module for a malfunction. Only a specialist can perform such an operation efficiently. Independent testing and repair of the control module can cause irreparable harm and subsequently you will definitely have to change the electronic filling. By the way, the cost of a new part is 50% of the cost of a new machine, so don’t take unnecessary risks.
You may have encountered other error codes for Atlant washing machines. If so, read the article of the same name, which is on our website, and we say goodbye to you and wish you good luck!
Interesting:
- Bosch dishwasher errors
- Error codes for different dishwashers
- Miele dishwasher errors
- Gorenje washing machine error codes
- Whirlpool dishwasher error codes
- Ariston dishwasher error codes
Reader comments
- Share your opinion - leave a comment
Solving the problem yourself
When an Atlant machine shows error F14, service center technicians usually resort to the following actions:
The above operations require knowledge, experience and appropriate tools, although the Atlant washing machine is not difficult to assemble. How to correct the situation yourself if F14 is lit on the display?
You can carry out the following preliminary steps:
To restart the machine:
If SMA Atlant still gives an error, it makes sense to perform a service test or run self-diagnosis. How to carry out these steps is described in detail in the instructions for your Atlant washing machine model - find the manual and follow the manufacturer’s recommendations.
Other ways to fix F14
If the preliminary steps did not help, and the washer still shows the ill-fated code on the display, then other measures can be taken.
Check your sewer connection
One of the most unpleasant system errors is F14. If the Atlant washing machine displays error F14, get ready for expenses, although it may still work out. Don't panic ahead of time. Let's decipher this code, and then see what you can do yourself, and what only with the help of a wizard.
Diagnosis and troubleshooting
What should be done to fix the problem? It is necessary to accurately identify the problem that caused the failure. Since there may be several options, you should check each of them, starting with simpler operations.
First of all, we comply with the safety requirements - disconnect the washing machine from the power supply. Only when the unit is completely de-energized is it possible to repair electrical devices.
To begin with, it is recommended to check whether the pressure level in the water supply system is sufficient, whether the valves on the taps built into the risers and at the entrance to the machine, directly in front of the intake hose, are fully open. After making sure that the water is flowing normally, you will have to carefully inspect the outside of the hose. It is probably twisted somewhere or crushed by the body of the washing machine.
It may seem to many that this is all elementary, but in practice it has been repeatedly proven that a third of the cases occur precisely in such situations.
The next step is to turn off the water supply to the unit and disconnect the water filling hose. The main task in this case is to make sure that there is nothing inside the hose. At the same time, the strainer installed on the inlet valve is checked. It is not difficult to find, since it is located at the point where the hose connects to the washing machine.
When your machine, after completed operations, continues to give an alarm signal in the form of F5 encoding, we begin to penetrate its body. To do this, unscrew and remove the cover of the machine. The intake valve is located in the upper left corner, near the rear panel. It is necessary to check it and all the pipes for clogging, then, using a multimeter, we make sure that the valve itself has not failed and check the functionality of its electrical circuit. It is quite possible that the device itself is working, but the wiring in a certain place is worn out, or the contacts are oxidized.
It would be a good idea to visually assess the condition of the wiring, since traces of carbon deposits and oxides are often visible to the naked eye. If the electrical circuit from the valve to the control unit is intact, and the valve itself is in working condition, you can move on to the next part - the sensor that controls the water level (pressostat).
One important clarification is needed here. If the machine does not pump water into itself at all, then there is no need to check the sensor.
And when water is poured into the tank and immediately drained, and a characteristic error light is displayed, you can immediately begin inspecting the machine with the level sensor. It is located near the back panel of the washing machine, in close proximity to the water intake valve, near the top cover.
The first step is to blow out and rinse all the tubes thoroughly, then check the electrical circuit with a multimeter. If the result is positive, there is only one thing left to do - look for the problem in the management module. But here you will have to think carefully about how prepared you are for such work. It is probably better to invite a competent specialist from the service center.
Elimination
The design of the Atlant washing machine is no different from the designs of models from other manufacturers. Therefore, getting to the complex elements of the device will not be difficult. When starting a renovation, evaluate its economic feasibility. And also follow the safety rules; carry out all work only with the equipment disconnected from the network.
The tachometer is faulty
To understand that the tachometer has failed, you first need to pay attention to how the unit works. The main “symptoms” of this malfunction:
- the rotation speed of the drum changes sharply;
- during the “spin” program, the drum rotates slowly, but should increase speed;
- during the “wash” program the revolutions are too frequent;
- After spinning, things remain wet.
To fix this problem, you first need to make sure that error F9 is caused by the tachogenerator.
- Unplug the washing machine.
- Remove the back cover of the device by unscrewing the fasteners.
- At the very bottom there is a motor that needs to be disconnected.
- After this, you need to disconnect the electrical wires from the tachometer and use a multimeter to check the voltage resistance value at the contacts. The indicator should be within 60 ohms. Then measure the voltage. When you crank the engine by hand, it increases and should be 0.2 V.
- If the sensor is faulty, it should be replaced. To do this, you need to loosen the harnesses and disconnect the wires. Unlock the latch, remove the protective cover and unscrew the fastening bolts. Remove the broken device and install a new device by performing these steps in reverse order.
The electric motor is damaged
To fix this problem, you need to remove the motor for inspection. You should disconnect the electrical wires from it, unscrew the bolts, and pull the engine itself towards you. First you need to check the condition of the brushes and mounting holders.
Brushes, an important element of moving contacts, begin to wear out after a certain period of time, which negatively affects the operation of the “heart” of the unit. Their wear can also generate error code F9. This is not difficult to determine: they will be too short. Worn brushes must be replaced.
If everything is in order with these items, you need to check the electric motor for current leakage to the housing using a multimeter. Each turn of the winding should be checked in case of breakdown. If all faults have been eliminated, but an error code is still issued, you should continue the diagnosis further.
Problems with the control module and electrical circuit
You should start by checking the electrical communication circuit. This element is located near the engine. It is a chip with wires. You should ring the multimeter several times for each transaction to eliminate possible errors. Replace faulty wires.
If everything is in order with the electrical network and there are no faults, there is a need to rule out an error in the control module. It is extremely difficult to fix this problem on your own. You will need certain knowledge and skills, since this is one of the main elements of any household appliance, complex in design, execution and operation.
This and other codes for the ATLANT washing machine are given below.
Description of errors
In total, there are 15 key errors that can occur when operating these washing machines. Each code has its own unique meaning. It is his knowledge that allows you to correctly identify the problem that has arisen, and therefore quickly solve it.
It is also important to understand that the reasons for the appearance of such malfunctions are not only different in each case, but sometimes they can appear due to an error in the operation of the entire device as a whole.
It's worth checking the fill valve
It was not possible to detect a breakdown, which means you need to check the inlet solenoid valve. It is located in the same place, under the top cover of the Atlant washing machine, only on the back wall, right behind the powder receiver box. First, disconnect the valve coil and check the contact resistance. In normal operating condition, the multimeter should show a resistance of 2-4 kOhm; if it shows much less or much more, it means that the inlet valve is faulty and needs to be replaced.
If the intake valve coil is in order, do not rush to rejoice. It is quite possible that the flow filter is clogged and is now preventing water from entering the machine. The solution to the problem is cleaning the flow filter. First, unscrew the inlet hose from the machine body. At the junction there is a small plastic mesh inside the fitting. This is a flow filter. Carefully remove it and wash it from dirt. If the mesh is overgrown with limescale, you can soak it in a solution of citric acid and then wash it.
In some cases, the cause of the F8 error is the electronics, specifically the control module. The Atlant firmware often fails, so you can call a technician who will reset it or replace it for you. In extreme cases, the control module will need to be replaced, but the master will decide this. When dealing with electronics, doing it yourself can be disastrous, so in any case, entrust this matter to a professional.