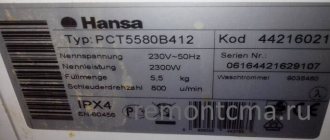
Let's look at replacing a bearing in a Zanussi Aquacycle 1000 washing machine, manufactured in 2002. All work was carried out at home, with our own hands. Since the repair was carried out in 2022, the age of the washing machine was approximately 15 years. Which, in principle, is not bad compared to machines that were manufactured at a later date. With proper operation, the service life of bearings is 15-20 years. Structurally, the Electrolux and Zanussi SMAs are similar, so this approach can be applied to both brands.
Do you wash your shoes in the machine?
Oh yes! No
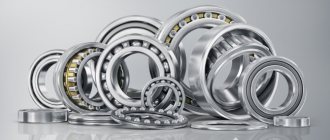
These machines use a powerful SKF double bearing model BA2D.
Characteristics:
- d=30;
- D=60;
- B=37.
Product code from spare parts suppliers: 026298, 12404633657, 255119, 633657, 663667.
For this tank, a special oil seal of the following dimensions is used: 40-60/10. Correspondence table for spare parts of popular models.
- Preparation
- Disassembling the Zanussi washing machine (“Zanussi”)
- Changing the bearing
- Assembling the washing machine
- Catalog SMA "Zanussi"
Preparation
When the bearing fails, noise occurs when the laundry is spun. And with every wash the noise gets louder. Therefore, it is better not to delay the replacement. Operating the machine with a half-broken bearing will lead to damage to the shaft or its seat. Also, if the oil seal is worn out, grease gets inside the tank and the laundry becomes dirty.
If the shaft is abraded, it will need to be processed using special equipment, and if restoration is impossible, then buy a cross. Even in Moscow it is quite difficult to buy it for a washing machine of a certain brand. They are usually delivered to order with a waiting period of 2 weeks to 2 months.
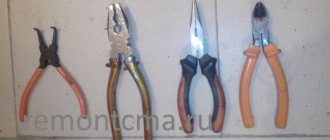
Set of pliers.
To perform a complex of works you need a set of tools:
- slotted screwdriver;
- Phillips screwdriver;
- set of socket heads (8, 10, 13, 17);
- ratchet, two extensions and cardan;
- pliers, round nose pliers, wire cutters, clamp pullers;
- hammer, chisel or drift, knife;
- plumbing silicone and a gun.
Knife, ratchet and adapters
More necessary tools.
This is the minimum kit with which you can change the drum bearings of a Zanussi washing machine. In case of complications, you will need a grinder.
In addition, you need a special lubricant for the MMA oil seals and a thread locker (must be blue). A flashlight will be very useful in your work.
This model has undergone repairs.
The most common breakdowns and their causes
Service center specialists have been repairing Zanussi washing equipment for many years. During this time, enough information has accumulated to provide statistics on common malfunctions of the SM of this brand and the reasons leading to breakdowns:
- Unreliable drive belts that stretch and slip in the pulley over time, causing the drum to slow down. It is possible for the drum to stop due to a belt flying off the pulley.
- Hatch locking devices (hereinafter also referred to as UBL, lock) are not of high quality. Many Zanussi SM repairs are associated with this particular breakdown.
- Tubular electric heaters (hereinafter also referred to as heating elements) are not designed to work with hard water, so they quickly become covered with scale and burn out from overheating.
In addition to the manufacturer’s shortcomings, there are operational problems that are common to all brands of SM, including units with both front and vertical loading:
- Blockages in the water drainage system, as a result of which the machines do not wring out the laundry well and do not completely drain the water from the tank.
- Rapid wear of parts due to contact with hard and contaminated water. Dirty and rusty water from the water supply clogs the inlet filters, disrupting the performance of the AFM.
Online diagnostics of a washing machine
If your machine stops washing or rinsing clothes normally, then some kind of malfunction or breakdown has occurred.
You can try to find the problem yourself. Run diagnostics
Select which operation your washing machine does not perform:
1. Doesn’t drain 2. Doesn’t rotate the drum 3. Doesn’t spin clothes 4. Noises, knocks, buzzes when spinning 5. Doesn’t turn on
Checking the operation of the drain pump Is the drain pump of the washing machine working? Yes No I don’t know << Back
Clogged hoses in the washing machine If the sound corresponds to the normal sound that has always been observed when the device is working, the cause is probably a clog.
Was there a blockage in the drain hose? Yes
<< Back
The drain pump does not work! If the sound matches the normal sound of the drain pump, it is recommended that you check the drain filter first.
After cleaning, does the drain pump work and does the washing machine drain water? Not really
<< Back
Operation of the drain pump The sound of the pump is usually immediately audible and noticeable. If there is no sound, the pump is not working. We are looking for how to separately enable the water drainage program. As a rule, this is a separate option. After the program has been turned on, the pump should start working in 1-3 seconds. If everything is done correctly and the pump is operational, a buzzing sound will appear. If you hear no buzzing or other sounds when you turn on the program, the pump is probably faulty.
Is the washing machine drain pump working? Not really
<< Back
Clogged car hoses If you have identified a clog in the hoses, you need to disassemble them, clean them, and then reassemble everything.
Does the washing machine drain well? Not really
<< Back
Hurray, you did a great job, you fixed it.
<< Return to the beginning of diagnostics
The drain pump is faulty, call a professional.
<< Return to the beginning of the diagnosis.
The washing machine does not rotate the drum. During the operation of the washing machine, such a problem may occur. Each model has a different drum operation. It rotates according to a given algorithm, which is set by the program. This principle applies to spinning and washing. If you are not sure whether the drum is not spinning or whether it is working, put the laundry in the washing machine. Start the spin program. If the machine is running, it will first drain the water and then start spinning. In this case, a rotational process will be observed. If rotation is not visible, then check the belt. First, turn off the program, then unplug the wire from the outlet so that power does not flow into the device. Now you need to remove the back cover. You will need to carefully inspect the drum belt. It is quite easy to determine whether it is in the wrong position or damaged.
Is the washing machine belt torn or stretched? Not really
<< Back
Broken drum drive belt If the belt breaks, it will be immediately visible. There are also often cases when the belt simply stretches, which is why the drum, accordingly, does not rotate. Do not allow the machine to operate if the belt breaks. It is important to check whether it has wound around the engine pulley or broken the wiring to the engine. The heating element and temperature sensor may also be damaged if the belt does catch the wires. It is imperative to ensure that the belt model is original. If you choose an unsuitable or low-quality product, this will affect the performance of other devices. How do you know what kind of belt you have? There will be a marking written on the old one, compare it with the one indicated on the belt offered to you. You can also find out belt information by car model.
<< Return to the beginning of the diagnosis.
Washing machine motor malfunction If a malfunction is not found, the block with wires must be disconnected from the electric motor. Carefully remove it. We visually evaluate the engine. It may have melting, cracks, or other effects that clearly indicate damage. We call the windings of the tachogenerator and the engine. It is important to understand that you can fully study how correctly the engine operates and whether there is a malfunction only at the stand. If rotation does not occur, there may be a problem with more than just the motor. Sometimes the cause is a malfunctioning electronic module. If a short circuit occurs in the engine, the module could be damaged, while the engine remains operational. Also, the wires could be damaged.
<< Return to the beginning of the diagnosis.
Repairing a washing machine that does not spin clothes After completing the washing process, the washing machine may not spin properly or may not start spinning. Firstly, look, perhaps another mode is set, which does not involve turning on the spin cycle at all. This happens, for example, with programs related to washing woolen items and delicate fabrics. To check, run the spin cycle separately. If the washing machine does not drain water, we proceed to check the pump.
Does the washing machine now spin clothes? Not really
<< Back
Congratulations, you have solved your problem!
<< Return to the beginning of the diagnosis.
Repair of washing machines, imbalance Modern washing machines place the laundry on the drum before spinning. This is necessary for quality work. Check if this feature works. Sometimes a situation occurs when things get wrapped up in a ball that cannot be unwound automatically within a certain time. At this point the work stops. You need to unwind this laundry yourself, lay it out and continue operating the washing machine. In this case, it is important to turn off the machine, and then, when the laundry is laid out, turn on a separate spin program.
Does the washing machine now spin clothes? Not really
<< Back
Washing machine repair, drum drive repair Now you need to check the drum drive belt. We remove the cover and visually assess the condition of the belt. There should be no damage. If the tension is weak, the spin may not turn on. If you need to replace the belt, you should only replace it with the original one. After replacing, we try the program again.
Fault found, does the washing machine spin? Not really
<< Back
The engine or electronic module is faulty, call a repairman to your home.
<< Return to the beginning of the diagnosis.
The washing machine hums, makes noise during the spin cycle, rumbles, and makes a jet plane noise. If the washing machine makes noise during operation, making unusual sounds, it’s time to pay special attention to it. In this case, a visible breakdown or lack of functionality may not be observed, but the appearance of strange sounds indicates that it is time to look for a malfunction. It is important to understand that a new car that has just been delivered should be inspected for shipping bolts. If you forget to remove them, noise and vibration are inevitable. So, let's begin! We turn the washing machine drum and listen to extraneous sounds.
When rotating, do you hear extraneous noise, hum, balls rolling, does the drum move unevenly with slight jamming? Not really
<< Back
If the drum rotates and uncharacteristic sounds appear, including vibration, it’s time to check the bearings. If they malfunction, they will have to be replaced.
<< Return to the beginning of the diagnosis.
The counterweight of the washing machine has come loose. The fastening of the counterweights must also be of high quality. If they are “loose”, it’s time to eliminate this defect. In some cases, you can notice that the bolts that secure the stones are completely missing. In this case, the connectors for mounting will be visible. The bolts need to be found and put in place - they probably simply came loose. A rumble heard while the washing machine is operating may indicate that the bolts have partially loosened. To check the bolts, you can simply push the drum. If it is secure, the bolts are fine. If it moves, there is a defect.
Do you hear any noise, clanging or rattling noises when moving the washing machine tub? Not really
<< Back
The counterweight has come off
<< Return to the beginning of diagnostics
Checking the shock absorbers of the washing machine Checking the shock absorbers. If you hear vibration or excessive noise during the spin cycle, there may be a problem with the shock absorbers. Sometimes the washer moves. Now let's check the functionality. Remove the top cover. Click on the tank, move it five to seven centimeters down. A normal reaction will be observed if the tank rises sharply, jumping a little and stopping in its normal place. If this does not happen, the shock absorbers need to be replaced.
Are the shock absorbers of the washing machine working? Not really
<< Back
If a visible defect has not been identified, check whether a foreign object may have entered the machine. Replacing shock absorbers. The problem with shock absorbers wearing out occurs quite often over time.
<< Return to the beginning of the diagnosis.
Replacing washing machine shock absorbers. Malfunction and wear of shock absorbers is a fairly common phenomenon.
<< Return to the beginning of the diagnosis.
The washing machine does not turn on. It is worth trying to find the cause of the problem yourself and fix it. We start by connecting the device to the network. Next, click on the “network” button. In different car models, different indications are triggered: here either the display will start working, or, on the contrary, some other button.
Does the washing machine have an indicator? Not really
<< Back
Hatch lock lock (UBL) You can check it by turning on any of the programs. We choose what we will use. Click on the corresponding button. Don't forget to pay attention to the inclusion. As a rule, the process of activating a function is characterized by the presence of a certain sound, for example a click, with which the device makes it clear that pressing again is not necessary and the machine is already working. If there is no sound, the button may be broken. In this case, the main thing that must be done is to block the hatch and start working. If this happens, everything is fine.
The washing machine is blocking the hatch and the UBL is triggered? Not really
<< Back
Water fill valve malfunction
<< Return to the beginning of the diagnosis.
The washing machine hatch does not lock
<< Return to the beginning of the diagnosis.
No indication Checking the electrical circuit. If you notice that the washing machine does not respond to being turned on, it is first recommended to check the power supply. The outlet may be faulty. Try connecting another device. If the outlet works, you need to check whether the circuit that conducts energy through the washing machine from one element to another is intact. To do this, you will need a multimeter, which will help you fully analyze the ability to respond to an electrical signal at several stages of operation. If there is no network connection anywhere, this is probably the problem. We carry out this manipulation until we reach the electronic module. If we are talking about an old washing machine, here it will look like the device’s program. When you turn on the button, there should be no breaks in the circuit. If the circuit works, everything is fine electrically.
Is the washing machine's power supply OK? Not really
<< Back
Repair of electronic module (unit)
<< Return to the beginning of diagnostics
Contact circuit fault
<< Return to the beginning of diagnostics
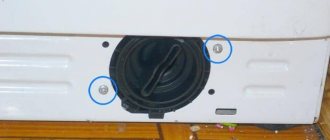
We apply a little force, because the wall fits into the technological protrusions on the body with two plastic latches. You can lightly hit the lid with your palm while facing the front of the washing machine.
Then remove the back half. In the Zanussi and Electrolux SMAs, it includes part of the body on the side. This technical solution provides advantages during repairs because it allows access to parts from the side.
To do this, remove two screws on each side. This is shown in the photo below.
Without top cover
Mounting screws
Then unscrew the 2 bolts (closed with a plug), which are located at the bottom of each side, next to the junction of the body halves.
Unscrew the fasteners from the bottom.
Unfasten the panel with water inlet valves from the back. It's easy to do. We use a small slotted screwdriver and unfasten the latches in the places shown in the photo below.
Drain valve mountings
This is what a Zanussi washing machine looks like with the back cover removed.
Without back cover
Remove the belt from the electric motor and drum pulley. Then we disconnect the rubber tubes from the two pressure switches.
Remove the drive belt and water level sensor
Then loosen the screw located on the pipe clamp. Marked with arrows in the photo. There is no need to unscrew it completely. The clamp holds the rubber pipe between the tank and the dispenser. Let's unfasten it.
Pipe from the dispenser tank
As a result of our actions, only two elements remained on top of the tank that are in contact with the body - springs. They dampen vibration when the drum rotates.
Let's move on to the bottom. We disconnect the electrical wiring from the water heating element of the tank.
Expert opinion
I work in the household appliance repair industry. Extensive experience in restoring washing machines and dishwashers.
Ask a Question
Important! It is necessary to very carefully remove the contacts from the temperature sensor. It is held in place by a plastic latch.
Using wire cutters, we bite off the plastic ties that attract the wiring to the tank and the electric motor.
Wiring fastenings
Unfasten the contact group and grounding from the motor. Unpinning is usually not that easy. Sometimes it is necessary to use pliers.
Motor contacts.
Press the plastic latch on the side. We take out the chip.
We disconnect the grounding, which is attached to the bushing with bearings.
Grounding on the tank
Now our tank is disconnected from the electrical wiring. We remove the train deep into the washing machine so as not to accidentally interrupt it.
We remove the motor. This must be done to make the tank as light as possible. This will also protect the electric motor from moisture getting on the winding or in the terminal box after disconnecting the rubber pipes.
It is important! Remove the motor from the tank before disconnecting the lower pipe! This will prevent water from entering the engine.
Unscrew the four bolts. Two in front.
Engine bolts
2 more in the back of the washing machine.
Distant motor screws
To unscrew you will need: “extensions” and a “cardan” for the “ratchet”, because it will not be possible to directly reach these bolts. This requires bending. Size - 10.
We take out the engine.
We remove the shock absorbers. They are held in place by plastic bushings. Arrows are shown in the photo.
Shock Absorber Lock Bushings
It doesn't make much sense to take both out. The most convenient way is to detach the shock absorbers from the tank and leave them attached to the body.
There is a certain finesse in removing the bushings that hold the shock absorbers in place. On the reverse side there is a protruding latch. It will not allow you to pull out the bushings.
Therefore, we clamp the valve from the reverse side and at the same time pull the sleeve towards us. Use pliers to pull, but first you can pry it off with a screwdriver.
After this, we detach the lower pipe, which connects to the drain pump. The second solution is to pull off the pipe from the pump. But this option is more difficult because the pump is located far in the depths. In addition, the pipe hanging on the tank can be damaged when the tank is pulled out.
So let's unhook it. To do this, use a screwdriver to loosen the metal clamp. We tighten the pipe.
But one more bandage needs to be removed. It attaches the pipe to the expansion tube, which connects to the pressure switch. The clamp is removed using pliers.
Lower pipe mountings
There is one part left that is connected to the tank - this is the cuff. It is pressed with a plastic clamp with small teeth that fit into each other. Open the door and find the connection point. Gently pull it towards you, slightly moving the teeth apart.
Plastic clamp holding the cuff
Cuff clamp.
Remove the plastic bandage and detach the cuff from the body of the washing machine. Now, everything is ready to pull out the tank. Let's get him. To do this, unhook the springs one by one, while simultaneously holding the tank with your hand through the drum.
Springs
Removed tank.
This is what a disassembled Zanussi washing machine looks like. It is necessary to handle the cable very carefully - you can accidentally break one of the wires.
Housing without tank
Common problems
One thing is certain: all problems in the operation of the machine are most often associated with the negligence of the owner. This may be an ignored instruction or incorrect installation. Housewives often overload or underload the drum, creating imbalances.
Even more cases of breakdowns are associated with improper operation and foreign objects entering the working paths of the device. There are also options when repairs are made due to wear and tear of system components.
Blockage
Clogging is a problem for all Zanussi cars without exception. This can be either a simple model or a fairly advanced device, for example, Aquacycle 800 or 900. All brand machines are very sensitive to the quality of tap water.
When installing the machine, it is recommended to install a separate fine filter at the inlet. It’s inexpensive and you won’t have to frequently remove the consequences of blockages.
If the machine is connected directly to the water supply, you need to clean the inlet filter mesh. Removing the blockage looks like this:
- the supply hose is unscrewed;
- unscrew the input filter from the machine body;
- the mesh is removed;
- cleaned and, if necessary, soaked in vinegar or a mild descaling agent;
- the filter is assembled, screwed into the housing, and a supply hose is connected to it.
You can often repair a machine with your own hands in this way. The filter device includes a procedure for removing and cleaning the mesh.
Extraneous noise during operation
Extraneous noise is the most common problem. This phenomenon may be caused by the following reasons:
- drum imbalance due to underloaded or overweight laundry;
- damage to the bearing block.
It is worth noting that malfunctions of a Zanussi horizontal-loading machine in the form of extraneous noise in any operating mode will most likely require the intervention of a qualified specialist. The cause is parts of mechanical components. This could also be a fairly harmless case when the shock absorber of the engine block is weakened or unbalanced. But the reason may lie in damaged bearings. In this case, the entire unit must be replaced.
Changing the bearing
To change the bearings, you need to disassemble the tank. To make working with it easier, it is better to remove the counterweights. We unscrew the through fasteners and remove the front one located around the cuff.
Counterweight Mounts
We pull off the rubber. It is pressed against the body with a round clamp, in the form of a spring.
Tank without counterweight and cuff. A spring is visible on the floor.
Remove the pulley using a 17 mm socket.
You will need to use a lot of force! Let's use leverage!
I use a metal tube for this to create the necessary pressure. The fact is that a special lock is applied to the thread to prevent unwinding during rotation. And tension must be applied in order to move the bolt from the retainer. After this it will unscrew easily.
Pulley removal lever
Remove the small counterweight under the pulley.
We unscrew the bolts in a circle that hold the two halves of the tank together. You will need an extension for the socket wrench.
Unscrewing the fastening bolts.
We separate the two halves of the tank and take out the drum. Sometimes it doesn't come out easily. Then you need to hit the shaft with a hammer - as many times as necessary.
Important! Do not hit the shaft directly. There is a possibility of damage. Let's tighten the fastening bolt and hit it through the board!
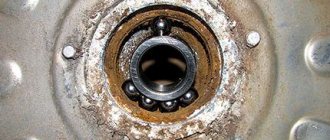
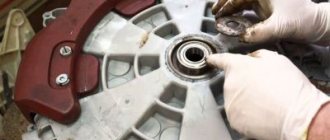
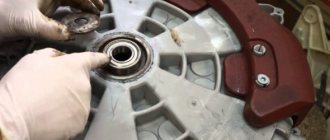
Bushing for bearings and oil seal.
We clean the landing site from the inside of the tank and remove the oil seal. To do this, use a strong screwdriver or chisel. Often you have to use a hammer.
Old oil seal, cleaned of dirt.
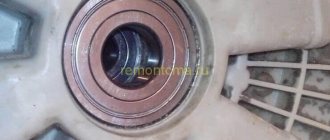
Then we pull out the metal retaining ring. It is located under the oil seal, in a special groove and fixes the position of the bearing. It is better to use round nose pliers with narrow tips and a slotted screwdriver for this. Requires some skill when removing.
Retaining ring.
We knock out the bearing. I use a chisel for this. Very comfortably. There is a wide platform on one side and a narrow one on the other. Let's dismantle the outer one first. We use a medium hammer.
Expert opinion
I work in the household appliance repair industry. Extensive experience in restoring washing machines and dishwashers.
Ask a Question
Note! It is more competent to use special pullers for removing and installing bearings. This is a professional tool. Costs - from 5000 rubles.
Since the bearing is double, this may take time, approximately 15-20 minutes. The chisel must be moved either in a circle or crosswise. This is necessary so that the bearing does not warp in the sleeve and it comes out evenly.
When knocking out, we strike any part of the bearing.
This is a rather noisy procedure, so it can be moved outside. I usually use counterweights as backing since I always have them on hand.
Repair kit.
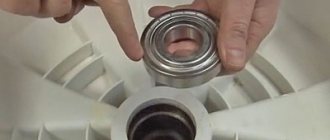
Let's start the installation. The new bearing has a plastic sleeve inside. Do not remove until the product is seated. It will come out easily on its own after you put the drum in place.
Plastic bushing in the bearing.
Expert opinion
When landing, strike only on the outer diameter of the bearing!
First we use the wide part of the chisel. When the body settles, it will be narrow. Be sure to strike on different sides. It is better to use the criss-cross technique, gradually moving in a circle.
You can hammer the bearing in other ways. Some people use an old bearing for this. Another option is a fairly large bolt and a small hammer. The fourth method, which is also the most professional, is a special installation tool.
Planting with a chisel.
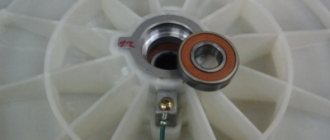
After the bearing is in place, be sure to put back the metal clamp. It should be located in the recess.
Mounted bearing with retaining ring
Then we install the oil seal. As a rule, it has to be driven in with a hammer through a plank. And also, you can use the old one for this. For reliability, it is recommended to use instant glue to connect to the body. This is especially important if the oil seal fits into place very loosely. For example, you placed it with your hands, pressing lightly.
We apply special lubricant to washing machine bearings. We place it on the inner skirt of the oil seal, completely filling the space.
It is highly advisable to apply lubricant to the part of the shaft that is in contact with the oil seal. Only here!
If you cannot find the right product, then you can use Ciatim 221. Some masters use Litol 24.
In principle, the product must satisfy the following requirements:
- Operating temperature not lower than 150°.
- Water resistance.
- Good ductility.
But it is still best to use special materials for washing machine seals.
Part selection
Nowadays, finding the necessary parts is not difficult. In a service center and a household appliance repair shop, just name the brand of your washing machine, and the sellers will immediately find the spare part you need. This applies not only to bearings and seals. In the same way, heating elements, pumps, motors and other important functional elements that require replacement are selected.
You can select the parts you need yourself by ordering them through the online store, but to do this you need to know the unique serial number of each spare part. It can be found on the surface of the element you are looking for that you want to change.
Assembling the washing machine
Installation is carried out in reverse order. However, there are some important subtleties.
First of all, when connecting the tank, it is advisable to use high-temperature plumbing silicone. You need to apply it to the joint. Some masters don't use it. But there are cases of small leakage at the junction. Therefore, we recommend using it.
Important! The silicone must be sanitary grade and high temperature resistant – above 100°!
The second essential point that must be fulfilled. When installing the pulley, we apply an anaerobic fixative to the threads. Only blue! Red is not allowed! You can buy it at an auto parts store.
Option for anaerobic thread locker.
This must be done so that the bolt that secures the pulley does not loosen during operation. This also happens. The washing machine will start to shake during the spin cycle.
Another important point is that if you used silicone, you should not use the machine during the day. It needs 24 hours to completely harden. Yes, and it is advisable to give the thread locker a day, according to the instructions.
Video
This approach can be applied when replacing bearings in any washing machine, not just the Zanussi brand. If you are unsure of your abilities, then it is better to turn to specialists!