How does the sensor work?
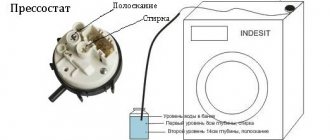
A pressure switch is provided in any automatic machine. It is necessary to control the water level. The sensor sends a signal to the “brain” of the washing machine, notifying the controller about the degree of fullness of the tank. This information is used by the module to control the wash.
The sensor membrane is very sensitive. Under pressure, the rod rises and presses on the plate with the spring. When the water in the tank reaches the desired level, the circuit closes. The pressure switch notifies the module that there is enough water, and the controller starts the next “step” of the wash. At the draining stage, the pressure in the pressure switch tube decreases, the rod begins to descend along with the plate. The electrical circuit is broken.
Replacing the pressure switch
If the pressure switch does not work, it needs to be replaced. The sensor cannot be repaired because it has a solid body. The new device must be identical to the broken one. You can buy it at the manufacturer's service center, in a store or online. In order not to make a mistake when choosing, you should indicate when purchasing the name and model of the washing machine or the identification number of the sensor, if it has one.
To install a new pressure switch, you need to complete the following steps:
- Install the device in place of the old one and fasten it with screws.
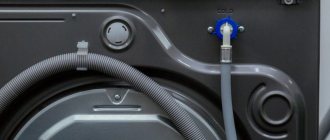
- Connect the hose to the tube and secure with a clamp. First check the hose for damage or contamination. If necessary, replace or clean.
- Connect the wiring.
- Install the top cover and tighten the screws.
- Plug in the plug and open the liquid supply.
- Place laundry in the drum and turn on the wash to check the functionality of the sensor.
Operating rules
To prevent the pressure switch from breaking, you must use washing equipment correctly. There are several operating rules that should be followed when using the machine:
- The machine cannot be used idle. Before starting the wash, the drum is filled at least halfway. If it is empty, the pressure switch will quickly break.
- Wash in warm water. Its temperature should not exceed forty-five degrees.
- Clean the drain regularly. To ensure that water drains well from the tank, you need to clean the drain hose once a month.
Adjustment
In some situations, rotation of the water level sensor can be avoided if proper configuration and adjustment is performed. To adjust the element that controls the water level in the washing unit, there is no need to contact repair specialists, since such work can be done on your own
It is necessary to follow the sequence of operations accurately and work carefully
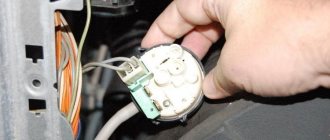
Before making adjustments, you need to find out the location of the element. A large number of washing machine owners mistakenly believe that the sensor is located in the body of the drum, but this is incorrect. The lion's share of manufacturers place a pressure switch at the top of the drain body, which is located near the side panel.
So, the sequence for adjusting the water level sensor of a washing machine looks like this:
- the machine for removing dirt from laundry is disconnected from the power supply and utilities;
- Having unscrewed the bolts and disconnected the electrical wiring, remove the water level sensor;
- we find specialized screws, through which the contacts in the body of the device are tightened or loosened;
- clean the surface of sealant.
All of the above actions can be considered the preparation stage, since the key work on regulating the pressure switch is still ahead. You will need to try to catch the moment of bringing together and disconnecting the contact group using cleaned screws. In this case, the well-known “scientific poking method” is practiced, since only a professional washing machine repairman can have a specialized device for carrying out such work. You will need to act like this:
- the first screw is turned half a turn, the water level sensor is connected to the machine, it starts working;
- if from the very beginning the machine took in little water, but as a result of adjustment it became more - you are on the right track, all that remains is to turn the screw more firmly in the chosen direction and cover it with a sealing compound;
- if actions with the screw give the opposite result, it will need to be turned in the opposite direction, making one or 1.5 turns.
Description
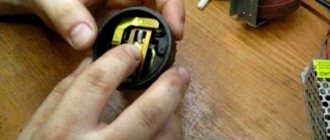
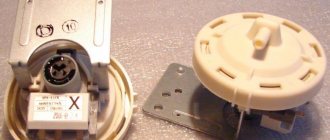
The pressure switch of a washing machine is a device that controls the volume of water in the tank. The main task of the device is to determine the amount of liquid by the pressure of its column. The relay looks like a disk, inside of which there is an air chamber with wires and a tube. The complexity of the pressure switch design depends on the number of washing modes that the machine is characterized by.
For this reason, the pressure switch from one unit will not necessarily function in another. The sensor is made from high quality plastic; it usually looks like a rounded part. A mechanism is needed for the proper functioning of the washing machine and high quality washing. This simple mechanical assembly consists of the following elements:
- frame;
- inductor;
- magnetic core;
- a diaphragm that changes shape under the influence of water pressure and displaces the core;
- contact group.
The electronic liquid level sensor may be located in the following parts of the unit.
- Under the top cover in classic-type washing machines, where there is a front door for loading things.
- In the lower part under the tank in a technique that is characterized by a vertical type of loading of laundry.
- In the area of the rear part of the case, slightly below the laundry container, the pressure switch is located in those machines that have plastic drums.
Symptoms of a problem
Sometimes it is quite difficult to determine the malfunction of a product, especially for people who do not understand technology. It is recommended that you familiarize yourself with the common signs that indicate a faulty pressure switch.
Stops drawing water into the tank
People who have their own washing machine often experience that liquid stops filling into the tank. There are several reasons for this problem:
- Problems with the valve responsible for supplying water. Liquid enters the system under tap pressure. The supply is opened using a special built-in valve, which begins to operate after a signal from the control module. If it is faulty, the liquid will not begin to flow.
- Control module failure. Due to a malfunction of this part, the valve does not receive a signal, and it does not begin to draw water.
- Blocker failure. He is responsible for blocking the hatch door. If the lock is faulty, the machine will not start working.
How to disassemble and repair a dishwasher with your own hands, instructions
However, the most common cause is considered to be a faulty pressure switch. If this product does not work, the machine will not be able to evaluate and will not begin to fill the tank.
Repeated cycles of water supply and drainage
Modern washing machines are equipped with an automatic liquid collection system. Not only valves, but also level switches are responsible for the flow of water. All these parts function using special commands coming from the control unit.
The control unit perceives this as a failure to comply with the command, and therefore it re-sends the signal to supply water. This results in the supply and drain cycles being repeated many times. Due to repetition of cycles, the washing time can increase significantly.
Reduced rinse and wash quality
Sometimes, after using a washing machine for a long time, the quality of rinsing and washing clothes gradually deteriorates. Many people attribute this to the use of inappropriate powders. However, there are other reasons why things begin to wash worse.
A common reason for poor washing quality is a faulty level switch. Due to the breakdown of this part, the washer cannot determine how much water is in the tank, and because of this, it often does not fill completely. This leads to the fact that the collected liquid is not enough to properly wash and rinse the washed items.
Water remains after finishing washing
There are times when, after completing work, some water remains inside the drum. This can happen because the pressure switch has failed and stopped functioning normally. If it does not work correctly, the control unit of the device will not receive a signal about the need to clean the tank. This will lead to the pumps not starting to work to pump out excess water.
However, there are other reasons for this problem:
- Pump filter clogged. Obstruction of liquid from the tank sometimes occurs due to a clogged filter. It will have to be cleaned for the drain to start working.
- There is a blockage inside the pipe. During the draining process, the waste liquid passes through the pipe. Experts advise cleaning it once a month to prevent it from becoming clogged.
Design and principle of operation of the device
Before checking the part, it is recommended that you familiarize yourself with its design features and operating principle. A pressure switch is a part that is responsible for controlling the volume of water in the washing system. Different operating modes of washing equipment require different amounts of water. Therefore, when switching, a level switch is used to check the amount of liquid in the tank.
The part is made of high-quality plastic and has a round shape. It connects to electrical wiring and a hose to determine pressure. Inside there is a switch with a thin membrane. When the system is filled with water, pressurized air will flow through the hose, causing the switch to close. After this, the system will stop taking in new fluid.
https://youtube.com/watch?v=XOBXWWR5RPQ
Symptoms of a problem
If the pressure sensor fails, an error code will be displayed on the display of modern washing machines (each manufacturer has its own error, look in the operating instructions). But damage can also be determined by other signs.
Water does not fill
After selecting a washing program and turning on the machine, water does not fill, but the wash starts. This happens when the contacts of the device stick in the “full” position, and the programmer automatically starts the “dry” washing process.
Repeating cycles multiple times (endless wash)
Due to a breakdown, the sensor stops functioning or does not work correctly, transmitting incorrect commands to the control panel. It is necessary to disconnect the machine from the network and replace the pressure switch.
Poor wash quality
If the sensor is adjusted to low pressure (or the membrane has become stuck due to age), then the water in the tank will not be enough to thoroughly wash dirty clothes. In this case, tighten the spring with the adjusting screw.
Water remains in the machine
There are several reasons why water remains in the drum, including a malfunction of the pressure switch or related elements. Sometimes after finishing the wash, not all the water is drained and new water immediately begins to accumulate. If all the hoses are clean and the drain pump is working correctly, the problem is in the pressure switch.
The smell of burning
The lack of water in the washing machine and the appearance of a burning smell indicates a malfunction of the sensor or problems with the pump. The programmer starts the washing process, the heating element begins to heat up, but since there is no water, the fuse of the heating device trips, which is why the smell appears.
Principle of operation
The operating principle of the pressure switch is based on reading oscillations that are converted into electronic signals. When water is pumped inside the washing tub of a machine, it creates powerful air vibrations that can be measured. These same vibrations reach the pressure switch core through the hose, pushing away the diaphragm and causing it to hit the central magnet of the device. As a result of the impacts, a pulse is generated that pushes the core into the adjusting screw and thereby sends data to the connected controller through the contacts. The electronic pressure switch thus receives up-to-date information about the extent to which the tank is filled with water.
The controller can determine the volume of filling the central container with water by the type of vibrations emitted. The higher they are, the fewer obstacles inside the washing machine for the propagation of sound waves and the lower the water level. Otherwise, when there is a lot of liquid, it begins to absorb any vibrations, which makes it clear to the computer circuit that there is not enough water and it is not recommended to start washing. When the oscillation frequency drops to the minimum specified by the setting, a corresponding signal is sent to the board through the adjusting screw and the machine stops drawing water through the hose.
At the same time, the factory settings for sensors vary from brand to brand, since they are set by manufacturers at the assembly stage and after that do not attract attention until a breakdown or technical diagnosis occurs. However, over time, due to numerous vibrations along the membrane and core, its height is lost, and the transmission of data on the degree of filling with water becomes less accurate, until the operation stops completely. To return it to operation, you need to disassemble the washing machine, which you can do yourself or entrust to a specialist.
Sensor Test Guide
Before trying to check the pressure switch on a Bosch Maxx 4 (or Samsung) washing machine using a tester or improvised means, you should weigh the validity of this action. If the washing machine is under warranty, unauthorized interference with the operation of the unit will be grounds for refusal of warranty service by the seller or manufacturer.
Sequencing:
- Unplug the power cord from the outlet.
- Remove the top panel by removing the two small screws located on the back wall and sliding the panel back and up.
- Find a sensor cantilevered to one of the walls of the housing.
- Remove the connector, release the fastening (screw), and remove the sensor hanging from the tube from the machine.
- Using pliers, open the clamp on the supply tube and remove the device.
Water level switch
Before checking the adjustment of the device using tools, you can evaluate the overall performance of the sensor. To do this, you will need a piece of tube identical to the rubber tube of the relay. Having pulled the device out of the machine, you need to connect it to a short tube, blow strongly into it and determine whether the relay inside the device clicks in response to a change in pressure. If not, the sensor is faulty.
Procedure for replacing the pressure switch
Before changing the pressure switch of a dishwasher or washing machine, you need to check the equipment and make sure that it really does not work. You can check whether the pressure switch is working and which specific part has failed in several stages:
Completely disconnect the machine from communications, turning off the water supply, drainage and electricity; Place the washing machine or dishwasher on a moisture-absorbing cover (for liquid residues) so that you have access to the water tank; Next, remove the outer cover and, based on external signs, locate the water tank and water pressure sensor with a tube; Next, you need to carefully unfasten the tube and check it for blockages, then blow into it, listening to the sensor itself. If the device is working properly, after air is supplied inside, a characteristic click of the membrane should be heard (possibly with a short delay of 1-2 seconds)
If punctures are found on the hose or it is clogged, you can replace the hose without replacing the main element; The electrical circuit is checked using an Ohmmeter, which should show a gradual decrease in resistance on the contacts coming out of the pressure switch housing; If a click is not heard or the resistance remains unchanged, this means that the device is faulty and needs to be replaced.
The entire replacement process consists of carefully unscrewing the mounting bolts and dismantling the faulty device, in whose place a new one is installed. In this case, it is advisable to use a tool suitable for this - special Phillips screwdrivers and pliers, and also purchase the exact sensor model that was installed on your equipment.
Otherwise, it will not be possible to guarantee adequate operation of the entire system, which may lead to failure of its remaining elements.
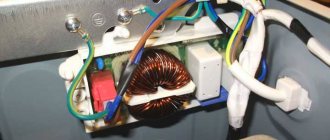
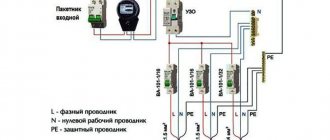
Pressure switch from a washing machine (mechanical water column level sensor)
Since the device is undoubtedly suitable for use in the manufacture of electrical automation for distillation and rectif. equipment, I decided to post the information in a separate topic. This device has an elastic membrane in a sealed housing that controls groups of electrical contacts, depending on the applied external pressure. Response levels are up to 500mm WATER column, usually there is adjustment. Water itself does not flow into the pressure switch; pressure is transmitted by air. Pressure switches from washing machines work with heating elements with a power of up to 2kW, the contacts are powerful, and they hold the load reliably. In the latest electronically controlled models, non-mechanical pressure switches are occasionally used. But usually they use mechanics, in addition to the water level indicator, through which power is supplied to the heating element, as additional protection against turning on the heating in the absence of water. From my many years of experience in repairing washing. The machines have NEVER had contact burnout. There were stickings due to loss of elasticity of the springs. Pressure switches have up to three groups of contacts for different pressure levels; there are two-section ones - with two chambers, but this is already rare. The groups are usually three-contact, switching; devices with one group of contacts usually have a fourth contact, which closes when the water level is exceeded. Groups are usually marked with two-digit numbers, the first character is the group number, the second is the contact number. All groups of contacts are adjusted externally with plastic screws. But to understand which goes where - only at random, or disassemble the pressure switch. At prices (in Moscow) The simplest is 300 rubles. And you can safely use a used one, the device is reliable.
Ask questions, I’ll tell you what I know.
And share your experience of using it, please.
Last ed. 23 Sep. 09, 18:15 from Third
Good topic, Third
, Thank you.
Actually, the pressure switch I have is the cheapest from some Candy or Upo - who knows, like this
At the factory it was adjusted to a threshold of 27mm mercury with a differential of 7mm mercury. Neither one nor the other suited me, I armed myself with a pressure gauge and other paraphernalia from the tonometer and first set the response threshold to 37 mm of mercury and the differential, respectively, to 2 mm. And now I’ve encountered such a problem, I’m writing about my rake so that someone doesn’t run into something similar.
BE VERY CAREFUL IN ADJUSTING THE DIFFERENTIAL - I don’t recommend lowering it to the limit.
The last rectification went down the drain - the result: 4 liters of alcohol were contaminated with tails. First, I blamed the power regulator, then the diodes in the power supply circuits of the heating elements, it turned out that the rattling and sticking of the contacts was in the pressure switch. The rectification was simply terrible - everything worked completely unpredictably, the Dallas sensors hardly worked at all, some points on the graph, it felt like there was always some kind of smoldering, very small and unstable short circuit, in short, the pressure switch did not regulate the pressure in the cube, but He constantly gradually raised it, then lowered it, and completely not in the range for which he was supposedly tuned. But what’s interesting is that the RCD with a shutdown threshold of 10 mA and the 16-amp “B”-class circuit breaker did not shut down the system, that is, even if there was a leak or a smoldering short circuit, the automatic shutdown did not notice them.
Now I figured it out, reset the response threshold to 50mm of mercury and the differential to 3mm, checked it with a 100W light bulb over the entire pressure range - it seems to plow predictably. I haven't tested it on a column yet. That's it.
Third
, and what is this yellow little thing (in my photo at the very bottom)? It bounces slightly when switching contacts, but does not affect anything. And what is this 4th contact, why is it needed there - it is also not used under any pressure?
Procedure for replacing the pressure switch
Once you have confirmed that the water level sensor is faulty, you can replace it with a new one. If the pressure switch malfunctions, you can repair the washing machine yourself. Repairing the water level sensor does not make sense, since its body is non-separable and attempts to disassemble it will lead to damage to the internal parts. The new water level sensor must be exactly the same type and name as the old one, corresponding to the given brand and model of the machine, taking into account the capacity of the loading drum. It also wouldn't hurt to check it before installation. The unit is installed in the reverse order of dismantling:
- secured in place using mounting screws;
- connecting the hose to the fitting and tightening the clamp;
- connecting wiring with a connector;
- installing the top cover and tightening the mounting bolts.
After completing the repair, you should turn on the washing machine and check operation in several modes or perform a test wash.
- https://stiralkainfo.ru/remont/kak-otregulirovat-pressostat-stiralnoj-mashiny.html
- https://sw19.ru/forum/5832
- https://serviceyard.net/sovetyi/regulirovka-pressostata-stiralnoy-mashinyi.html
- https://cosmo-frost.ru/stiralnye-mashiny/remont-i-zamena/kak-proverit-pressostat-rele-urovnya-stiralnoj-mashiny/
- https://tehrevizor.ru/remont/78-krupnaja-bytovaja-tehnika/proverjaem-pressostat-stiralnoj-mashiny.html
Settings
For the level sensor to work correctly, it must be configured, but this is not the concern of the owner of the washing machine, but the manufacturer, since the setting is carried out and checked in production. However, there are situations when the owner of the equipment wants to change the pressure switch settings. This can be done by tightening the adjusting screws on the part.
How to check the sensor
To make sure the sensor is working, you need to check it. There are several useful recommendations that will help you check the serviceability of the part.
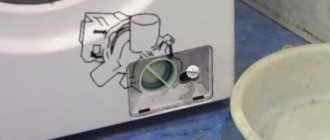
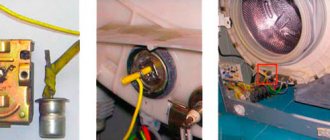
Where is
Before proceeding with dismantling, you should understand the location of the product. Many washing machine owners mistakenly believe that the part is located inside the drum, but this is not the case. Most manufacturers install a level switch on top of the drain body, which is mounted near the side wall. This arrangement is considered very convenient, as it simplifies the removal of the product from the structure.
However, on some models the sensor may be installed in other locations. For example, in modern models of Samsung or Ariston washing machines, the part is installed on the right near the front wall. For cars, the relay is located in the central part of the left side wall.
How to dismantle
It is quite easy to dismantle the pressure switch yourself. However, despite this, you need to familiarize yourself with how to do it correctly. The dismantling process is carried out in several successive stages:
Removing the top cover. To get rid of it, you will have to unscrew two bolts that are located on the back wall. The top cover is then carefully slid back and removed. Detaching a part. The relay is connected to wires leading to the control unit and a hose
Before removing the product, you must carefully disconnect the wiring and hose. Removing the pressure switch. It is connected to the wall with mounting bolts that must be unscrewed.
Checking with a multimeter
There are different methods for checking the functionality of a device, but most often they use a multimeter for this.
It is set in advance to resistance mode, after which the probes are connected to the contacts of the removed part. After connecting the probes, the values on the tester display should change. If the numbers have not changed, then the relay is faulty and will have to be completely replaced with a new one.
What wallpaper can be painted, operating instructions and tips for applying the material
Checking legs, hoses, bolts
It is best to start with the bolts that secure the drum during transportation. They are located on the back panel, installed in the right places and fixed. With their help, the tank is not subject to vibration and accidental damage. Any tilt of the bolts hints that the car was handled carelessly during transportation and the tank has moved out of its place. And if it is made of plastic, then, most likely, cracks have appeared on it. It is best to abandon such a car in time.
Let's move on to the legs of the SMA. There are four of them in total, and each one will have to be screwed in to make sure there are no defects. The installation process should go smoothly without any obstacles. Serviceable legs will ensure the evenness of the working body, which will affect its service life.
The hoses must be intact, and they will have to be inspected at least visually
In this case, pay attention to the fastenings so that the diameter of the hoses corresponds to their size. The drain hose, through which water is directed into the sewer pipe, is attached to the back wall of the washing machine and is already connected to the pump
Its structure is corrugated, the material used for manufacturing is distinguished by its thinness. The hose feels fragile to the touch and is highly likely to suffer damage from mechanical impacts. So this element of the machine will have to be checked thoroughly, because it is through it that most leaks occur.
The inlet hose has a denser structure. At its ends there are plastic nuts, with the help of which the hose is mounted to the water pipe and to the machine itself. All elements must be intact and free of chips and cracks. The nuts must be tightened without fail to check the condition of the threads and the tightness of the fit.
The washing powder tray must be completely dry and clean. You can even smell the item to make sure it hasn't been washed with chemicals.
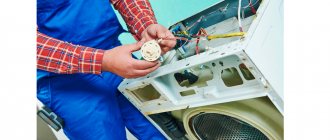
Repair features
The pressure switch works according to a specific scheme, which is not complicated. The owner of the washing machine can independently clean the pipe, remove the sensor, or replace the device. A broken water level sensor can cause serious problems with your washing machine. If the user fails to clean or repair the part in a timely manner, the following problems may appear:
- water will stop collecting;
- the spin of washed clothes will deteriorate;
- Over time, the heating element may burn out;
- the laundry will be poorly washed;
- the tank will overflow with water.
In case of minor breakdowns of the pressure switch, you should not buy a new mechanism; tuning the old device can help with this situation. The sensor is replaced as follows.
- Removing the old relay by disconnecting the wires and hoses. The procedure must be carried out with extreme care to avoid unwanted damage. After this, unscrew the mounting bolts that secure the housing.
- Installing a new relay. The structure is screwed to the place where the old one was. After this, a hose is attached to it with a clamp and the electrical wiring is installed.
Before installing a new relay, it is worth checking its functionality in advance. Immediately after repair work, the machine should be checked in several washing modes. In order to prevent breakdowns of the pressure switch, experts recommend listening to the following advice.
- Do not use the washing machine while idling. Before washing, the drum is filled more than half with liquid. If the device is empty, the sensor will soon break.
- Wash exclusively with warm water. For a high-quality laundry cleaning procedure, the temperature of the liquid should not be more than 45 degrees.
- Clean the drain on a regular basis. To ensure that water drains from the tank without obstructions, the drain must be cleaned once every 30 days.
Each washing machine is equipped with a pressure switch, which is responsible for the water level in the drum. In some cases, the relay may break down, after which it will need to be repaired or urgently replaced. If it is difficult for the owner to check or replace it, then it is better to use the services of professionals. To increase the service life of household appliances, as well as their parts, it is recommended to use the machine strictly according to the instructions provided by the manufacturer.
To learn how the pressure switch works, see below.
Consequences of ignoring the problem
Failure of the pressure switch leads to serious consequences, which should be familiarized with in advance. If you do not replace the broken part in time, the following problems will appear:
- Water does not fill up. If the level switch is broken, the liquid stops collecting. In this case, the heating element may turn on, which will lead to further damage to the heating element. Therefore, before starting washing, be sure to check that the tank is not empty.
- Deterioration in wringing out washed items. Sometimes, due to a component failure, the fluid stops draining normally. Because of this, things turn out much worse.
- Tank overflow. Sometimes, due to a broken part, too much water is pumped into the tank, causing it to overflow.
Checking the pressure switch
If you have the slightest doubt about the correct operation of the pressure switch, you must immediately replace it with a new one. But before that, you need to gain confidence that the problem is with the sensor. Checking the pressure switch of a washing machine is quite simple:
- The top panel must be removed. You can remove it by unscrewing the special bolts and sliding it in the opposite direction from you. On most models, the sensor is located at the top of the side wall.
- Experts recommend simply unscrewing the pressure switch. It is usually secured with several screws, which are quite easy to unscrew.
- After this, disconnect the tube and contacts from the sensor. The hose is secured with special clamps; they will either have to be carefully disassembled or cut off and then replaced with new ones.
Carefully examine the dismantled pressure switch: there should be no damage or formations on the housing. Check the tube and the condition of the insulating material of the wiring no less carefully. If necessary, clear blockages and repair minor damage. Clean the sensor contacts.
Now let's check the device itself. Typically, a ten-centimeter hose is used for this, identical in diameter to the one already removed earlier. Having connected the tube to the inlet fitting of the pressure switch, blow strongly into it.
At this moment, clicks should be heard from the sensor. Their number depends on the blowing force.
This small device is necessary for the entire system. When it fails, it deprives you of the ability to wash, and can lead to various breakdowns. Replacing the pressure switch in an automatic washing machine is a troublesome, but not complicated process.
Pay attention to the behavior of your machine, and you will be able to notice a malfunction in time
After some time from the moment of operation of the washing machine, any of its elements may lose their functionality. For example, a violation of water intake, expressed in underfilling or overfilling of liquid, will tell you that there are problems with the sensor that controls its intake. It is not always necessary to replace it; sometimes it is enough to adjust the pressure switch of the washing machine so that it works normally. By performing these steps yourself, you will not spend extra money on a new element and will extend the life of the existing sensor.
What is this detail?
Modern automatic machines have many components and components. Each part performs a specific function. The pressure switch monitors the water level in the tank. The sensor measures how much liquid is in the “centrifuge”, focusing on the pressure in the tube.
The relay is made in the form of a disk. Inside the pressure switch there is an air chamber with a diaphragm, a magnetic core and a tube. Sensors can be of simple or complex types, differing in the sensitivity of the membrane and the stroke of the rod.
The pressure switch from one machine does not always fit another washing machine. Therefore, if the factory sensor breaks down and requires replacement, be sure to look for and buy an analogue, focusing on the model and serial number of the machine. The “shell” of the pressure switch is made of high quality plastic. Externally, the relay resembles a washer. The sensor is assembled from the following components:
- plastic “shell” (body);
- coil;
- membrane. She is able to change shape under pressure and press a switch;
- magnetic core (plays the role of a switch);
- wires.
Depending on the model of the automatic machine, the pressure switch needs to be looked for in different places. The water level sensor is installed:
- under the top panel of the case (on most front-facing cameras);
- from below, under the tank (in “verticals”);
- at the back of the body, just below the tank. This arrangement is typical for SMAs with plastic drums.
Now it’s clear how the pressure switch works and in which part of the washing machine to look for it. We will also analyze the principle of operation of the level sensor. Let's tell you what its role is in an automatic machine.
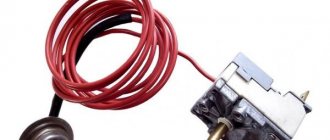
Variety of temperature sensors
An automatic washing machine can be equipped with only one of the following three temperature sensors:
- Bimetallic;
- Thermistor;
- Gas-filled.
Each of these three temperature sensors has its own different capabilities and may differ in design and operation, so each of them is replaced and tested differently.
The bimetallic temperature sensor looks like a tablet, approximately 20-30 millimeters in diameter and 10 millimeters in height. Inside this small tablet is a bimetallic strip. During the process of heating water, when it reaches a certain temperature, the plate bends and creates a closure of the contacts. Under this condition, the heating process is completed.
The thermistor has become a fairly popular element among modern washing designs, which has replaced the temperature sensor.
The thermistor looks like a small elongated cylinder. Its diameter is about 10 millimeters, and its length reaches about 30 millimeters. This cylinder is attached directly to the heating element. The principle of operation of such an element does not involve any mechanical work of the part, but simply changes the resistance during the process of heating the water to the temperature you need.
A gas-filled temperature sensor has only two parts: the first is a tablet made of metal with a diameter of approximately 20-30 millimeters and a height of about 30 millimeters.
The first element is mainly located inside the tank itself, and is always touching the water to change the temperature. The second part of the temperature sensor is made in the form of a copper tube, which is connected to the temperature controller (external), which is located on the control panel of the washing machine. Inside these elements there is a gas, the name of which is freon. Under the temperature of the water, this gas can compress or expand, thereby forming contacts that lead to the heating element.