- We disassemble the washing machine
Household appliances tend to break down when you least expect it. Bosch washing machines are no exception. That is why many are interested in whether it is possible to repair a Bosch washing machine with your own hands, without the help of a specialist. Experts answer this question in the affirmative. To dismantle, inspect and replace parts, you must have instructions, a diagram of the washing machine and a certain set of tools.
Even a novice technician can repair a washing machine at home.
Diagnostics
Most modern models of Bosch washing machines, for example the Maxx 5-6-7 series, are equipped with a self-diagnosis system, which greatly simplifies the identification of faults. In order to establish the nature of the breakdown, it is not necessary to contact the service center; it is enough to perform a few manipulations, and your machine itself will “tell” what the problem is. So, let's start performing the service test:
- Close the sunroof, move the program selector to the “Off” position.
- Pause for 2-3 seconds, move the switch to “Spin” (clockwise).
- When the Start LED flashes, press and hold the Mode Speed button. Watch "Start" - it should start flashing again.
- Turn the switch to "Drain" (clockwise).
- Release “Revolution Mode” (you didn’t forget to hold this position, did you?).
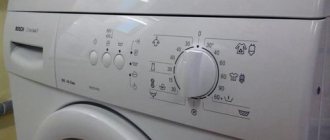
- Next, put the switch in the position corresponding to testing any component of the washing machine (3 – motor, 4 – drain pump, 5 – tubular electric heater (TEH), 8 – main wash water inlet valve, 14, 15 – quick automatic test). Below is a diagram of the switch and the location of the numbers that correspond to the position of its handle.
Here is a schematic image of the switch and an explanation of the positions of its handle
Some models differ in the numbering of commands: for example, in the Bosch Logixx 8 washing machine, the engine is checked in the 4th position (by the way, in this washing machine you can carry out quick diagnostics by setting the switch to number 3). When the test is completed, an error code will appear on the display, which the instructions will help you decipher. In older models without a display, the error can be recognized by the glow of the LEDs, after which you can begin to repair the Bosch washing machine.
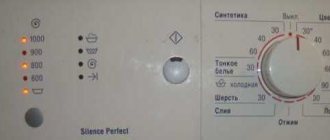
The photo shows the control panel of the Bosch Logixx 8 washing machine; Diagnostics of breakdowns in it is carried out according to the Bosch Maxx principle, only the numbering of commands is slightly different
It is somewhat more difficult for owners of older generation models - they will have to determine the breakdown based on its symptoms.
Signs of malfunctions and their causes
Devices from earlier years, for example Bosch WFT 2830 or Bosch WFF 1201, cannot independently diagnose problems, so the user will have to do this based on their characteristic symptoms:
- Water is collected slowly or not at all . This occurs due to the accumulation of debris in the inlet filter or a malfunction of the fill valve. The culprit of the breakdown may also be the water level sensor - pressure switch;
- the water doesn't drain well . The problem most often lies in a clogged drain filter, failure of the drain pump or pressure switch;
- the water does not heat up . The heating element is almost always to blame for this. The heating element burns out for two reasons - natural wear or scale formation. Sometimes there is no heating due to problems with the control board or a malfunction of the temperature sensor;
- The drum does not spin . A belt drive transmits torque from the engine to the drum. If the belt falls off or breaks, the drum will not move. A more serious option is engine failure;
- loud noise during spin cycle . The reason usually lies in the destruction of the bearings.
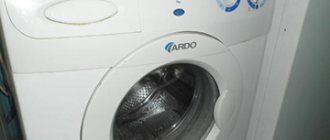
In the photo Bosch Maxx 4 WFC 2060 is a model equipped with a self-diagnosis function
Any of the listed problems can be caused by a failure of the control module (electronic controller). Unfortunately, it is very difficult to repair this unit yourself; it is better not to try. Contact a service that provides repair services for Bosch washing machines at home. Specialists will resolder the board or replace it with a new one.
Characteristics
The dimensions of the washing machine are 60x85x40 cm. It is not designed as an additional element for countertops or other interior options, therefore it is free-standing. The maximum weight of loaded laundry should not exceed 5 kg. Washing efficiency - A. This class is one of the largest, which guarantees the best results even with stubborn old stains. Loading is front type.
Bosch Classixx 5 (the annotation has more detailed properties) is equipped with 5 temperature variations. Among the washing options, you can note the separate washing of cotton, wool, and jeans. Combined mode is allowed. There are 11 options in total. The machine consumes 45 liters per wash. water.
There is a spin function. There is also a button in the program that cancels this process. In addition, a leakage protection system is connected.
Getting ready for renovation
Restoring the functionality of a washing machine involves disassembling it, and in order to correctly carry out this procedure, you need to familiarize yourself with the layout of the internal elements of the equipment.
Here is an approximate diagram of the internal structure of a washing machine
We disassemble the washing machine
You will have the following disassembly steps:
- removing the top, back and front covers;
- removing the detergent tray;
- removing the control panel;
- dismantling the motor, intake valve, pressure sensor;
- disconnecting connectors, wiring, pipes and hoses;
- unscrewing weights and supports;
- removal and disassembly of the tank.
What tools are needed?
Before you repair your Bosch washing machine, make sure you have:
- screwdrivers - Phillips, slotted and hexagonal;
- hammer;
- chisels;
- wire cutter;
- pliers.
You will also need an electrical measuring device - a multimeter.
Dismantling procedure
In order not to get confused during disassembly, let's outline a plan. How to disassemble a Bosch washing machine - dismantling sequence:
- all walls;
- container for detergent;
- control panel;
- electric motor, pump, tubular electric heater;
- drive belt, pulley;
- shock absorbers, counterweights;
- inlet valve, pipes, pressure switch;
- filter, pipes;
- hatch and UBL;
- tank.
Shutdown
The simplest stage. It is important - your safety depends on it. Disassembling a Bosch washing machine begins with disconnecting all communications. Disconnect the device from the water pipe, from the sewer, and disconnect from the electrical network.
What and how we repair houses
Next, using the example of repairing a Bosch Maxx 5 washing machine, we will tell you in more detail about what problems you can fix yourself:
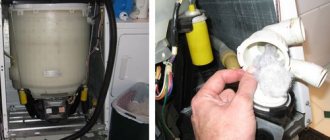
- Cleaning filters . The named parts are most susceptible to blockages. The drain filter is located in the lower corner of the machine, behind a small panel, and is closed with a lid. To open the filter, you need to turn the lid handle counterclockwise. It is not only the filters that need to be cleaned, but also the place where they are installed – dirt also collects there. Before removing the drain filter, spread rags under it - water will flow onto them while removing the part. The inlet filter is located at the connection point of the water inlet hose.
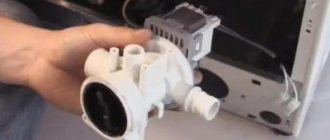
- Repair or replacement of the drain pump . You can get to it by removing the front panel of the machine. How to do it? Pull out the detergent dispenser tray. Unscrew the screw located at the bottom right in the opened niche. Remove the bottom panel - to do this, unscrew the screw next to the drain filter, then the screws at the bottom of the panel. Remove the metal ring that secures the seal to the hatch, using a screwdriver to bend the spring, and dismantle the seal itself. Pull the bottom edge of the front panel to remove it. To remove the pump, you need to disconnect the wires from the hatch lock. So, the pump is in your hands. Disassemble it and check for foreign objects. The impeller of the mechanism must rotate freely in both directions. If nothing interferes with its movement, check the winding resistance with a multimeter - a reading of 200 Ohms indicates its serviceability.
- Replacing the heating element - heating element . Remove the back wall of the case. At the bottom of the tank you will find a shank (two contacts with wires connected to them). Measure its resistance with a multimeter. The value should be 30 ohms. The absence of numbers or the infinity sign indicate that the heating element must be replaced. It must be removed by disconnecting the wires and unscrewing the nut between the contacts. The spiral may become stuck and cannot be removed. Tap it lightly with a rubber mallet or soften the scale with a special product such as WD-40. After you have removed the heating element, clean the inner edges of the hole in the tank and only then mount the new part. When replacing, it is important to use a heater designed specifically for your model. If you install another one, it may burn out immediately (and along with it the control module).
- Troubleshooting the pressure switch . How to repair this part? Malfunctions of the water level sensor can be associated not only with its final breakdown. The element itself may turn out to be serviceable - just a blockage may form in the tube that is attached to it. The pressure switch is located under the top cover in the right corner and is held on by two screws. Check its tube and contacts and clean them if necessary. Replace the sensor if necessary.
- Replacing bearings . This procedure will require complete disassembly of the washing machine. During dismantling, do not disconnect the wires from the control unit - it will be difficult to connect it back. Dismantle the part and place it on the upper frame or hang it on a special hook. How to disassemble the machine? When repairing a Bosch washing machine, in order to unscrew the drum, you must first unscrew the springs. The tank is connected by two plastic latches that will have to be broken. The faulty bearings are carefully knocked out of the seat using a hammer and chisel, the seating area is cleaned, and then new parts are installed.
Now you know how to repair the unit at home. Bosch Maxx 4 washing machines are repaired in a similar way.
In the photo - Bosch Maxx 5 washing machine
Identifying broken bearings
It is not difficult to understand that the BoschMaxx 5 needs to replace the bearings. The washing machine will signal every wash about problems with the drum assembly. The very first and most obvious “symptom” is increased vibration of the body, which during spinning develops into a strong hum and “jumping”. At the same time, a roar and clanging sound is heard, reminiscent of metal balls rolling. In neglected situations, rusty liquid will leak out from under the machine. It will also be found on the pulley if you remove the back wall and carry out an inspection.
You can also check the condition of the bearing assembly using a “manual test”.
- We take hold of the edge of the drum.
- We pull the container forward and back, and then left and right.
- We evaluate the movement of the tank: if play is noticeable, the drum is loose, which means the bearings need to be replaced.
You cannot operate the washing machine with broken bearings. With each wash, the drum will become more loose and begin to hit the tank, destroying it and itself. All this will lead to an imbalance, the machine will begin to jump and gradually damage internal parts and mechanisms. The pulley will not be left out, which will make grooves on the outside and finally “break through” the drum cylinder. In this case, Bosch repairs will become several times more expensive.
Prevention
It’s good to be able to repair household appliances yourself, but it’s even better when they don’t break. Timely prevention will help you avoid washing machine breakdowns. It includes regular cleaning of the filters (especially the drain filter - every 2-3 washes) and the drain pump, and lubrication of the bearing seals. To prevent scale from forming too intensively, special filters should be installed on the water supply system. Give your Bosch machine proper care and it will serve you for many years.
Resetting an error on a Bosch Maxx 5 washing machine
Hold down the “Revolution” button and move the selector 1 division to the left - “7 o’clock” (depending on the SMA model, this can be the “Super fast”, “Drain” or “Spin” mode). Count down 3 seconds and release the Speed button.
Turn the selector to 5 o'clock. The mode may be called “Jeans”, “Rinse” or “Delicates”. The most important thing is that you took 1 “step” counterclockwise from the 6 o’clock position.
Wait 2 seconds and return the selector to the 12 o'clock position (off). You need to turn the selector counterclockwise!
After these steps, the machine should reset the error and, when selecting a program, show its duration.
We finish everything by removing the tank
If all the steps described above have been completed, you can complete the work by removing the tank. To do this, just unscrew the shock absorbers and counterweights, and then try to pull the tank out of the body. If it comes out safely, you can congratulate yourself: you have managed to disassemble the Bosch washing machine yourself!
So, we have described the process of disassembling a Bosch washing machine. Of course, it is not advisable to repair high-quality equipment yourself; it is preferable to entrust all the work to a specialist, but it is still worth knowing what to do in a pinch.
Remember that you perform all the actions described here only at your own peril and risk. No one is responsible for possible damage if you deviate from the instructions. We hope that our material was useful to you.
How to reset an error on a Bosch washing machine
The self-diagnosis system of various Bosch washing machines has one oddity. If the program recognizes a malfunction and generates an error code, you cannot simply remove this error from the display, even after repairing the washing machine.
You must first fix the problem, then, following a certain scheme, you need to reset the error on the Bosch washing machine. Only after this the washing machine will be able to start normally and can be used. We will tell you how to perform such a reset in this article.
Reset for Logixx 8 series machines
An equally mysterious error reset scheme for the Bosch Logixx 8 washing machine. To be honest, it’s not clear what the developers were thinking when they put such a strange algorithm into the program. Why did they need this? Let's forward this question to the German developers, and we'll move on to a description of resetting the error code on the Bosch Logixx 8 washing machine. So, we proceed as follows.
- We turn on the machine.
- Move the program selection knob to the “Spin” position.
- We wait about two seconds until a characteristic squeak is heard and an error flashes on the display.
- We find a button near the display with an arrow to the left, hold it and count down 4 seconds.
- Next, quickly turn the program selection knob to the left by 1 division (to the drain position).
- Next, release the “Arrow” button and move the program selector to the “off” position.
After you have completed all of the above, the error will be reset and after turning on the washing machine again, you can start washing. Please note that the error will definitely return if you simply reset it without eliminating the cause of its occurrence. Such a reset should be done only after a quality repair, otherwise a serious system failure may occur, which will add to the problems.
How to disassemble a top-loading washing machine
Disassembling vertical washing machines made by Bosch, Whirlpool and other companies is performed in approximately the same way. There may be only minor differences, but the general procedure is very similar and looks like this:
- Unscrew the fasteners on the sides, pry them off with a screwdriver and disconnect the control panel.
- Tilt the panel back a little, disconnect the wiring after photographing it. Remove and store the assembly.
- Remove the board: disconnect the remaining wiring and unscrew the screws.
- Disconnect the fill valve. First, you should open the clamps and separate the rubber hoses, turn off the power and press on the special holes to squeeze out the part.
- Unscrew the fasteners holding the side panels. Slide them down, remove and put away.
- Now there is access to the fasteners securing the front panel. Unscrew it and remove this part of the housing.
- Now the user has access to such important components as a belt, motor, pump, pressure switch.
- Next you need to lift the cover, unscrew the fasteners and remove it. It is necessary to disassemble the lid in very rare cases, for example, if the latch holding the door after closing is broken.
- The upper part of the case is held in place by several self-tapping screws under the rubber seal; to remove it, you will need to unscrew them.
- Now you have access to the hatch locking device and the cuff.
- To replace bearings on vertical washing machines, the tank cannot be pulled out, unlike front-facing ones. But if such a need nevertheless arises, the shock absorbers and counterweights should be disconnected.
- The tank is held in place by four springs. After all interfering parts have been removed, it can be pulled out of the case.
Disassembly of the top-loading washing machine is complete.
Disassembling a Bosch washing machine
To replace bearings and seals, the Bosch machine will need to be completely disassembled. This process is very similar for different series (Bosch Classixx5, Bosh Avantixx or other) and looks like this:
Unscrew the screws from the back of the washing machine, move it forward a little and remove the top cover. Remove the detergent drawer. Unscrew the three screws behind the cuvette and one from the inside that hold the control panel. Take a photo of the wiring connection, disconnect the wires, remove the panel. Remove the plinth panel located at the bottom of the front of the machine. Unscrew the screws located behind it. Open the hatch. Unclench and disconnect the clamp holding the cuff. Tuck the cuff inside. Unscrew the screws holding the UBL, stick your hand inside, pull out the locking device, disconnect the wiring and remove the part. Lift, remove and move the front panel to the side. Disconnect the compartment into which the detergent cuvette is inserted, loosen the clamp securing the hose for supplying detergent to the tank and remove the pipe. Unscrew the fasteners, remove the counterweights installed at the top and bottom. Take a photo of the heating element wiring and disconnect it. Unscrew the nut holding the heating element to the edge of the bolt and push it inward, then pull out the heating element. Substituting the container so that the remaining water does not spill onto the floor, remove the pipe going from the tank to the pump. Disconnect the wiring, unscrew the fasteners, remove the pressure switch. Remove the wiring fasteners, move the wires to the side so as not to interfere with the removal of the tank. Unscrew the fasteners and remove the back cover of the Bosch machine. Pull the belt to the side and, turning the drum, remove it. Unclench the clamps holding the motor wires, disconnect the wiring, unscrew the fasteners and remove the motor. Disconnect the pressure tap chamber. Unscrew the lower shock absorber mount, disconnect and remove the part. Holding the springs, carefully remove the tank along with the drum and pull it out of the housing.
Video
We invite you to watch a video on the topic “Repairing Bosch washing machines - how to replace bearings.”
Author: Elena Lebedenko
Found a mistake? Select it and click the buttons:
Ctrl + Enter
Interesting! Washing machines have something to do with the origin of the expression “money laundering.” In the 1930s, American gangsters used a network of laundries as a cover for their illegal activities. By passing off the proceeds of crime as proceeds from cleaning clothes, they turned “dirty” money into “clean” money.
Astronauts, while in Earth orbit, solve the problem of dirty things using an original method. Clothes are dropped from the spacecraft and burn up in the upper atmosphere.
There is a washing machine “for bachelors”. Linen washed in such a unit does not need to be ironed at all! The thing is that the device does not have a drum: some things can be placed inside the container directly on hangers (for example, jackets and shirts), and smaller things (for example, underwear and socks) can be placed on special shelves.
The first officially patented washing machine was made of wood and was a box with a frame, half filled with wooden balls. Laundry for washing and detergent were loaded inside and the frame was moved using a lever, which, in turn, made the balls move and grind the laundry.
The expression “soap opera” (“soap”) did not arise by chance. The very first series and shows that had a female audience were broadcast on television at a time when housewives did cleaning, ironing and laundry. In addition, to attract female viewers to the screens, commercials for detergents: soaps and powders were often played on air.
There are a variety of balls that are used in the washing machine. Antistatic ones will prevent the fabric from sticking to the body after washing, balls with special loops will “comb” the lint and prevent the appearance of pills, and silicone ones with pimples will prevent fluff from matting when washing outerwear.
History knows the fact that a kitten fell into the drum of a washing machine and, after going through a full wash cycle on the “Wool” program, got out of the unit unharmed. The only trouble for the pet was an allergy to washing powder.
For washing small items on the road or in a hotel, it is convenient to use a regular plastic bag. Socks or tights are kneaded inside a tied bag along with water and a small amount of detergent. This method allows you to pre-soak things and wash them without damaging the fabric or wasting a lot of powder and water.
Washing machines equipped with the “No Iron” or “Easy Iron” functions can wash clothes with little to no wrinkling. This effect is achieved through a special approach to spinning - it is performed at low speeds, with long pauses, and a small amount of water is retained in the tank.
Removing the tank
Having dismantled all the main parts on the washing machine, we begin to remove the tank. This is not difficult to do, since all the springs have been removed and the tank is lowered down about thirty centimeters. You need to grab the edges of the hatch and pull the tank towards you along with the drum of the washing machine. If everything is in order, the knot will literally fall out.
All that remains is to disassemble the tank to check the condition of the seals and bearings. All washing machines from Bosch have collapsible tanks, so you don’t have to cut them. After unscrewing several dozen screws, we disassemble the tank into two halves.
Removing the program panel
The next step in disassembling a Bosch washing machine is to remove the program panel. This operation does not require much effort, since fastening occurs using a latch and a pair of bolts. They are located on the left side and must be unscrewed immediately.
Important! You should not completely detach the panel with the programs - it is better to just carefully flip them over the frame and leave them alone. This action is possible if you do not need to repair this part.
Where to begin
Despite the fact that we want to get down to business as soon as possible, we must note that the best place to start is by preparing all those tools that may be required during the disassembly and subsequent assembly process. Their list is quite small.
During the work you may need the following tools:
- wrenches and wrenches of different sizes,
- a hammer or several hammers (small, medium and large, depending on the model of the machine and the nature of the breakdown),
- several screwdrivers with Phillips and straight slots (in the washing machine there may be parts screwed with screws of different threads and diameters),
- pliers