Any washing machine can fail, especially if it has been in service for more than one year. After the warranty period expires, most amateur craftsmen try to fix the problems themselves. Often, in order to carry out repairs, you have to look for the cause of the breakdown, and for this you have to get to the internal parts.
Often, in order to carry out repairs, you have to look for the cause of the breakdown, and for this you need to get to the internal parts
How to disassemble a Samsung washing machine with your own hands, what is needed for this and what is the sequence of actions - you will find the answers to these questions in the article.
Preparation
Disassembling a washing machine is not difficult if the owner of the device has minimal skills in electrical engineering and plumbing. In Samsung brand models, such as, for example, S821, WF-S861, S803J, WF6458N7W, it is easy to access the main mechanisms.
To disassemble and subsequently repair the washing machine, you need to choose a bright and spacious place where nothing will interfere with the work.
Whatever machine you are going to repair, first it is important to prepare a workplace and tools that will be useful during the disassembly process. Of course, you can get started with a few screwdrivers and wrenches. But if the machine requires a detailed inspection and subsequent repairs, it is better to prepare everything you need at once. So, you may need:
- hammer;
- wire cutters;
- screwdrivers (slotted and figured);
- open-end wrenches;
- heads (socket wrenches);
- pliers;
- hacksaw;
- pliers;
- mites;
- soldering iron
It is important to prepare auxiliary materials in advance - liquid for softening nut fasteners WD-40, silicone sealant and lubricant for hinge elements. It is convenient to have a clean rag on hand to wipe your hands or any remaining liquid from the machine. Experienced craftsmen advise beginners to photograph each stage of disassembling the unit to make it easier to reassemble the device after completion of the repair, therefore, you need to prepare a camera.
It is convenient to disassemble the unit when all the tools are at hand
The preparation stage may not seem so important, but the result largely depends on the quality of its implementation.
Samsung DC41-00035A does not turn on. Scheme
View of the MFS-C2R10NB-00/C80908/6LF module itself.
The defective unit has obvious signs of overheating, capacitor CE1 is swollen.
Remove the display board. Underneath is a plastic backing that covers the board. We cut out a window in it under the defective unit. On this board it is divided into sections, which is quite convenient. It is convenient to cut with a craft knife.
Then pry it up with a screwdriver and remove the window.
I clean the place from the “jelly”. And I unsolder the shimka contacts.
Cleaning up the “jelly”
And remove the microcircuit
To unsolder the capacitor, I had to cut out an additional window.
We take the new TNY266PN.
And we install it in place of the failed one.
The same procedure applies to the capacitor.
Checking the module. The 220 V module power is supplied to the relay contact relay 2 and the middle connector CN3. The testing of this module was successful.
Result: Capacitor CE1 and microcircuit IC3 were replaced. The defect occurs due to the constant presence of the washing machine in the network.
Recommendations: After each wash, turn off the SMA from the mains.
Repair of washing machines
Site search
Contacts. Saransk
| 8 |
| vaschmaster.ru |
Articles
Samsung washing machine diagram
Before you start disassembling the washing machine, it is advisable to get an idea of its structure. The unit diagram will show the location of the functional parts and will help when making repairs.
Here is a diagram of the internal structure of the washing machine
If you suspect that the problems are caused by poor electronics, it will be useful to have the electrical diagram of the unit on hand.
Here is a schematic diagram of a Samsung washing machine.
For an ordinary user, a schematic representation of a machine’s structure may seem complex and incomprehensible, but if anyone wants to understand the circuit, anyone can understand it.
How to disassemble the unit yourself: step-by-step instructions
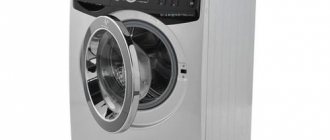
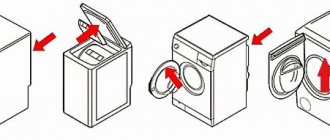
To properly disassemble a Samsung washing machine, we recommend following the following sequence of actions. You need to start the process by removing the top cover , for which you need to take a screwdriver and unscrew the two screws located at the back of the machine. Then carefully slide the cover forward a little and remove it from the body. If you need to inspect the motor pulley and belt drive, simply pull the counterweight towards you.
The washing machine begins to be disassembled from the top cover
The next step is to remove the detergent tray . Open the container, press the locking tab and pull the compartment towards you as you would when removing it for cleaning. It is a little more difficult to remove the cuff - the rubber drum seal. Helping yourself with a screwdriver, carefully disconnect the fixing ring and remove it from the cuff. Perform the procedure slowly so as not to accidentally damage the rubber. Next, wrap the rubber part inside the drum.
Removing the bottom panel , under which there is a drain hose and filter, is easy. In Samsung machines, the part is fixed with latches, so you just need to disconnect it from the body. As a result, the drain pump becomes accessible. To get it, you will need to remove the clamps using pliers and unscrew several screws with a curly screwdriver.
Next, go to the dashboard , under which the electronic control unit is located. To remove the part, you need to unscrew the screws located in the niche of the detergent dispenser and on the opposite side of the panel. Then unfasten the latches and separate the control unit from the machine body. The part can be left hanging on the wires or placed on the top of the unit, but it is better to disconnect it from the wires and put it aside.
The control panel can be left hanging during disassembly
After the above manipulations, begin dismantling the facade surface. How to remove the front panel of a Samsung washing machine? To do this, simply unscrew the fasteners and lightly separate the panel from the body.
When removing the front panel, do not forget to first disconnect the sunroof lock from the wires connected to it.
To remove the back panel , unscrew the 4 bolts from the back and move the part to the side. Now you need to disconnect all the hoses that are attached to the unit tank: filler and drain, as well as the tubes leading to the pressure switch and the detergent compartment. Use a screwdriver to first remove the clamps.
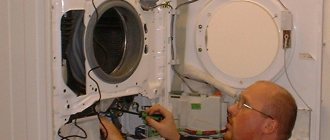
Next you should deal with the tubular electric heater (TEH): dismantle it or simply disconnect it from the wires. Typically the heating element is located at the bottom of the tank under the drum. If you need to replace the heating element, unscrew the nuts and completely remove it from the socket. At this stage also disconnect the wires from the motor . There are quite a lot of contacts, so you need to photograph or write down the sequence of connections so as not to confuse anything during assembly.
To dismantle the heating element completely, you need to unscrew the fasteners in the middle and carefully pull the heater towards you
You also need to remove the counterweights , which are located on top and bottom of the tank. Unscrew the bolts with a suitable size wrench and set the weights aside.
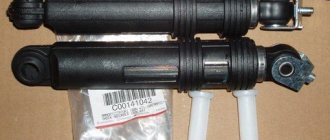
Now move on to a more complex process - removing the tank . It is better to do this work not alone, but with an assistant. First, unscrew the bolts that secure the shock absorbers to the tank and disconnect them. Together with an assistant, slowly and carefully remove the part from the springs and remove it out. Next you need to separate the engine from the tank. First, disconnect the drive belt, then unscrew the bolts holding the motor and remove it. Finally, remove the pulley.
This is what a disassembled washing machine tank looks like
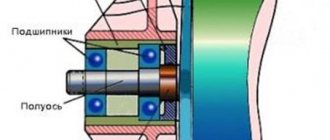
To replace the bearings in the drum, it is necessary to disassemble the tank . The task becomes more complicated if the part turns out to be non-separable. In this case, you will have to cut it, repair the bearings, seal the joints and glue the parts together or connect them with bolts and nuts.
In washing machines with a collapsible tank, for example, in the Samsung Diamond 6 kg model, replacement is much simpler: the two halves of the tank can be held together with tie bolts or latches that simply need to be disconnected. Then you can remove the drum on which the bearings are located. To remove the bearing assembly, carefully knock out the metal rings using a hammer and chisel.
When replacing bearings, pay attention to the condition of the seat - it should not be damaged.
By removing the parts one by one, you can easily disassemble the washing machine and get to the parts that require repair. You need to reassemble the equipment in the reverse order, without skipping any of the indicated steps.
Repair of Samsung S821, R831 and R1031 washing machines
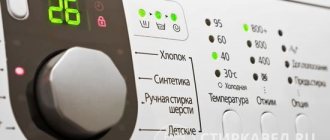
Let's look at the error codes:
The figure shows which temperature lights will light up during failures. The Course indicators are flashing, all of them can be six, model s821. Using the Temp indicator, we find out the error code 1. Water filling error - Error indication shown
- A water filling error occurs when the water level does not cause the pressure switch frequency to change by more than 100 Hz/min or the water is not filled to the preset level within 20 minutes from the time of the initial filling.
- The error status can be cleared by turning the mains power on and off (POWER S/W OFF button).
2. Drain Error - Error indication shown
- Occurs if the pressure switch frequency (water level) is 24.5 kHz or less in the initial phase of the foam detection cycle
- The error status can be cleared by turning the mains power on and off (POWER S/W OFF button).
3. Overflow error - Error indication shown
- An overflow error occurs when the water level differs from the one set in the cycle. The error status can be cleared by turning the mains power on and off (POWER S/W OFF button).
- The water will be drained by the drain pump for 2 minutes until the power is turned off or until the pressure switch reaches a frequency of more than 24.5 kHz.
4. Unbalance Error - Error indication shown
- The laundry is not balanced, arrange the laundry evenly.
- An error may occur if only one item of clothing is loaded. The end result may be an unsatisfactory spin cycle and an error message will appear on the panel display
- The error status can be cleared by turning the mains power on and off (POWER S/W OFF button).
5. Heating element error - Error indication shown
- An error may occur if the water temperature increases by less than 7°C after turning on the heating element.
- The error status can be cleared by turning the mains power on and off (POWER S/W OFF button).
6. Door Opening Error - Error Indication Shown
- The error can be resolved by closing the door
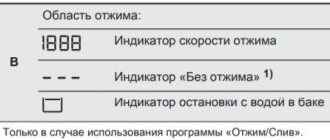
7. Pressostat error * Frequency generated by the pressure switch depending on the water level
| Level | Low level | High level |
| Incorrect frequency | >30 kHz | <15 kHz |
— Error indication shown
If the frequency indicated in the table above is recorded for more than 5 seconds, then a pressure switch error occurs.
- When this error occurs, the drain pump will run for 3 minutes. and then stop.
- After this, the display shows a pressure switch error
8. Incorrect water temperature - Error indication shown
- Occurs when the water temperature is 50°C or more in the “Delicate” and “Wool” cycles.
- At the time of the initial water fill, if the water temperature does not correspond to the one set in the cycle, the water will be drained by the drain pump for 2 minutes until a frequency of 24.5 kHz appears on the pressure switch.
- The error status can be cleared by turning the mains power on and off (POWER S/W OFF button).
9. Water leak error ERROR (E9) - Error indication shown
- A water leak error occurs when water drains without the help of the drain pump after starting a wash program.
10. Tachogenerator error - Error indication shown
- This error occurs if the engine tachogenerator fails or the tachogenerator produces less than 2 pulses. per second
- The error status can be cleared by turning the mains power on and off (POWER S/W OFF button).
11. Motor Triac Short Circuit - Error Indication Shown
- This error occurs if the tachogenerator registers more than 300 pulses. 1 sec after voltage is applied to the motor.
- The error status can be cleared by turning the mains power on and off (POWER S/W OFF button).
12. Thermostat Error - Error Indication Shown
- This error occurs when the thermostat is faulty or its voltage is less than 0.2V or more than 4.5V
- The error status can be cleared by turning the mains power on and off (POWER S/W OFF button).
+7(918) 611-94-94