It is quite difficult to disassemble an Electrolux washing machine for spare parts or for repair purposes without having the skills and experience of such work.
Errors made during the disassembly process can become the final verdict for the further operation of the household appliance.
For those who are faced with such work for the first time, detailed step-by-step instructions on how to disassemble an Electrolux washing machine will come to the rescue.
By adhering to it, disassembling and reassembling the washing machine will be done as quickly as possible and without any problems.
Is it possible to remove the lid of a washing machine?
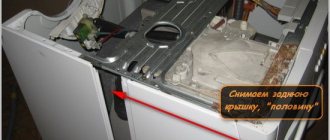
To remove the lid from the washing machine, you first need to move it away from the wall so that you can access the back wall of the washer. ... After the lid is unscrewed, it must be removed; to do this, you need to move the lid back relative to the washing machine, then lift it up and put it to the side.
Interesting materials:
Do I need to cover clematis for the winter? Do I need to cover strawberries? Do lilies need to be covered for the winter? Do I need to cover Honeysuckle for the winter? Do you need to cook moss mushrooms? Do you need to boil saffron milk caps before salting? Do you need to cook fresh champignons? Do you need to cook russula? Do I need to drain the water from the steam generator? Do I need to soak dry milk mushrooms?
Preparing for disassembly
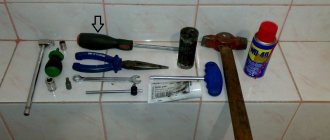
To make the process of disassembling the washing machine go as quickly as possible, you need to prepare the following set of tools in advance:
- wrenches;
- slotted and Phillips screwdrivers (a good option is screwdrivers with a magnetized tip that holds very small fasteners);
- pliers (when working with household appliances, it is better to choose a tool with rubberized lining on the handles);
- WD-40 liquid (an irreplaceable assistant in situations where it is necessary to unscrew scale-covered and rust-covered bolts).
In addition to tools, you should always have rags and a basin at hand (necessary for collecting the remaining water in the tank, drain hose).
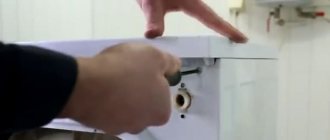
Having prepared the necessary tools, household appliances are disconnected from the water supply, sewerage, electricity, and placed in an open, free space so that nothing interferes with the disassembly process.
Electrolux washing machine diagram
Understanding what the main elements of a washing machine look like and where they are located will help you quickly diagnose and repair household appliances.
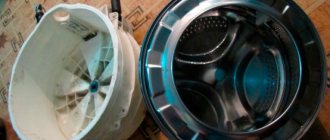
So: all elements of the internal structure are hidden behind the metal panels of the case (front, rear, side) and the lid. To extend the life of the washing machine in conditions of high humidity, the panels are coated with a special protective enamel.
Depending on the location of the hatch, there are Electrolux washing machines with vertical loading (laundry is loaded by opening the lid) and front loading (the hatch is located on the front panel).
The internal structure (a certain set of parts and mechanisms that ensure uninterrupted, high-quality operation of the washing machine) includes:
- The control module is one of the main elements that controls and controls the functioning of all mechanisms of the washing machine.
- The control panel helps you select the desired program, start or pause the washing process.
- Pressure switch and inlet valve (provide control of the process of water intake into the tank).
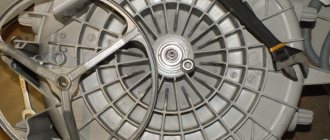
- The motor is the driving force that ensures the rotation of the drum.
- Tach sensor (controls the rotation speed of the drum).
- A tubular electric heater (TEH) is located in the lower part of the washing machine body, under the tank, and heats the water to a set temperature.
- Thermistor (built into the heating element, determines the degree of water heating).
- Damper and springs are elements that reduce vibration of the washing machine drum during the washing, rinsing or spinning process.
- Heavy concrete or plastic blocks are counterweights (they help dampen the vibration that occurs during operation of the washing machine).
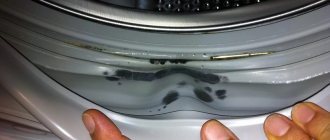
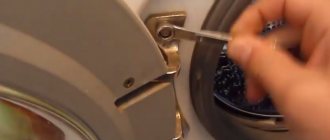
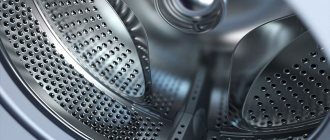
- The rubber seal around the hatch is a cuff (ensures the door fits as tightly as possible and prevents water from leaking).
- Hatch blocking device (protects the washing machine from leaks).
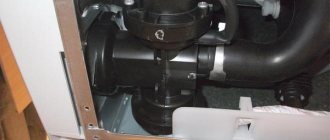
- The drain pump, filter, and pipes are the main elements of the system for draining waste water from the drum.
On the rear panel there are: power cord, drain and inlet hoses.
Call the master
Sometimes you can’t do everything yourself, or it’s just scary to get into the washing machine without experience in performing such work. In such cases, it is better to call a specialist.
There are several options:
- Contact a specialized company. You can find companies that do repairs online. The advantage is that you can immediately get acquainted with the reputation and reviews of the company, the disadvantage is that it will cost more than calling private craftsmen.
- Services for freelancers. There are special services, for example, “You Do”, where you need to set a task, describe the approximate breakdown, if possible, set a price. The master can respond to the task. Such services usually also have reviews and ratings, and the price is lower than on companies.
- Private advertisements. Private craftsmen post information about repair services on bulletin boards and social networks. But you should be careful with this method; there is always a risk of running into a scammer.
- The cost of services depends on the pricing policy of a particular company or master and even on the city of residence.
Other, less difficult to install components, for example, a power cord, a hatch latch, or removing a third-party object, will cost about 1000-1500 rubles including labor.
Unfortunately, there are quite a lot of scammers, because of them you can lose both money and equipment. Common schemes:
- Taking an advance for the visit of the master. Advances are possible only in cases where the master travels far outside the city, and even then not always. Usually, after sending the advance, the “specialist” number does not respond.
- The washing machine is taken to the workshop for repairs. Moreover, the address of this workshop is unknown; in such cases, the equipment can be taken away forever.
- Replacement of working units. A type of fraud when, in order to increase the check, they change something that still works. It is more difficult to understand such a situation; it is advisable to first read reviews about the honesty of the service.
Program selector
If there are errors related to the device for switching and selecting programs, it is almost impossible to correct them yourself. The simplest thing is to buy an electronic module and replace it.
Very often the configuration fails and you have to re-enter data into memory or overwrite it. The average person does not have such equipment (a stand for rewriting volatile memory), so they have to call a specialist.
Errors and reasons:
| Code | Description | Causes |
| E82 | Selector set incorrectly |
|
| E83 | The selector data is not being read correctly. Code E83 appears only in testing or diagnostic mode on a bench | Electronic module error. It incorrectly detects the device configuration |
| E93, E94 | The washing unit configuration is incorrect | Program cycles fail. Such a defect can only be corrected by entering the correct configuration code. It is necessary to replace the processor board or write new data to non-volatile memory |
| E95 | The connection between the non-volatile memory and the main processor is broken. They are located on the main controller | Possible open circuit between EEPROM and main processor |
| E96 | The configuration of the electronic module does not match the external elements connected to it | Errors in the controller software |
| E97 | The position of the selection selector does not correspond to the software of the processor used | Incorrectly entered configuration code or replace the main unit. |
Electrolux fault codes
The self-diagnosis system allows the user to determine the cause of the malfunction. When the fault code is displayed on the display, you just have to find out its meaning. Then troubleshooting will be quick.
Let's look at the main Electrolux error codes:
| Error code | Code meaning |
| E11 | No water supply. |
| E13 | There is a water leak. |
| E21 | Error draining water. |
| E23/E24 | There is a problem with the board's triac, which is responsible for the operation of the pump. |
| E31/E32 | Pressostat failure. |
| E33 | The heating element does not work. |
| E35 | Overflow of water. Exceeding the normal level. |
| E36 | The heater protection sensor has failed. |
| E38 | There is a problem with the pressure switch. |
| E39 | The overflow sensor is faulty. |
| E41/E45 | Broken mechanical lock, UBL, door handle. |
| E51/E54 | Problems with the control module. |
| E55 | The SM motor or its wiring is faulty. |
| E56 | Tachogenerator failure. |
| E57 | The voltage in the circuit exceeds the permissible limits. |
| E58/E59 | Error in the operation of the electric motor. |
| E5A/E5E | Control module error. |
| E61/E62 | The water gets too hot. |
| E66 | Problems in the operation of the heating element. |
| E71 | Problems with the thermostat. |
| E72/E73 | Damage to the drying temperature sensor. KZ. |
| E74 | The thermistor is not positioned correctly. |
| E82/E84 | Main module malfunction. |
| E85 | Pump problem. |
| E91 | There is no communication with the control module. Wiring fault. |
| E92/E99 | Error in the control board. |
| EA1/EA6 | The DSP has failed. Worn drive belt. |
| EB1/EB3 | Problems with wiring. Incorrect voltage. |
| EF1 | The water did not drain after the timeout expired. |
| EF2 | Too much foam. |
| EF3 | Problems with the pump. |
| EF4 | The flow sensor does not give a signal. |
| EF5 | Drum overload. Stopping the operation of the SM. |
| EN1 | Power failure. Problems with the electronic board. |
| EN3 | Insufficient voltage in the network. |
| ENE | The circuit protection relay has broken. |
| ENF | Circuit relay not recognized. |
List of required tools
- First, prepare the necessary tools. Everyone has most of them in their home; if one of them is missing, they turn to neighbors for help or go to the store.
- Then a well-lit, spacious place is prepared, the floor is covered with rags or paper so as not to lose small parts and bolts.
For disassembly you will need:
- a screwdriver with a set of bits or a set of Phillips screwdrivers;
- wrench;
- flat screwdriver;
- hexagonal wrench 8 mm;
- multimeter;
- pliers, pliers;
- hammer;
- colored markers;
- transparent sealant;
- CV joint lubricants, VD-40;
- clean rags.
When cutting a tank, a fine-toothed hacksaw, a drill with a long drill bit, bolts or self-tapping screws, and a sealant gun will be useful. It is advisable to stock up on tools in advance.
Electronic module errors
Very often, the processor unit or wiring is to blame for the inadequate operation of the washing unit. You can determine the cause by the code, but it is not always possible to repair the module on your own.
To search for a burnt or defective part, you need a special stand, which is available in workshops. Its workers will repair the unit or select a new one.
Reasons for module failure:
- E5A Cooling radiator temperature threshold exceeds 88°
- E5B The DC voltage on the corresponding bus is much lower than the allocated value of 175 V
- E5C The constant potential in the relevant circuit is much higher than the required value of 430 V
- E5D FCV is unable to receive/send operation signal within a 2 second period
- E5E No communication between the processor module and the FCV control board
- E5F Frequent control program resets are observed. Because of this, the FCV board continuously polls the machine configuration
- E84 Recirculation pump signals are not recognized. There is no voltage at its contacts or always has a potential of 5 volts
- E91 The connection between the machine remote control and the processor unit is broken
- E92 The main electronics are not coordinated with the user interface
- E98 Engine control module does not match with processor board
- EBE Protection relay damaged
- EBF, EHF Safety circuit is not recognized correctly
- EB1, EH1 Power supply frequency is not normal
- EB2, EB3, EH2, Mains voltage too high or low
- EH3 Interference in the network or the power supply is faulty.
- If there are errors EB1, EH1 or EB2, EB3, EH2, you must verify the discrepancy between the parameters by measuring them with a multimeter or frequency meter. If the network voltage is often too high or too low, you need to buy and install a stabilizer.
- EH3 appears , you need to stop the machine and check the network. If there is no interference, there is normal voltage and frequency, change the ED.