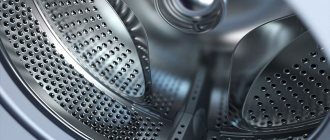
The user will immediately find out that the bearing in the automatic machine has worn out or completely fallen apart. The washing machine will begin to make a “knocking” sound, hum, vibrate and malfunction. To prevent the unit from permanently failing, it is necessary to replace the drum bearing as soon as possible. Timely repairs will preserve the remaining elements and components of the system.
Before you begin replacement, you should understand the essence of the upcoming work. You can change the bearings yourself, without resorting to the help of specialists. We will explain in detail how to do this in this article.
Step-by-step recommendations on how to remove the drum on a washing machine
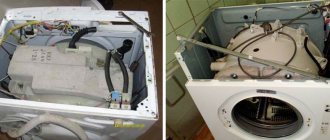
In the event of a serious breakdown of the automatic washing machine, serious disassembly of the entire structure is necessary.
To identify and eliminate the cause, the technician often needs to remove the drum from the washing device, remove the bearings and replace them. But the process of removing the drum is labor-intensive and time-consuming. Moreover, if the approach is incorrect, there is a risk of breakdown of the entire unit. Of course, a reliable option is to call a specialist to your home. But, in conditions of strict financial austerity, we have to do the work ourselves. Before you begin dismantling, it is recommended to study the advice of professionals and, if possible, apply them in practice. Article on the topic: How to connect the motor from an Ardo automatic washing machine
Features of Beko washing machines
Most Beko washing machines have front loading of laundry on the front panel; the dimensions of the unit can be varied. Front loading helps expand the design features of the machine, so the consumer has the opportunity to choose any model, even a fully built-in one. The Beko washing machine range includes the following options:
- with standard sizes;
- compact units;
- narrow cars.
Beko household appliances can be installed in the kitchen, bathroom, both large and small rooms. The cost of the unit is influenced by the maximum volume of laundry. Cars with a capacity of less than 7 kilograms are much cheaper than capacious options. Units from this manufacturer are almost silent, as they have a direct connection of the drum to the ProSmart inverter motor. In addition, this type of motor can save electricity by almost half. Some models have mechanical control, so the cost of such products is cheaper. In addition to basic options, Beko machines have the following functional features:
- quick wash at 40 degrees;
- the presence of a delicate washing mode, cleaning children's linen, wool, down, and self-cleaning.
Let's start disassembling the machine
To disassemble the washing machine, you need to prepare a screwdriver, Phillips and flathead screwdrivers. Using these tools, you can remove all parts of the machine and get to the washing machine tank. The algorithm of actions will be as follows:
- disconnect the device from the power supply;
- remove the top cover of the case, and to do this, unscrew the 2 screws located on the back;
- remove the powder receptacle from the unit;
- Unscrew the screws holding the control panel and move it to the side;
- unfasten the lower decorative panel from the body;
- unscrew the 3 screws located behind the decorative panel;
- Unclench the wire clamp holding the cuff, move it to the side and tuck the elastic into the drum;
- Unfasten the front wall of the case.
When removing the front panel, you will see that the hatch locking device is not disconnected from the main part of the machine. It is necessary to carefully, without damaging the contacts, reset the lock chip or simply unhook the UBL.
- unfasten the filler pipe;
- disconnect the wire leading to the dispenser and disconnect the tray from the body;
- remove the upper metal false panel that opened after disconnecting the control panel;
- lower the counterweight down a little; to do this, loosen its mounting bolts;
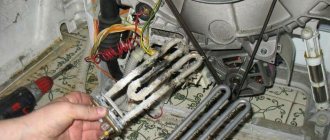
- disconnect the thermistor by resetting its terminals;
- remove the power and ground wires from the contacts of the tubular heater;
- remove the heating element from the housing;
- loosen the clamps holding the plastic tank cover;
- remove the cover and set it aside.
Article on the topic: LG washing machine does not spin, what to do
The main stage of analyzing the SMA has been completed, as you understand, you can do the work yourself, it is not necessary to transfer the washing machine to a workshop. To change the bearings, you have to remove the drum from the housing and gain access to the worn parts.
We install new bearings
To purchase suitable components for the washing machine, you need to know the full name of the automatic machine model. When purchasing bearings, you should provide this information to the manager. Another option is to contact a specialized store with the elements already removed and ask specialists to select identical parts.
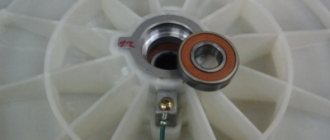
A bearing of a smaller diameter is installed on the outside of the tank (this can be done through the removed rear wall of the housing). It is hammered in with a hammer and a drift. You should rest solely on the outer frame of the part and, tapping with a hammer, carefully press the element inside the tank.
Do not hit the inner race of the bearing under any circumstances, as this may lead to its destruction.
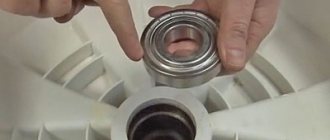
Having attached one of the parts, you can proceed to installing the second element. To begin, insert the bearing into the hole and fix its position with one blow of a hammer.
Then, using a drift, hammer the element into place. After installing the bearings, it is necessary to “plant” the oil seal in place. The rubber ring is treated with a special lubricant, this is necessary to improve performance characteristics and extend the service life of the seal.
After the oil seal is securely fixed, it is necessary to treat the drum bushing with a lubricant. Lubrication will ensure water tightness and heat resistance of the connection, extending the life of the bearings and sealing ring.
The replacement has been made, now it is necessary to put all the elements of the system into the housing. First of all, the drum is installed in place, the pulley is attached, and the drive belt is put on. Next, the rear wall of the unit is screwed into place. Subsequent assembly is carried out in reverse order. As you can see, it is possible to replace bearings with your own hands. To do this, you need to prepare all the necessary tools and strictly follow the instructions for action.
Interesting:
- Replacing a bearing in a Zanussi washing machine
- How to change bearings in a Whirlpool washing machine?
- How to change bearings and seal on an LG washing machine?
- Replacing a bearing in an Electrolux washing machine
- How to change a bearing on a Samsung washing machine
- How to properly remove a bearing from a drum
Reader comments
- Share your opinion - leave a comment
Recommendations: how to change the bearing in an Atlant washing machine
Next you should remove the cuff. This is a rubber band, one end is put on the tank, the other on the front panel, and it is secured with a clamp. It needs to be removed. Find the perimeter of the elastic with your hand, feel for the small spring that connects the ends of the clamp. Pry this thing up with a flat-head screwdriver, and then pull it out together with the clamp. Then remove the front edge of the cuff and tuck it inside the tank.
Further self-disassembly proceeds as follows:
- Latch the car hatch, unscrew the bolts holding the panel, carefully remove it from the hook;
- Moving this part towards you, remove the wire to free the front wall - this will give access to other parts of the device;
- Then you need to disconnect the drain pipe; to do this, unscrew the clamp;
- Next, disconnect the heating element, remove the back wall, carefully disconnect the wires going to the heating element (the wiring is completely disconnected);
- Get rid of the counterweights, unscrew them, disconnect the water level sensor, disconnect the flavors;
- The tank is not heavy, it is easy to pull it out; you need to free the container from the springs on which it is supported;
- Then you need to remove the belt, after which the engine is unscrewed.
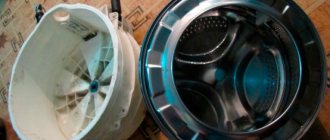
Next comes such an important step as disassembling the tank. You need to separate the halves that make it up. On the back half you will see the drum itself. It must be disconnected very carefully. Remove the pulley: unscrew the fasteners, remove the pulley from the axle. After it is removed, the removed bolt should be screwed back in. Use a hammer to carefully knock out the shaft. When the shaft is level with the top of the bolt, remove the bot and pull out the drum.
Article on the topic: How to turn on the Ariston avsl 109 washing machine
Then you need to make sure the integrity of the shaft. If everything is fine, put a new bearing on it and see if there is any play. And if there is a defect, you need to change the shaft.
We disassemble the tank, change the bearings
The process of disassembling the tank will be less labor-intensive than the procedure for removing it. We'll tell you what actions need to be taken to get to the damaged bearings:
- unfasten the drum pulley;
- Using an adjustable wrench or a gas wrench, unscrew the mounting bolt;
- unscrew all the retaining screws located around the perimeter of the tank;
- Carefully separate the tank into two parts and pull out the drum. This procedure is not so easy to perform; you will have to lightly tap the shaft with a hammer to remove the drum;
- carefully examine the exposed surface. If a washing machine with such a malfunction has been in use for quite a long time, part of the damaged bearing may stick to the shaft, forming a hole;
- if a wear is found, take a grinder and carefully cut off the edges of the bearing, then take a gas wrench and pull out the hard-to-remove part of the element.
If during the work you encounter difficulties with dismantling metal parts, use special lubricant WD-40.
After the old parts are removed, thoroughly clean the surface of the tank, drum, and shaft seats. When working, be sure to use lubricant to treat the bearings. The shaft and oil seal are treated with lubricant. Install the new parts in their intended place. To securely fix new bearings, it is recommended to use Supermoment glue or sealant.
Beko washing machine repair
- Beko washing machines
- Diagnostics Beko
- Disassembly of the Beko washing machine
- Replacing bearings on Beko
- Beko washing machine does not drain
- Doesn't heat water
A failure of a Beko washing machine is always a bad thing. But there is no need to panic, you can always contact RBT-Service. But some faults can be fixed with your own hands without the help of a specialist.
Beko washing machine
Beko washing machines were very reliable equipment until 2010; all machines worked for 5-15 years without malfunctions. You can also distinguish types of washing machines:
- Standard size.
- Compact.
- Narrow.
Beko washing machines have the following advantages: low noise level, and they also save electricity. The program has a quick wash at 40 degrees and the presence of delicate, children's wash. You can also wash items made from wool and down.
Diagnostics of the beko washing machine
To make it easier for you to determine the breakdown of your machine, we will describe the most frequent calls to us:
- There is a blockage in the drain filter; all you have to do is clean it.
- The machine has stopped heating water; the heating element needs to be replaced.
- The machine is leaking, check the cuff for a hole.
- The drum does not spin, check the brushes.
- There is a noise, most likely it is a bearing.
Article on the topic: How to clean the drain hole in a washing machine
Also, an extraneous sound may appear due to a foreign object that has fallen inside the tank or drain filter.
Disassembly of the Beko washing machine
Most washing machines are disassembled according to the same principle, including Beko, first we need to remove the top cover to gain access. To repair the water intake valve or water level sensor, but if you want to do a complete disassembly, then you need to take out the powder pocket and unscrew the screws that hold the control board and disconnect the wires from it.
Next you need to remove the lower decorative panel to gain access to the screws that hold the front part and unscrew them. You also need to open the hatch door of the washing machine and remove the clamp and move the cuff. Disconnect the hatch lock and remove the front panel. Now you have access to the remaining spare parts of the washing machine, we also remind you that the machine has a back cover and very rarely a heating element can be installed there.
How to replace a bearing?
Replacing bearings on a washing machine is not an easy task and is beyond the capabilities of every client; if you are not confident in your abilities, you can always contact Washing Machine Repair in Samara.
Reasons for replacing bearings:
- Loud noise from the washing machine, customers usually say it sounds like a plane is taking off.
- There was some play at the tank.
- The car runs away.
You can read more about replacing bearings in this article: replacing bearings on a washing machine.
Article on the topic: What is partial protection against leaks in a washing machine
The above cases may indicate not only wear of the bearings, but also a breakdown of the cross. To purchase new bearings and other parts, it is worth knowing the exact name of the washing machine model. You can also go to the store with removed bearings and ask the specialists to sell identical ones.
How to clean the filter?
According to statistics, one of the common reasons for the failure of a washing machine is that so that you do not encounter such a problem and the drain filter does not dry out, you need to do preventive maintenance and clean the machine from debris. This will not be a problem for you, just remove the decorative bottom panel and unscrew the drain filter counterclockwise; you can read more in this article: cleaning the drain filter yourself.
Beko washing machine does not heat water
One of the common situations is when the washing machine has stopped washing things and the heater is to blame - this is one of the main parts for washing our dirty laundry, which fails due to water hardness and needs to be serviced or replaced with a new one. Advice from the master, I personally think that it is cheaper to change the heating element than to clean it. If your machine is equipped with a display, the following symbols will appear on the panel: H2 or H3 this means the heating element has failed and needs to be replaced. You can read how to replace the heating element in the following articles: Replacing the heating element with your own hands.
Article on the topic: Can Nike boots be washed in a washing machine?
All other cases, such as the washing machine turning on (the indicator does not light up) or the machine does not start, it smells burning and others, it is better to trust the professionals in their field, since there are many nuances that you cannot simply repair without the necessary equipment.
We are carefully preparing for repairs
To replace the bearings on Hans’ machine yourself, you need to have a full set of tools, as well as new parts that will be needed during the repair process. Let's figure out what to prepare:
- small hammer;
- open-end wrenches of various sizes;
- grinder (grinder);
- pliers or pliers;
- gas key;
- two types of screwdrivers: Phillips and slotted;
- sealant;
- lubricant intended for processing SMA bearings (can be replaced with lithium grease);
- a smartphone with a good camera or camera. It is advisable to record the process of disassembling the washing machine, disconnecting wiring and other things on camera, so that at the end of the process all the parts and cables are correctly connected to their places.
As for spare parts, you should purchase two new bearings and an oil seal. After visiting a specialized store, you can tell the manager the model of the washing machine and ask to select the parts. If you order components via the Internet, we advise you to disassemble the machine before purchasing, remove the elements and use their numbers to find analogues in the online store.
Try to find original spare parts, they will function much longer, also choose bearings specifically for automatic washing machines (closed type).
Before starting the main work, you should prepare the washing machine itself. Unplug the machine's power cord from the outlet, turn off the tap responsible for supplying water to the apartment, and disconnect the inlet hose. After this, drain the remaining water in the tank. Then you need to remove the drain hose and drag the washing machine to a place where it will be convenient to repair it, this can be a spare room, a spacious corridor or a garage. You can carry out work in the entrance, but you need to make sure that you do not disturb your neighbors. The preparatory process is complete, you can begin the main repairs.
How to understand what exactly is broken in the washing machine
First you need to determine the cause of the malfunction, and then take action. A beginner in the field of repairing household appliances can identify a breakdown by the following signs:
- The water has stopped heating, so things are washed in cold water - probably the problem is in the heating element.
- The washing tub takes too long to fill with water or does not fill at all. There may be a problem with the pump or hoses.
- The door does not close until it clicks, preventing the washing process from starting. For door problems see here
- The water does not drain after the wash is completed, and the machine can make a very loud noise at this moment. There may be a problem with the pressure switch.
- When washing, the drum may make strange sounds: knocking, grinding. A foreign object may have entered the drum.
- It is not possible to start the washing program. After turning on the machine, all the indicators blink strangely. Sometimes you can still select a program, but the wash still does not start. The motor or control module may be broken.
- After pressing the power button, the equipment does not start, even though it is plugged in. There is probably a problem with the control module, power supply, or power supply of the machine.
- Sometimes the washing device may show an error on the display and it will not perform its functions. It is better to look for error codes in the instructions for the corresponding model.
Article on the topic: Is it possible to connect an automatic washing machine in a house without running water?
If the beko washing machine malfunctions with a load of 5-6 kg, you should stop the washing program as quickly as possible, or unplug it from the socket. Then you need to remove excess weight from the drum and find out the true cause of what happened.
Hatch door seal
Remove the top cover, for which, using a Phillips screwdriver, unscrew the two screws securing the cover to the body (Fig. 2).
Rice. 2.Removing the top cover mounting screws
After this, lifting the back of the top cover with one hand, move it back with the other hand and separate it from the body (Fig. 3).
Rice. 3.Removing the top cover
The control panel is dismantled, for which the detergent dispenser hopper is removed, and using a Phillips screwdriver, the two screws securing the control panel are unscrewed (Fig. 4).
Rice. 4.Removing the control panel mounting screws
Holding the control panel with your right hand, slide the panel outward with your left hand and turn it almost 90° until the panel (on the right side) disengages from the mounting latch (Fig. 5 and 6).
Rice. 5.Left side compartment of control panel
Rice. 6. Separate the right side of the control panel
In this position, turn the control panel 180° parallel to the side wall of the washing machine and use the service hook to hang the panel on the side wall of the machine (Fig. 7).
Rice. 7.Hanging the control panel on the side of the machine
The longer end of the hook goes into the hole in the detergent hopper, and the short end hangs on the top edge of the side wall of the machine (Fig. 8).
Rice. 8.Using the service hook to hang the control panel
The base panel is dismantled, for which, using a Phillips screwdriver, the two screws securing the base panel to the side walls of the machine are unscrewed, after which the panel is removed (Fig. 9).
Rice. 9. Removing the plinth panel
The panel can be pryed off with some tool, taking precautions not to damage the paint layer.
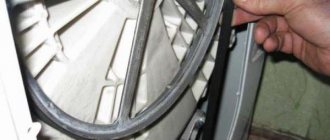
Having opened the hatch door of the washing machine, use a flat screwdriver to remove the hatch seal clamp (Fig. 10),
Rice. 10.Removing the clamp securing the hatch door seal
and then separate the hatch seal from. front panel (Fig. 11).
Rice. 11. Separating the hatch door seal from the front panel
Remove the front panel of the case, for which, using a Phillips screwdriver, unscrew the four screws securing the front panel to the side walls of the machine, and remove the panel along with the hatch (Fig. 12).
Rice. 12. Removing the front panel
Disconnect the wires from the door locking device (Fig. 13).
Rice. 13.Disconnecting the wires from the hatch locking device
Using pliers, loosen the spring clamp on the tube connecting the Jet System distribution valve to the hatch door seal, and remove the tube from the water injection fitting (Fig. 14).
Rice. 14.Disconnecting the tube from the water injection fitting
READ MORE: Lubricating oil seals with bearing grease. Tank seal for a washing machine - how to lubricate it and how to replace it? Is it worth replacing
Using pliers, loosen the spring clamp on the tube suitable for the level switch, remove the tube from the level switch fitting (Fig. 15),
Rice. 15. Disconnecting the tube from the level switch fitting
then pull it out of the hatch door seal (Fig. 16).
Rice. 16. Removing the tube from the hatch door seal
How to remove
During the repair process, you should adhere to the recommendations below so as not to damage the equipment even more, since in this situation there is a possibility that even an experienced technician will no longer be able to help you.
However, if you are sure that you can handle it, stock up on tools. So, let's start disassembling.
We will need:
- transparent sealant;
- felt-tip pen;
- self-tapping screws from 15 to 25 mm;
- can of WD-40;
- litol (lubricant);
- awl;
- a set of star keys;
- steel pin 20 - 25 cm long and 15 mm in diameter;
- pliers;
- side cutters;
- drill and drill bits;
- grinder and discs for cutting metal;
- hacksaw for metal;
- socket screwdrivers;
- hammer;
- adjustable wrenches;
- screwdrivers, flat and shaped.
Disassembly steps:
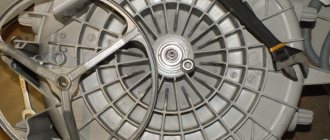
- The pulley is easy to remove. We just pull it together, rocking it from side to side. If this is blocked by parts of the broken bearing, you will have to use a hammer to knock out the pulley, being extremely careful not to damage the shaft threads. To clean the threads, use a can of WD-40. The next step is to remove the shaft with an assistant.
- First, we unscrew the bolts on the shell in order to remove the casing. Our task is to get to the tank, so we remove all the parts and remove the tank.
It is also necessary to remove the rubber seal and all other parts from the tank. Next we divide our tank by cutting. We cut with a hacksaw for metal, having previously reduced the layout with a hammer so that the slot is not wide. You need to cut along the taped seam.
If the seam is located on the front part it will be convenient to cut, but often it runs from the back close to the pressure switch chamber, which will make the work much more difficult.
In this case, you will have to remove the panel from the hacksaw, and in order not to injure yourself, one end of the panel must be wrapped with electrical tape or cloth. It is necessary to work with great care. To prevent our tank from breaking in half under the influence of its heavy weight, it must be supported on both sides. Ideally, it is better to do this with an assistant.
Then you need to knock the shaft out of the rear half of the drum, having first removed the pulley. The shaft sits tightly on the bearings. The pulley bolt is usually sharpened for a star screwdriver.
It may be difficult to unscrew it, since the threads are often filled with glue. By sawing off the edges of the bolt head with a grinder, we will greatly simplify our task - the bolt can be grabbed with a wrench of a suitable size or an adjustable one.
You may be interested in an article on how to replace the pump in a washing machine.
Read the article about replacing the washing machine hatch cuff yourself here.
Steps to take when replacing a front-loading washing machine bearing yourself
As already written above, replacing a bearing is a rather complex task, for which it is necessary to disassemble the washing machine. To do this you will need the following tools:
- hammer;
- rubber (plastic) mallet;
- pliers;
- Screwdriver Set;
- set of wrenches;
- gas key.
In addition, you must have silicone sealant, WD-40 aerosol, as well as appropriately sized bearings and seals, as well as lithol or another type of similar lubricant.
For your information!
If the user is performing such work for the first time, then in order to facilitate the assembly process and avoid mistakes, you can use a smartphone and film all types of connections of various components and electrical connections before starting the disassembly process.
READ MORE: How to choose an electric water heater (2018) | Other household appliances | Blog | DNS Club
The work of replacing the bearing on different models of washing machines may vary slightly, but, nevertheless, the main steps are performed in the following sequence:
| Illustration | Description of action |
| The back cover is unscrewed. | |
| The drum shaft drive belt is removed. | |
| The rotation of the drum is jammed; for this, use a screwdriver or other durable tool. | |
| The nut securing the pulley is unscrewed and it is removed. | |
| The wires from the heating elements and other elements of the electrical circuit are disconnected. | |
| The elements securing the drum to the machine body and the electric motor are unscrewed. | |
| The top cover of the washing machine is unscrewed and removed. | |
| The structural elements located in the upper part of the housing are disconnected, preventing the drum from being removed. | |
| The drum is removed from the machine body. | |
| Using a screwdriver, remove the oil seal. | |
| Using a hammer and punch, first knock out the inner bearing. | |
| Then the outer bearing is removed in the same way. | |
| The seat is cleared of dirt, and the new bearing is pressed in using a mallet or a wooden block and a hammer. |
In order to knock out the bearing, you can use a core and a hammer, as in the case discussed above, or special pullers, if available.
Important!
When knocking out a bearing, it is necessary to strike along its entire circumference, otherwise the bearing may become crooked and jam, which will lead to unnecessary problems associated with its removal.
To make it easier to install the new bearing into the seat, it can be lubricated with grease or another type of thick lubricant. When installing a bearing located inside the drum body, you can use a hammer handle or a specially made piece of wood that matches the diameter of the seat.
WD-40 aerosol will be required if any fastening elements will not be unscrewed, then they should be treated with this preparation. The washing machine is assembled in the reverse order to how it was disassembled. After completion, the functionality of the repaired household appliance is checked.
What do you need to remove the drum?
Before starting disassembly work, it is worth preparing the tools. Almost everything listed below is available to any home craftsman:
- screwdrivers of various types;
- pliers;
- spanners;
- hammer;
- hacksaw saw (for a non-separable drum).
If you have found everything you need, you can get to work.
How to change a bearing in an Ariston washing machine
If you follow all operating rules, the service life of ball bearings on Ariston machines is from 6 to 10 years, without the need for maintenance; manufacturing defects are practically eliminated, judging by the reviews. But if the seal is overloaded or the seal is damaged, water may get into the seal, which will lead to leaching of the lubricant, rusting and failure.
An increasing hum during spinning, vibration, and sometimes grinding are characteristic signs that urgent replacement of parts is necessary. To be sure, you can check whether there is any play in the drum in the tank.
At home, repairs are carried out if you have the necessary tools, traditional for such work, free space and pre-purchased seals and seals. As in machines from many other manufacturers, the parts are located in a drum, which can be reached by disassembling almost the entire unit.
In order to avoid mistakes, you need to study the instructions for self-repair, during disassembly, write down all actions, label the pipes and contacts.
Having disassembled the machine and pulled out the tank, you need to lay it on the floor, unscrew the locking bolt and remove the pulley. Open the latches and remove the bolts around the perimeter and remove the drum. If it does not give in, you can lightly hit the bushing with a stop. Then the outer piece is removed by uniform tapping on the chisel, which should be installed at the edge of the outer casing, moving along the entire contour of the part. To prevent damage to other elements, it is better to purchase a puller in advance. The internal p/sh is dismantled in the same way.
Next, the seats are cleaned, all components and assemblies are checked, and the machine is assembled.
Detection of bearing failures
First of all, I would like to note that in Beko washing machines, in comparison with other brands of equipment, the process of replacing bearings is quite simple, and this is good news. First, let's look at what signs will indicate a 100% need for replacement?
- A hum that occurs when the drum is rotated by hand.
- There is significant drum play.
- In the “Spin” mode, the washing machine makes a lot of noise and knocks.
In some cases, not only bearing wear may occur, but also the crosspiece may break. This situation will lead to higher repair costs, since the part cannot be purchased separately; it is supplied only complete with the drum.
Looseness or destruction of the counterweight
If the machine (for example, CANDY AQUA 08351D/2-S) jumps when it washes, shakes while it wrings things out, the counterweight is most likely damaged or the bolts that secure the drum to the tub pulley are loose.
A counterweight is a concrete or plastic block that is designed to balance the washing machine. The block prevents vibration, thereby ensuring stability of the device. Washing machines are most often equipped with concrete counterweights. Such structures are destroyed regardless of the material: they crack and crumble.
Fasteners become loose over time. Because of this, the washing machine vibrates and knocks. Loose fasteners are a consequence of unevenly loaded laundry.
Attention! Increased vibrations and shaking of the machine reduces the wear resistance of other parts, which leads to equipment failure.
To solve the problem, disassemble the housing and tighten the mounting bolts or replace them. A cracked counterweight cannot be repaired; it is better to immediately contact a repairman who will replace the weight block.
Failure of shock absorbers
Washing machines are equipped with either shock absorbers or dampers. The first ones are designed for a certain force intended for a specific device model, for example, LG FH296WDS. A stretched shock absorber leads to increased vibration of the washing machine while it spins the laundry.
A type of shock-absorbing part is dampers. They do not have their own “stroke”: unlike conventional shock absorbers, the “stroke” is provided by a moving tube or plate, which is attached to the tank in plastic linings. The role of fasteners is played by metal rods whose shape resembles a “P”. It is the fitting plates or tubes of the lining that cause the malfunction: over time, they “move away” from the tank of the machine (for example, Bosch WAB24262BY).