Don’t throw pissing rags, as a radio amateur, I fixed it twice...
Problem No. 1 - the machine was knocked out during washing, when turned on, all the lamps on the display were on, there was no response to the control.
As the autopsy showed, the Minisel 800 control module failed: - the diode bridge was broken - the track leading to the power winding of the motor was burnt out - the motor control triac was broken. I replaced the elements, restored the track, and after a couple of washes a new problem arose:
Problem No. 2 - after a couple of successful washes, the drum began to spin jerkily (the light was flashing, the belt was eating up, as a result the triac died again and the machine again became a “brick”)
As the autopsy showed, the Minisel 800 control module failed again: - the motor control triac was broken. Replaced the triac with a higher quality analogue from ST with a current reserve (16A instead of 12A)
PS: Taking this opportunity as a preventative measure: - treated the belt with a drive belt tensioner conditioner from Hi-Gear (I have positive experience) - cleaned the heater from scale (in citric acid until factory clean)
The circuit on the Internet turned out to be a button accordion, judging by it - the triac switches the short circuit (phase to ground), and not the motor.
Check out the recommendations for repairing the Ardo washing machine from the master!
Manufacturer (translated from Italian home appliances) is Antonio Merloni.
Standard front-loading models with the FL index. With drying - WD.
What breaks most often according to statistics:
- 30% - clogged drainage path, wear and breakdown of the pump:
Open the loading hatch and identify the machine model on the sticker.
Unscrew the drain filter from the front bottom and clean it.
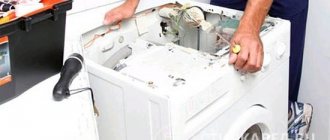
We change the pump, which is located at the bottom right on the back side.
Loosen the clamp on the drain pump pipe.
We check the pump, clean it, and if it malfunctions, replace it.
Over time, mechanical wear appears on the shaft. The impeller dangles and does not pump out water well.
- 20% malfunction of the electronic control board:
MINISEL board:
Ardo models FL1000,FL1202,FLS81S,A800XEL, AE810, AE800X, SE810, FLS81S, AED1000X,TL1000EX, TL1010E ANNA610, ANNA 600X, A410, A610, A500, A1000.
We look at the power source and the level of constant voltages (5 and 12 V) at its outputs. If there is no voltage at the output of the IP, check the corresponding elements - power switch, power filter, power transformer T1, rectifier (D11-D14), microcircuit U1.
module :
Models A800, A804, A810, A814, WD800X, S1000X, T80, T800, TL800X, TL804, etc.
Malfunctions in the DMPU module
For the power supply module:
break in resistance R51 (A, B); stabilizer U3; Zener diode D24 (short circuit); varistor VDR5 is broken.
For engine control:
relay K1, K2; rsimistor TR2. Diodes D1-D6, D9-10, D15, D23.
Legacy DMPA module:
They are used in machines that include an asynchronous drive motor and a mechanical command device.
Models A1000PL, A1000XCZ, A1000XPL, WD1000PL, TL1000X, etc.
The wear of the heating element increases with “hard” water.
Overgrown with scale (scabs), it transfers heat poorly and burns out.
You need to pull out the elastic band and not the heating element. Since when pulling out the heating element you can wedge the elastic band.?
This is important to avoid further leakage under the seal.
- 10% wear on the commutator motor brushes, loose contacts, broken drive belt
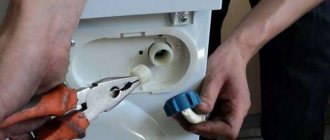
Remove the belt, unscrew the screws and remove the engine. There are two brushes on the engine, each secured with two screws. Unscrew the screws and remove the brushes.
Inspect the motor power supply terminal from the board and the ground wire.
Elmarc ancona 1 scheme
Before you begin repairing the DMPU module, you must have a complete picture of the problem. It is best to test the module on a washing machine by running the autotest program.
The autotest program can be carried out on any model of washing machine that uses the module modifications described in [1]. DMPU modules cannot be tested on machine models with induction motors, high speed models (above 1000 rpm), or S1000X models manufactured before December 1999.
Before starting the autotest, it is necessary to transfer the SM to the following state:
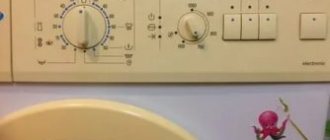
• set the programmer to position 30 until it clicks (second to last before STOP on the “Cotton” program);
• the temperature regulator is set to position 0;
• release all buttons on the front panel of the SM;
• there must be no water in the tank;
• the hatch must be closed.
To start the autotest, turn on the power to the CM - if there is no short circuit in the temperature probe and it is not disconnected, the drum rotates at a speed of 45 rpm, otherwise it stands still.
Turn the temperature control knob to the 40°C position - the drum rotates at a speed of 250 rpm, the drain pump is turned on and voltage is applied to the timer motor. 2 minutes are allotted for further testing, after which the test stops.
If you need to skip the button test, turn the temperature control knob to position 0. This part of the test will bring the centrifuge to its maximum speed.
To test the buttons and circuits of additional functions, they must be pressed in accordance with the specified sequence, otherwise an error condition will be created and the drive motor will not rotate:
• when you press the half load button, the drum rotation speed changes from 250 to
• when you press rinse buttons 3 or 4, the drum rotation speed changes from 400 to 500 rpm;
• when you press the stop button with water in the tank, the drum rotation speed changes from 500 to 600 rpm;
• when you press the economical wash button, the drum rotation speed changes from 600 to
• when you press the button for increased water level, the drum rotation speed changes from
720 rpm to maximum. If the washing machine being tested does not have one of the listed buttons, to continue the test, press and immediately release the centrifuge shutdown button.
Note. The centrifuge shutdown button and the centrifuge speed control begin to function correctly only 3 seconds after the end of the sequence of operations.
This autotest allows you to check the operation of all components of the washing machine, with the exception of the fill valve, heating element and level switch.
Program 1 is used to check the fill valve and level switch.
Checking the DMPU Module Using Test Instruments
The DMPU module can be tested offline. To do this, you need to assemble a circuit in accordance with Fig. 1. Before testing the module, you must check:
— integrity of the printed circuit board;
- quality of soldering, especially of powerful elements (triacs, resistor R51);
- absence of damaged elements.
Be sure to check resistors R51 (consists of two large ceramic resistors connected in parallel). The resistance of these resistors connected in parallel should be 3.1 kOhm. A common module defect is when one or both resistors are broken.
Finally, without soldering the voltage regulator U3 (5 V), check the resistance between its terminals. If a short circuit is detected between the terminals, the stabilizer is replaced.
Testing the DMPU module without connecting to a washing machine
Let us explain the procedure for assembling the circuit for testing the DMPU module.
Connect to cont. A01-A02 is a resistor with a resistance of 5 kOhm, to A05-A07 is a 220 V / 60 W lamp. In addition, jumpers are installed between the contacts. A08 and A09, A10 and A11. Then install one of the following jumpers on the CNC connector:
a) to check the general test;
b) to test the water filling program;
c) to test the water drain program.
The 220 V supply voltage is supplied to the module through contacts C01 and C04.
The testing procedure with jumper “a” is given in table. 1.
Table 1. Result of the general test with different configurations of the control module (jumper “a”)
| Relay type in DMPU module | Module behavior during testing |
| AJS1312 | After the relay is triggered, the brightness of the lamp gradually increases (within a few seconds), then it glows continuously with maximum brightness (within a few seconds) and turns off abruptly, pause (within a few seconds). Then the brightness of the lamp slowly increases again. The procedure is repeated 4 times |
| AJW7212 | After three relay activations, the brightness of the lamp gradually increases (within a few seconds), then it glows continuously with maximum brightness (within a few seconds) and goes out sharply, pause (within a few seconds). Then the lamp slowly lights up again. The procedure is repeated 4 times |
| RP420024 | After two relay activations, the brightness of the lamp gradually increases (within a few seconds). Then the test is repeated 4 times |
Depending on the microcontroller firmware version, the execution time of each test step and the pause between them can vary in the range from 6 to 20 s. At the end of the test, a voltage of 220 V appears between contacts C01 and C03 of the CNC connector.
This test allows you to check the serviceability of the microcontroller and, in part, the power supply, engine control module, command generation module, engine speed control system and timer control module.
This behavior of the module during the test is explained by the fact that it does not receive impulses from the tachometer and the system perceives this as a lack of rotor rotation. As a result, the controller smoothly increases the voltage supplied to the motor. If after this the system does not receive impulses from the tachometer, power is removed from the engine and a second attempt is made after a few seconds. After the 4th attempt, the module supplies power to the timer motor to move to a new operation code - wash. In a new operation, everything is repeated until the programmer reaches the STOP position.
This behavior of the machine can be observed when the owner complains that the machine does everything, but the drum does not rotate. It is impossible to unequivocally diagnose that the module is faulty, since the motor may be faulty (brush wear). It should also be noted that the results of the autotest on the machine itself should be treated with caution, and they can be used only after all elements and components interacting with the module have been checked.
What breaks most often according to statistics:
- 30% - clogged drainage path, wear and breakdown of the pump:
Open the loading hatch and identify the machine model on the sticker.
Unscrew the drain filter from the front bottom and clean it.
We change the pump, which is located at the bottom right on the back side.
Loosen the clamp on the drain pump pipe.
We check the pump, clean it, and if it malfunctions, replace it.
Over time, mechanical wear appears on the shaft. The impeller dangles and does not pump out water well.
- 20% malfunction of the electronic control board:
MINISEL board:
Ardo models FL1000,FL1202,FLS81S,A800XEL, AE810, AE800X, SE810, FLS81S, AED1000X,TL1000EX, TL1010E ANNA610, ANNA 600X, A410, A610, A500, A1000.
We look at the power source and the level of constant voltages (5 and 12 V) at its outputs. If there is no voltage at the output of the IP, check the corresponding elements - power switch, power filter, power transformer T1, rectifier (D11-D14), microcircuit U1.
module :
Models A800, A804, A810, A814, WD800X, S1000X, T80, T800, TL800X, TL804, etc.
Malfunctions in the DMPU module
For the power supply module:
break in resistance R51 (A, B); stabilizer U3; Zener diode D24 (short circuit); varistor VDR5 is broken.
For engine control:
relay K1, K2; rsimistor TR2. Diodes D1-D6, D9-10, D15, D23.
Legacy DMPA module:
They are used in machines that include an asynchronous drive motor and a mechanical command device.
Models A1000PL, A1000XCZ, A1000XPL, WD1000PL, TL1000X, etc.
The wear of the heating element increases with “hard” water.
Overgrown with scale (scabs), it transfers heat poorly and burns out.
You need to pull out the elastic band and not the heating element. Since when pulling out the heating element you can wedge the elastic band.?
This is important to avoid further leakage under the seal.
- 10% wear on the commutator motor brushes, loose contacts, broken drive belt
Remove the belt, unscrew the screws and remove the engine. There are two brushes on the engine, each secured with two screws. Unscrew the screws and remove the brushes.
Inspect the motor power supply terminal from the board and the ground wire.
Very often the contacts oxidize due to humidity and the machine gives an error because of this.
Each brush is installed in a brush holder. It can be disassembled into two halves. Pay attention to how much the brush protrudes.
This size should be at least 1 cm. The optimal option is 1.5 cm. After that, we assemble everything and install it in place.
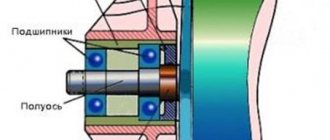
- 10% - extraneous noise (bearings, shock absorbers, foreign objects)
Having jammed the pulley, unscrew the upper shaft clamping nut counterclockwise.
If the oil seal is not filled with specialized lubricant and the crosspiece bushing is not lubricated with it during assembly, the oil seal will wear out very quickly, regardless of its quality, this has been proven in practice.
Checking and repairing the DMPU module of ARDO washing machines
Before you begin repairing the DMPU module, you must have a complete picture of the problem. It is best to test the module on a washing machine by running the autotest program.
Autotest
The autotest program can be carried out on any model of washing machine that uses the module modifications described in [1]. DMPU modules cannot be tested on machine models with induction motors, high speed models (above 1000 rpm), or S1000X models manufactured before December 1999. Before starting the autotest, it is necessary to transfer the SM to the following state: • set the programmer to position 30 until it clicks (the penultimate one before STOP on the “Cotton” program); • the temperature regulator is set to position 0; • release all buttons on the front panel of the SM; • there must be no water in the tank; • the hatch must be closed. To start the autotest, turn on the power to the CM - if there is no short circuit in the temperature probe and it is not disconnected, the drum rotates at a speed of 45 rpm, otherwise it stands still. Turn the temperature control knob to the 40°C position - the drum rotates at a speed of 250 rpm, the drain pump is turned on and voltage is applied to the timer motor. 2 minutes are allotted for further testing, after which the test stops.
If you need to skip the button test, turn the temperature control knob to position 0. This part of the test will bring the centrifuge to its maximum speed. To test the buttons and circuits of additional functions, they must be pressed in accordance with the specified sequence, otherwise an error condition is created and the drive motor will not rotate: • when the half-load button is pressed, the drum rotation speed changes from 250 to 400 rpm; • when you press rinse buttons 3 or 4, the drum rotation speed changes from 400 to 500 rpm; • when you press the stop button with water in the tank, the drum rotation speed changes from 500 to 600 rpm; • when you press the economical wash button, the drum rotation speed changes from 600 to 720 rpm; • when you press the button for increased water level, the drum rotation speed changes from 720 rpm to maximum. If the washing machine being tested does not have one of the listed buttons, to continue the test, press and immediately release the centrifuge shutdown button. Note. The centrifuge shutdown button and the centrifuge speed control begin to function correctly only 3 seconds after the end of the sequence of operations. This autotest allows you to check the operation of all components of the washing machine, with the exception of the fill valve, heating element and level switch. To check the fill valve and level switch, use program 1. Checking the DMPU module using measuring instruments
Rice. 1
The DMPU module can be tested offline. To do this, you need to assemble a circuit in accordance with Fig. 1. Before testing the module, it is necessary to check: — the integrity of the printed circuit board; - quality of soldering, especially of powerful elements (triacs, resistor R51); - absence of damaged elements. Be sure to check resistors R51 (consists of two large ceramic resistors connected in parallel). The resistance of these resistors connected in parallel should be 3.1 kOhm. A common module defect is when one or both resistors are broken. Finally, without soldering the voltage regulator U3 (5 V), check the resistance between its terminals. If a short circuit is detected between the terminals, the stabilizer is replaced. Testing the DMPU module without connecting to a washing machine Let us explain the procedure for assembling the circuit for testing the DMPU module. Connect to cont. A01-A02 is a resistor with a resistance of 5 kOhm, to A05-A07 is a 220 V / 60 W lamp. In addition, jumpers are installed between the contacts. A08 and A09, A10 and A11. Then install one of the following jumpers on the CNC connector: a) to check the general test; b) to test the water filling program; c) to test the water drainage program. The 220 V supply voltage is supplied to the module through contacts C01 and C04. The testing procedure with jumper “a” is given in table. 1.
Table 1. Result of the general test with different configurations of the control module (jumper “a”)
| Relay type in DMPU module | Module behavior during testing |
| AJS1312 | After the relay is triggered, the brightness of the lamp gradually increases (within a few seconds), then it glows continuously with maximum brightness (within a few seconds) and turns off abruptly, pause (within a few seconds). Then the brightness of the lamp slowly increases again. The procedure is repeated 4 times |
| AJW7212 | After three relay activations, the brightness of the lamp gradually increases (within a few seconds), then it glows continuously with maximum brightness (within a few seconds) and goes out sharply, pause (within a few seconds). Then the lamp slowly lights up again. The procedure is repeated 4 times |
| RP420024 | After two relay activations, the brightness of the lamp gradually increases (within a few seconds). Then the test is repeated 4 times |
Depending on the microcontroller firmware version, the execution time of each test step and the pause between them can vary in the range from 6 to 20 s. At the end of the test, a voltage of 220 V appears between contacts C01 and C03 of the CNC connector. This test allows you to check the health of the microcontroller and, in part, the power supply, engine control module, command generation module, engine speed control system and timer control module. This behavior of the module during the test is explained by the fact that it does not receive impulses from the tachometer and the system perceives this as a lack of rotor rotation. As a result, the controller smoothly increases the voltage supplied to the motor. If after this the system does not receive impulses from the tachometer, power is removed from the engine and a second attempt is made after a few seconds. After the 4th attempt, the module supplies power to the timer motor to move to a new operation code - wash. In a new operation, everything is repeated until the programmer reaches the STOP position. This behavior of the machine can be observed when the owner complains that the machine does everything, but the drum does not rotate. It is impossible to unequivocally diagnose that the module is faulty, since the motor may be faulty (brush wear). It should also be noted that the results of the autotest on the machine itself should be treated with caution, and they can be used only after all elements and components interacting with the module have been checked. Testing with jumper "b" allows you to check the fill valve control module - between contacts C01 (CNC) and B12 (CNB) there should be a voltage of 220 V. Testing with jumper "c" of the circuit allows you to check the drain pump control module - between contacts C01 and C02 ( CNC) voltage must be 220 V.
If none of the tests run, you need to check the presence of 24 and 5 V voltages at the output of the power module. If there is a log. "1" on pin. 4 and 5 U1 in accordance with the modification of the engine control module (if there is a discrepancy in the PA5-6 signal outputs), do not rush to assume that the microcontroller is faulty - there may be a situation where this is caused by an incorrect combination of input signals on U1. Note. In order not to damage MK U1, all measurements on its terminals must be carried out with a device with a high input resistance. Power elements used in the DMPU module The types of triacs used in the DMPU modules are given in table. 2.
| Triac type | Type of shell |
| VTV24 | T0-220 |
| VTV16 | T0-220 |
| VTV08 | T0-220 |
| VTV04 | T0-220 |
| VT134 | SOT-82 |
| Z00607 | TO-92 |
The appearance and pinout of triacs in T0-220, TO-92 and SOT-82 cases are shown in Fig. 2-4.
Triacs are checked with an ohmmeter, and the conductivity should only be between terminals A1 and G (1 and 3 for SOT-82). The appearance and pinout of transistors BC337 and BC327 used in the module is shown in Fig. 5, and a 5 V stabilizer (LM78L05 or KA78L05A) - in Fig. 6.
The module uses the following types of diodes: 1N4148 and 1N4007.
Common defects of elements in the DMPU module Power module: • open resistance R51 (A, B); • failure of stabilizer U3; • failure of zener diode DZ4 (short circuit); • break of varistor VDR5. Engine control module: • failure of relays K1, K2; • failure of triac TR2.
Command generation module: • failure of diodes D1-D6, D9-10, D15, D23. Load control modules (timer, fill valve and drain pump): • failure of triacs TR1, TR4, TR5; • breakage of printed wiring tracks in power circuits. In addition, often the malfunction of the DMPU module can be associated with burning of the contacts of the CNA, CNB and CNC connectors. Literature 1. V. Kochkin. “Design of the electronic module DMPU of ARDO washing machines.” “Repair & Service” No. 12, 2004.
Author: Victor Kochkin Repair and service